


先说结果:
当我们实例化自定义Fragment时,官方推荐Fragment.setArguments(Bundle bundle)这种方式来传递参数,而不推荐通过构造方法直接来传递参数。
原因分析:
首先,我们来测试下通过构造方法传递参数的情况:
public class FramentTestActivity extends ActionBarActivity {

    @Override
    protected void onCreate(Bundle savedInstanceState) {
        super.onCreate(savedInstanceState);
        setContentView(R.layout.activity_main);

        if (savedInstanceState == null) {
            getSupportFragmentManager().beginTransaction()
                    .add(R.id.container, new TestFragment("param")).commit();
        }

    }

    public static class TestFragment extends Fragment {

        private String mArg = "non-param";

        public TestFragment() {
            Log.i("INFO", "TestFragment non-parameter constructor");
        }

        public TestFragment(String arg){
            mArg = arg;
            Log.i("INFO", "TestFragment construct with parameter");
        }

        @Override
        public View onCreateView(LayoutInflater inflater, ViewGroup container,
                Bundle savedInstanceState) {
            View rootView = inflater.inflate(R.layout.fragment_main, container,
                    false);
            TextView tv = (TextView) rootView.findViewById(R.id.tv);
            tv.setText(mArg);
            return rootView;
        }
    }

} 
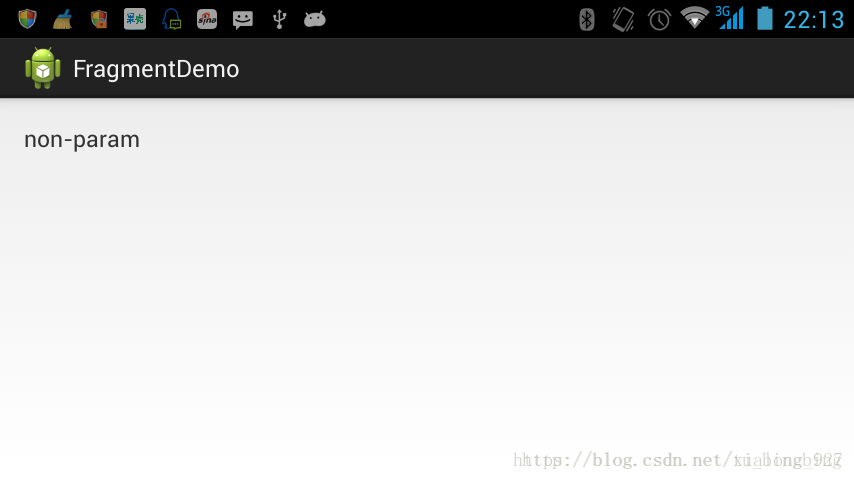
可以看到我们传递过来的数据正确的显示了,现在来考虑一个问题,如果设备配置参数发生变化,这里以横竖屏切换来说明问题,显示如下
发生了什么问题呢?我们传递的参数哪去了?为什么会显示默认值?不急着讨论这个问题,接下来我们来看看Fragment.setArguments(Bundle bundle)这种方式的运行情况
public class FramentTest2Activity extends ActionBarActivity {

        @Override
        protected void onCreate(Bundle savedInstanceState) {
              super.onCreate(savedInstanceState);
             setContentView(R.layout. activity_main);

              if (savedInstanceState == null) {
                    getSupportFragmentManager().beginTransaction()
                                 .add(R.id. container, TestFragment.newInstance("param")).commit();
             }

       }

        public static class TestFragment extends Fragment {

              private static final String ARG = "arg";

              public TestFragment() {
                    Log. i("INFO", "TestFragment non-parameter constructor" );
             }

              public static Fragment newInstance(String arg){
                    TestFragment fragment = new TestFragment();
                    Bundle bundle = new Bundle();
                    bundle.putString( ARG, arg);
                    fragment.setArguments(bundle);
                     return fragment;
             }

              @Override
              public View onCreateView(LayoutInflater inflater, ViewGroup container,
                           Bundle savedInstanceState) {
                    View rootView = inflater.inflate(R.layout. fragment_main, container,
                                  false);
                    TextView tv = (TextView) rootView.findViewById(R.id. tv);
                    tv.setText(getArguments().getString( ARG));
                     return rootView;
             }
       }

} 
我们再来看看横竖屏切换后的运行情况
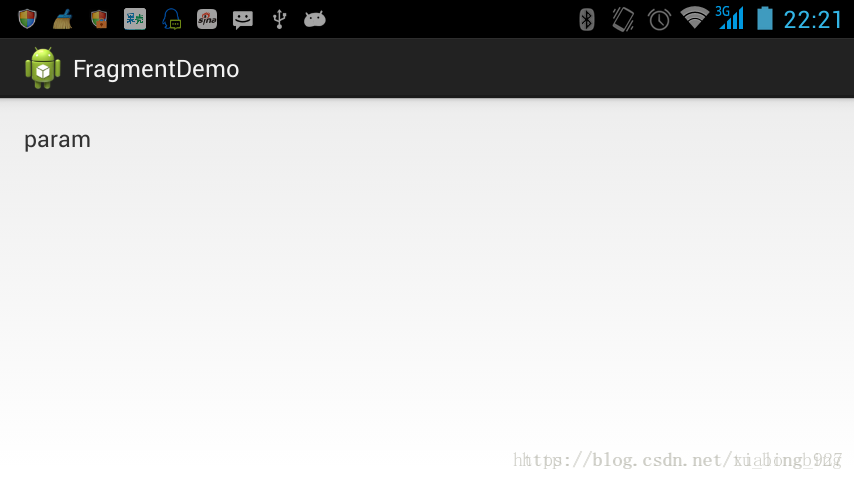
看到了吧,我们传递的参数在横竖屏切换的情况下完好保存了下来,正确的显示给用户
那么这到底是怎么回事呢,我们知道设备横竖屏切换的话,当前展示给用户的Activity默认情况下会重新创建并展现给用户,那依附于Activity的Fragment会进行如何处理呢,我们可以通过源码来查看
先来看看Activity的onCreate(Bundle saveInstance)方法
protected void onCreate(Bundle savedInstanceState) {
    if (DEBUG_LIFECYCLE ) Slog.v( TAG, "onCreate " + this + ": " + savedInstanceState);
    if (mLastNonConfigurationInstances != null) {
        mAllLoaderManagers = mLastNonConfigurationInstances .loaders ;
    }
    if (mActivityInfo .parentActivityName != null) {
        if (mActionBar == null) {
            mEnableDefaultActionBarUp = true ;
        } else {
            mActionBar .setDefaultDisplayHomeAsUpEnabled( true);
        }
    }
    if (savedInstanceState != null) {
        Parcelable p = savedInstanceState.getParcelable( FRAGMENTS_TAG );
        mFragments .restoreAllState(p, mLastNonConfigurationInstances != null
                ? mLastNonConfigurationInstances .fragments : null);
    }
    mFragments .dispatchCreate();
    getApplication().dispatchActivityCreated( this , savedInstanceState);
    mCalled = true ;
}
由于我们的Fragment是由FragmentManager来管理,所以可以跟进FragmentManager.restoreAllState()方法,通过对当前活动的Fragmnet找到下面的代码块
for (int i=0; i<fms.mActive.length; i++) {
           FragmentState fs = fms.mActive[i];
           if (fs != null) {
              Fragment f = fs.instantiate(mActivity, mParent);
               if (DEBUG) Log.v(TAG, "restoreAllState: active #" + i + ": " + f);
               mActive.add(f);
               // Now that the fragment is instantiated (or came from being
               // retained above), clear mInstance in case we end up re-restoring
                // from this FragmentState again.
                fs.mInstance = null;
           } else {
               mActive.add(null);
                if (mAvailIndices == null) {
                    mAvailIndices = new ArrayList<Integer>();
               }
               if (DEBUG) Log.v(TAG, "restoreAllState: avail #" + i);
               mAvailIndices.add(i);
           }
}
接下来我们可以看看FragmentState.instantitate()方法的实现
可以看到最终转入到Fragment. instantitate()方法public Fragment instantiate(Activity activity, Fragment parent) {
if (mInstance != null) {
return mInstance ;
}
if (mArguments != null) {
mArguments .setClassLoader(activity.getClassLoader());
}
mInstance = Fragment.instantiate(activity, mClassName , mArguments );
if (mSavedFragmentState != null) {
mSavedFragmentState .setClassLoader(activity.getClassLoader());
mInstance .mSavedFragmentState = mSavedFragmentState ;
}
mInstance .setIndex(mIndex , parent);
mInstance .mFromLayout = mFromLayout ;
mInstance .mRestored = true;
mInstance .mFragmentId = mFragmentId ;
mInstance .mContainerId = mContainerId ;
mInstance .mTag = mTag ;
mInstance .mRetainInstance = mRetainInstance ;
mInstance .mDetached = mDetached ;
mInstance .mFragmentManager = activity.mFragments;
if (FragmentManagerImpl.DEBUG) Log.v(FragmentManagerImpl.TAG,
"Instantiated fragment " + mInstance );
return mInstance ;
} 可以看到最终转入到Fragment.instantitate()方法
public static Fragment instantiate(Context context, String fname, Bundle args) {
   try {
       Class<?> clazz = sClassMap .get(fname);
       if (clazz == null) {
           // Class not found in the cache, see if it's real, and try to add it
           clazz = context.getClassLoader().loadClass(fname);
           sClassMap .put(fname, clazz);
       }
       Fragment f = (Fragment)clazz.newInstance();
       if (args != null) {
           args.setClassLoader(f.getClass().getClassLoader());
           f. mArguments = args;
       }
       return f;
   } catch (ClassNotFoundException e) {
       throw new InstantiationException( "Unable to instantiate fragment " + fname
               + ": make sure class name exists, is public, and has an"
               + " empty constructor that is public" , e);
   } catch (java.lang.InstantiationException e) {
       throw new InstantiationException( "Unable to instantiate fragment " + fname
               + ": make sure class name exists, is public, and has an"
               + " empty constructor that is public" , e);
   } catch (IllegalAccessException e) {
       throw new InstantiationException( "Unable to instantiate fragment " + fname
               + ": make sure class name exists, is public, and has an"
               + " empty constructor that is public" , e);
   }
通过此方法可以看到,最终会通过反射无参构造实例化一个新的Fragment,并且给mArgments初始化为原先的值,而原来的Fragment实例的数据都丢失了,并重新进行了初始化
通过上面的分析,我们可以知道Activity重新创建时,会重新构建它所管理的Fragment,原先的Fragment的字段值将会全部丢失,但是通过Fragment.setArguments(Bundle bundle)方法设置的bundle会保留下来。所以尽量使用Fragment.setArguments(Bundle bundle)方式来传递参数
/**
     * 初始化fragmentlist
     */
    private void initFragmentList() {
        mListFragment = new ArrayList<>();
        for (int i = 0; i < 7; i++) {
            RemoteStepFragment fragment = new RemoteStepFragment();
            Bundle bundle = new Bundle();
            bundle.putInt("TAG", i);
            fragment.setArguments(bundle);
            mListFragment.add(fragment);
        }
    }
fragment中
// 获取传递的参数
		mTag = getArguments().getInt("TAG");


 1313
1313


 被折叠的 条评论
为什么被折叠?
被折叠的 条评论
为什么被折叠?
 到【灌水乐园】发言


