


一个nginx C++ hello_world http module
一、背景
由于需要开发一个nginx C++ http module,因此写了一个demo。nginx是C实现的,如果需要添加C++模块,则需要修改configure后的Makefile文件。实现思路:C++ module使用g++编译器,nginx源码使用C编译器,最后用g++链接生成nginx可执行文件。
二、C++ module相关源码
在nginx源码包里, 建立 src/module/ngx_http_hello_world_module/ 路径 (mkdir -p src/module/ngx_http_hello_world_module)。
在src/module/ngx_http_hello_world_module/路径下存放config和ngx_http_hello_world_module.cpp两个文件。文件内容如下所示:
config文件
ngx_addon_name=ngx_http_hello_world_module
HTTP_MODULES="$HTTP_MODULES ngx_http_hello_world_module"
NGX_ADDON_SRCS="$NGX_ADDON_SRCS $ngx_addon_dir/ngx_http_hello_world_module.cpp"
ngx_http_hello_world_module.cpp文件
extern "C" {
#include <ngx_config.h>
#include <ngx_core.h>
#include <ngx_http.h>
}
typedef struct {
    ngx_str_t output_words;
} ngx_http_hello_world_loc_conf_t;

// To process HelloWorld command arguments
static char* ngx_http_hello_world(ngx_conf_t* cf, ngx_command_t* cmd, void* conf);

// Allocate memory for HelloWorld command
static void* ngx_http_hello_world_create_loc_conf(ngx_conf_t* cf);

// Copy HelloWorld argument to another place
static char* ngx_http_hello_world_merge_loc_conf(ngx_conf_t* cf, void* parent, void* child);

// Structure for the HelloWorld command
static ngx_command_t ngx_http_hello_world_commands[] = {
    {
        ngx_string("hello_world"), // The command name
        NGX_HTTP_LOC_CONF | NGX_CONF_TAKE1,
        ngx_http_hello_world, // The command handler
        NGX_HTTP_LOC_CONF_OFFSET,
        offsetof(ngx_http_hello_world_loc_conf_t, output_words),
        NULL
    },
    ngx_null_command
};

// Structure for the HelloWorld context
static ngx_http_module_t ngx_http_hello_world_module_ctx = {
    NULL,
    NULL,
    NULL,
    NULL,
    NULL,
    NULL,
    ngx_http_hello_world_create_loc_conf,
    ngx_http_hello_world_merge_loc_conf
};

// Structure for the HelloWorld module, the most important thing
ngx_module_t ngx_http_hello_world_module = {
    NGX_MODULE_V1,
    &ngx_http_hello_world_module_ctx,
    ngx_http_hello_world_commands,
    NGX_HTTP_MODULE,
    NULL,
    NULL,
    NULL,
    NULL,
    NULL,
    NULL,
    NULL,
    NGX_MODULE_V1_PADDING
};

static ngx_int_t ngx_http_hello_world_handler(ngx_http_request_t* r) {
    ngx_int_t rc;
    ngx_buf_t* b;
    ngx_chain_t out[2];

    ngx_http_hello_world_loc_conf_t* hlcf;
    hlcf = (ngx_http_hello_world_loc_conf_t*)ngx_http_get_module_loc_conf(r, ngx_http_hello_world_module);

    r->headers_out.content_type.len = sizeof("text/plain") - 1;
    r->headers_out.content_type.data = (u_char*)"text/plain";

    b = (ngx_buf_t*)ngx_pcalloc(r->pool, sizeof(ngx_buf_t));

    out[0].buf = b;
    out[0].next = &out[1];

    b->pos = (u_char*)"hello_world, ";
    b->last = b->pos + sizeof("hello_world, ") - 1;
    b->memory = 1;

    b = (ngx_buf_t*)ngx_pcalloc(r->pool, sizeof(ngx_buf_t));

    out[1].buf = b;
    out[1].next = NULL;

    b->pos = hlcf->output_words.data;
    b->last = hlcf->output_words.data + (hlcf->output_words.len);
    b->memory = 1;
    b->last_buf = 1;

    r->headers_out.status = NGX_HTTP_OK;
    r->headers_out.content_length_n = hlcf->output_words.len + sizeof("hello_world, ") - 1;
    rc = ngx_http_send_header(r);
    if (rc == NGX_ERROR || rc > NGX_OK || r->header_only) {
        return rc;
    }

    return ngx_http_output_filter(r, &out[0]);
}

static void* ngx_http_hello_world_create_loc_conf(ngx_conf_t* cf) {
    ngx_http_hello_world_loc_conf_t* conf;

    conf = (ngx_http_hello_world_loc_conf_t*)ngx_pcalloc(cf->pool, sizeof(ngx_http_hello_world_loc_conf_t));
    if (conf == NULL) {
        return NGX_CONF_ERROR;
    }
    conf->output_words.len = 0;
    conf->output_words.data = NULL;

    return conf;
}

static char* ngx_http_hello_world_merge_loc_conf(ngx_conf_t* cf, void* parent, void* child) {
    ngx_http_hello_world_loc_conf_t* prev = (ngx_http_hello_world_loc_conf_t*)parent;
    ngx_http_hello_world_loc_conf_t* conf = (ngx_http_hello_world_loc_conf_t*)child;
    ngx_conf_merge_str_value(conf->output_words, prev->output_words, "Nginx");
    return NGX_CONF_OK;
}

static char* ngx_http_hello_world(ngx_conf_t* cf, ngx_command_t* cmd, void* conf) {
    ngx_http_core_loc_conf_t* clcf;
    clcf = (ngx_http_core_loc_conf_t*)ngx_http_conf_get_module_loc_conf(cf, ngx_http_core_module);
    clcf->handler = ngx_http_hello_world_handler;
    ngx_conf_set_str_slot(cf, cmd, conf);
    return NGX_CONF_OK;
}
三、编译
1)使用configure的-add-module选项加入C++源码路径 。./configure --prefix=/usr/local/nginx/ --add-module=./src/module/ngx_http_hello_world_module/ --with-pcre=../../pcre-8.39
2)修改obj/Makefile文件。
在CC = cc下一行添加CXX = g++
把LINK = $(CC) 修改成LINK = $(CXX)
3)make && make install
四、修改nginx.conf 文件
在nginx.conf文件http模块的server模块中增加location /hello_world { hello_world Poechant; } ,修改后nginx.conf文件http配置如下所示:
http {
    include       mime.types;
    default_type  application/octet-stream;

    #access_log  logs/access.log  main;

    sendfile        on;
    #tcp_nopush     on;

    #keepalive_timeout  0;
    keepalive_timeout  65;

    #gzip  on;

    server {
        listen       80;
        server_name  localhost;

        #charset koi8-r;

        #access_log  logs/host.access.log  main;

        location / {
            root   html;
            index  index.html index.htm;
        }

        #error_page  404              /404.html;

        # redirect server error pages to the static page /50x.html
        #
        error_page   500 502 503 504  /50x.html;
        location = /50x.html {
            root   html;
        }

    location /hello_world {
            hello_world Poechant;
        }

    }

}
五、测试
启动nginx进程,在浏览器地址栏中输入http://服务器IP/hello_world ,其中服务器IP为你的nginx部署的服务器的IP。出现如下响应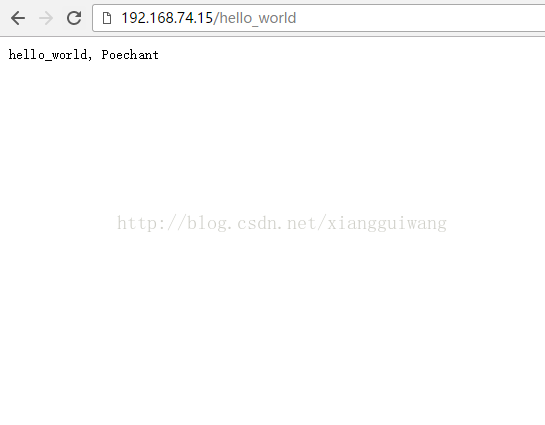


 4万+
4万+


 被折叠的 条评论
为什么被折叠?
被折叠的 条评论
为什么被折叠?
 到【灌水乐园】发言


