


用eclipse设置TestNG,下面的步骤必须遵循:
步骤1:下载TestNG的归档文件
| OS | 压缩文件名 |
|---|---|
| Windows | testng-6.8.jar |
| Linux | testng-6.8.jar |
| Mac | testng-6.8.jar |
假设你上面复制的JAR文件到 C:\>TestNG 文件夹.
第二步:设置Eclipse环境
-
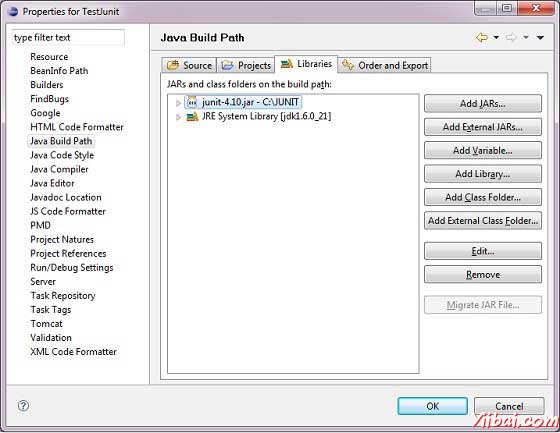
打开 eclipse -> 右键单击项目,然后单击property > Build Path > Configure Build Path 并添加 testng-6.8.jar 在库中使用 Add External Jar 按钮.
-
我们假设你的eclipse 中 TestNG插件已经内置,如果不是,那么请使用更新站点获取最新版本:
-
在你的 eclipse IDE, 选择 Help / Software updates / Find and Install.
-
搜索新功能安装。
-
新的远程站点。
-
For Eclipse 3.4 and above, enter http://beust.com/eclipse.
-
For Eclipse 3.3 and below, enter http://beust.com/eclipse1.
-
Make sure the check box next to URL is checked and click Next.
-
然后Eclipse会引导帮您完成整个过程。
-
现在,你的eclipse已经可以使用 TestNG测试用例的开发做好准备。
步骤3:确认Eclipse已经安装TestNG
-
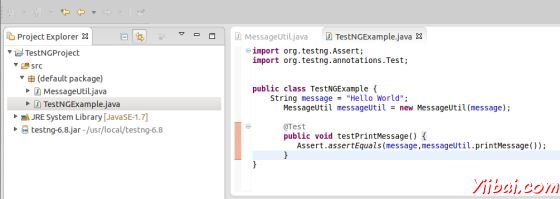
在eclipse中创建一个项目TestNGProject
-
创建一类MessageUtil在项目测试。
/*
* This class prints the given message on console.
*/
public class MessageUtil {

   private String message;

   //Constructor
   //@param message to be printed
   public MessageUtil(String message){
      this.message = message;
   }

   // prints the message
   public String printMessage(){
      System.out.println(message);
      return message;
   }
}
-
在项目中创建一个测试类TestNGExample
import org.testng.Assert;
import org.testng.annotations.Test;

public class TestNGExample {
    String message = "Hello World";
    MessageUtil messageUtil = new MessageUtil(message);

    @Test
    public void testPrintMessage() {
       Assert.assertEquals(message,messageUtil.printMessage());
   }
}
下面应该是项目结构:
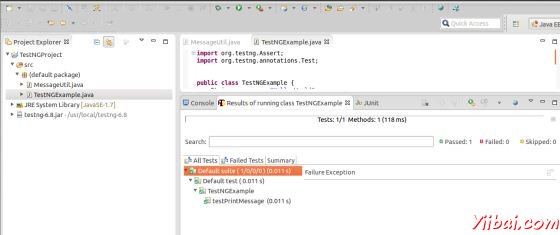
最后,通过右击程序和TestNG的运行验证程序的输出。
验证结果。


 2024
2024

 被折叠的 条评论
为什么被折叠?
被折叠的 条评论
为什么被折叠?
 到【灌水乐园】发言


