


目录
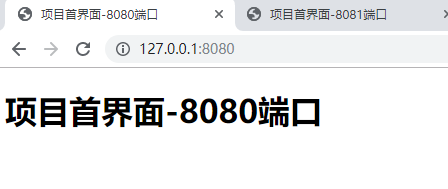
1.1、tomcat: http://127.0.0.1:8080
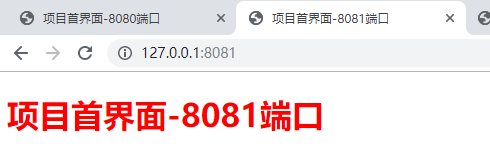
1.2、tomcat:http://127.0.0.1:8081
3、网关代理fastcgi_pass(php+nginx配合)
3.3.1、新建文件夹:E:\php\www 。然后创建两个文件
3.5、解决 nginx+fastcgi+php的并发阻塞问题
1、准备两个tomcat和一个nginx

1.1、tomcat: http://127.0.0.1:8080
1.2、tomcat:http://127.0.0.1:8081
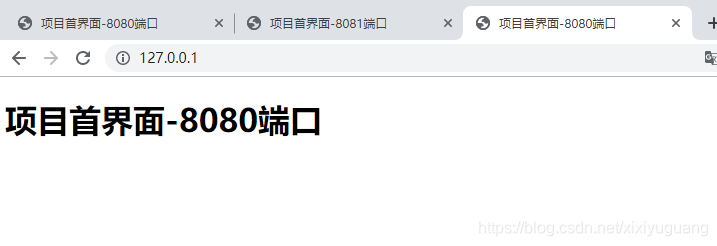
1.3、nginx:http://127.0.0.1
2、反向代理proxy_pass
官方文档;http://nginx.org/en/docs/http/ngx_http_proxy_module.html#proxy_pass
2.1、反向代理
介绍:127.0.0.1的80端口转发到127.0.0.1:8080. 。在这里127.0.0.1就类似于服务器的ip地址同理。
 server {
        listen      80;
        server_name localhost www.xxx.com; #域名
        location / {
            proxy_pass http://127.0.0.1:8080;
            client_max_body_size 1024m; #请求体大小设置
        }
      }
效果展示
2.2、反向代理-使用upstream
  upstream tomcat{
        server 127.0.0.1:8081;
    }

    server {
        listen      80;
        server_name localhost www.xxx.com; #域名
        location / {
            proxy_pass http://tomcat;
            client_max_body_size 1024m; #请求体大小设置
        }
      }
2.3、反向代理-负载均衡-轮循模式
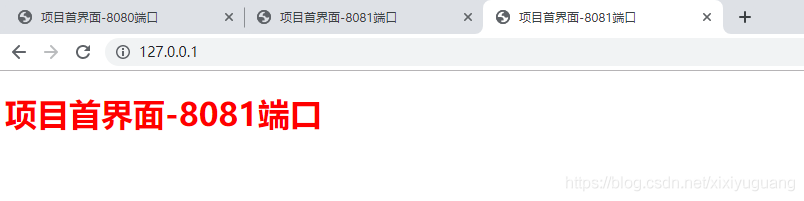
轮询方式是默认方式,每个请求按照时间顺序逐一分配到不同的后端服务器进行处理,如有服务器宕机会被自动剔除。
#  负载均衡-轮循模式
    upstream tomcat{
        server 127.0.0.1:8080;
        server 127.0.0.1:8081;
    }

    server {
        listen      80;
        server_name localhost www.xxx.com; #域名
        location / {
            proxy_pass http://tomcat;
            client_max_body_size 1024m; #请求体大小设置
        }
      }
访问的时候刷新,会发现每次都不一样。为轮循
2.4、反向代理-负载均衡-权重模式
权重方式是利用weight指定的权重比率,与访问率成正比。用于后端服务器性能不均的情况。
# weigth参数表示权值,权值越高则被分配到的概率越大。测试的时候发现weight=3,刷新的时候8080端口就刷出3次
# max_fails允许请求失败的次数默认为l
# fail_timeoutq请求失败后暂停服务的时间
# backup预留的备份机器
# down表示当前的server暂时不参与负载均衡。
#  weigth参数表示权值,权值越高则被分配到的概率越大。测试的时候发现weight=3,刷新的时候8080端口就刷出3次
#  max_fails允许请求失败的次数默认为l
#  fail_timeoutq请求失败后暂停服务的时间
#  backup预留的备份机器
#  down表示当前的server暂时不参与负载均衡。
upstream tomcat{
        #weigrt权重值(越大访问率大),在fail_timeout时间内检查后端服务器max_fails次,失败则被剔除;
        server 127.0.0.1:8080 weight=3 fail_timeout=30s max_fails=2;
        server 127.0.0.1:8081 weight=1 fail_timeout=30s max_fails=2;
    }

    server {
        listen      80;
        server_name localhost www.xxx.com; #域名
        location / {
            proxy_pass http://tomcat;
            client_max_body_size 1024m; #请求体大小设置
        }
      }
2.4、反向代理-负载均衡-ip_hash方式
ip_hash方式是按每个请求访问IP的hash结果分配,可以使每个访客固定访问一个后端服务器,可以解决Session共享的问题。
一般情况下不太建议使用这种方式
# ip_hash;
 upstream tomcat{
        ip_hash;
        server 127.0.0.1:8080  fail_timeout=5s ;
        server 127.0.0.1:8081   fail_timeout=5s  ;
    }

    server {
        listen      80;
        server_name localhost www.xxx.com; #域名
        location / {
            proxy_pass http://tomcat;
            client_max_body_size 1024m; #请求体大小设置
        }
      }
3、网关代理fastcgi_pass(php+nginx配合)
官方文档: http://nginx.org/en/docs/http/ngx_http_fastcgi_module.html#fastcgi_pass
fastcgi介绍:CGI全称是“公共网关接口”(Common Gateway Interface),HTTP服务器与你的或其它机器上的程序进行“交谈”的一种工具,其程序一般运行在网络服务器上。 CGI可以用任何一种语言编写,只要这种语言具有标准输入、输出和环境变量。如php,perl,tcl等。
这种模式一般和php配合一起使用所以我们首先要安装php
3.1、php安装(本人安装的是php-7.3.1)
3.1.1、php下载
进入PHP下载地址http://windows.php.net/download下载最新线程安全版PHP zip压缩包,解压缩后放在想要安装的路径下。注意:下载的PHP VC版本不能比前面安装的vc redist版高。
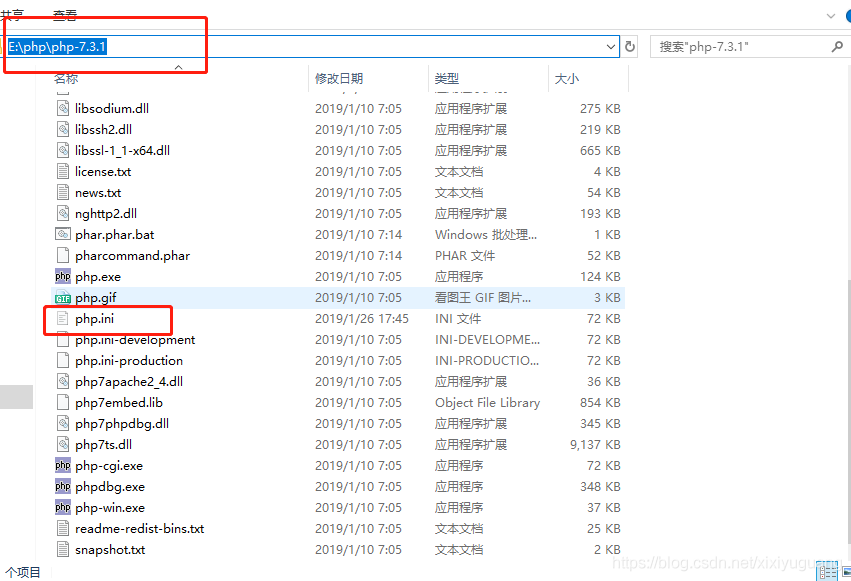
3.1.2、php配置
进入PHP安装目录,复制一份php.ini-development改名为php.ini放到安装路径下,打开找到"extension_dir",去掉注释符,将值改为"PHP安装路径\ext"。我当前的是:extension_dir = "E:\php\php-7.3.1\ext"
如图:
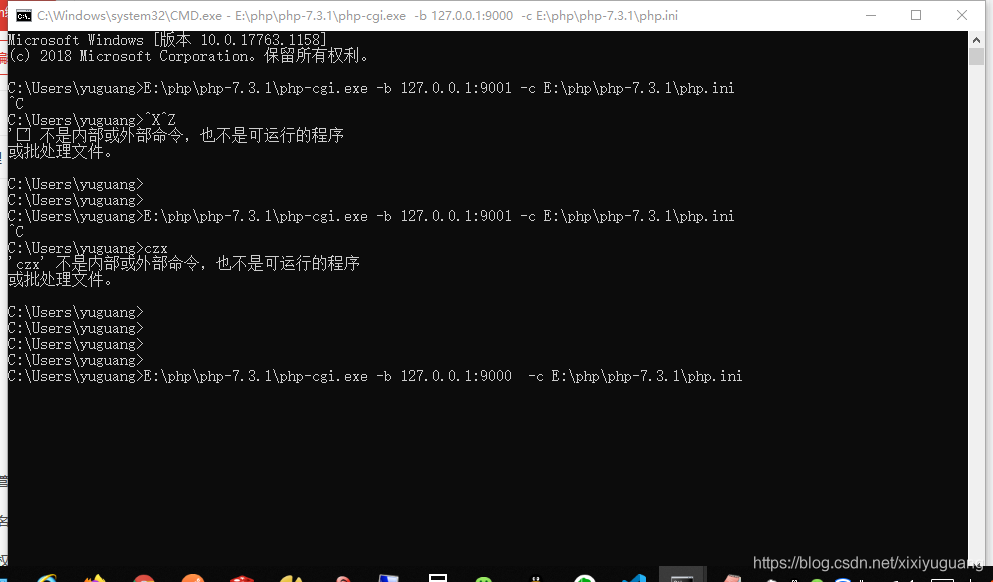
3.2、开启cgi端口
//  命令,在控制台执行
E:\php\php-7.3.1\php-cgi.exe -b 127.0.0.1:9000  -c E:\php\php-7.3.1\php.ini
如图:
3.3、fastcgi_passnginx配置
3.3.1、新建文件夹:E:\php\www 。然后创建两个文件
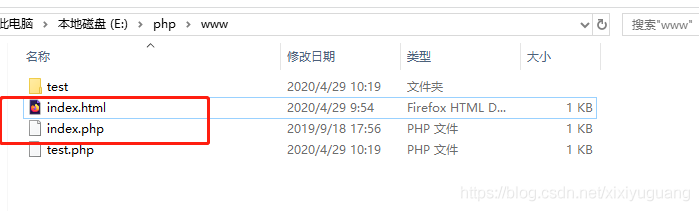
3.3.2、创建文件index.php
<?php
echo '<strong>Hello, this is index.php!</strong>';
?>
3.3.3、创建文件index.html
this is index html
3.3.4、修改nginx配置
server {
        listen       7000;
        server_name  localhost;
        location / {
            ## 解决跨域的代码
            add_header Access-Control-Allow-Origin *;
            add_header Access-Control-Allow-Headers X-Requested-With;
            add_header Access-Control-Allow-Methods GET,POST,PUT,DELETE,OPTIONS;
            #创建的包含 index.html和 index.php的文件夹
            root   E:/php/www;
            index  index.html index.htm index.php;
            try_files $uri $uri/ /index.php?$query_string;
        }

        # 判断后缀为php的地址
        location ~ \.php$ {
            #创建的包含 index.html和 index.php的文件夹
            root           E:/php/www;
            fastcgi_pass   127.0.0.1:9000; #端口是上面开通的cgi端口
            fastcgi_index  index.php;
            fastcgi_param  SCRIPT_FILENAME  $document_root$fastcgi_script_name;
            include        fastcgi_params;
        }
        error_page   500 502 503 504  /50x.html;
    }
重启nginx:nginx.exe -s reload
3.4、调试页面截图
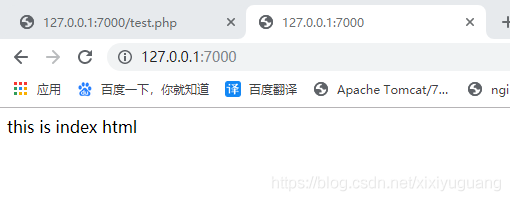
访问:http://127.0.0.1:7000/index.php

3.5、解决 nginx+fastcgi+php的并发阻塞问题
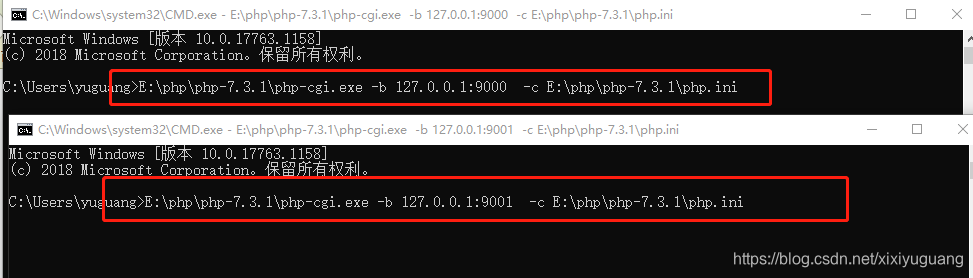
3.5.1、启动多个cgi端口(9000,9001端口)
命令:E:\php\php-7.3.1\php-cgi.exe -b 127.0.0.1:9000 -c E:\php\php-7.3.1\php.ini
3.5.2、nginx配置
然后重启nginx:E:\php\nginx-1.18.0> nginx.exe -s reload
 upstream fastcgi_proxy{
        server 127.0.0.1:9000;
        server 127.0.0.1:9001;
    }

     server {
        listen       7000;
        server_name  localhost;
        location / {
            add_header Access-Control-Allow-Origin *;
            add_header Access-Control-Allow-Headers X-Requested-With;
            add_header Access-Control-Allow-Methods GET,POST,PUT,DELETE,OPTIONS;
            root   E:/php/www;
            index  index.html index.htm index.php;
            try_files $uri $uri/ /index.php?$query_string;
        }

        location ~ \.php$ {
            root           E:/php/www;
            fastcgi_pass   fastcgi_proxy;
            fastcgi_index  index.php;
            fastcgi_param  SCRIPT_FILENAME  $document_root$fastcgi_script_name;
            include        fastcgi_params;
            client_max_body_size    10m;
        }
        error_page   500 502 503 504  /50x.html;
    }
3.5.3、测试
经过测试发现,9000端口和9001端口只要有一个还在启动,http://127.0.0.1:7000/index.php 这个地址就可以访问
如由于需要相关软件和资料,欢迎留言


 615
615


 被折叠的 条评论
为什么被折叠?
被折叠的 条评论
为什么被折叠?
 到【灌水乐园】发言


