引言: 本文系《认证鉴权与API权限控制在微服务架构中的设计与实现》系列的第二篇,本文重点讲解用户身份的认证与token发放的具体实现。本文篇幅较长,对涉及到的大部分代码进行了分析,可收藏于闲暇时间阅读,欢迎订阅本系列文章。
1. 系统概览
在上一篇 认证鉴权与API权限控制在微服务架构中的设计与实现(一)介绍了该项目的背景以及技术调研与最后选型,并且对于最终实现的endpoint执行结果进行展示。对系统架构虽然有提到,但是并未列出详细流程图。在笔者的应用场景中,Auth系统与网关进行结合。在网关出配置相应的端点信息,如登录系统申请token授权,校验check_token等端点。
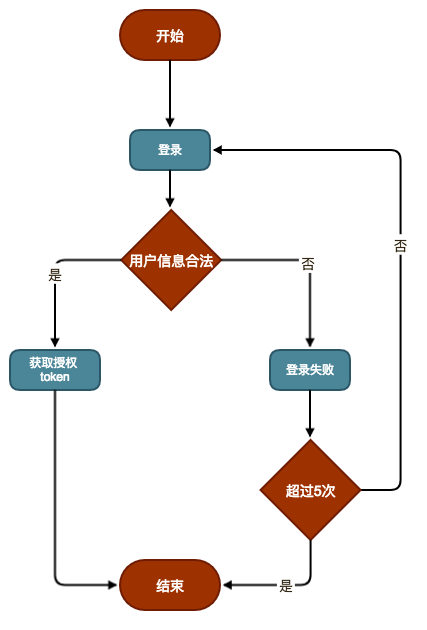
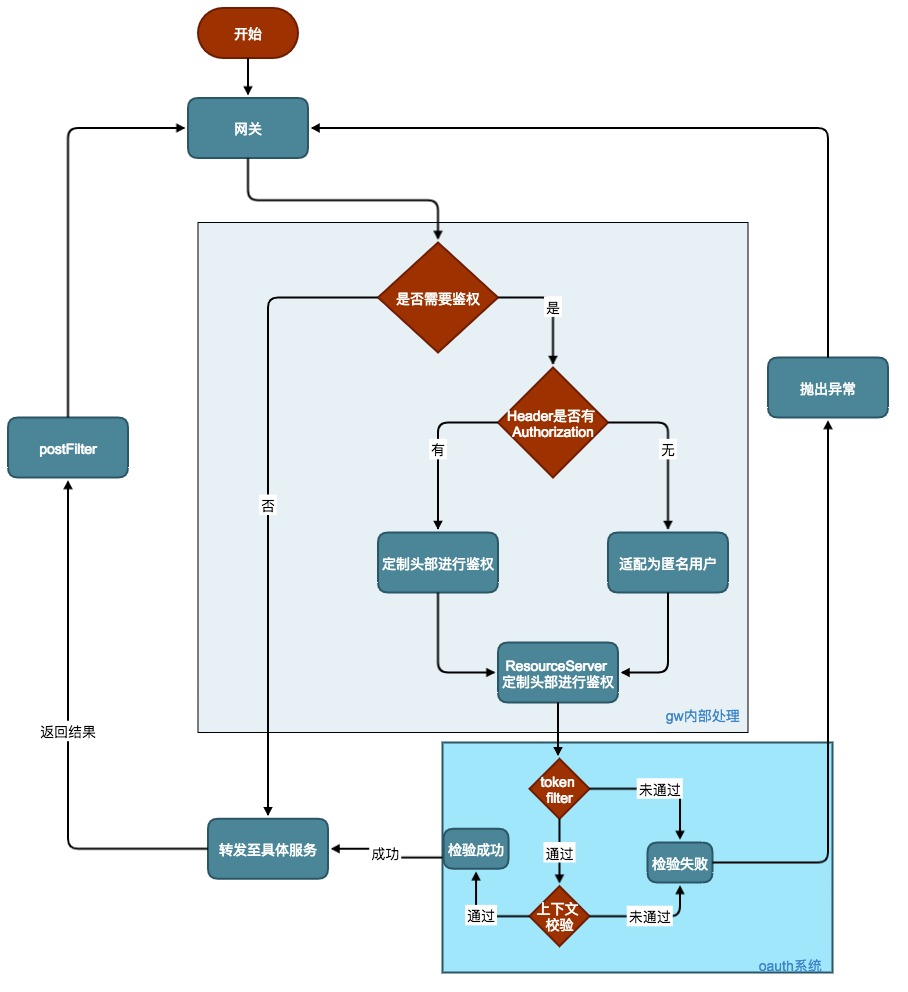
下图为网关与Auth系统结合的流程图,网关系统的具体实现细节在后面另写文章介绍。(此处流程图的绘制中,笔者使用极简的语言描述,各位同学轻喷😆!)

上图展示了系统登录的简单流程,其中的细节有省略,用户信息的合法性校验实际是调用用户系统。大体流程是这样,客户端请求到达网关之后,根据网关识别的请求登录端点,转发到Auth系统,将用户的信息进行校验。
另一方面是对于一般请求的校验。一些不需要权限的公开接口,在网关处配置好,请求到达网关后,匹配了路径将会直接放行。如果需要对该请求进行校验,会将该请求的相关验证信息截取,以及API权限校验所需的上下文信息(笔者项目对于一些操作进行权限前置验证,下一篇章会讲到),调用Auth系统,校验成功后进行路由转发。

这篇文章就重点讲解我们在第一篇文章中提到的用户身份的认证与token发放。这个也主要包含两个方面:
- 用户合法性的认证
- 获取到授权的token
2. 配置与类图
2.1 AuthorizationServer主要配置
关于AuthorizationServer和ResourceServer的配置在上一篇文章已经列出。AuthorizationServer主要是继承了AuthorizationServerConfigurerAdapter,覆写了其实现接口的三个方法:
- 1 //对应于配置AuthorizationServer安全认证的相关信息,创建ClientCredentialsTokenEndpointFilter核心过滤器
- 2 @Override
- 3 public void configure(AuthorizationServerSecurityConfigurer security) throws Exception {
- 4 }
- 5 //配置OAuth2的客户端相关信息
- 6 @Override
- 7 public void configure(ClientDetailsServiceConfigurer clients) throws Exception {
- 8 }
- 9 //配置身份认证器,配置认证方式,TokenStore,TokenGranter,OAuth2RequestFactory
- 10 @Override
- 11 public void configure(AuthorizationServerEndpointsConfigurer endpoints) throws Exception {
- 12 }
2.2 主要Authentication类的类图

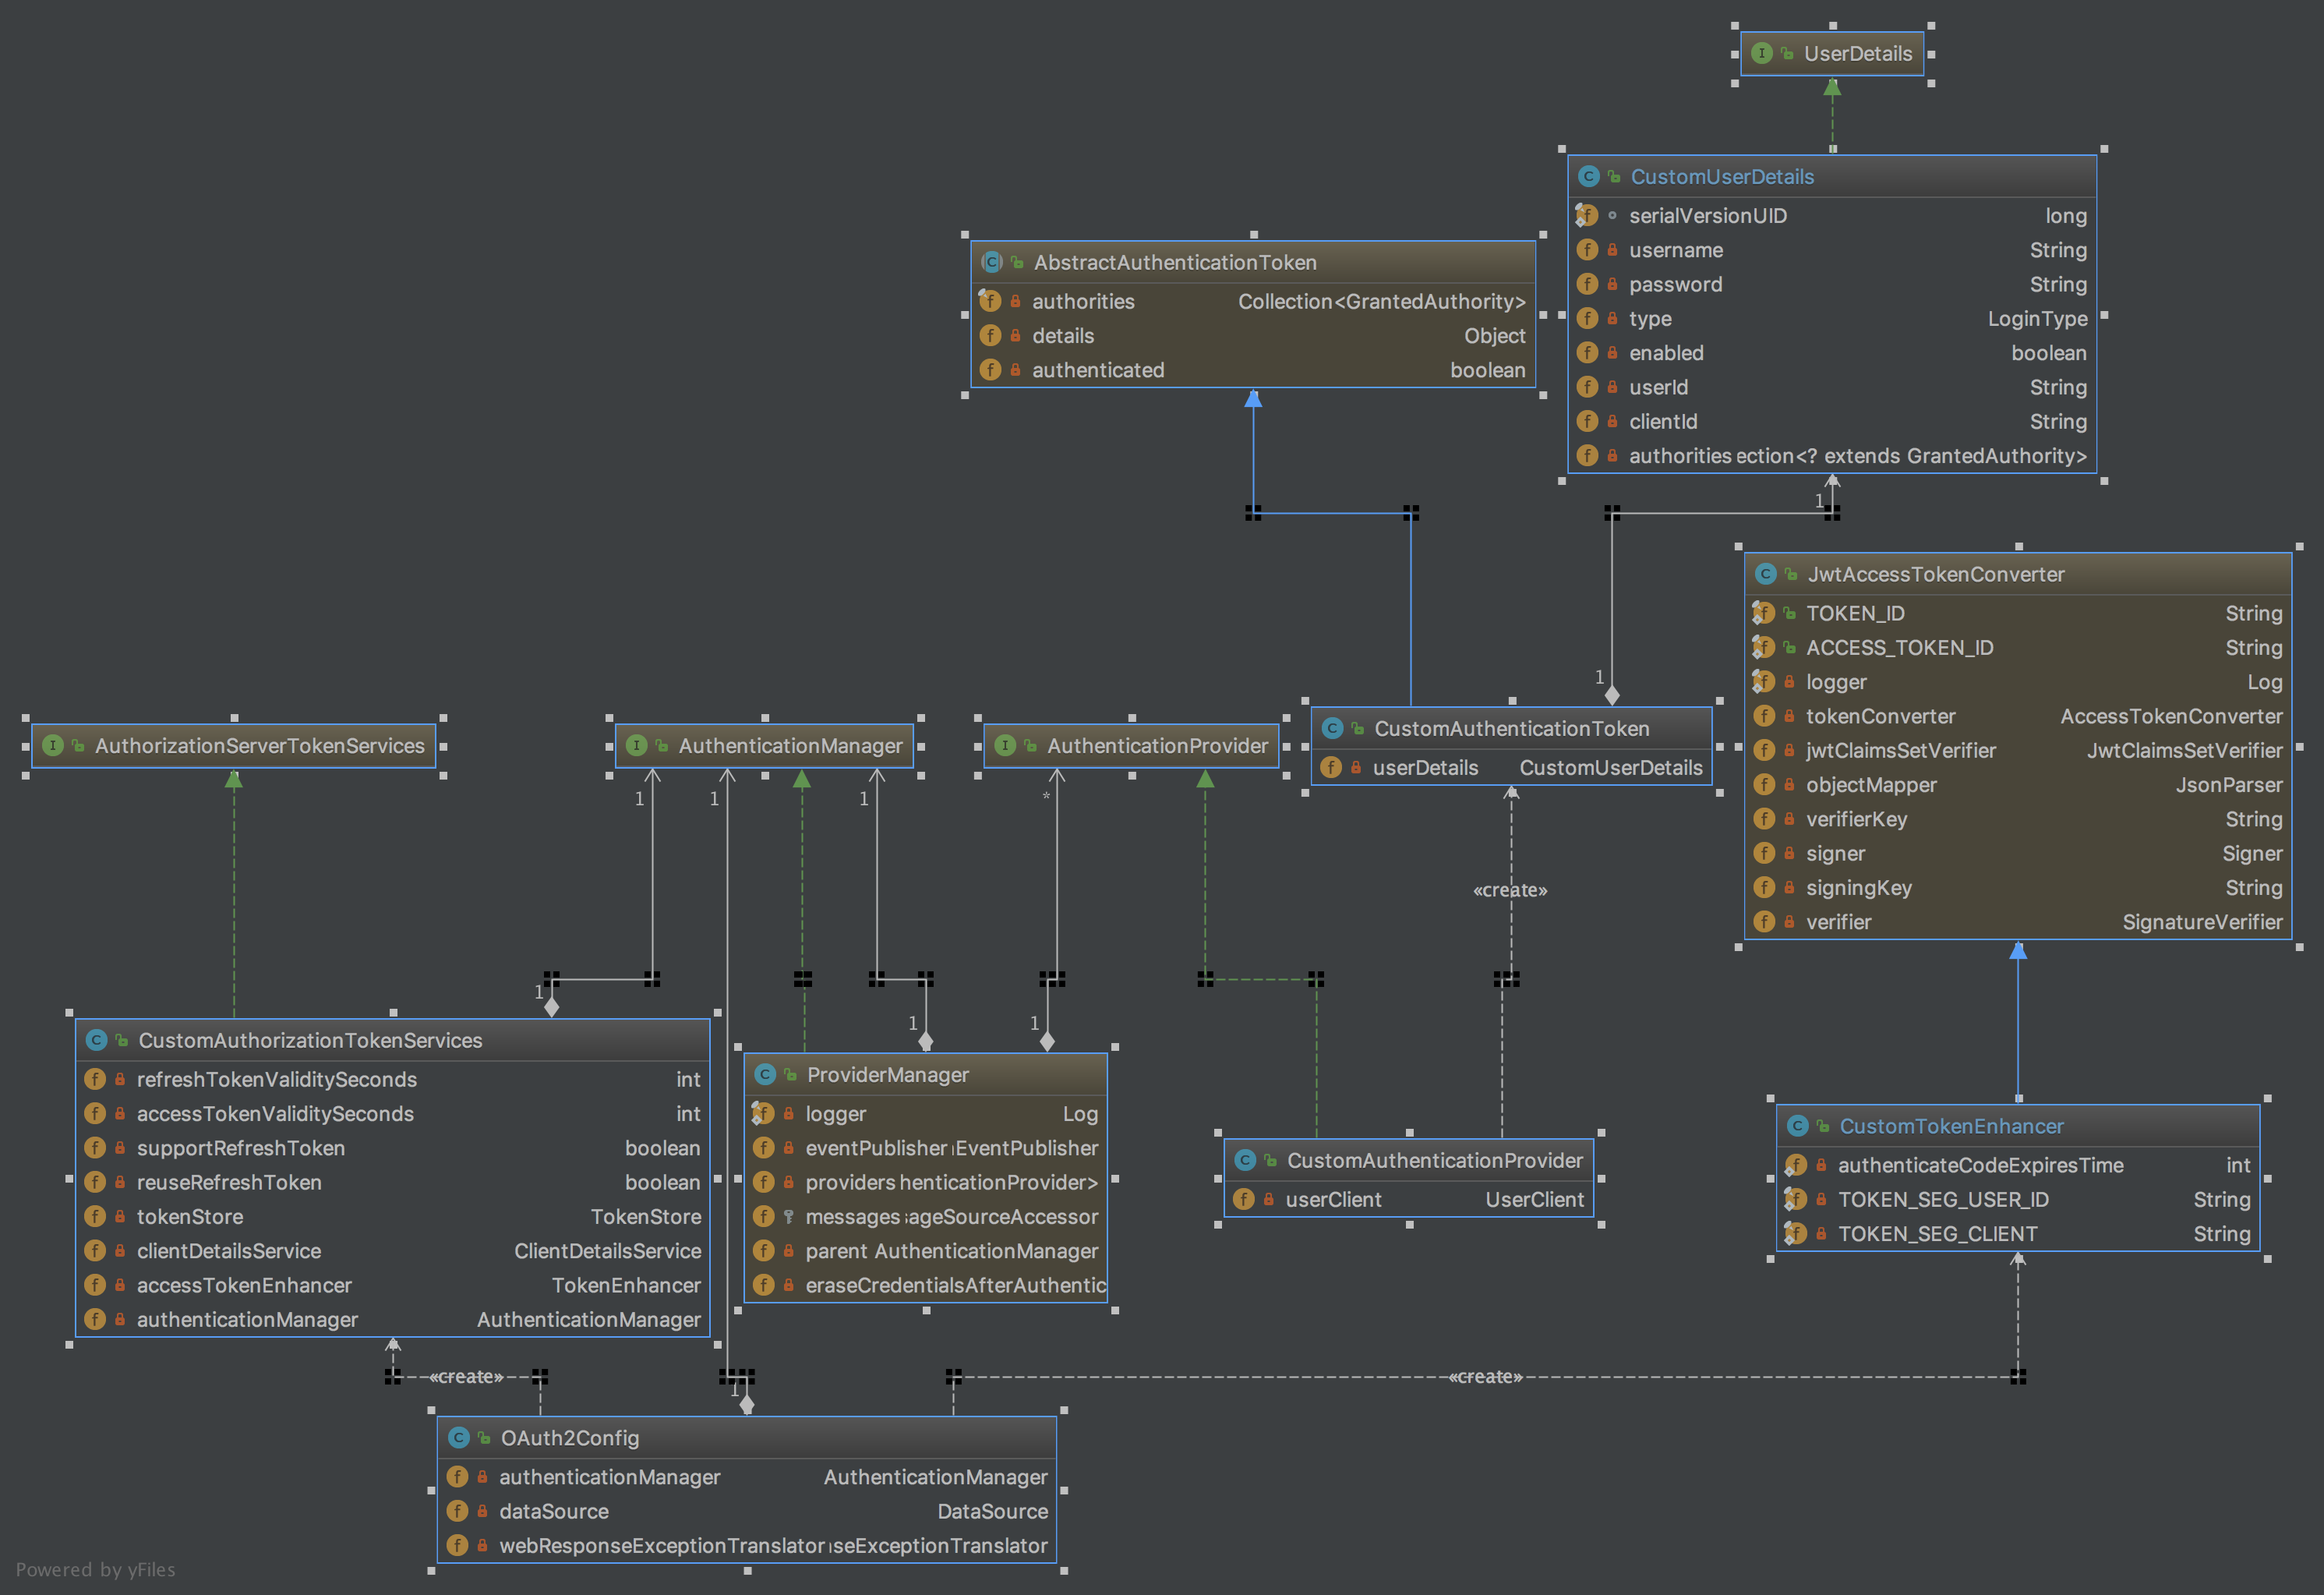
主要的验证方法authenticate(Authentication authentication)在接口AuthenticationManager中,其实现类有ProviderManager,有上图可以看出ProviderManager又依赖于AuthenticationProvider接口,其定义了一个List<AuthenticationProvider>全局变量。笔者这边实现了该接口的实现类CustomAuthenticationProvider。自定义一个provider,并在GlobalAuthenticationConfigurerAdapter中配置好改自定义的校验provider,覆写configure()方法。
- 1 @Configuration
- 2 public class AuthenticationManagerConfig extends GlobalAuthenticationConfigurerAdapter {
- 3 @Autowired
- 4 CustomAuthenticationProvider customAuthenticationProvider;
- 5 @Override
- 6 public void configure(AuthenticationManagerBuilder auth) throws Exception {
- 7 auth.authenticationProvider(customAuthenticationProvider);//使用自定义的AuthenticationProvider
- 8 }
- 9 }
AuthenticationManagerBuilder是用来创建AuthenticationManager,允许自定义提供多种方式的AuthenticationProvider,比如LDAP、基于JDBC等等。
3. 认证与授权token
下面讲解认证与授权token主要的类与接口。
3.1 内置端点TokenEndpoint
Spring-Security-Oauth2的提供的jar包中内置了与token相关的基础端点。本文认证与授权token与/oauth/token有关,其处理的接口类为TokenEndpoint。下面我们来看一下对于认证与授权token流程的具体处理过程。
- 1 @FrameworkEndpoint
- 2 public class TokenEndpoint extends AbstractEndpoint {
- 3 ...
- 4 @RequestMapping(value = "/oauth/token", method=RequestMethod.POST)
- 5 public ResponseEntity<OAuth2AccessToken> postAccessToken(Principal principal, @RequestParam
- 6 Map<String, String> parameters) throws HttpRequestMethodNotSupportedException {
- 7 //首先对client信息进行校验
- 8 if (!(principal instanceof Authentication)) {
- 9 throw new InsufficientAuthenticationException(
- 10 "There is no client authentication. Try adding an appropriate authentication filter.");
- 11 }
- 12 String clientId = getClientId(principal);
- 13 //根据请求中的clientId,加载client的具体信息
- 14 ClientDetails authenticatedClient = getClientDetailsService().loadClientByClientId(clientId);
- 15 TokenRequest tokenRequest = getOAuth2RequestFactory().createTokenRequest(parameters, authenticatedClient);
- 16 ...
- 17
- 18 //验证scope域范围
- 19 if (authenticatedClient != null) {
- 20 oAuth2RequestValidator.validateScope(tokenRequest, authenticatedClient);
- 21 }
- 22 //授权方式不能为空
- 23 if (!StringUtils.hasText(tokenRequest.getGrantType())) {
- 24 throw new InvalidRequestException("Missing grant type");
- 25 }
- 26 //token endpoint不支持Implicit模式
- 27 if (tokenRequest.getGrantType().equals("implicit")) {
- 28 throw new InvalidGrantException("Implicit grant type not supported from token endpoint");
- 29 }
- 30 ...
- 31
- 32 //进入CompositeTokenGranter,匹配授权模式,然后进行password模式的身份验证和token的发放
- 33 OAuth2AccessToken token = getTokenGranter().grant(tokenRequest.getGrantType(), tokenRequest);
- 34 if (token == null) {
- 35 throw new UnsupportedGrantTypeException("Unsupported grant type: " + tokenRequest.getGrantType());
- 36 }
- 37 return getResponse(token);
- 38 }
- 39 ...

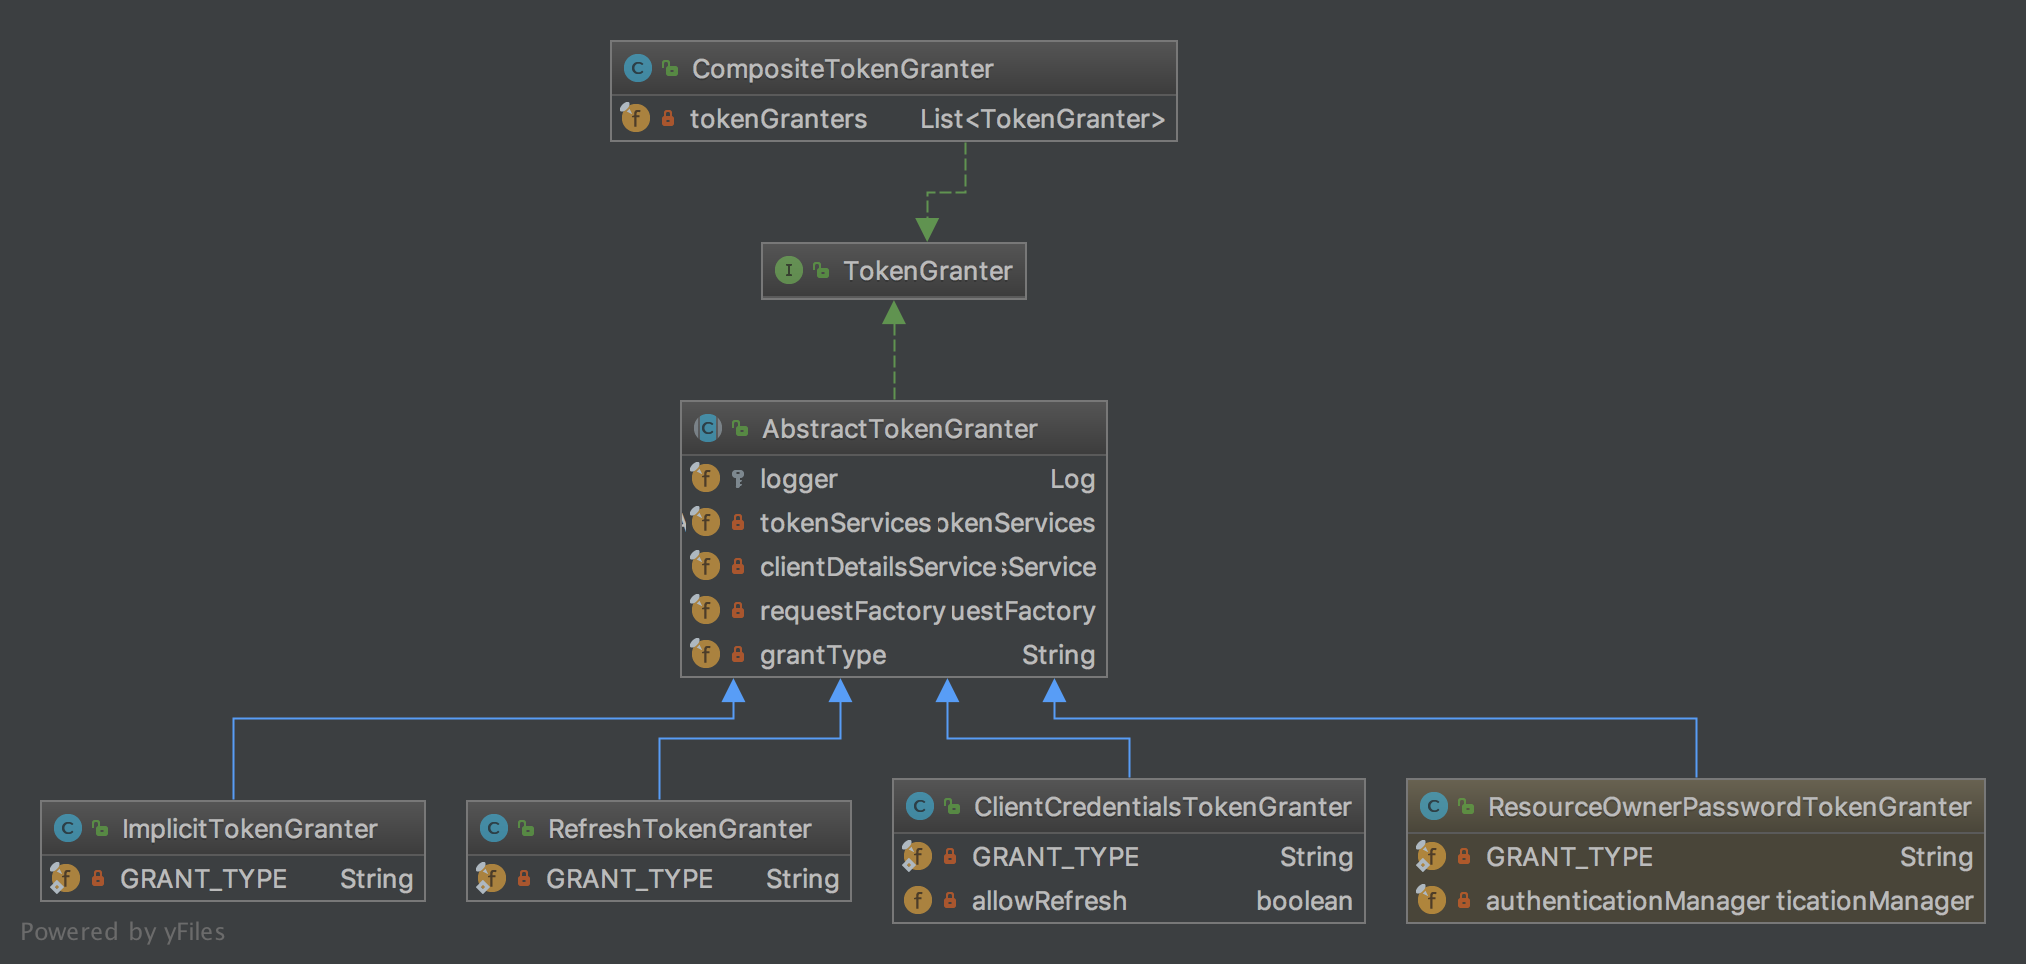
上面给代码进行了注释,读者感兴趣可以看看。接口处理的主要流程就是对authentication信息进行检查是否合法,不合法直接抛出异常,然后对请求的GrantType进行处理,根据GrantType,进行password模式的身份验证和token的发放。下面我们来看下TokenGranter的类图。

可以看出TokenGranter的实现类CompositeTokenGranter中有一个List<TokenGranter>,对应五种GrantType的实际授权实现。这边涉及到的getTokenGranter(),代码也列下:
- 1 public class CompositeTokenGranter implements TokenGranter {
- 2 //GrantType的集合,有五种,之前有讲
- 3 private final List<TokenGranter> tokenGranters;
- 4 public CompositeTokenGranter(List<TokenGranter> tokenGranters) {
- 5 this.tokenGranters = new ArrayList<TokenGranter>(tokenGranters);
- 6 }
- 7
- 8 //遍历list,匹配到相应的grantType就进行处理
- 9 public OAuth2AccessToken grant(String grantType, TokenRequest tokenRequest) {
- 10 for (TokenGranter granter : tokenGranters) {
- 11 OAuth2AccessToken grant = granter.grant(grantType, tokenRequest);
- 12 if (grant!=null) {
- 13 return grant;
- 14 }
- 15 }
- 16 return null;
- 17 }
- 18 ...
- 19 }
本次请求是使用的password模式,随后进入其GrantType具体的处理流程,下面是grant()方法。
- 1 public OAuth2AccessToken grant(String grantType, TokenRequest tokenRequest) {
- 2 if (!this.grantType.equals(grantType)) {
- 3 return null;
- 4 }
- 5
- 6 String clientId = tokenRequest.getClientId();
- 7 //加载clientId对应的ClientDetails,为了下一步的验证
- 8 ClientDetails client = clientDetailsService.loadClientByClientId(clientId);
- 9 //再次验证clientId是否拥有该grantType模式,安全
- 10 validateGrantType(grantType, client);
- 11 //获取token
- 12 return getAccessToken(client, tokenRequest);
- 13 }
- 14 protected OAuth2AccessToken getAccessToken(ClientDetails client, TokenRequest tokenRequest) {
- 15 //进入创建token之前,进行身份验证
- 16 return tokenServices.createAccessToken(getOAuth2Authentication(client, tokenRequest));
- 17 }
- 18 protected OAuth2Authentication getOAuth2Authentication(ClientDetails client, TokenRequest tokenRequest) {
- 19 //身份验证
- 20 OAuth2Request storedOAuth2Request = requestFactory.createOAuth2Request(client, tokenRequest);
- 21 return new OAuth2Authentication(storedOAuth2Request, null);
- 22 }
上面一段代码是grant()方法具体的实现细节。GrantType匹配到其对应的grant()后,先进行基本的验证确保安全,然后进入主流程,就是下面小节要讲的验证身份和发放token。
3.2 自定义的验证类CustomAuthenticationProvider
CustomAuthenticationProvider中定义了验证方法的具体实现。其具体实现如下所示。
- 1 //主要的自定义验证方法
- 2 @Override
- 3 public Authentication authenticate(Authentication authentication) throws AuthenticationException {
- 4 String username = authentication.getName();
- 5 String password = (String) authentication.getCredentials();
- 6 Map data = (Map) authentication.getDetails();
- 7 String clientId = (String) data.get("client");
- 8 Assert.hasText(clientId,"clientId must have value" );
- 9 String type = (String) data.get("type");
- 10 //通过调用user服务,校验用户信息
- 11 Map map = userClient.checkUsernameAndPassword(getUserServicePostObject(username, password, type));
- 12 //校验返回的信息,不正确则抛出异常,授权失败
- 13 String userId = (String) map.get("userId");
- 14 if (StringUtils.isBlank(userId)) {
- 15 String errorCode = (String) map.get("code");
- 16 throw new BadCredentialsException(errorCode);
- 17 }
- 18 CustomUserDetails customUserDetails = buildCustomUserDetails(username, password, userId, clientId);
- 19 return new CustomAuthenticationToken(customUserDetails);
- 20 }
- 21 //构造一个CustomUserDetails,简单,略去
- 22 private CustomUserDetails buildCustomUserDetails(String username, String password, String userId, String clientId) {
- 23 }
- 24 //构造一个请求userService的map,内容略
- 25 private Map<String, String> getUserServicePostObject(String username, String password, String type) {
- 26 }
authenticate()最后返回构造的自定义CustomAuthenticationToken,在CustomAuthenticationToken中,将boolean authenticated设为true,user信息验证成功。这边传入的参数CustomUserDetails与token生成有关,作为payload中的信息,下面会讲到。
- 1 //继承抽象类AbstractAuthenticationToken
- 2 public class CustomAuthenticationToken extends AbstractAuthenticationToken {
- 3 private CustomUserDetails userDetails;
- 4 public CustomAuthenticationToken(CustomUserDetails userDetails) {
- 5 super(null);
- 6 this.userDetails = userDetails;
- 7 super.setAuthenticated(true);
- 8 }
- 9 ...
- 10 }
而AbstractAuthenticationToken实现了接口Authentication和CredentialsContainer,里面的具体信息读者可以自己看下源码。
3.3 关于JWT
用户信息校验完成之后,下一步则是要对该用户进行授权。在讲具体的授权之前,先补充下关于JWT Token的相关知识点。
Json web token (JWT), 是为了在网络应用环境间传递声明而执行的一种基于JSON的开放标准(RFC 7519)。该token被设计为紧凑且安全的,特别适用于分布式站点的单点登录(SSO)场景。JWT的声明一般被用来在身份提供者和服务提供者间传递被认证的用户身份信息,以便于从资源服务器获取资源,也可以增加一些额外的其它业务逻辑所必须的声明信息,该token也可直接被用于认证,也可被加密。
从上面的描述可知JWT的定义,这边读者可以对比下token的认证和传统的session认证的区别。推荐一篇文章什么是 JWT – JSON WEB TOKEN,笔者这边就不详细扩展讲了,只是简单介绍下其构成。
JWT包含三部分:header头部、payload信息、signature签名。下面以上一篇生成好的access_token为例介绍。
- header
jwt的头部承载两部分信息,一是声明类型,这里是jwt;二是声明加密的算法 通常直接使用 HMAC SHA256。第一部分一般固定为:
| 1 |
|
- playload
存放的有效信息,这些有效信息包含三个部分、标准中注册的声明、公共的声明、私有的声明。这边笔者额外添加的信息为X-KEETS-UserId和X-KEETS-ClientId。读者可根据实际项目需要进行定制。最后playload经过base64编码后的结果为:
| 1 |
|
- signature
jwt的第三部分是一个签证信息,这个签证信息由三部分组成:header (base64后的)、payload (base64后的)、secret。
关于secret,细心的读者可能会发现之前的配置里面有具体设置。前两部分连接组成的字符串,通过header中声明的加密方式进行加盐secret组合加密,然后就构成了jwt的第三部分。第三部分结果为:
| 1 |
|
3.3 自定义的AuthorizationTokenServices
现在到了为用户创建token,这边主要与自定义的接口AuthorizationServerTokenServices有关。AuthorizationServerTokenServices主要有如下三个方法:
- //创建token
- OAuth2AccessToken createAccessToken(OAuth2Authentication authentication) throws AuthenticationException;
- //刷新token
- OAuth2AccessToken refreshAccessToken(String refreshToken, TokenRequest tokenRequest)
- throws AuthenticationException;
- //获取token
- OAuth2AccessToken getAccessToken(OAuth2Authentication authentication);
由于篇幅限制,笔者这边仅对createAccessToken()的实现方法进行分析,其他的方法实现,读者可以下关注笔者的GitHub项目。
- 1 public class CustomAuthorizationTokenServices implements AuthorizationServerTokenServices, ConsumerTokenServices {
- 2 ...
- 3
- 4 public OAuth2AccessToken createAccessToken(OAuth2Authentication authentication) throws AuthenticationException {
- 5 //通过TokenStore,获取现存的AccessToken
- 6 OAuth2AccessToken existingAccessToken = tokenStore.getAccessToken(authentication);
- 7 OAuth2RefreshToken refreshToken;
- 8 //移除已有的AccessToken和refreshToken
- 9 if (existingAccessToken != null) {
- 10 if (existingAccessToken.getRefreshToken() != null) {
- 11 refreshToken = existingAccessToken.getRefreshToken();
- 12 // The token store could remove the refresh token when the
- 13 // access token is removed, but we want to be sure
- 14 tokenStore.removeRefreshToken(refreshToken);
- 15 }
- 16 tokenStore.removeAccessToken(existingAccessToken);
- 17 }
- 18 //recreate a refreshToken
- 19 refreshToken = createRefreshToken(authentication);
- 20 OAuth2AccessToken accessToken = createAccessToken(authentication, refreshToken);
- 21 if (accessToken != null) {
- 22 tokenStore.storeAccessToken(accessToken, authentication);
- 23 }
- 24 refreshToken = accessToken.getRefreshToken();
- 25 if (refreshToken != null) {
- 26 tokenStore.storeRefreshToken(refreshToken, authentication);
- 27 }
- 28 return accessToken;
- 29 }
- 30 ...
- 31 }
这边具体的实现在上面有注释,基本没有改写多少,读者此处可以参阅源码。createAccessToken()还调用了两个私有方法,分别创建accessToken和refreshToken。创建accessToken,需要基于refreshToken。
此处可以自定义设置token的时效长度,accessToken创建实现如下:
- 1 private int refreshTokenValiditySeconds = 60 * 60 * 24 * 30; // default 30 days.
- 2 private int accessTokenValiditySeconds = 60 * 60 * 12; // default 12 hours.
- 3
- 4 private OAuth2AccessToken createAccessToken(OAuth2Authentication authentication, OAuth2RefreshToken refreshToken) {
- 5 //对应tokenId,存储的标识
- 6 DefaultOAuth2AccessToken token = new DefaultOAuth2AccessToken(UUID.randomUUID().toString());
- 7 int validitySeconds = getAccessTokenValiditySeconds(authentication.getOAuth2Request());
- 8 if (validitySeconds > 0) {
- 9 token.setExpiration(new Date(System.currentTimeMillis() + (validitySeconds * 1000L)));
- 10 }
- 11 token.setRefreshToken(refreshToken);
- 12 //scope对应作用范围
- 13 token.setScope(authentication.getOAuth2Request().getScope());
- 14 //上一节介绍的自定义TokenEnhancer,这边使用
- 15 return accessTokenEnhancer != null ? accessTokenEnhancer.enhance(token, authentication) : token;
- 16 }
既然提到TokenEnhancer,这边简单贴一下代码。
- 1 public class CustomTokenEnhancer extends JwtAccessTokenConverter {
- 2 private static final String TOKEN_SEG_USER_ID = "X-KEETS-UserId";
- 3 private static final String TOKEN_SEG_CLIENT = "X-KEETS-ClientId";
- 4 @Override
- 5 public OAuth2AccessToken enhance(OAuth2AccessToken accessToken,
- 6 OAuth2Authentication authentication) {
- 7 CustomUserDetails userDetails = (CustomUserDetails) authentication.getPrincipal();
- 8 Map<String, Object> info = new HashMap<>();
- 9 //从自定义的userDetails中取出UserId
- 10 info.put(TOKEN_SEG_USER_ID, userDetails.getUserId());
- 11 DefaultOAuth2AccessToken customAccessToken = new DefaultOAuth2AccessToken(accessToken);
- 12 customAccessToken.setAdditionalInformation(info);
- 13 OAuth2AccessToken enhancedToken = super.enhance(customAccessToken, authentication);
- 14 //设置ClientId
- 15 enhancedToken.getAdditionalInformation().put(TOKEN_SEG_CLIENT, userDetails.getClientId());
- 16 return enhancedToken;
- 17 }
- 18 }
自此,用户身份校验与发放授权token结束。最终成功返回的结果为:
- 1 {
- 2 "access_token": "eyJhbGciOiJIUzI1NiIsInR5cCI6IkpXVCJ9.eyJYLUtFRVRTLVVzZXJJZCI6ImQ2NDQ4YzI0LTNjNGMtNGI4MC04MzcyLWMyZDYxODY4ZjhjNiIsImV4cCI6MTUwODQ0Nzc1NiwidXNlcl9uYW1lIjoia2VldHMiLCJqdGkiOiJiYWQ3MmIxOS1kOWYzLTQ5MDItYWZmYS0wNDMwZTdkYjc5ZWQiLCJjbGllbnRfaWQiOiJmcm9udGVuZCIsInNjb3BlIjpbImFsbCJdfQ.5ZNVN8TLavgpWy8KZQKArcbj7ItJLLaY1zBRaAgMjdo",
- 3 "token_type": "bearer",
- 4 "refresh_token": "eyJhbGciOiJIUzI1NiIsInR5cCI6IkpXVCJ9.eyJYLUtFRVRTLVVzZXJJZCI6ImQ2NDQ4YzI0LTNjNGMtNGI4MC04MzcyLWMyZDYxODY4ZjhjNiIsInVzZXJfbmFtZSI6ImtlZXRzIiwic2NvcGUiOlsiYWxsIl0sImF0aSI6ImJhZDcyYjE5LWQ5ZjMtNDkwMi1hZmZhLTA0MzBlN2RiNzllZCIsImV4cCI6MTUxMDk5NjU1NiwianRpIjoiYWE0MWY1MjctODE3YS00N2UyLWFhOTgtZjNlMDZmNmY0NTZlIiwiY2xpZW50X2lkIjoiZnJvbnRlbmQifQ.mICT1-lxOAqOU9M-Ud7wZBb4tTux6OQWouQJ2nn1DeE",
- 5 "expires_in": 43195,
- 6 "scope": "all",
- 7 "X-KEETS-UserId": "d6448c24-3c4c-4b80-8372-c2d61868f8c6",
- 8 "jti": "bad72b19-d9f3-4902-affa-0430e7db79ed",
- 9 "X-KEETS-ClientId": "frontend"
- 10 }
4. 总结
本文开头给出了Auth系统概述,画出了简要的登录和校验的流程图,方便读者能对系统的实现有个大概的了解。然后主要讲解了用户身份的认证与token发放的具体实现。对于其中主要的类和接口进行了分析与讲解。下一篇文章主要讲解token的鉴定和API级别的上下文权限校验。
本文的源码地址:
GitHub:GitHub - keets2012/Auth-service: spring security + oauth2.0 + jwt
码云: Auth-Service: spring security + oauth2.0 + jwt
参考
来源:http://blueskykong.com/2017/10/22/security2
♥ 作者:明志健致远
♠ 出处:明志健致远 - 博客园
♦ 本文版权归作者和博客园共有,欢迎转载,但未经作者同意必须保留此段声明,且在文章页面明显位置给出原文连接,否则保留追究法律责任的权利。
♣ 本博客大多为学习笔记或读书笔记,本文如对您有帮助,还请多推荐下此文,如有错误欢迎指正,相互学习,共同进步。


 6209
6209


 被折叠的 条评论
为什么被折叠?


