


tableview 是继承了scrollView, 具备了可滑动等属性, tableview算是常用的控件了...还是直接说正题吧
首先必须在实现类上遵守 tableview的数据源协议 <UITableViewDataSource>, 然后通过其提供的创建列表的控制方法 ,实现对tableview的具体创建
1. - (NSInteger) numberofSectionsInTableView : (UITableView *) tableView;
该方法从字面意思看以看出是设置在tableview控件中有多少组的, 参数tableView, 是我们手动拖入的控件,这可这样认为.当它在内部掉用该方法时,会自动匹配我们的控件参数
2. - (NSInteger) tableView : (UITableView *) tableView numberofRowsInSection : (NSInteger) section;
该方法是设置tableview中的分组的具体情况, 每个分组有多少行. 参数 section 是一个动态的参数, 代表分组号.
使用方法:
- (NSInteger)tableView:(UITableView *)tableView numberOfRowsInSection:(NSInteger)section
{
    NSLog(@"numberOfRowsInSection-%ld",section);
    if (section == 0) {
        //第一组
        return 3;
    }else{
        //第二组
        return 2;
    }
}3.- (UITableViewCell *)tableView:(UITableView *)tableView cellForRowAtIndexPath:(NSIndexPath *)indexPath;
该方法是列表中的行中,具体显示的内容, 列表中的行 是一个UITableviewCell控件, 所以它也可以自定义 只要我们的控件继承UITableViewCell.
这里面有一个indexPath参数, 该参数封装了 section 和 row , 它动态的代表 表格的创建过程 和 将来触摸表格时, 所处的位置"坐标" , 某组, 某行.
使用方法:
- (UITableViewCell *)tableView:(UITableView *)tableView cellForRowAtIndexPath:(NSIndexPath *)indexPath
{
    UITableViewCell *cell = [[UITableViewCell alloc] init];    //cell是需要我们自己穿件的, 我们还可以创建他的样式,后面会提到

    if (indexPath.section == 0) {
        //第一组
        if (indexPath.row == 0) {
            //第一组  第一行
            cell.textLabel.text = @"张三";
        }else if(indexPath.row == 1){
            //第一组  第2行
            cell.textLabel.text = @"李四";
        }else{
            //第一组  第3行
            cell.textLabel.text = @"王五";
        }
    }else{
        //第二组
        if(indexPath.row == 0){
            cell.textLabel.text = @"何炅";
        }else{
            cell.textLabel.text = @"海涛";
        }
    }

    return cell;
}
有了这三条就可以实现一个基本的列表了.
==========================================================
关于cell :
当我们使用这条语句的时候..
UITableViewCell *cell = [[UITableViewCell alloc] init];我们是创建了系统提供的cell样式, 里面究竟是什么呢....

这是一个cell 它包括一个imageview, 上面的textlable, 下面的detaitextlable, 以及一个最右侧的附属物accessoryType;
其实他们的本质就一个imageview控件, 两个lable, 一个button按钮....
cell.textLabel.text = hero.name;
cell.detailTextLabel.text = hero.intro;
cell.imageView.image = [UIImage imageNamed:hero.icon];
cell.accessoryType = UITableViewCellAccessoryDisclosureIndicator;
这样使用他们即可.
只要会使用这几个控件 , 就可以设置他们的属性, 比如 ,label的属性, 我们让文字全部显示出来,
cell.detailTextLable.numberOflines = 0;
还有一个cell的高度问题, 这个是需要在代理方法中设置的, 需实现<UITableViewDelegate> 协议.
- (CGFloat)tableView:(UITableView *)tableView heightForRowAtIndexPath:(NSIndexPath *)indexPath;
通过indexPath参数 可以设置任意cell的高度...
tableview之所以很常用是因为他的性能很高,具体怎么表现呢.
就是当我们滑动以及创建它的时候 ,它可以设置一个可重用的缓冲池..而不必再每次 滑动的时候都创建一个cell控件...这样就增加了系统的性能.
直观的表现, 当我们 滑动的时候 可以看到cell显示的内容, 那这就又用到了
.- (UITableViewCell *)tableView:(UITableView *)tableView cellForRowAtIndexPath:(NSIndexPath *)indexPath
这个函数, 我们虽然不能深入的了解 它的具体 运行原理, 但是可以分析出,它是 受我们所给予的外界事件 所控制的, 比如indexPath参数, 他的动态表现就可以看出, 当我们触碰到一个cell的时候,他就会确定当前所处的"坐标" -----分组, 行号 ..
所以我们应该在这里实现它的缓冲池.
- (UITableViewCell *)tableView:(UITableView *)tableView cellForRowAtIndexPath:(NSIndexPath *)indexPath
{
//1 创建可重用cell对象
static NSString *reuseId = @"car"; //创建一个缓冲池的名字, 系统中可能有多个缓冲池.
UITableViewCell *cell = [tableView dequeueReusableCellWithIdentifier:reuseId]; //创建一个cell并且是从 缓冲池中取得的..
if (cell == nil) { //当缓冲池中还没有可重用的cell时候就需要我们自己创建了.
cell = [[UITableViewCell alloc] initWithStyle:UITableViewCellStyleDefault reuseIdentifier:reuseId]; //创建完后, 告诉它不用的时候放到缓冲池
}
//2 给cell内部的子控件赋值
//
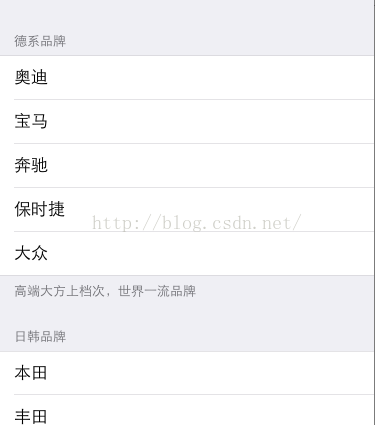
CZCarGroup *carGroup = self.carGroups[indexPath.section];
cell.textLabel.text = [carGroup.cars[indexPath.row] name];
cell.imageView.image = [UIImage imageNamed:[carGroup.cars[indexPath.row] icon]];
//3 返回cell
return cell;
}
当我们将当前的一屏幕cell滑动过去的时候这时候, 滑过去的cell就可以被加入到缓冲池中, 然后新的cell就可以从缓冲池中取得了 ...
=========================
关于分组:
说完了 cell 再说说section , 分组上又有那些属性呢.
每个分组有一个头标识还有一个尾标识,
- (NSString *)tableView:(UITableView *)tableView titleForHeaderInSection:(NSInteger)section;
- (NSString *)tableView:(UITableView *)tableView titleForFooterInSection:(NSInteger)section;
这两个方法 返回值都是字符串, 所以根据 section参数所提供的动态数据, 就可以完成对任意分组的标识动态 描述.
对分组的高度控制和对cell的高度控制一样 都是在代理方法中完成的. .
- (CGFloat)tableView:(UITableView *)tableView heightForHeaderInSection:(NSInteger)section;
- (CGFloat)tableView:(UITableView *)tableView heightForFooterInSection:(NSInteger)section;
嗯. ...暂时对分组的控制就这些................
==========================================================
关于tableview :
tableview 我们可以从定义中看到 也是由多部分组成的, 最常用的说一下
首先它也有一个头和尾看定义

他的头和尾 是两个 UIView, 所以我们同样可以进行自定义....
效果如图
tableHeaderView
tableFooterView

因为他们都是UIView 所以可以是任何控件...
具体过程,将在后面实现...


 1119
1119

 被折叠的 条评论
为什么被折叠?
被折叠的 条评论
为什么被折叠?
 到【灌水乐园】发言


