


前面讲解了tensorflow读取csv格式的数据(http://blog.csdn.net/xuan_zizizi/article/details/78400839 ,以及tensorflow的3个函数gfile,WholeFileReader,read_file 读取图像数据(http://blog.csdn.net/xuan_zizizi/article/details/78418351) ,这些方法对于小数据量都可以较好的实施,但是对于深度学习的大量图片则存在效率问题。一般读取可以理解为直接加载数据进内存和通过队列加载。今天要讲的tensorboard就是通过队列进行读取图片集并制作成二进制的数据集,能更好的利用内存,更方便复制和移动,不需要单独的标签文件。下面具体讲解:
1.生成TFRecord文件
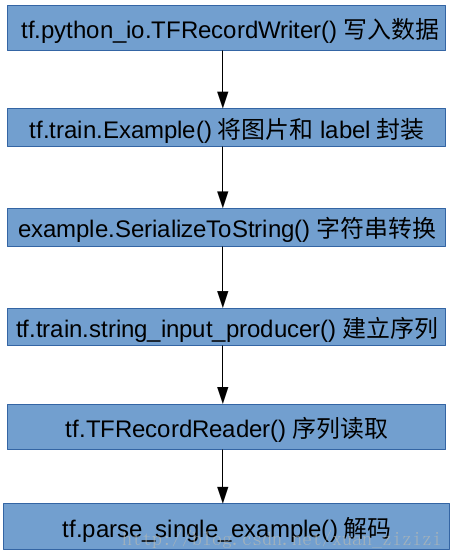
写入TFRecord数据:tf.train.Example 协议内存块包含了Features字段,通过Features字段里面的feature将图片的二进制数据和label进行统一封装, 然后将example协议内存块转化为字符串, tf.python_io.TFRecordWriter 将图片写入到TFRecords文件中。流程如下注释所示:
import os
import tensorflow as tf
#cwd = os.getcwd()#自动获取当前目录路径
cwd = '/home/zcm/tensorf/ball/'#手动输入路径
classes = {'ball1','ball2'}#类别设定
#定义writer用于写入数据,tf.python_io.TFRecordWriter 写入到TFRecords文件中
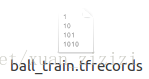
writer = tf.python_io.TFRecordWriter("ball_train.tfrecords")#定义生成的文件名为“ball_train.tfrecords”
for index, name in enumerate(classes):
class_path = cwd + name + "/"
for img_name in os.listdir(class_path):
img_path = class_path + img_name #每一个图片的地址
img = Image.open(img_path)
img = img.resize((224, 224)) #将图片保存成224×224大小
img_raw = img.tobytes() #将图片转化为原生bytes,#tf.train.Example 协议内存块包含了Features字段,通过feature将图片的二进制数据和label进行统一封装
example = tf.train.Example(features=tf.train.Features(feature={
"label": tf.train.Feature(int64_list=tf.train.Int64List(value=[index])),
'img_raw': tf.train.Feature(bytes_list=tf.train.BytesList(value=[img_raw]))
})) #example对象对label和image进行封装
writer.write(example.SerializeToString()) #序列化为字符串,example协议内存块转化为字符串
writer.close()结果在当前运行路径下生成名为ball_train.tfrecords的文件。
这样数据集的生成就完成了,接下来就是数据的读取。
2.读取TFRecord数据
(1)可以简单的5通过os读取:
import os
import tensorflow as tf

for serialized_example in tf.python_io.tf_record_iterator("ball_train.tfrecords"):
    example = tf.train.Example()
    example.ParseFromString(serialized_example)

    image = example.features.feature['image'].bytes_list.value
    label = example.features.feature['label'].int64_list.value
    # 可以做一些预处理之类的
    print (image,label)
(2)一般比实用的是利用tf.train.string_input_producer()这个函数建立一个队列,利用tf.RecoderReader()和tf.parse_single_example()来将example协议内存块解析为张量。具体操作如下:
import os
import tensorflow as tf
from PIL import Image #image后面需要使用
cwd = '/home/zcm/tensorf/ball/'#手动输入路径
filename_queue = tf.train.string_input_producer(["ball_train.tfrecords"]) #读入流中
reader = tf.TFRecordReader()
_, serialized_example = reader.read(filename_queue) #返回文件名和文件
features = tf.parse_single_example(serialized_example,
features={
'label': tf.FixedLenFeature([], tf.int64),
'img_raw' : tf.FixedLenFeature([], tf.string),
}) #取出包含image和label的feature对象
image = tf.decode_raw(features['img_raw'], tf.uint8)
image = tf.reshape(image, [224, 224, 3])
label = tf.cast(features['label'], tf.int32)
with tf.Session() as sess: #开始一个会话
init_op = tf.global_variables_initializer()
sess.run(init_op)
coord=tf.train.Coordinator()
threads= tf.train.start_queue_runners(coord=coord)
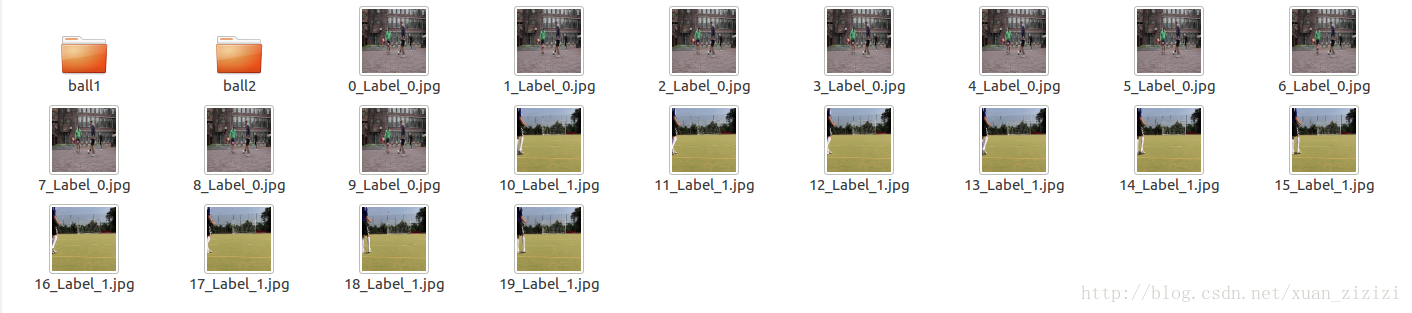
for i in range(20):
example, l = sess.run([image,label])#在会话中取出image和label
img=Image.fromarray(example, 'RGB')#这里Image是之前提到的
img.save(cwd+str(i)+'_''Label_'+str(l)+'.jpg')#存下图片
print('----------------------------')
print(example, l)
coord.request_stop()
coord.join(threads)结果打印出图片的种类和保存图片:
(3)也可以定义一个函数read_and_decode(filename)来进行读取和解码,操作如下所示:
import os
import tensorflow as tf
from PIL import Image #image后面需要使用

cwd = '/home/zcm/tensorf/ball/'#手动输入路径
def read_and_decode(filename): # 读入dog_train.tfrecords
    filename_queue = tf.train.string_input_producer([filename])#生成一个queue队列

    reader = tf.TFRecordReader()
    _, serialized_example = reader.read(filename_queue)#返回文件名和文件
    features = tf.parse_single_example(serialized_example,
                                       features={
                                           'label': tf.FixedLenFeature([], tf.int64),
                                           'img_raw' : tf.FixedLenFeature([], tf.string),
                                       })#将image数据和label取出来

    img = tf.decode_raw(features['img_raw'], tf.uint8)
    img = tf.reshape(img, [224,224, 3])  #reshape为224*224的3通道图片
    #归一化
    img = tf.cast(img, tf.float32) * (1. / 255) - 0.5 #在流中抛出img张量
    label = tf.cast(features['label'], tf.int32) #在流中抛出label张量
    return img, label
image, label = read_and_decode("ball_train.tfrecords") #使用函数读入流中
with tf.Session() as sess: #开始一个会话
    init_op = tf.global_variables_initializer()
    sess.run(init_op)
    coord=tf.train.Coordinator()
    threads= tf.train.start_queue_runners(coord=coord)
    for i in range(20):
        example, l = sess.run([image,label])#在会话中取出image和label
        img=Image.fromarray(example, 'RGB')#这里Image是之前提到的
        img.save(cwd+str(i)+'_''Label_'+str(l)+'.jpg')#存下图片
        print('----------------------------')
        print(example, l)
    coord.request_stop()
    coord.join(threads)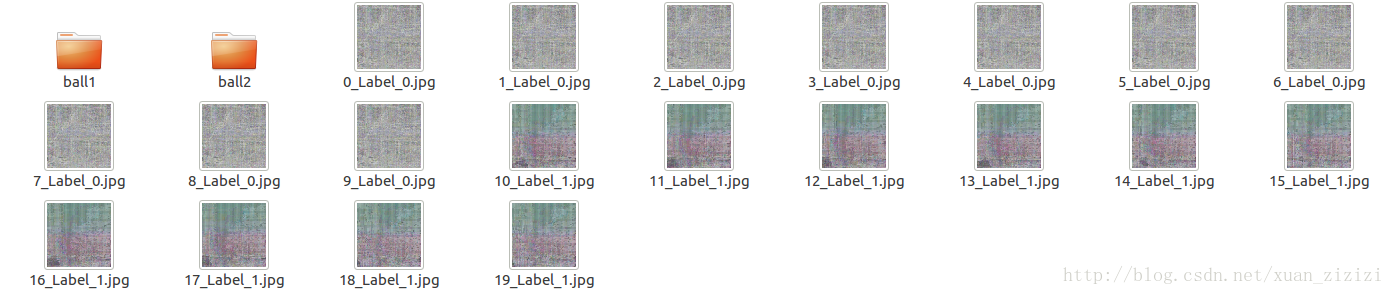
注意:在显示的时候把归一化操作注释掉,但是在进行数据预处理的时候需要加上,下面的图片是进行归一化之后的显示结果。
总结一下自己制作数据集的流程:
参考文献:
http://blog.csdn.net/hjxu2016/article/details/76165559
https://www.2cto.com/kf/201702/604326.html
http://blog.csdn.net/u012759136/article/details/52232266
http://blog.csdn.net/xueyingxue001/article/details/68943650


 1248
1248


 被折叠的 条评论
为什么被折叠?
被折叠的 条评论
为什么被折叠?
 到【灌水乐园】发言


