


大家好,希望每个人身体健康。在part1和part2部分对于Constraint Layout我们已经了解了很多新的知识。现在是时候学习Constraint Lyaout的剩余部分了,很有可能这是关于Constraint Layout 的最后一部分。
动机:
今天的学习动机和在part1部分是一样的,不过在这篇文章中我们只要集中在Constraint Layout 的动画上。不好的消息是Android给出文档中并不能给予我们太多帮助。在开始这篇文章之前我要先向各位道歉,因为我对某些概念的理解是有错误的;但是,在最后我会给你100%的保证,根据我的概念你在使用Constraint Layout 的动画时会很享受,很舒服。
对于这个主题的名字我很困惑,最有决定使用三个名词( Constraint Layout Animations, Constraint Layout Dynamic Constraints and Constraint Layout UI by Java)来作为这篇文章的名字,在文章的最后,你就会理解我为什么使用这个三个名词。
这次我不会直接解释Constraint Layout 动画API介绍的功能,而是和你分享你在实现过程中可能遇到的问题。那就开始吧:)。
我们必须下载2.3版本的AndroidStudio,之前版本对Visual Editor支持不是很好,在Design Tab会提示一下错误信息。因为下载最新的2.3版本是十分必要的,在我写这篇文章时2.3beta版已经可以使用了。
简介:
在这篇文章中我们主要使用java编程,但在开始之前我要解释一下这篇文章的内容是如何运行的。
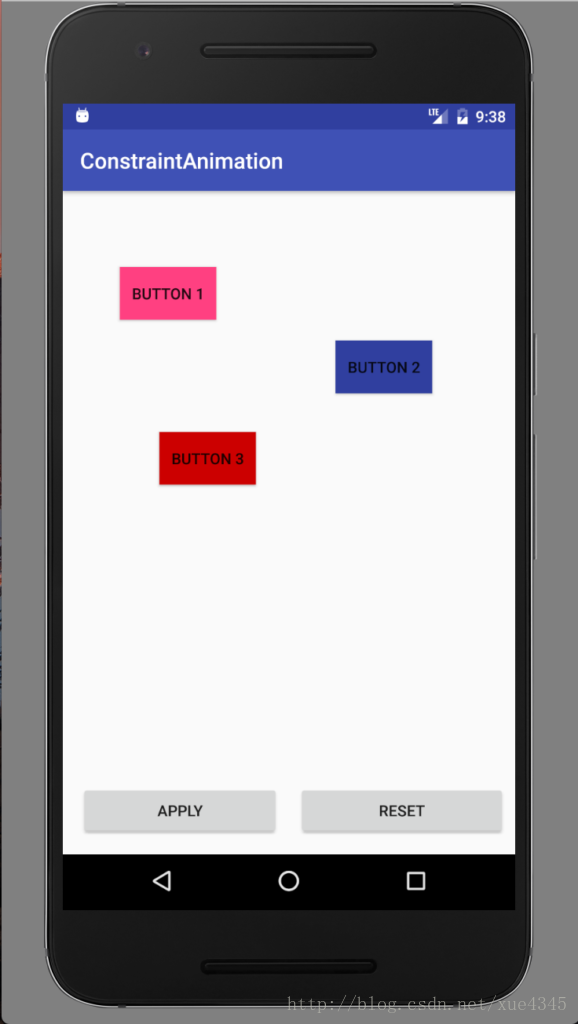
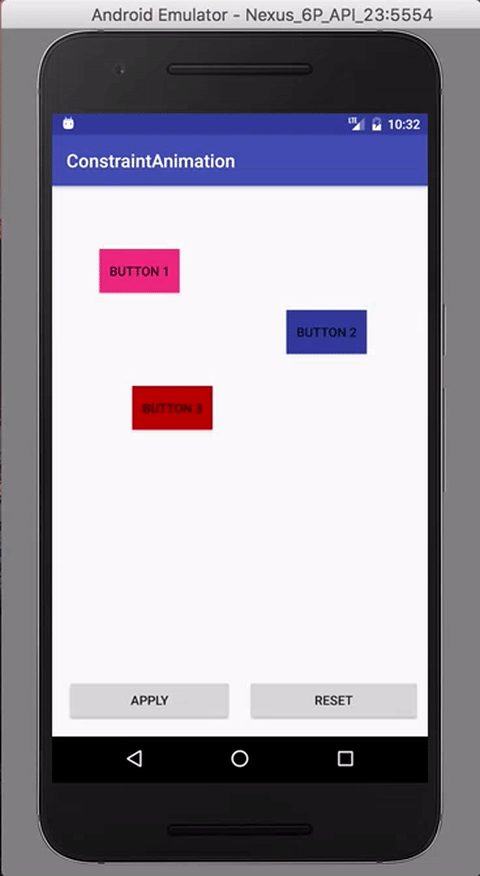
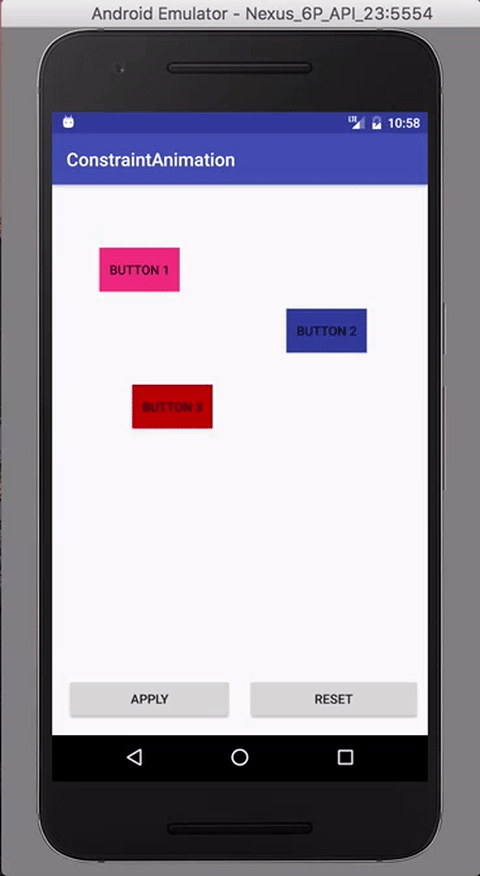
在这篇文章中我将使用上面这个app。我使用了一个Constraint Layout,并且在这个布局里包含了5个Button。
Apply和Reset Button只负责应用和重置我们的动画,其他是三个button用于动画效果。我们会在这三个Button上演示不同的动画效果。最重要的是在开始前我们需要知道这三个Button的约束。
<?xml version="1.0" encoding="utf-8"?>
<android.support.constraint.ConstraintLayout xmlns:android="http://schemas.android.com/apk/res/android"
    android:id="@+id/main"
    android:layout_width="match_parent"
    android:layout_height="match_parent">


    <Button
        android:id="@+id/applyButton"
        android:text="Apply"
        ...
        />

    <Button
        android:id="@+id/resetButton"
        android:text="Reset"
        ...
        />

    <Button
        android:id="@+id/button1"
        android:layout_width="wrap_content"
        android:layout_height="wrap_content"
        android:background="@color/colorAccent"
        android:text="Button 1"
        android:layout_marginLeft="52dp"
        app:layout_constraintLeft_toLeftOf="parent"
        android:layout_marginStart="52dp"
        app:layout_constraintTop_toTopOf="parent"
        android:layout_marginTop="69dp" />

    <Button
        android:id="@+id/button2"
        android:layout_width="wrap_content"
        android:layout_height="wrap_content"
        android:background="@color/colorPrimaryDark"
        android:text="Button 2"
        app:layout_constraintLeft_toRightOf="@+id/button1"
        android:layout_marginLeft="8dp"
        android:layout_marginStart="8dp"
        android:layout_marginRight="8dp"
        app:layout_constraintRight_toRightOf="parent"
        app:layout_constraintHorizontal_bias="0.571"
        app:layout_constraintTop_toTopOf="parent"
        android:layout_marginTop="136dp" />

    <Button
        android:id="@+id/button3"
        android:layout_width="wrap_content"
        android:layout_height="wrap_content"
        android:background="@android:color/holo_red_dark"
        android:text="Button 3"
        android:layout_marginTop="102dp"
        app:layout_constraintTop_toBottomOf="@+id/button1"
        android:layout_marginLeft="88dp"
        app:layout_constraintLeft_toLeftOf="parent"
        android:layout_marginStart="88dp" />

</android.support.constraint.ConstraintLayout>
因为查看完代码,你能够很容易的理解这个三个Button之间的关系,但为了轻松一下看下面这张图
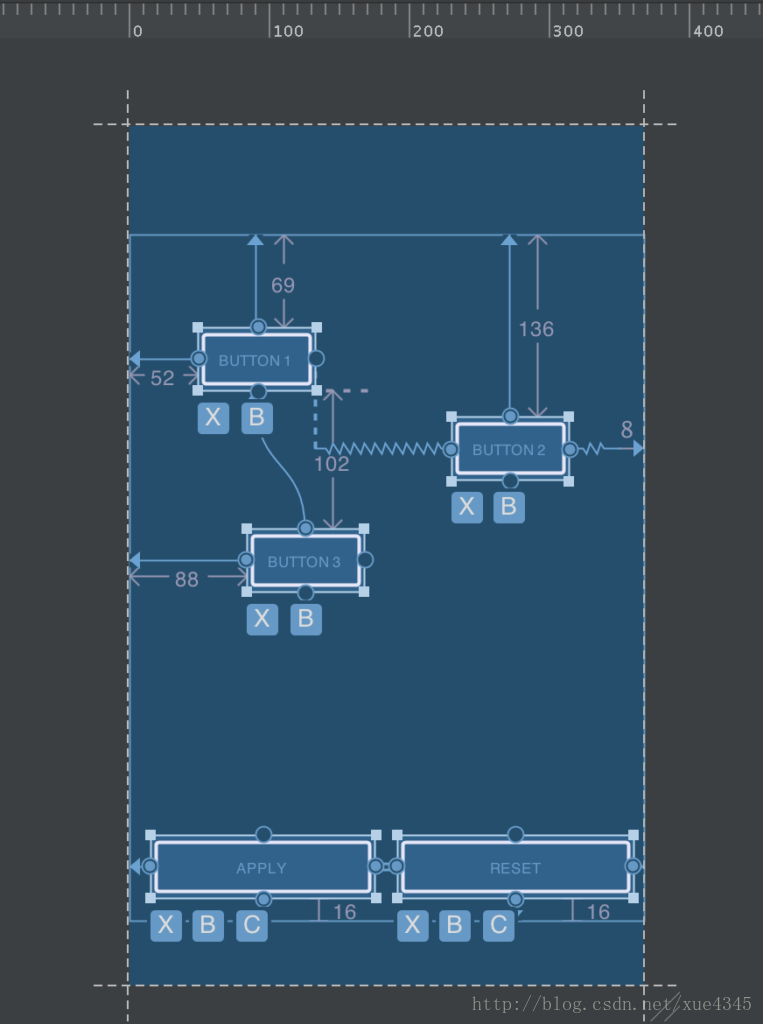
哈哈,我知道这个图和查看xml比起来相当简单。现在你了解了三个button之间和父布局之间的关系。太棒了。
另外,在更深入之前我想给你解释另一个新的API。
public class MainActivity extends AppCompatActivity {

    private ConstraintLayout constraintLayout;
    private ConstraintSet applyConstraintSet = new ConstraintSet();
    private ConstraintSet resetConstraintSet = new ConstraintSet();

    @Override
    protected void onCreate(Bundle savedInstanceState) {
        super.onCreate(savedInstanceState);
        setContentView(R.layout.activity_main);
        constraintLayout = (ConstraintLayout) findViewById(R.id.main);
        resetConstraintSet.clone(constraintLayout);
        applyConstraintSet.clone(constraintLayout);
    }

    public void onApplyClick(View view) {

    }

    public void onResetClick(View view) {

    }
我们主要看ConstraintSet的两个实例,其他代码都很简单。ConstraintSet 这个API在这篇教程中我们会大量使用。简单来说,你可以想像这个API将会记住我们在XML中实现的所有约束。怎么样?就如你看到的,在上面代码中我有一个ConstraintLayout的引用,之后我将clone它的约束到这两个字段resetConstraintSet 和 applyConstraintSet中。非常简单。
从这里开始,为了新的要求我将要改变我的写作风格。迷惑。。。
对于同样的要求我将使用不同的语句,因此你可以很容易理解这篇文章的标题了。
New Requirements:
当用户点击Apply时,我想要button1通过动画的方式和父视图的左对齐;
用开发者语言描述:
哥们儿,当用户点击Apply时,我想要在ConstraintLayout中使用java代码将button1和父视图做对齐,你能帮助我吗?
Solution:
public void onApplyClick(View view) {
    applyConstraintSet.setMargin(R.id.button1,ConstraintSet.START,8);
    applyConstraintSet.applyTo(constraintLayout);
}

public void onResetClick(View view) {
    resetConstraintSet.applyTo(constraintLayout);
}从现在开始我只向你展示onApplyClick()方法,其他部分到是相同了。忘记了,如果你看onResetClick(),我总是应用初始的约束来让UI回到初始状态。
现在这里有两个新API的方法,setMargin() 和 applyTo(),我觉得applyTo() 就不必解释了吧。
setMargin() 将会接受三个参数(viewId,anchor,margin)。Button1的左边距52dp,但当用户点击时变成8px。接下来给你展示效果。

没有按钮是移动的而是突然改变,这看起来一点也不像动画。这太糟糕了,因为我们需要再次审核一下代码。
审查代码之后我搞明白了,我需要在applyButton()方法中添加一行代码。下面就是添加完这样代码的效果。

搞定!是时候回顾一下新代码的变动了。
public void onApplyClick(View view) {
    TransitionManager.beginDelayedTransition(constraintLayout);
    applyConstraintSet.setMargin(R.id.button1,ConstraintSet.START,8);
    applyConstraintSet.applyTo(constraintLayout);
}这里我必须添加TransitionManager API。各位,对于TransitionManager API这里有一个支持库,你可以添加gradle依赖。
compile 'com.android.support:transition:25.1.0'在进入下一个需求之前,我想校正一下这些事情。
简单来说我们仅仅使用了两个API,ConstraintSet和TransitionManager。从现在开始我们仅使用了ConstraintSet API。
New Requirement:
用户语言描述:
我想给所有按钮添加动画,当用户点击Apply时,所有按钮在父控件中水平居中。
开发者语言描述:
哥们儿,当用户点击apply按钮时,我想要所有的按钮移动到父控件的水平中部,需要在ConstraintLayout中使用Java代码完成。你能帮助我吗?
Solution:
public void onApplyClick(View view) {
    TransitionManager.beginDelayedTransition(constraintLayout);
    applyConstraintSet.centerHorizontally(R.id.button1, R.id.main);
    applyConstraintSet.centerHorizontally(R.id.button2, R.id.main);
    applyConstraintSet.centerHorizontally(R.id.button3, R.id.main);
    applyConstraintSet.applyTo(constraintLayout);
}这里我使用了centerHorizontally()方法。这个方法接收两个参数:
First:我想做水平居中的View;
Second:根据哪个View来水平居中;
Oh这不是我想要的效果。在分析之后我知道了问题所在。对于不同的按钮有不同的margin,当我们点击Apply按钮时,这些按钮都要居中但是然需要考虑margin。所以是时候解决这个问题了。
public void onApplyClick(View view) {
    TransitionManager.beginDelayedTransition(constraintLayout);

    applyConstraintSet.setMargin(R.id.button1,ConstraintSet.START,0);
    applyConstraintSet.setMargin(R.id.button1,ConstraintSet.END,0);
    applyConstraintSet.setMargin(R.id.button2,ConstraintSet.START,0);
    applyConstraintSet.setMargin(R.id.button2,ConstraintSet.END,0);
    applyConstraintSet.setMargin(R.id.button3,ConstraintSet.START,0);
    applyConstraintSet.setMargin(R.id.button3,ConstraintSet.END,0);


    applyConstraintSet.centerHorizontally(R.id.button1, R.id.main);
    applyConstraintSet.centerHorizontally(R.id.button2, R.id.main);
    applyConstraintSet.centerHorizontally(R.id.button3, R.id.main);
    applyConstraintSet.applyTo(constraintLayout);
}
这里我让所有按钮的左右margin都为0,然后看效果。

New Requirement:
用户语言描述:
当用户点击Apply时,我想给button3添加动画使其移动的父控件中部;
开发者语音描述:
哥们儿,当用户点击Apply时,我想要button3移动到父控件的中部,需要在ConstraintLayout中使用Java代码实现。你能帮助我吗?
Solution:
public void onApplyClick(View view) {
    TransitionManager.beginDelayedTransition(constraintLayout);

    applyConstraintSet.setMargin(R.id.button3,ConstraintSet.START,0);
    applyConstraintSet.setMargin(R.id.button3,ConstraintSet.END,0);
    applyConstraintSet.setMargin(R.id.button3,ConstraintSet.TOP,0);
    applyConstraintSet.setMargin(R.id.button3,ConstraintSet.BOTTOM,0);

    applyConstraintSet.centerHorizontally(R.id.button3, R.id.main);
    applyConstraintSet.centerVertically(R.id.button3, R.id.main);

    applyConstraintSet.applyTo(constraintLayout);
}
这里首先我给四个边添加了0边距,之后我用到了centerHorizontal + centerVertical 方法。

New Requirement:
用户语言描述:
当用户点击Apply时,我想给所有button添加动画效果使其从当前大小到600px;
开发者语音描述:
哥们儿,当用户点击Apply时,我想给所有button添加动画效果使其从当前大小到600px,需要在ConstraintLayout中使用Java代码实现。你能帮助我吗?
Solution:
public void onApplyClick(View view) {
        TransitionManager.beginDelayedTransition(constraintLayout);

        applyConstraintSet.constrainWidth(R.id.button1,600);
        applyConstraintSet.constrainWidth(R.id.button2,600);
        applyConstraintSet.constrainWidth(R.id.button3,600);

//        applyConstraintSet.constrainHeight(R.id.button1,100);
//        applyConstraintSet.constrainHeight(R.id.button2,100);
//        applyConstraintSet.constrainHeight(R.id.button3,100);

        applyConstraintSet.applyTo(constraintLayout);

    }
这里我使用了constraintWidth 方法,效果如下。
New Requirement:
用户语言描述:
当用户点击Apply时,我想给所有button1添加动画效果使其它的宽高和等于屏幕大小,同时其他按钮隐藏;
开发者语音描述:
哥们儿,当用户点击Apply时,我先想要button1的宽高值为match_parent,而其他视图Visible属性设置为gone,需要在ConstraintLayout中使用Java代码实现。你能帮助我吗?
Solution:
public void onApplyClick(View view) {
    TransitionManager.beginDelayedTransition(constraintLayout);

    applyConstraintSet.setVisibility(R.id.button2,ConstraintSet.GONE);
    applyConstraintSet.setVisibility(R.id.button3,ConstraintSet.GONE);
    applyConstraintSet.clear(R.id.button1);
    applyConstraintSet.connect(R.id.button1,ConstraintSet.LEFT,R.id.main,ConstraintSet.LEFT,0);
    applyConstraintSet.connect(R.id.button1,ConstraintSet.RIGHT,R.id.main,ConstraintSet.RIGHT,0);
    applyConstraintSet.connect(R.id.button1,ConstraintSet.TOP,R.id.main,ConstraintSet.TOP,0);
    applyConstraintSet.connect(R.id.button1,ConstraintSet.BOTTOM,R.id.main,ConstraintSet.BOTTOM,0);
    applyConstraintSet.applyTo(constraintLayout);
}
这里我想解释一下我用到的几个新方法:
setVisibility:这个很简单,就不解释了;
clear:清楚加在这个View上的所有约束;
connet:给这个View添加约束,这个方法接收五个参数。
1st:我想添加约束的View;
2nd:侧面/边缘 我想使用的约束;
3rd:给视图添加约束时对应的锚点视图;
4th:锚点视图的侧面/边缘;
5th:边距;
是时候开始一些高端的特性了。根据我们在totorial2部分学习的Chaining 概念。我将向你展示如何用JAVA来实现。
New Requirement:
用户语言描述:
当用户点击Apply时,我想给所有button添加动画,彼此对齐,位于屏幕的顶部并且水平居中;
开发者语音描述:
哥们儿,当用户点击Apply时,我想实现三个按钮的packed chaning效果,需要在ConstraintLayout中使用Java代码实现。你能帮助我吗?
Solution:
正如我说的这是先进的用法,但是我要解释一下其实也没啥大不了的。所以准备好了。
public void onApplyClick(View view) {
    TransitionManager.beginDelayedTransition(constraintLayout);

    applyConstraintSet.clear(R.id.button1);
    applyConstraintSet.clear(R.id.button2);
    applyConstraintSet.clear(R.id.button3);
首先,我清除了三个按钮的所以约束。这是我个人的偏好,你也可以只移除边距,大小或其他属性,但我感觉这是最简单的实现方式。现在我们的按钮已经没有约束了。(0 width, 0 height, 0 margin …)
// button 1 left and top align to parent
applyConstraintSet.connect(R.id.button1, ConstraintSet.LEFT, R.id.main, ConstraintSet.LEFT, 0);
现在我给button1添加左约束,就像上面展示的一样。
// button 3 right and top align to parent
applyConstraintSet.connect(R.id.button3, ConstraintSet.RIGHT, R.id.main, ConstraintSet.RIGHT, 0);
接着我给button3添加了右约束,在你的大脑中产生一个这个代码的草图,现在button1在父控件的左上角,同时button2在父控件的右边。
// bi-direction or Chaining between button 1 and button 2
applyConstraintSet.connect(R.id.button2, ConstraintSet.LEFT, R.id.button1, ConstraintSet.RIGHT, 0);
applyConstraintSet.connect(R.id.button1, ConstraintSet.RIGHT, R.id.button2, ConstraintSet.LEFT, 0);
这里button1和button2 之间创建了bi-directional的关系,正如上面展示的那样;
// bi-direction or Chaining between button 2 and button 3
applyConstraintSet.connect(R.id.button2, ConstraintSet.RIGHT, R.id.button3, ConstraintSet.LEFT, 0);
applyConstraintSet.connect(R.id.button3, ConstraintSet.LEFT, R.id.button2, ConstraintSet.RIGHT, 0);
这里button2和button3之间创建了bi-directional的关系,正如上面展示的那样;
applyConstraintSet.createHorizontalChain(R.id.button1,
        R.id.button3,
        new int[]{R.id.button1, R.id.button3},
        null, ConstraintWidget.CHAIN_PACKED);
这个方法会给我们创建一个水平的链表。因为这个method会接收5个参数。
1st:头View的id;
2nd:这个链表尾View的id;
3rd:int数组,头、尾视图的id组成的int类型数组;
4th:float数组,如果想要有权重的链表设置,否则为null;
5th:链表的类型,例如CHAIN_SPREAD;
现在我尝试运行,我得到了下面的结果;
Oh no. That is not required behaviour. If you guys remember I clear all constraints of these Buttons. That’s why there width and height is 0. Now I need to give width and height as shown below.
当然这不是我们想要的结果,如果你们还记得我清除了这些按钮的所以约束,这就是为什么width和height都是0.现在我需要给他们width和height赋值,正如下面这样。
applyConstraintSet.constrainWidth(R.id.button1,ConstraintSet.WRAP_CONTENT);
applyConstraintSet.constrainWidth(R.id.button2,ConstraintSet.WRAP_CONTENT);
applyConstraintSet.constrainWidth(R.id.button3,ConstraintSet.WRAP_CONTENT);

applyConstraintSet.constrainHeight(R.id.button1,ConstraintSet.WRAP_CONTENT);
applyConstraintSet.constrainHeight(R.id.button2,ConstraintSet.WRAP_CONTENT);
applyConstraintSet.constrainHeight(R.id.button3,ConstraintSet.WRAP_CONTENT);
现在再运行一次:

完整展示一下代码:
public void onApplyClick(View view) {
    TransitionManager.beginDelayedTransition(constraintLayout);

    applyConstraintSet.clear(R.id.button1);
    applyConstraintSet.clear(R.id.button2);
    applyConstraintSet.clear(R.id.button3);

    // button 1 left and top align to parent
    applyConstraintSet.connect(R.id.button1, ConstraintSet.LEFT, R.id.main, ConstraintSet.LEFT, 0);

    // button 3 right and top align to parent
    applyConstraintSet.connect(R.id.button3, ConstraintSet.RIGHT, R.id.main, ConstraintSet.RIGHT, 0);

    // bi-direction or Chaining between button 1 and button 2
    applyConstraintSet.connect(R.id.button2, ConstraintSet.LEFT, R.id.button1, ConstraintSet.RIGHT, 0);
    applyConstraintSet.connect(R.id.button1, ConstraintSet.RIGHT, R.id.button2, ConstraintSet.LEFT, 0);

    // bi-direction or Chaining between button 2 and button 3
    applyConstraintSet.connect(R.id.button2, ConstraintSet.RIGHT, R.id.button3, ConstraintSet.LEFT, 0);
    applyConstraintSet.connect(R.id.button3, ConstraintSet.LEFT, R.id.button2, ConstraintSet.RIGHT, 0);

    applyConstraintSet.createHorizontalChain(R.id.button1,
            R.id.button3,
            new int[]{R.id.button1, R.id.button3}, null, ConstraintWidget.CHAIN_PACKED);

    applyConstraintSet.constrainWidth(R.id.button1,ConstraintSet.WRAP_CONTENT);
    applyConstraintSet.constrainWidth(R.id.button2,ConstraintSet.WRAP_CONTENT);
    applyConstraintSet.constrainWidth(R.id.button3,ConstraintSet.WRAP_CONTENT);

    applyConstraintSet.constrainHeight(R.id.button1,ConstraintSet.WRAP_CONTENT);
    applyConstraintSet.constrainHeight(R.id.button2,ConstraintSet.WRAP_CONTENT);
    applyConstraintSet.constrainHeight(R.id.button3,ConstraintSet.WRAP_CONTENT);

    applyConstraintSet.applyTo(constraintLayout);
}
现在试着改变一下链表样式:
applyConstraintSet.createHorizontalChain(R.id.button1,
        R.id.button3,
        new int[]{R.id.button1, R.id.button3}, null, ConstraintWidget.CHAIN_SPREAD);
再次改变链表样式:
applyConstraintSet.createHorizontalChain(R.id.button1,
        R.id.button3,
        new int[]{R.id.button1, R.id.button3}, null, ConstraintWidget.CHAIN_SPREAD_INSIDE);
现在我将再次向你展示一下带有bias(偏移)的CHAIN_PACKED ;
applyConstraintSet.createHorizontalChain(R.id.button1,
        R.id.button3,
        new int[]{R.id.button1, R.id.button3}, null, ConstraintWidget.CHAIN_PACKED);

applyConstraintSet.setHorizontalBias(R.id.button1, .1f);这里正如上所示,我用到了新的setHorizontalBias()方法,其中我给我们链组的头View一个float类型的偏移值;
Bonus:
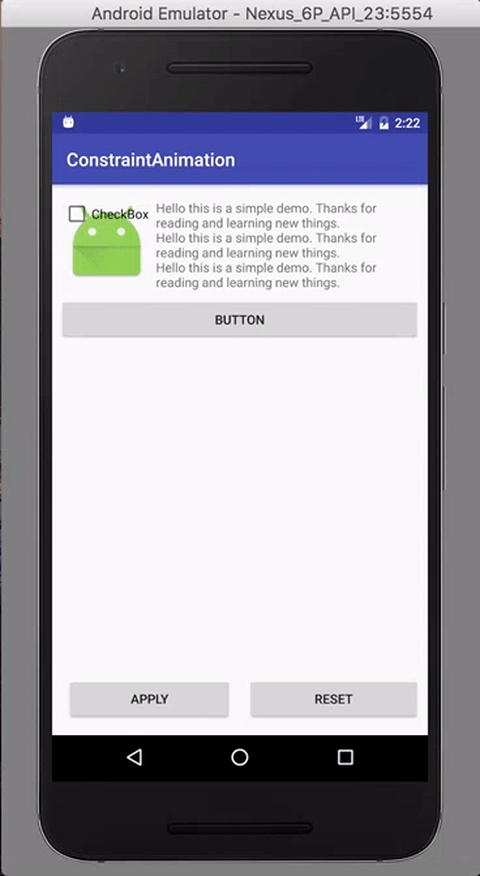
I am showing you one more use of ConstraintSet which also mentioned in Android API doc. So basically we can apply two different ConstraintSet on same ConstraintLayout as shown below.
这里我将向你展示ConstraintSet另一种用法,这种方式在Android API的文档中也提到了。基本上就是我们可以应用不同的ConstraintSet到同一个ConstraintLayout上,正如下面所示。
public class MainActivity extends AppCompatActivity {

    private ConstraintLayout constraintLayout;
    private ConstraintSet constraintSet1 = new ConstraintSet();
    private ConstraintSet constraintSet2 = new ConstraintSet();

    @Override
    protected void onCreate(Bundle savedInstanceState) {
        super.onCreate(savedInstanceState);
        setContentView(R.layout.activity_main);
        constraintLayout = (ConstraintLayout) findViewById(R.id.main);
        constraintSet1.clone(constraintLayout);
        constraintSet2.clone(this, R.layout.activity_main2);
    }

    public void onApplyClick(View view) {
        TransitionManager.beginDelayedTransition(constraintLayout);
        constraintSet2.applyTo(constraintLayout);
    }

    public void onResetClick(View view) {
        TransitionManager.beginDelayedTransition(constraintLayout);
        constraintSet1.applyTo(constraintLayout);
    }
}
XML of activity_main:
<?xml version="1.0" encoding="utf-8"?>
<android.support.constraint.ConstraintLayout xmlns:android="http://schemas.android.com/apk/res/android"
    xmlns:app="http://schemas.android.com/apk/res-auto"
    xmlns:tools="http://schemas.android.com/tools"
    android:id="@+id/main"
    android:layout_width="match_parent"
    android:layout_height="match_parent"
    tools:context="com.constraintanimation.MainActivity">


    <Button
        android:onClick="onApplyClick"
        app:layout_constraintHorizontal_weight="1"
        android:id="@+id/applyButton"
        android:layout_width="0dp"
        android:layout_height="wrap_content"
        android:text="Apply"
        android:layout_marginLeft="16dp"
        app:layout_constraintLeft_toLeftOf="parent"
        android:layout_marginStart="16dp"
        app:layout_constraintBottom_toBottomOf="parent"
        android:layout_marginBottom="16dp"
        app:layout_constraintRight_toLeftOf="@+id/resetButton"
        android:layout_marginRight="8dp"
        android:layout_marginEnd="8dp" />

    <Button
        android:onClick="onResetClick"
        app:layout_constraintHorizontal_weight="1"
        android:id="@+id/resetButton"
        android:layout_width="0dp"
        android:layout_height="wrap_content"
        android:text="Reset"
        app:layout_constraintBottom_toBottomOf="parent"
        android:layout_marginBottom="16dp"
        app:layout_constraintLeft_toRightOf="@+id/applyButton"
        android:layout_marginLeft="8dp"
        android:layout_marginRight="8dp"
        app:layout_constraintRight_toRightOf="parent"
        android:layout_marginStart="8dp"
        android:layout_marginEnd="8dp"

        />

    <ImageView
        android:id="@+id/imageView"
        android:layout_width="92dp"
        android:layout_height="92dp"
        app:srcCompat="@mipmap/ic_launcher"
        android:layout_marginTop="16dp"
        app:layout_constraintTop_toTopOf="parent"
        android:layout_marginLeft="8dp"
        app:layout_constraintLeft_toLeftOf="parent"
        android:layout_marginStart="8dp"
        android:layout_marginRight="8dp"
        app:layout_constraintRight_toRightOf="parent"
        app:layout_constraintHorizontal_bias="0.02"
        android:layout_marginEnd="8dp" />

    <TextView
        android:id="@+id/textView"
        android:layout_width="0dp"
        android:layout_height="wrap_content"
        android:text="Hello this is a simple demo. Thanks for reading and learning new things.\nHello this is a simple demo. Thanks for reading and learning new things.\nHello this is a simple demo. Thanks for reading and learning new things.\nHello this is a simple demo. Thanks for reading and learning new things.\nHello this is a simple demo. Thanks for reading and learning new things.\nHello this is a simple demo. Thanks for reading and learning new things.\nHello this is a simple demo. Thanks for reading and learning new things.\nHello this is a simple demo. Thanks for reading and learning new things.\n"
        android:layout_marginRight="8dp"
        android:lines="6"
        app:layout_constraintRight_toRightOf="parent"
        android:layout_marginEnd="8dp"
        app:layout_constraintLeft_toRightOf="@+id/imageView"
        android:layout_marginLeft="8dp"
        android:layout_marginStart="8dp"
        app:layout_constraintHorizontal_bias="0.0"
        app:layout_constraintTop_toTopOf="parent"
        android:layout_marginTop="16dp" />

    <CheckBox
        android:id="@+id/checkBox"
        android:layout_width="wrap_content"
        android:layout_height="wrap_content"
        android:text="CheckBox"
        android:layout_marginTop="16dp"
        app:layout_constraintTop_toTopOf="parent"
        android:layout_marginLeft="16dp"
        app:layout_constraintLeft_toLeftOf="parent"
        android:layout_marginStart="16dp"
        app:layout_constraintRight_toLeftOf="@+id/textView"
        android:layout_marginRight="8dp"
        app:layout_constraintHorizontal_bias="1.0"
        android:layout_marginEnd="8dp" />

    <Button
        android:id="@+id/button"
        android:layout_width="0dp"
        android:layout_height="wrap_content"
        android:text="Button"
        android:layout_marginRight="8dp"
        app:layout_constraintRight_toRightOf="parent"
        android:layout_marginEnd="8dp"
        android:layout_marginLeft="8dp"
        app:layout_constraintLeft_toLeftOf="parent"
        android:layout_marginStart="8dp"
        android:layout_marginTop="8dp"
        app:layout_constraintTop_toBottomOf="@+id/textView" />

</android.support.constraint.ConstraintLayout>
XML of activty_main2:
<?xml version="1.0" encoding="utf-8"?>
<android.support.constraint.ConstraintLayout xmlns:android="http://schemas.android.com/apk/res/android"
    xmlns:app="http://schemas.android.com/apk/res-auto"
    xmlns:tools="http://schemas.android.com/tools"
    android:id="@+id/main"
    android:layout_width="match_parent"
    android:layout_height="match_parent"
    tools:context="com.constraintanimation.MainActivity">


    <Button
        android:onClick="onApplyClick"
        app:layout_constraintHorizontal_weight="1"
        android:id="@+id/applyButton"
        android:layout_width="0dp"
        android:layout_height="wrap_content"
        android:text="Apply"
        android:layout_marginLeft="16dp"
        app:layout_constraintLeft_toLeftOf="parent"
        android:layout_marginStart="16dp"
        app:layout_constraintBottom_toBottomOf="parent"
        android:layout_marginBottom="16dp"
        app:layout_constraintRight_toLeftOf="@+id/resetButton"
        android:layout_marginRight="8dp"
        android:layout_marginEnd="8dp" />

    <Button
        android:onClick="onResetClick"
        app:layout_constraintHorizontal_weight="1"
        android:id="@+id/resetButton"
        android:layout_width="0dp"
        android:layout_height="wrap_content"
        android:text="Reset"
        app:layout_constraintBottom_toBottomOf="parent"
        android:layout_marginBottom="16dp"
        app:layout_constraintLeft_toRightOf="@+id/applyButton"
        android:layout_marginLeft="8dp"
        android:layout_marginRight="8dp"
        app:layout_constraintRight_toRightOf="parent"
        android:layout_marginStart="8dp"
        android:layout_marginEnd="8dp"

        />

    <ImageView
        android:id="@+id/imageView"
        android:layout_width="353dp"
        android:layout_height="157dp"
        app:srcCompat="@mipmap/ic_launcher"
        android:layout_marginTop="16dp"
        app:layout_constraintTop_toTopOf="parent"
        android:layout_marginRight="8dp"
        app:layout_constraintRight_toRightOf="parent"
        android:layout_marginEnd="8dp"
        android:layout_marginLeft="8dp"
        app:layout_constraintLeft_toLeftOf="parent"
        android:layout_marginStart="8dp" />

    <TextView
        android:id="@+id/textView"
        android:layout_width="352dp"
        android:layout_height="108dp"
        android:text="Hello this is a simple demo. Thanks for reading and learning new things.\nHello this is a simple demo. Thanks for reading and learning new things.\nHello this is a simple demo. Thanks for reading and learning new things.\nHello this is a simple demo. Thanks for reading and learning new things.\nHello this is a simple demo. Thanks for reading and learning new things.\nHello this is a simple demo. Thanks for reading and learning new things.\nHello this is a simple demo. Thanks for reading and learning new things.\nHello this is a simple demo. Thanks for reading and learning new things.\n"
        android:lines="6"
        android:layout_marginTop="12dp"
        app:layout_constraintTop_toBottomOf="@+id/imageView"
        android:layout_marginRight="8dp"
        app:layout_constraintRight_toRightOf="parent"
        android:layout_marginLeft="8dp"
        app:layout_constraintLeft_toLeftOf="parent"
        android:layout_marginStart="8dp"
        android:layout_marginEnd="8dp" />

    <CheckBox
        android:id="@+id/checkBox"
        android:layout_width="wrap_content"
        android:layout_height="wrap_content"
        android:text="CheckBox"
        android:layout_marginTop="16dp"
        app:layout_constraintTop_toTopOf="parent"
        android:layout_marginRight="16dp"
        app:layout_constraintRight_toRightOf="parent"
        android:layout_marginEnd="16dp" />

    <Button
        android:id="@+id/button"
        android:layout_width="0dp"
        android:layout_height="0dp"
        android:text="Button"
        android:layout_marginRight="16dp"
        app:layout_constraintRight_toRightOf="parent"
        android:layout_marginEnd="16dp"
        android:layout_marginLeft="8dp"
        app:layout_constraintLeft_toLeftOf="parent"
        app:layout_constraintHorizontal_bias="0.0"
        android:layout_marginStart="8dp"
        android:layout_marginTop="8dp"
        app:layout_constraintTop_toBottomOf="@+id/textView"
        android:layout_marginBottom="8dp"
        app:layout_constraintBottom_toTopOf="@+id/applyButton" />

</android.support.constraint.ConstraintLayout>
我们终于完成了 ConstraitLayout 动画效果.现在剩下的一个也是最后一个主题是 Constraint Layout Visual [Design] Editor ( What the hell is this )[Part4]。
OK,是时候说再见了,祝你有一个愉快的周末。


 506
506


 被折叠的 条评论
为什么被折叠?
被折叠的 条评论
为什么被折叠?
 到【灌水乐园】发言


