


引用地址:.NET Core 使用 Consul 服务注册发现 - 阿星Plus - 博客园
Consul是一个用来实现分布式系统服务发现与配置的开源工具。它内置了服务注册与发现框架、分布一致性协议实现、健康检查、Key/Value存储、多数据中心方案,不再需要依赖其他工具,使用起来也较为简单。
Consul官网:https://www.consul.io- 开源地址:https://github.com/hashicorp/consul、https://github.com/G-Research/consuldotnet
1|0安装
Consul支持各种平台的安装,安装文档:Downloads | Consul by HashiCorp,为了快速使用,我这里选择用docker方式安装。
version: "3"

services:
  service_1:
    image: consul
    command: agent -server -client=0.0.0.0 -bootstrap-expect=3 -node=service_1
    volumes:
      - /usr/local/docker/consul/data/service_1:/data
  service_2:
    image: consul
    command: agent -server -client=0.0.0.0 -retry-join=service_1 -node=service_2
    volumes:
      - /usr/local/docker/consul/data/service_2:/data
    depends_on:
      - service_1
  service_3:
    image: consul
    command: agent -server -client=0.0.0.0 -retry-join=service_1 -node=service_3
    volumes:
      - /usr/local/docker/consul/data/service_3:/data
    depends_on:
      - service_1
  client_1:
    image: consul
    command: agent -client=0.0.0.0 -retry-join=service_1 -ui -node=client_1
    ports:
      - 8500:8500
    volumes:
      - /usr/local/docker/consul/data/client_1:/data
    depends_on:
      - service_2
      - service_3
提供一个docker-compose.yaml,使用docker-compose up编排脚本启动Consul,如果你不熟悉,可以选择其它方式能运行Consul即可。
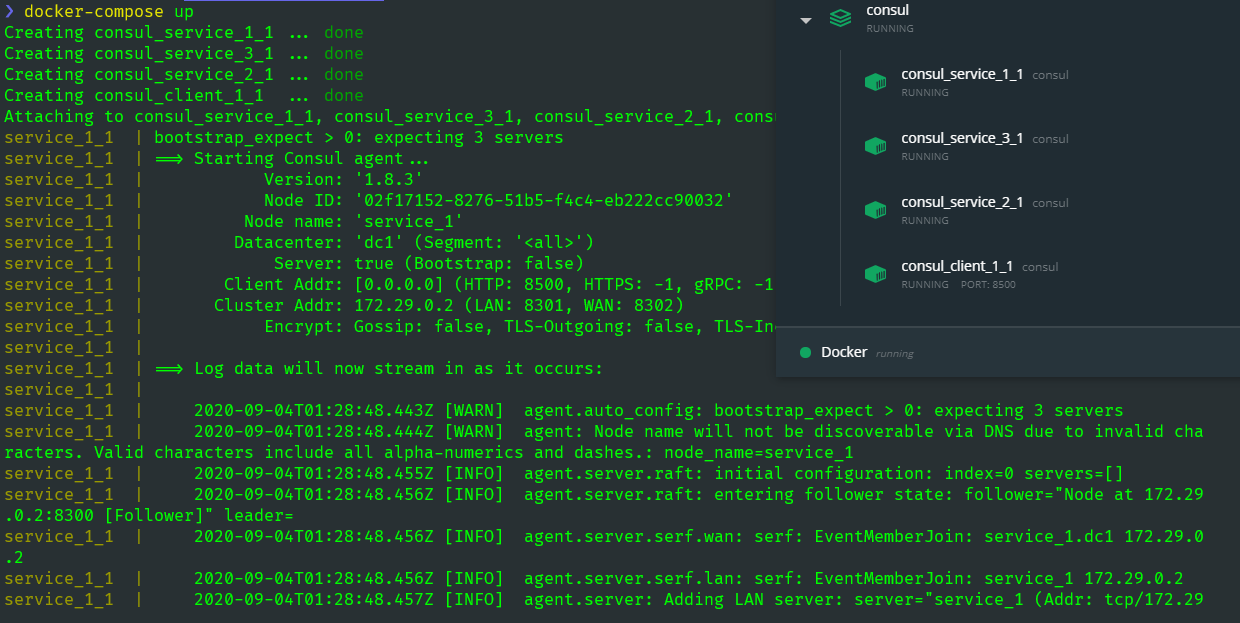
这里使用 Docker 搭建 3个 server 节点 + 1 个 client 节点,API 服务通过 client 节点进行服务注册和发现。
安装完成启动Consul,打开默认地址 http://localhost:8500 可以看到Consului界面。
2|0快速使用
添加两个webapi服务,ServiceA和ServiceB,一个webapi客户端Client来调用服务。
dotnet new sln -n consul_demo

dotnet new webapi -n ServiceA
dotnet sln add ServiceA/ServiceA.csproj

dotnet new webapi -n ServiceB
dotnet sln add ServiceB/ServiceB.csproj

dotnet new webapi -n Client
dotnet sln add Client/Client.csproj

在项目中添加Consul组件包
Install-Package Consul
2|1服务注册
接下来在两个服务中添加必要的代码来实现将服务注册到Consul中。
首先将Consul配置信息添加到appsettings.json
{ "Consul": { "Address": "http://host.docker.internal:8500", "HealthCheck": "/healthcheck", "Name": "ServiceA", "Ip": "host.docker.internal" } }
因为我们要将项目都运行在docker中,所以这里的地址要用 host.docker.internal 代替,使用 localhost 无法正常启动,如果不在 docker 中运行,这里就配置层 localhost。
添加一个扩展方法
UseConul(this IApplicationBuilder app, IConfiguration configuration, IHostApplicationLifetime lifetime)。
using System; using Consul; using Microsoft.AspNetCore.Builder; using Microsoft.Extensions.Configuration; using Microsoft.Extensions.Hosting; namespace ServiceA { public static class Extensions { public static IApplicationBuilder UseConul(this IApplicationBuilder app, IConfiguration configuration, IHostApplicationLifetime lifetime) { var client = new ConsulClient(options => { options.Address = new Uri(configuration["Consul:Address"]); // Consul客户端地址 }); var registration = new AgentServiceRegistration { ID = Guid.NewGuid().ToString(), // 唯一Id Name = configuration["Consul:Name"], // 服务名 Address = configuration["Consul:Ip"], // 服务绑定IP Port = Convert.ToInt32(configuration["Consul:Port"]), // 服务绑定端口 Check = new AgentServiceCheck { DeregisterCriticalServiceAfter = TimeSpan.FromSeconds(5), // 服务启动多久后注册 Interval = TimeSpan.FromSeconds(10), // 健康检查时间间隔 HTTP = $"http://{configuration["Consul:Ip"]}:{configuration["Consul:Port"]}{configuration["Consul:HealthCheck"]}", // 健康检查地址 Timeout = TimeSpan.FromSeconds(5) // 超时时间 } }; // 注册服务 client.Agent.ServiceRegister(registration).Wait(); // 应用程序终止时,取消服务注册 lifetime.ApplicationStopping.Register(() => { client.Agent.ServiceDeregister(registration.ID).Wait(); }); return app; } } }
然后在Startup.cs中使用扩展方法即可。
public void Configure(IApplicationBuilder app, IWebHostEnvironment env, IHostApplicationLifetime lifetime) { ... app.UseConul(Configuration, lifetime); }
注意,这里将IConfiguration和IHostApplicationLifetime作为参数传进来的,根据实际开发做对应的修改就可以了。
分别在ServiceA和ServiceB都完成一遍上述操作,因为不是实际项目,这里就产生的许多重复代码,在真正的项目开发过程中可以考虑放在一个单独的项目中,ServiceA和ServiceB分别引用,调用。
接着去实现健康检查接口。
// ServiceA using Microsoft.AspNetCore.Mvc; namespace ServiceA.Controllers { [Route("[controller]")] [ApiController] public class HealthCheckController : ControllerBase { /// <summary> /// 健康检查 /// </summary> /// <returns></returns> [HttpGet] public IActionResult api() { return Ok(); } } }
// ServiceB using Microsoft.AspNetCore.Mvc; namespace ServiceB.Controllers { [Route("[controller]")] [ApiController] public class HealthCheckController : ControllerBase { /// <summary> /// 健康检查 /// </summary> /// <returns></returns> [HttpGet] public IActionResult Get() { return Ok(); } } }
最后在ServiceA和ServiceB中都添加一个接口。
// ServiceA using System; using Microsoft.AspNetCore.Mvc; using Microsoft.Extensions.Configuration; namespace ServiceA.Controllers { [Route("api/[controller]")] [ApiController] public class ServiceAController : ControllerBase { [HttpGet] public IActionResult Get([FromServices] IConfiguration configuration) { var result = new { msg = $"我是{nameof(ServiceA)},当前时间:{DateTime.Now:G}", ip = Request.HttpContext.Connection.LocalIpAddress.ToString(), port = configuration["Consul:Port"] }; return Ok(result); } } }
// ServiceB using System; using Microsoft.AspNetCore.Mvc; using Microsoft.Extensions.Configuration; namespace ServiceB.Controllers { [Route("api/[controller]")] [ApiController] public class ServiceBController : ControllerBase { [HttpGet] public IActionResult Get([FromServices] IConfiguration configuration) { var result = new { msg = $"我是{nameof(ServiceB)},当前时间:{DateTime.Now:G}", ip = Request.HttpContext.Connection.LocalIpAddress.ToString(), port = configuration["Consul:Port"] }; return Ok(result); } } }
这样我们写了两个服务,ServiceA和ServiceB。都添加了健康检查接口和一个自己的服务接口,返回一段json。
我们现在来运行看看效果,可以使用任何方式,只要能启动即可,我这里选择在docker中运行,直接在 Visual Studio中对着两个解决方案右键添加,选择Docker支持,默认会帮我们自动创建好Dockfile,非常方便。
生成的Dockfile文件内容如下:
# ServiceA FROM mcr.microsoft.com/dotnet/core/aspnet:3.1-buster-slim AS base WORKDIR /app EXPOSE 80 EXPOSE 443 FROM mcr.microsoft.com/dotnet/core/sdk:3.1-buster AS build WORKDIR /src COPY ["ServiceA/ServiceA.csproj", "ServiceA/"] RUN dotnet restore "ServiceA/ServiceA.csproj" COPY . . WORKDIR "/src/ServiceA" RUN dotnet build "ServiceA.csproj" -c Release -o /app/build FROM build AS publish RUN dotnet publish "ServiceA.csproj" -c Release -o /app/publish FROM base AS final WORKDIR /app COPY --from=publish /app/publish . ENTRYPOINT ["dotnet", "ServiceA.dll"]
# ServiceB FROM mcr.microsoft.com/dotnet/core/aspnet:3.1-buster-slim AS base WORKDIR /app EXPOSE 80 EXPOSE 443 FROM mcr.microsoft.com/dotnet/core/sdk:3.1-buster AS build WORKDIR /src COPY ["ServiceB/ServiceB.csproj", "ServiceB/"] RUN dotnet restore "ServiceB/ServiceB.csproj" COPY . . WORKDIR "/src/ServiceB" RUN dotnet build "ServiceB.csproj" -c Release -o /app/build FROM build AS publish RUN dotnet publish "ServiceB.csproj" -c Release -o /app/publish FROM base AS final WORKDIR /app COPY --from=publish /app/publish . ENTRYPOINT ["dotnet", "ServiceB.dll"]
然后定位到项目根目录,使用命令去编译两个镜像,service_a和service_b
docker build -t service_a:dev -f ./ServiceA/Dockerfile . docker build -t service_b:dev -f ./ServiceB/Dockerfile .
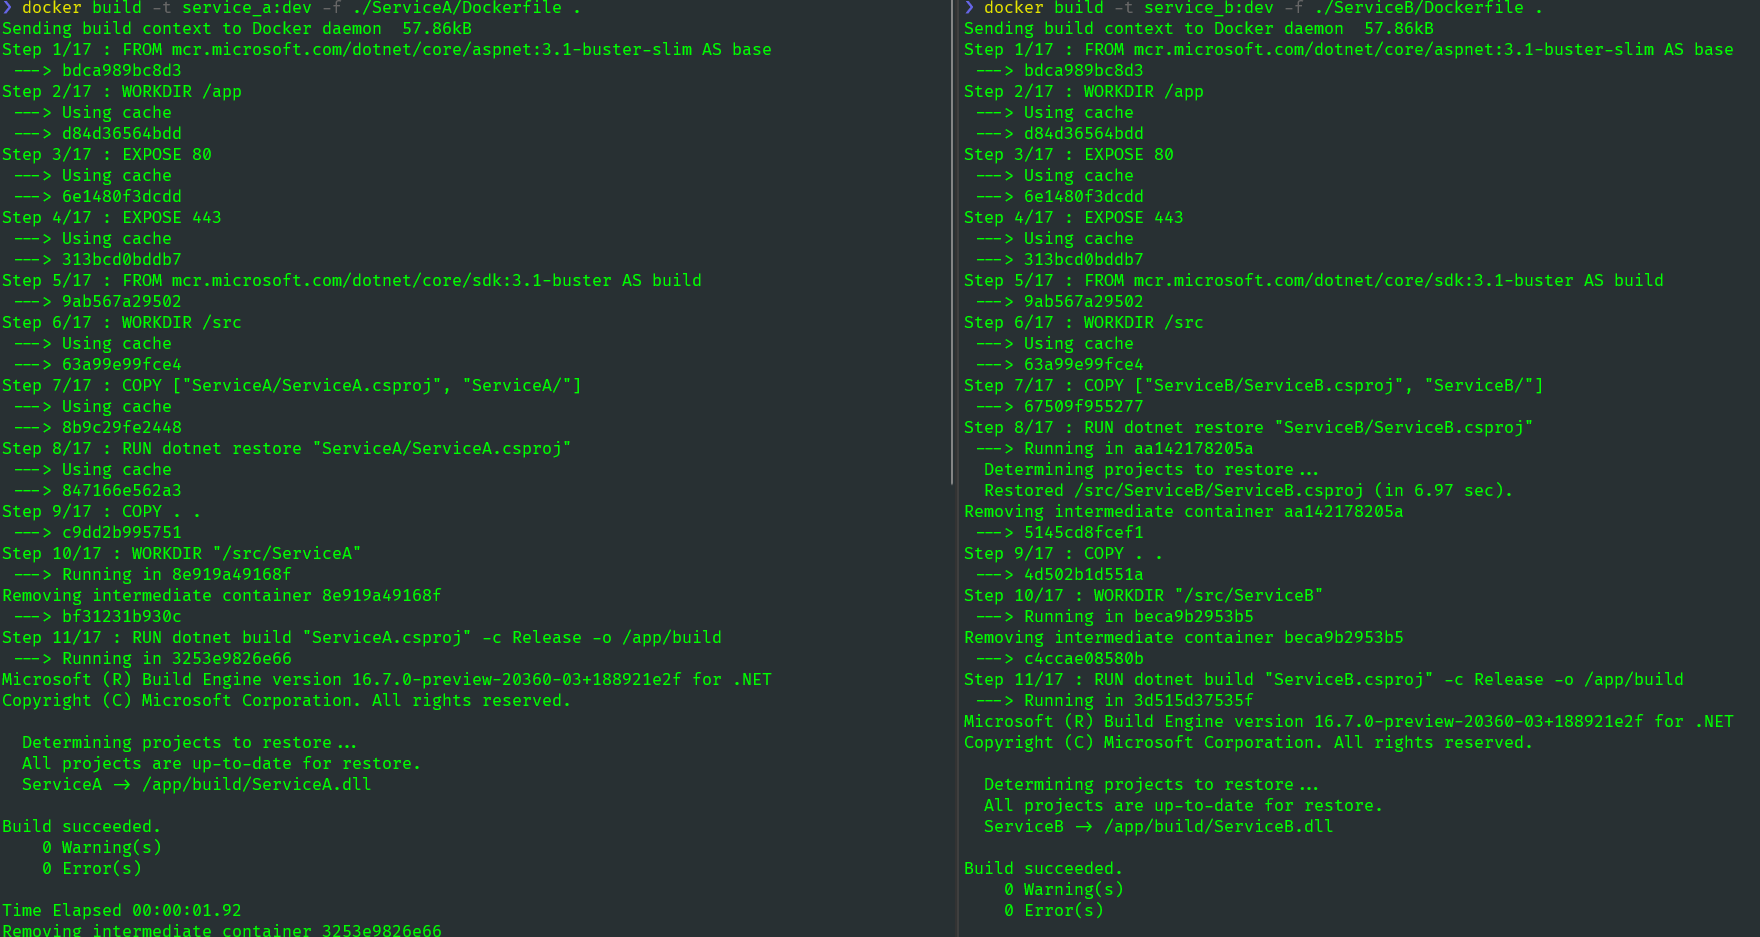
看到 Successfully 就成功了,通过docker image ls可以看到我们打包的两个镜像。
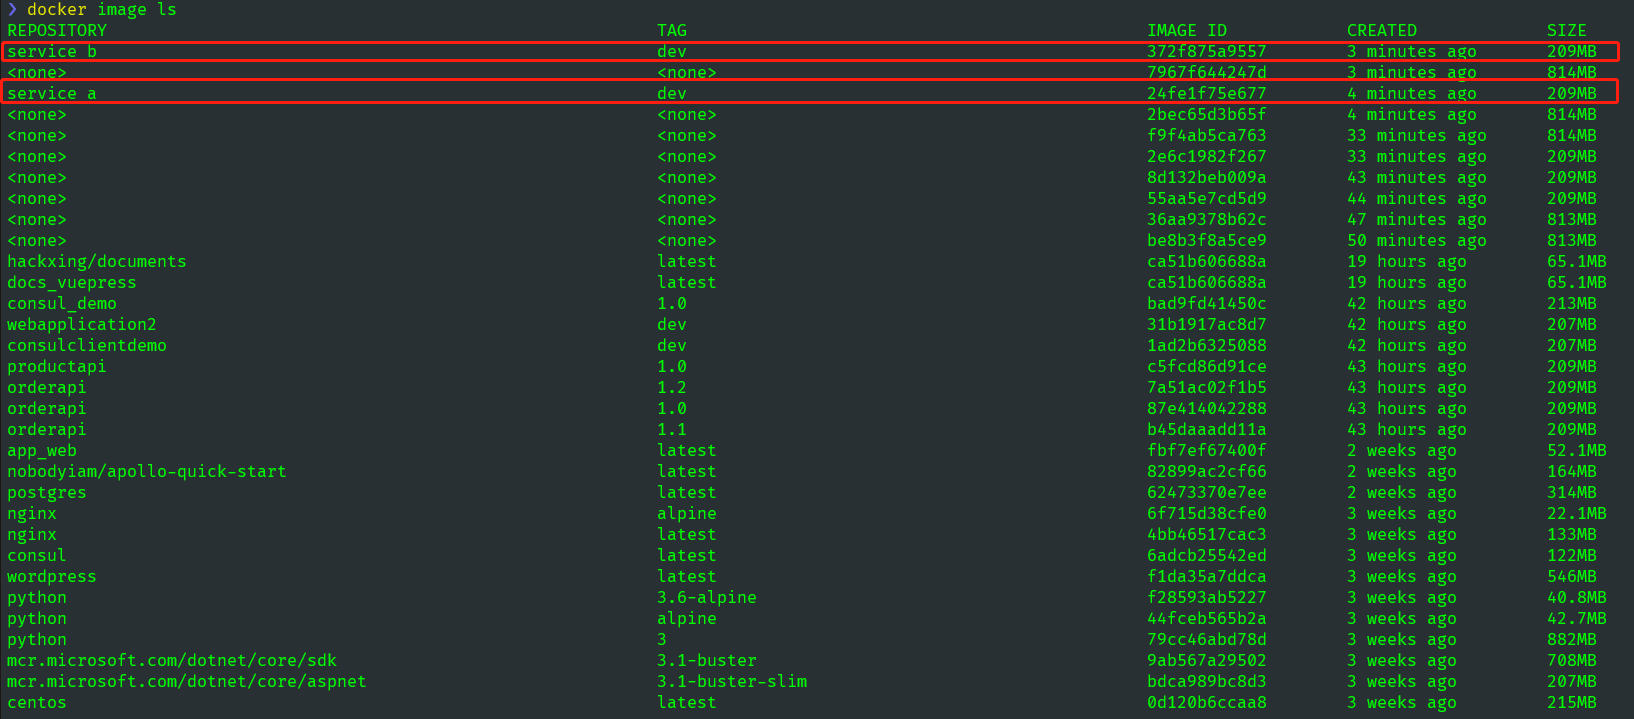
这里顺便提一句,已经可以看到我们编译的镜像,service_a和service_b了,但是还有许多名称为<none>的镜像,这些镜像可以不用管它,这种叫做虚悬镜像,既没有仓库名,也没有标签。是因为docker build导致的这种现象。由于新旧镜像同名,旧镜像名称被取消,从而出现仓库名、标签均为 <none> 的镜像。
一般来说,虚悬镜像已经失去了存在的价值,是可以随意删除的,可以docker image prune命令删除,这样镜像列表就干净多了。
最后将两个镜像service_a和service_b,分别运行三个实例。
docker run -d -p 5050:80 --name service_a1 service_a:dev --Consul:Port="5050" docker run -d -p 5051:80 --name service_a2 service_a:dev --Consul:Port="5051" docker run -d -p 5052:80 --name service_a3 service_a:dev --Consul:Port="5052" docker run -d -p 5060:80 --name service_b1 service_b:dev --Consul:Port="5060" docker run -d -p 5061:80 --name service_b2 service_b:dev --Consul:Port="5061" docker run -d -p 5062:80 --name service_b3 service_b:dev --Consul:Port="5062"
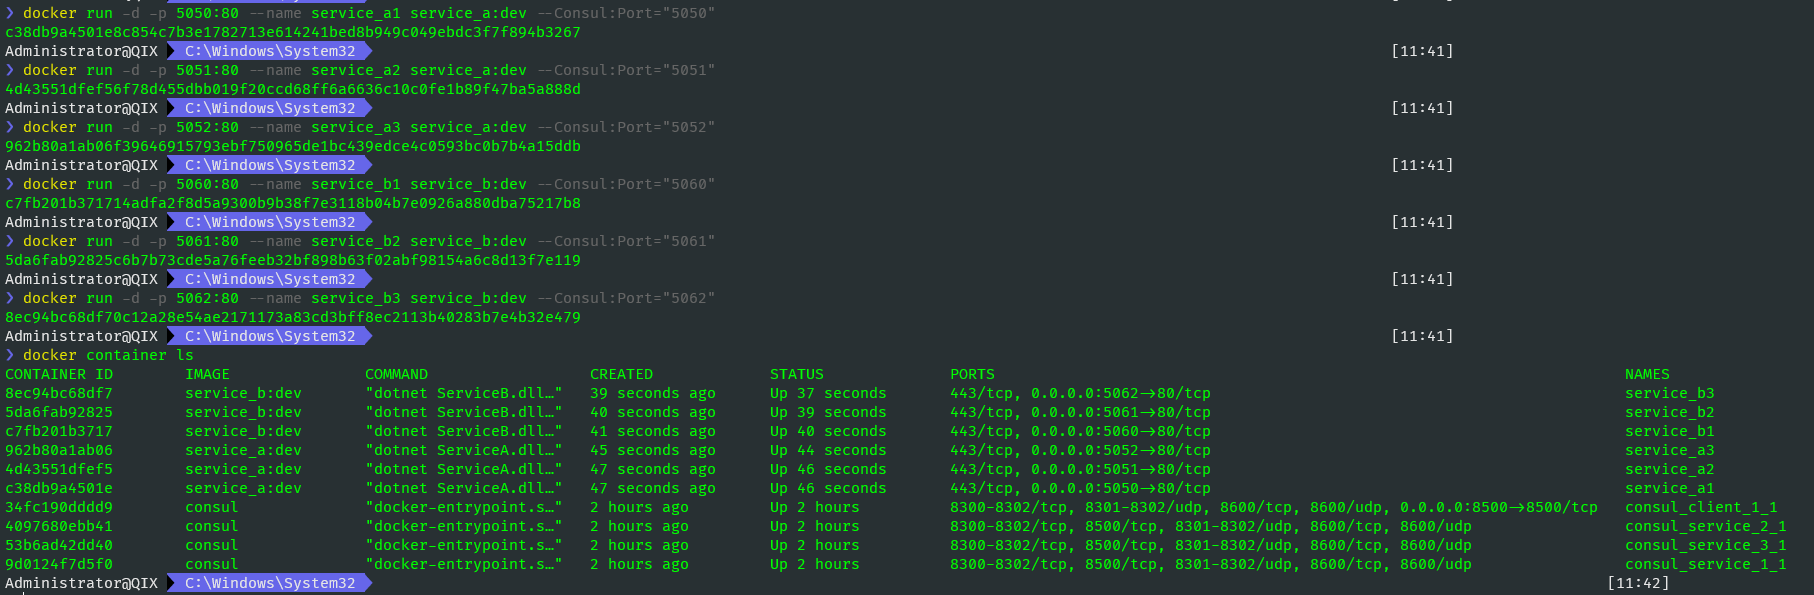
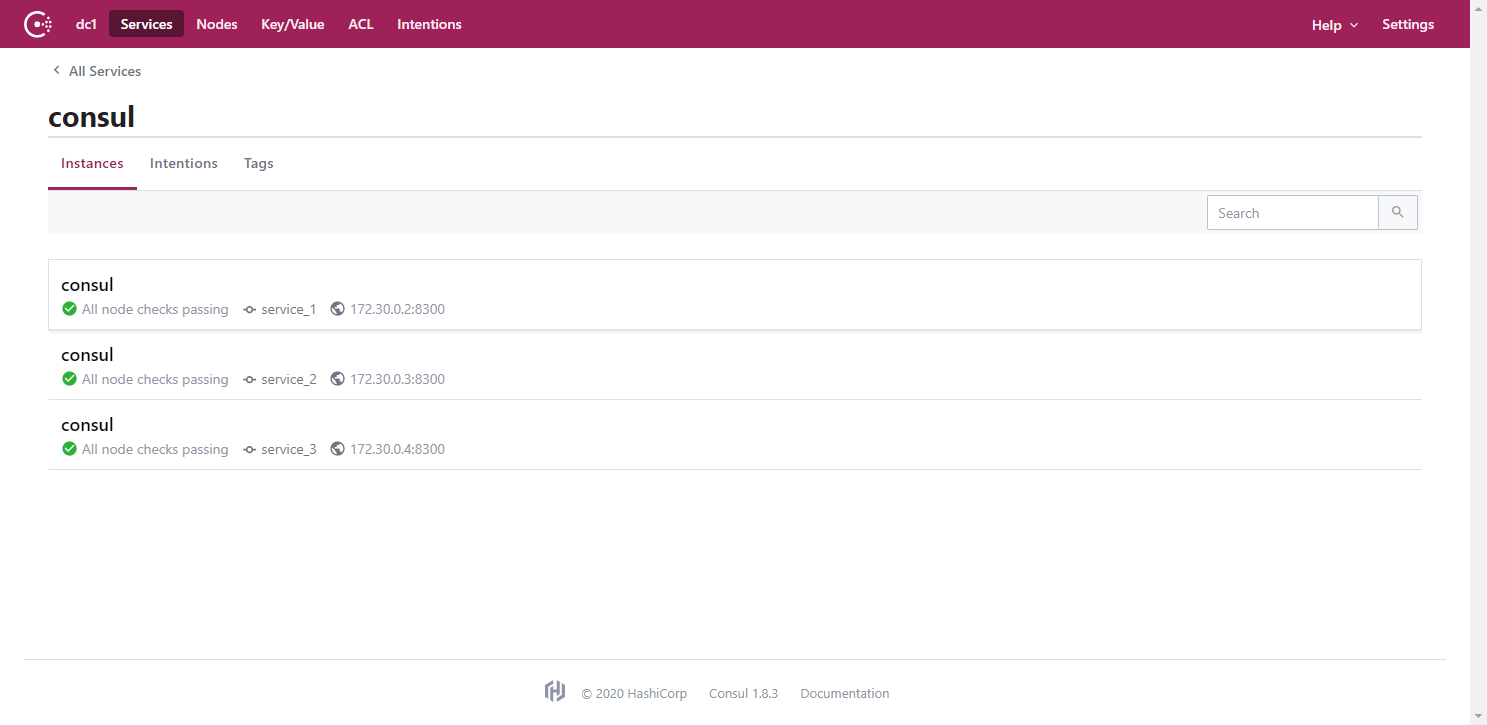
运行成功,接下来就是见证奇迹的时刻,去到Consul看看。

成功将两个服务注册到Consul,并且每个服务都有多个实例。
访问一下接口试试吧,看看能不能成功出现结果。
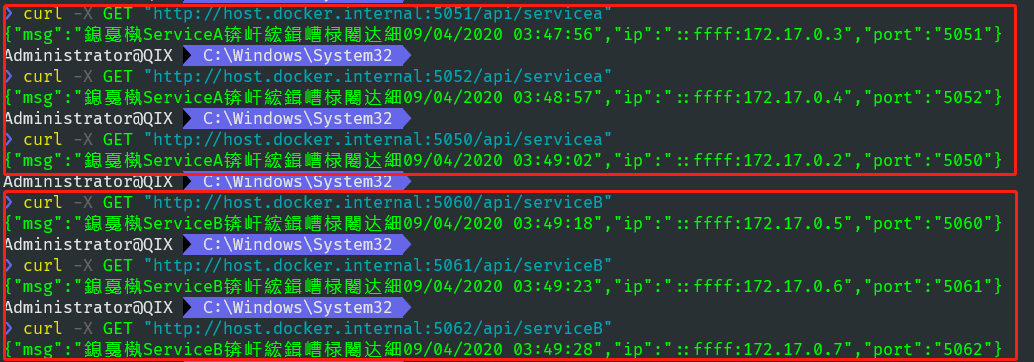
因为终端编码问题,导致显示乱码,这个不影响,ok,至此服务注册大功告成。
2|2服务发现
搞定了服务注册,接下来演示一下如何服务发现,在Client项目中先将Consul地址配置到appsettings.json中。
{ "Consul": { "Address": "http://host.docker.internal:8500" } }
然后添加一个接口,IService.cs,添加三个方法,分别获取两个服务的返回结果以及初始化服务的方法。
using System.Threading.Tasks; namespace Client { public interface IService { /// <summary> /// 获取 ServiceA 返回数据 /// </summary> /// <returns></returns> Task<string> GetServiceA(); /// <summary> /// 获取 ServiceB 返回数据 /// </summary> /// <returns></returns> Task<string> GetServiceB(); /// <summary> /// 初始化服务 /// </summary> void InitServices(); } }
实现类:Service.cs
using System; using System.Collections.Concurrent; using System.Linq; using System.Net.Http; using System.Threading.Tasks; using Consul; using Microsoft.Extensions.Configuration; namespace Client { public class Service : IService { private readonly IConfiguration _configuration; private readonly ConsulClient _consulClient; private ConcurrentBag<string> _serviceAUrls; private ConcurrentBag<string> _serviceBUrls; private IHttpClientFactory _httpClient; public Service(IConfiguration configuration, IHttpClientFactory httpClient) { _configuration = configuration; _consulClient = new ConsulClient(options => { options.Address = new Uri(_configuration["Consul:Address"]); }); _httpClient = httpClient; } public async Task<string> GetServiceA() { if (_serviceAUrls == null) return await Task.FromResult("ServiceA正在初始化..."); using var httpClient = _httpClient.CreateClient(); var serviceUrl = _serviceAUrls.ElementAt(new Random().Next(_serviceAUrls.Count())); Console.WriteLine("ServiceA:" + serviceUrl); var result = await httpClient.GetStringAsync($"{serviceUrl}/api/servicea"); return result; } public async Task<string> GetServiceB() { if (_serviceBUrls == null) return await Task.FromResult("ServiceB正在初始化..."); using var httpClient = _httpClient.CreateClient(); var serviceUrl = _serviceBUrls.ElementAt(new Random().Next(_serviceBUrls.Count())); Console.WriteLine("ServiceB:" + serviceUrl); var result = await httpClient.GetStringAsync($"{serviceUrl}/api/serviceb"); return result; } public void InitServices() { var serviceNames = new string[] { "ServiceA", "ServiceB" }; foreach (var item in serviceNames) { Task.Run(async () => { var queryOptions = new QueryOptions { WaitTime = TimeSpan.FromMinutes(5) }; while (true) { await InitServicesAsync(queryOptions, item); } }); } async Task InitServicesAsync(QueryOptions queryOptions, string serviceName) { var result = await _consulClient.Health.Service(serviceName, null, true, queryOptions); if (queryOptions.WaitIndex != result.LastIndex) { queryOptions.WaitIndex = result.LastIndex; var services = result.Response.Select(x => $"http://{x.Service.Address}:{x.Service.Port}"); if (serviceName == "ServiceA") { _serviceAUrls = new ConcurrentBag<string>(services); } else if (serviceName == "ServiceB") { _serviceBUrls = new ConcurrentBag<string>(services); } } } } } }
代码就不解释了,相信都可以看懂,使用了Random类随机获取一个服务,关于这点可以选择更合适的负载均衡方式。
在Startup.cs中添加接口依赖注入、使用初始化服务等代码。
using Microsoft.AspNetCore.Builder; using Microsoft.AspNetCore.Hosting; using Microsoft.Extensions.Configuration; using Microsoft.Extensions.DependencyInjection; using Microsoft.Extensions.Hosting; namespace Client { public class Startup { public Startup(IConfiguration configuration) { Configuration = configuration; } public IConfiguration Configuration { get; } public void ConfigureServices(IServiceCollection services) { services.AddControllers(); services.AddHttpClient(); services.AddSingleton<IService, Service>(); } public void Configure(IApplicationBuilder app, IWebHostEnvironment env, IService service) { if (env.IsDevelopment()) { app.UseDeveloperExceptionPage(); } app.UseHttpsRedirection(); app.UseRouting(); app.UseAuthorization(); app.UseEndpoints(endpoints => { endpoints.MapControllers(); }); service.InitServices(); } } }
一切就绪,添加api访问我们的两个服务。
using System.Threading.Tasks; using Microsoft.AspNetCore.Mvc; namespace Client.Controllers { [Route("api")] [ApiController] public class HomeController : ControllerBase { [HttpGet] [Route("service_result")] public async Task<IActionResult> GetService([FromServices] IService service) { return Ok(new { serviceA = await service.GetServiceA(), serviceB = await service.GetServiceB() }); } } }
直接在Visual Studio中运行Client项目,在浏览器访问api。
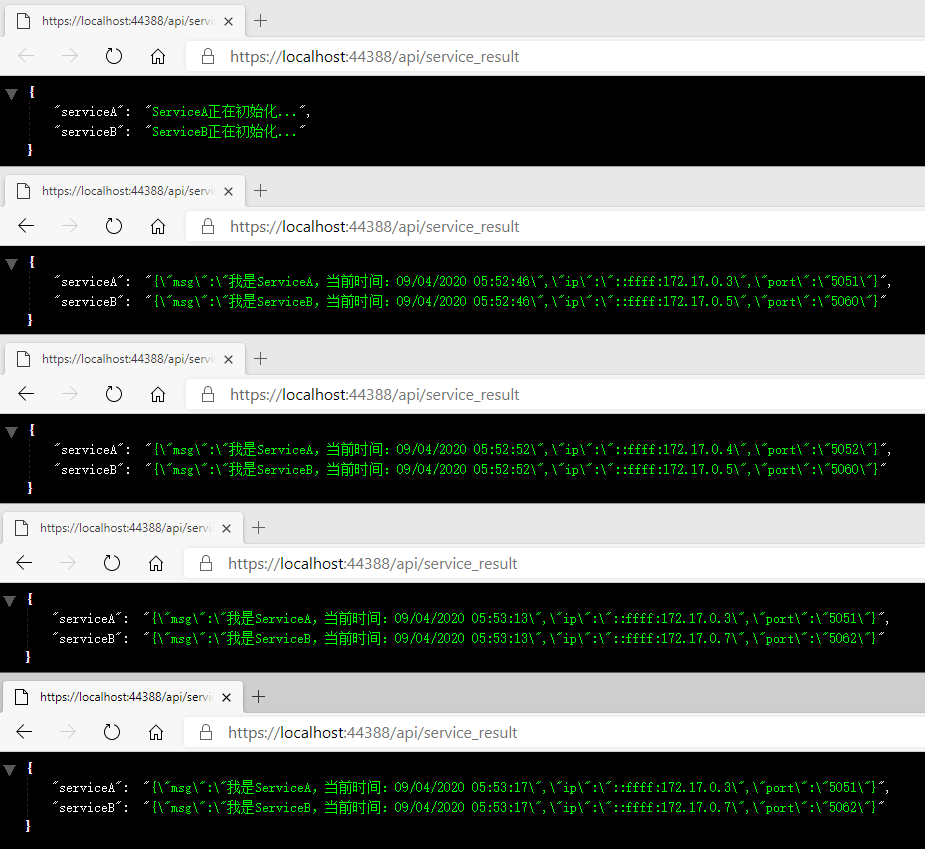
大功告成,服务注册与发现,现在就算之中的某个节点挂掉,服务也可以照常运行。


 144
144


 被折叠的 条评论
为什么被折叠?
被折叠的 条评论
为什么被折叠?
 到【灌水乐园】发言


