


android surfaceflinger研究----显示系统
http://www.cnblogs.com/armlinux/archive/2012/02/29/2396756.html
这周抽空研究了一下SurfaceFlinger,发现真正复杂的并不是SurfaceFlinger本身,而是android的display显示系统,网上关于这部分的介绍有不少,本不打算写的,但是发现还是记录一下研究代码的过程比较好,一是能够帮助自己理清思路,另一个原因就是以后当这块内容忘记的时候,能快速的通过这个记录捡起来。
一. android显示系统的建立
SurfaceFlinger对于显示的管理是通过一个或多个GraphicPlane对象(目前android只实现了一个)来管理的,
@SurfaceFlinger.h
- GraphicPlane mGraphicPlanes[1];

1. FrameBuffer的建立
framebuffer,确切的是说是linux下的framebuffer,,它是linux图形显示系统中一个与图形硬件无关的抽象层,user完全不用考虑我们的硬件设备,而仅仅使用framebuffer就可以实现对屏幕的操作。
android的framebuffer并没有被SurfaceFlinger直接使用,而是在framebuffer外做了一层包装,这个包装就是FramebufferNativeWindow,我们来看一下FramebufferNativeWindow的创建过程。
我们的framebuffer是由一个设备符fbDev来表示的,它是FramebufferNativeWindow的一个成员,我们来分析一下对fbDev的处理过程。
1.1. fbDev设备符
1.1.1 gralloc library
在这之前,先介绍一下gralloc library,它的形态如grallocBOARDPLATFORM.so, BOARDPLATFORM可以从属性ro.board.platform中获得,这篇文章中我们以Qualcommmsmx7x30为例,也就是gralloc.msm7x30.so中,它的源路径在hardware/msm7k/libgralloc-qsd8k。
framebuffer的初始化需要通过HAL gralloc.msm7x30.so 来完成与底层硬件驱动的适配,但是gralloc library并不是平台无关的,不同的vendor可能会实现自己的gralloc library,因此为了保证在创建framebuffer时能够平台无关,android只能是动态的判断并使用当前的gralloc library,android通过从gralloc library中再抽象出一个hw_module_t结构来供使用,它为framebuffer的初始化提供了需要的gralloc.msm7x30.so业务。因此通过这个hw_module_t结构我们就不需要知道当前系统使用的到底是哪个gralloc library。按规定,所有gralloc library中的这个结构体被命名为HAL_MODULE_INFO_SYM(HMI)。当前分析的系统中,HAL_MODULE_INFO_SYM在hardware/msm7k/libgralloc-qsd8k/galloc.cpp。
1.1.2 打开fbDev设备符
下面看如何打开 打开fbDev设备符。通过HAL_MODULE_INFO_SYM提供的gralloc.msm7x30.so的接口我们调用到了fb_device_open()@hardware/msm7k/libgralloc-qsd8kframebuffer.cpp。
- int fb_device_open(hw_module_tconst* module, constchar* name,
- hw_device_t** device)
- {
- int status = -EINVAL;
- if (!strcmp(name, GRALLOC_HARDWARE_FB0)) {
- alloc_device_t* gralloc_device;
- status = gralloc_open(module, &gralloc_device);
- /* initialize our state here */
- fb_context_t *dev = (fb_context_t*)malloc(sizeof(*dev));
- memset(dev, 0, sizeof(*dev));
- /* initialize the procs */
- dev->device.common.tag = HARDWARE_DEVICE_TAG;
- private_module_t* m = (private_module_t*)module;
- status = mapFrameBuffer(m);
- }
在这个函数中,主要为fbDev设备符指定一个fb_context_t实例,并通过函数mapFrameBuffer()对设备节点/dev/graphics/fb0进行操作,操作的目的有:
1.获得屏幕设备的信息,并将屏幕信息保存在HAL_MODULE_INFO_SYM(上面代码中的module)中。
2. 向/dev/graphics/fb0请求page flip模式,page
flip模式需要至少2个屏幕大小的buffer,page flip模式在后面介绍。目前android系统中设置为2个屏幕大小的buffer。当然屏幕设备可能不支持page flip模式。
mapFrameBufferLocked()@hardware/msm7k/libgralloc-qsd8k/framebuffer.cpp
- /*
- * Request NUM_BUFFERS screens (at lest 2 for page flipping)
- */
- info.yres_virtual = info.yres * NUM_BUFFERS;
- uint32_t flags = PAGE_FLIP;
- if (ioctl(fd, FBIOPUT_VSCREENINFO, &info) == -1) {
- info.yres_virtual = info.yres;
- flags &= ~PAGE_FLIP;
- LOGW("FBIOPUT_VSCREENINFO failed, page flipping not supported");
- }
3. 映射屏幕设备缓存区给fbDev设备符。
mapFrameBufferLocked()@hardware/msm7k/libgralloc-qsd8k/framebuffer.cpp
- /*
- * map the framebuffer
- */
- int err;
- size_t fbSize = roundUpToPageSize(finfo.line_length * info.yres_virtual);
- module->framebuffer = new private_handle_t(dup(fd), fbSize,
- private_handle_t::PRIV_FLAGS_USES_PMEM);
- module->numBuffers = info.yres_virtual / info.yres;
- module->bufferMask = 0;
- void* vaddr = mmap(0, fbSize, PROT_READ|PROT_WRITE, MAP_SHARED, fd, 0);
- if (vaddr == MAP_FAILED) {
- LOGE("Error mapping the framebuffer (%s)", strerror(errno));
- return -errno;
- }
- module->framebuffer->base = intptr_t(vaddr);
- memset(vaddr, 0, fbSize);
1.2 grDev设备符
在为framebuffer,也就是FramebufferNativeWindow申请内存之前,我们还要介绍一个概念,就是grDev设备符。它虽然也叫设备符,但是它和具体的设备没有直接关系,我们看它的类型就是知道了alloc_device_t,没错,grDev设备符就是为了FramebufferNativeWindow管理内存使用的。为FramebufferNativeWindow提供了申请/释放内存的接口。
1.3 FramebufferNativeWindow内存管理
- sp<NativeBuffer> buffers[2];
1.3.1 屏幕设备支持page filp模式
- // create a "fake" handles for it
- intptr_t vaddr = intptr_t(m->framebuffer->base);
- private_handle_t* hnd = new private_handle_t(dup(m->framebuffer->fd), size,
- private_handle_t::PRIV_FLAGS_USES_PMEM |
- private_handle_t::PRIV_FLAGS_FRAMEBUFFER);
- // find a free slot
- for (uint32_t i=0 ; i<numBuffers ; i++) {
- if ((bufferMask & (1LU<<i)) == 0) {
- m->bufferMask |= (1LU<<i);
- break;
- }
- vaddr += bufferSize;
- }
- hnd->base = vaddr;
- hnd->offset = vaddr - intptr_t(m->framebuffer->base);
- *pHandle = hnd;
1.3.2 屏幕设备不支持page flip模式
gralloc_alloc_framebuffer_locked()@hardware/msm7k/libgralloc-qsd8k/gpu.cpp
- const uint32_t bufferMask = m->bufferMask;
- const uint32_t numBuffers = m->numBuffers;
- const size_t bufferSize = m->finfo.line_length * m->info.yres;
- if (numBuffers == 1) {
- // If we have only one buffer, we never use page-flipping. Instead,
- // we return a regular buffer which will be memcpy'ed to the main
- // screen when post is called.
- int newUsage = (usage & ~GRALLOC_USAGE_HW_FB) | GRALLOC_USAGE_HW_2D;
- return gralloc_alloc_buffer(bufferSize, newUsage, pHandle);
- }
2. 打开Overlay
- if (hw_get_module(OVERLAY_HARDWARE_MODULE_ID, &module) == 0) {
- overlay_control_open(module, &mOverlayEngine);
- }
3. 选择OpenGL ES library(也即软/硬件加速)
- 0 0 android
- 0 1 adreno200
- libGLESv1_CM_adreno200.so
- libGLESv2_adreno200.so
- libEGL_adreno200.so
3.1 OpenGL初始化
frameworks/base/opengl/libs/EGL/egl.cpp
- static egl_connection_t gEGLImpl[IMPL_NUM_IMPLEMENTATIONS];
- enum {
- IMPL_HARDWARE = 0,
- IMPL_SOFTWARE,
- IMPL_NUM_IMPLEMENTATIONS
- };
gEGLImpl[IMPL_HARDWARE]中保存着硬件图形设备的OpenGL api地址,从
- libGLESv1_CM_adreno200.so
- libGLESv2_adreno200.so
- libEGL_adreno200.so
3.2 EGL和GLES api
- enum {
- EGL = 0x01,
- GLESv1_CM = 0x02,
- GLESv2 = 0x04
- };

3.3 OpenGL config
3.3.1 系统默认pixel format
- if(info.bits_per_pixel == 32) {
- /*
- * Explicitly request RGBA_8888
- */
- /* Note: the GL driver does not have a r=8 g=8 b=8 a=0 config, so if we do
- * not use the MDP for composition (i.e. hw composition == 0), ask for
- * RGBA instead of RGBX. */
- if (property_get("debug.sf.hw", property, NULL) > 0 && atoi(property) == 0)
- module->fbFormat = HAL_PIXEL_FORMAT_RGBX_8888;
- else if(property_get("debug.composition.type", property, NULL) > 0 && (strncmp(property,"mdp", 3) == 0))
- module->fbFormat = HAL_PIXEL_FORMAT_RGBX_8888;
- else
- module->fbFormat = HAL_PIXEL_FORMAT_RGBA_8888;
- } else {
- /*
- * Explicitly request 5/6/5
- */
- module->fbFormat = HAL_PIXEL_FORMAT_RGB_565;
- }
3.3.2 config初始化
所有的OpenGL库提供的config,同样需要将软硬两种模式的各自的OpenGL config提取出来供系统使用,如同OpenGL api地址一样。OpenGL config提取出来后保存在另外一个全局变量- static egl_display_t gDisplay[NUM_DISPLAYS];
- // EGLDisplay are global, not attached to a given thread
- const unsigned int NUM_DISPLAYS = 1;
- <strong> </strong> // sort our configurations so we can do binary-searches
- qsort( dp->configs,
- dp->numTotalConfigs,
- sizeof(egl_config_t), cmp_configs);<strong>
- </strong>
3.3.3 config选择
3.3.3.1 满足属性要求
- // initialize EGL
- EGLint attribs[] = {
- EGL_SURFACE_TYPE, EGL_WINDOW_BIT,
- EGL_NONE, 0,
- EGL_NONE
- };
3.3.3.2 满足RGBA要求
- static GGLFormat const gPixelFormatInfos[] =
- { // Alpha Red Green Blue
- { 0, 0, {{ 0, 0, 0, 0, 0, 0, 0, 0 }}, 0 }, // PIXEL_FORMAT_NONE
- { 4, 32, {{32,24, 8, 0, 16, 8, 24,16 }}, GGL_RGBA }, // PIXEL_FORMAT_RGBA_8888
format信息,去和openGL的config比较,得到想要的config。
- EGLConfig* const configs = (EGLConfig*)malloc(sizeof(EGLConfig)*numConfigs);
- if (eglChooseConfig(dpy, attrs, configs, numConfigs, &n) == EGL_FALSE) {
- free(configs);
- return BAD_VALUE;
- }
- const int fbSzA = fbFormatInfo.getSize(PixelFormatInfo::INDEX_ALPHA);
- const int fbSzR = fbFormatInfo.getSize(PixelFormatInfo::INDEX_RED);
- const int fbSzG = fbFormatInfo.getSize(PixelFormatInfo::INDEX_GREEN);
- const int fbSzB = fbFormatInfo.getSize(PixelFormatInfo::INDEX_BLUE);
- int i;
- EGLConfig config = NULL;
- for (i=0 ; i<n ; i++) {
- EGLint r,g,b,a;
- EGLConfig curr = configs[i];
- eglGetConfigAttrib(dpy, curr, EGL_RED_SIZE, &r);
- eglGetConfigAttrib(dpy, curr, EGL_GREEN_SIZE, &g);
- eglGetConfigAttrib(dpy, curr, EGL_BLUE_SIZE, &b);
- eglGetConfigAttrib(dpy, curr, EGL_ALPHA_SIZE, &a);
- if (fbSzA <= a && fbSzR <= r && fbSzG <= g && fbSzB <= b) {
- config = curr;
- break;
- }
- }
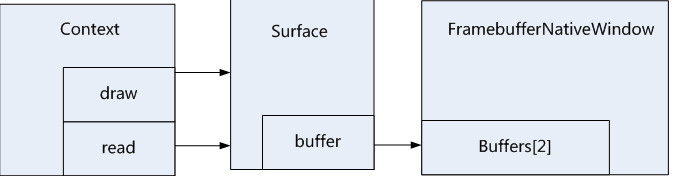
4. 创建main surface
5. 创建 OpenGL ES 上下文
AnOpenGL context represents many things. A context stores all of the state associated with this instance of OpenGL. It represents the (potentially visible)default framebufferthat rendering commands will draw to when not drawing to aframebuffer object. Think of a context as an object that holds all of OpenGL; when a context is destroyed, OpenGL is destroyed.
http://www.opengl.org/wiki/OpenGL_context
具体的创建过程专业术语太多,也没有仔细研究不再介绍。
6. 绑定context和surface
6.1 多线程支持
- ogles_context_t* current = (ogles_context_t*)getGlThreadSpecific();
- if (gl) {
- egl_context_t* c = egl_context_t::context(gl);
- if (c->flags & egl_context_t::IS_CURRENT) {
- if (current != gl) {
- // it is an error to set a context current, if it's already
- // current to another thread
- return -1;
- }
- } else {
- if (current) {
- // mark the current context as not current, and flush
- glFlush();
- egl_context_t::context(current)->flags &= ~egl_context_t::IS_CURRENT;
- }
- }
- if (!(c->flags & egl_context_t::IS_CURRENT)) {
- // The context is not current, make it current!
- setGlThreadSpecific(gl);
- c->flags |= egl_context_t::IS_CURRENT;
- }
- // cur_c has to be valid here (but could be terminated)
- if (ctx != EGL_NO_CONTEXT) {
- setGlThreadSpecific(c->cnx->hooks[c->version]);
- setContext(ctx);
- _c.acquire();
- } else {
- setGlThreadSpecific(&gHooksNoContext);
- setContext(EGL_NO_CONTEXT);
- }
尽管openGL 实现了多线程的支持,目前我从代码中别没有找到多线程的使用。
6.2 设置surface和context之间的关系
- // Unbind the context from this thread
- eglMakeCurrent(display, EGL_NO_SURFACE, EGL_NO_SURFACE, EGL_NO_CONTEXT);
- // initialize primary screen
- // (other display should be initialized in the same manner, but
- // asynchronously, as they could come and go. None of this is supported
- // yet).
- const GraphicPlane& plane(graphicPlane(dpy));
- const DisplayHardware& hw = plane.displayHardware();
- const uint32_t w = hw.getWidth();
- const uint32_t h = hw.getHeight();
- const uint32_t f = hw.getFormat();
- hw.makeCurrent();
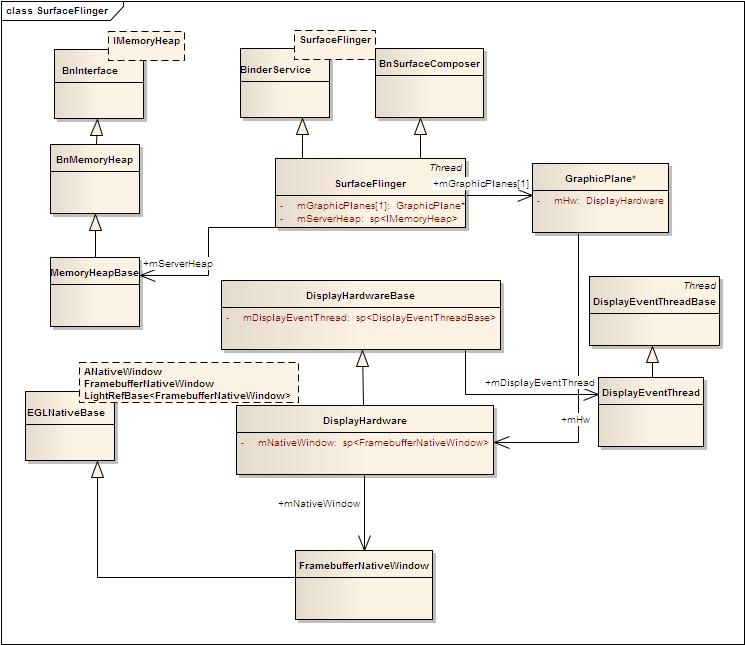
下图为这个图形系统的类图结构。
原文二:
android surfaceflinger研究----Surface机制
链接:http://blog.csdn.net/windskier/article/details/7041610
前一篇文章介绍了android的显示系统,这篇文章中,我们把视角往上层移动一下,研究一下framework是如何与surfaceflinger进行业务交互的。如何创建surface,如何显示窗口等等,所有的这一切都是通过系统服务WindowManagerService与surfaceflinger来进行的。
android中的Surface机制这一块代码写的比较难理解,光叫Surface的类就有3个,因此本篇文章从两部分来分析,首先,想要理解Surface机制,还是需要首先理清各个类之间的关系。其次,在理解了整个Surface机制的类关系之后,到时我们再结合前一篇文章中对显示系统的介绍,研究一下一个Surface是如何和显示系统建立起联系来的,这个联系主要是指Surface的显示buffer的存储管理。在下篇文章中,再分析SurfaceFlinger是如何将已经存储了窗口图形数据的Surface Buffer显示到显示系统中。。
1. Surface机制的静态关系
将这一部分叫做Surface机制,是有别于SurfaceFlinger而言的,android的图形系统中,作为C/S模型两端的WMS和SurfaceFlinger是图形系统业务的核心,但是不把WMS和SurfaceFlinger中间的这层联系搞清楚的话,是很难理解整个图形系统的,在本文中我将两者之间的这个联系关系称之为Surface机制,它的主要任务就是创建一个Surface,ViewRoot在这个Surface上描绘当前的窗口,SurfaceFlinger将这个Surface flinger(扔)给显示系统将其呈现在硬件设备上。其实这里这个Surface在不同的模块中是以不同的形态存在的,唯一不变的就是其对应的显示Buffer。

1.1 ViewRoot和WMS共享Surface
我们知道每个Activity都会有一个ViewRoot作为Activity Window与WMS交互的接口,ViewRoot会绘制整个Activity的窗口View到Surface上,因此我们在ViewRoot中就有了创建Surface的需求。看一下代码中的Surface的定义:relayoutWindow()@ViewRoot.java
- <span style="font-size:13px;"> private final Surface mSurface = new Surface();</span>
- <span style="font-size:13px;"> public Surface() {
- if (DEBUG_RELEASE) {
- mCreationStack = new Exception();
- }
- mCanvas = new CompatibleCanvas();
- }</span>
relayoutWindow()@ViewRoot.java
- <span style="font-size:13px;"> int relayoutResult = sWindowSession.relayout(
- mWindow, params,
- (int) (mView.mMeasuredWidth * appScale + 0.5f),
- (int) (mView.mMeasuredHeight * appScale + 0.5f),
- viewVisibility, insetsPending, mWinFrame,
- mPendingContentInsets, mPendingVisibleInsets,
- mPendingConfiguration, mSurface);</span>
- <span style="font-size:13px;"> Surface surface = win.createSurfaceLocked();
- if (surface != null) {
- outSurface.copyFrom(surface);
- win.mReportDestroySurface = false;
- win.mSurfacePendingDestroy = false;
- if (SHOW_TRANSACTIONS) Slog.i(TAG,
- " OUT SURFACE " + outSurface + ": copied");
- } else {</span>
1.2 SurfaceSession
SurfaceSession可以认为是创建Surface过程中,WMS和SurfaceFlinger之间的会话层,通过这个SurfaceSession实现了Surface的创建。

SurfaceSession是JAVA层的概念,@SurfaceSession.java。它对应的native实体是一个SurfaceComposerClient对象。
SurfaceComposerClient通过ComposerService类来获得SurfaceFlinger的IBinder接口,但是光获得SurfaceFlinger的IBinder接口是不够的,要想请求SurfaceFlinger创建一个Surface,还需要向SurfaceFlinger获得一个IBinder接口ISurfaceComposerClient,通过这个ISurfaceComposerClient来请求SurfaceFlinger创建一个Surface,为什么这么绕呢,为什么不直接让SurfaceFlinger创建Surface呢?
站在SurfaceFlinger的角度来考虑,对于SurfaceFlinger来说,可能有多个Client来请求SurfaceFlinger的业务,每个Client可能会请求SurfaceFlinger创建多个Surface,那么SurfaceFlinger本地需要提供一套机制来保存每个client请求创建的Surface,SurfaceFlinger通过为每个client创建一个Client对象实现这个机制,并将这个Client的IBinder接口ISurfaceComposerClient返给SurfaceComposerClient对象。SurfaceComposerClient对象在通过ISurfaceComposerClient去请求创建Surface。
@SurfaceFlinger.h
- class Client : public BnSurfaceComposerClient
@SurfaceComposerClient.cpp
- void SurfaceComposerClient::onFirstRef()
- {
- sp<ISurfaceComposer> sm(getComposerService());
- if (sm != 0) {
- sp<ISurfaceComposerClient> conn = sm->createConnection();
- if (conn != 0) {
- mClient = conn;
- Composer::addClient(this);
- mPrebuiltLayerState = new layer_state_t;
- mStatus = NO_ERROR;
- }
- }
- }
下图描述了整个SurfaceSession的内部结构与工作流程。
其中蓝色箭头是SurfaceComposerClient通过ComposerService获得SurfaceFlinger的IBinder接口ISurfaceComposer过程;
红色箭头表示SurfaceComposerClient通过IPC请求SurfaceFlinger创建Client的过程,并获得Client的IBinder接口ISurfaceComposerClient;
绿色箭头表示SurfaceComposerClient通过IPC请求Client创建Surface。

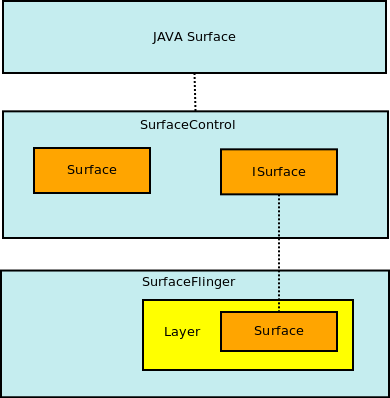
1.3 Surface的形态
上一节我们分析了SurfaceSession的静态结构,得知Surface的创建过程是通过SurfaceSession这个中间会话层去请求SurfaceFlinger去创建的,并且这篇文章中,我们说了半天Surface了,那么究竟我们要创建的Surface究竟是什么样的一个东西呢,它的具体形态是什么呢?这一小节我们就来分析以下Surface的形态。
1.3.1 client端Surface的形态
首先,我们看一下Surface在WMS中定义的代码
createSurfaceLocked()@WindowManagerService.java
- mSurface = new Surface(
- mSession.mSurfaceSession, mSession.mPid,
- mAttrs.getTitle().toString(),
- 0, w, h, mAttrs.format, flags);
@Surface.java
- public Surface(SurfaceSession s,
- int pid, int display, int w, int h, int format, int flags)
- throws OutOfResourcesException {
- if (DEBUG_RELEASE) {
- mCreationStack = new Exception();
- }
- mCanvas = new CompatibleCanvas();
- init(s,pid,null,display,w,h,format,flags);
- }
Native 函数init回调到SurfaceComposerClient的createSurface()函数,往下的过程在上一节的图中描述的很清楚,流程就不介绍了,同时我们先不管SurfaceFlinger为SurfaceComposerClient创建的Surface到底是一个什么东西,我们先看看SurfaceComposerClient为WMS创建的是一个什么东西?
@SurfaceComposerClient.cpp
- sp<SurfaceControl> SurfaceComposerClient::createSurface(
- int pid,
- const String8& name,
- DisplayID display,
- uint32_t w,
- uint32_t h,
- PixelFormat format,
- uint32_t flags)
- {
- sp<SurfaceControl> result;
- if (mStatus == NO_ERROR) {
- ISurfaceComposerClient::surface_data_t data;
- sp<ISurface> surface = mClient->createSurface(&data, pid, name,
- display, w, h, format, flags);
- if (surface != 0) {
- result = new SurfaceControl(this, surface, data, w, h, format, flags);
- }
- }
- return result;
- }
从上面的代码我们可以看出,SurfaceComposerClient为WMS返回的是一个SurfaceControl对象,这个SurfaceControl对象包含了surfaceFlinger为SurfaceComposerClient创建的surface,这个surfaceFlinge创建的Surface在Client端的形态为ISurface。这个过程下面分析SurfaceFlinger端的Surface形态时会看到。
SurfaceControl类中还有一个非常重要的成员,它的类型也叫做Surface,定义在frameworks/base/libs/surfaceflinger/Surface.h。这个Surface提供了显示Buffer的管理。在文章的后面再介绍。
@frameworks/base/libs/surfaceflinger_client/Surface.cpp
- sp<Surface> SurfaceControl::getSurface() const
- {
- Mutex::Autolock _l(mLock);
- if (mSurfaceData == 0) {
- mSurfaceData = new Surface(const_cast<SurfaceControl*>(this));
- }
- return mSurfaceData;
- }
1.3.2 SurfaceFlinger端Surface形态
- sp<Layer> normalLayer;
- switch (flags & eFXSurfaceMask) {
- case eFXSurfaceNormal:
- if (UNLIKELY(flags & ePushBuffers)) {
- layer = createPushBuffersSurface(client, d, w, h, flags);
- } else {
- normalLayer = createNormalSurface(client, d, w, h, flags, format);
- layer = normalLayer;
- }
- break;
- case eFXSurfaceBlur:
- layer = createBlurSurface(client, d, w, h, flags);
- break;
- case eFXSurfaceDim:
- layer = createDimSurface(client, d, w, h, flags);
- break;
- }
- if (layer != 0) {
- layer->initStates(w, h, flags);
- layer->setName(name);
- ssize_t token = addClientLayer(client, layer);
- surfaceHandle = layer->getSurface();
- if (surfaceHandle != 0) {
- params->token = token;
- params->identity = surfaceHandle->getIdentity();
- params->width = w;
- params->height = h;
- params->format = format;
- if (normalLayer != 0) {
- Mutex::Autolock _l(mStateLock);
- mLayerMap.add(surfaceHandle->asBinder(), normalLayer);
- }
- }
当client请求SurfaceFlinger创建Surface时,SurfaceFlinger首先根据WMS提供的窗口的属性来一个命名为Layer概念的对象,然后再根据Layer创建它的子类对象LayerBaseClient::Surface。此时第三个名为Surface类出现了,下一节我们来介绍一下这个Layer的概念。
1.4 Layer

1.4.1 Layer的分类
目前,android中有4中Layer类型,如上图所示。
1. Layer, 普通的Layer,它为每个Client端请求的Surface创建显示Buffer。
2. LayerBuffer,这种Layer它并不会创建显示Buffer,它只是使用已有的Buffer作为显示Buffer,如Camera的preview;
3. LayerBlur,这种Layer也不会创建显示Buffer,它只是将通过这个Layer将原来FrameBuffer上的数据进行模糊处理;
4. LayerDim,这种Layer也不会创建显示Buffer,它只是将通过这个Layer将原来FrameBuffer上的数据进行暗淡处理;
从这中Layer看出,我们分析的重点就是第一种Layer,下面我们着重分析一下普通的Layer。Layer的具体业务我们在下一篇文章中分析
1.4.2 Layer的管理
上文我们在分析SurfaceSession的时候,也分析过,一个Client可能会创建多个Surface,也就是要创建多个Layer,那么SurfaceFlinger端如何管理这个写个Layer呢?SurfaceFlinger维护了2个Vector来管理Layer。
第一种方式,我们知道SurfaceFlinger会为每个SurfaceSession创建一个Client对象,这第一种方式就是将所有为某一个SurfacSession创建的Layer保存在它对应的Client对象中。
SurfaceFlinger::createSurface()@SurfaceFlinger.cpp
- ssize_t token = addClientLayer(client, layer);
第二种方式,将所有的创建的普通的Layer保存起来,以便Client Surface在请求实现Buffer时能够辨识Client Surface对应的Layer。
SurfaceFlinger::createSurface()@SurfaceFlinger.cpp
- mLayerMap.add(surfaceHandle->asBinder(), normalLayer);
2. Surface 显示Buffer的存储管理
在前文介绍Client端的Surface形态的内容时,我们提到SurfaceControl中还会维护一个名为Surface对象,它定义在 frameworks/base/libs/surfaceflinger/Surface.h中,它负责向LayerBaseClient::Surface请求显示Buffer,同时将显示Buffer交给JAVA Surface的Canvas去绘制窗口,我们称这个Surface为Client Surface。
2.1 窗口绘制
draw()@ViewRoot.java
- Canvas canvas;
- try {
- int left = dirty.left;
- int top = dirty.top;
- int right = dirty.right;
- int bottom = dirty.bottom;
- canvas = surface.lockCanvas(dirty);
- if (left != dirty.left || top != dirty.top || right != dirty.right ||
- bottom != dirty.bottom) {
- mAttachInfo.mIgnoreDirtyState = true;
- }
- // TODO: Do this in native
- canvas.setDensity(mDensity);
- static jobject Surface_lockCanvas(JNIEnv* env, jobject clazz, jobject dirtyRect)
- {
- const sp<Surface>& surface(getSurface(env, clazz));
- if (!Surface::isValid(surface))
- return 0;
- SkCanvas* nativeCanvas = (SkCanvas*)env->GetIntField(canvas, no.native_canvas);
- SkBitmap bitmap;
- ssize_t bpr = info.s * bytesPerPixel(info.format);
- bitmap.setConfig(convertPixelFormat(info.format), info.w, info.h, bpr);
- if (info.format == PIXEL_FORMAT_RGBX_8888) {
- bitmap.setIsOpaque(true);
- }
- if (info.w > 0 && info.h > 0) {
- bitmap.setPixels(info.bits);
- } else {
- // be safe with an empty bitmap.
- bitmap.setPixels(NULL);
- }
- nativeCanvas->setBitmapDevice(bitmap);
- SkRegion clipReg;
- if (dirtyRegion.isRect()) { // very common case
- const Rect b(dirtyRegion.getBounds());
- clipReg.setRect(b.left, b.top, b.right, b.bottom);
- } else {
- size_t count;
- Rect const* r = dirtyRegion.getArray(&count);
- while (count) {
- clipReg.op(r->left, r->top, r->right, r->bottom, SkRegion::kUnion_Op);
- r++, count--;
- }
- }
- nativeCanvas->clipRegion(clipReg);
- int saveCount = nativeCanvas->save();
- env->SetIntField(clazz, so.saveCount, saveCount);
- if (dirtyRect) {
- const Rect& bounds(dirtyRegion.getBounds());
- env->SetIntField(dirtyRect, ro.l, bounds.left);
- env->SetIntField(dirtyRect, ro.t, bounds.top);
- env->SetIntField(dirtyRect, ro.r, bounds.right);
- env->SetIntField(dirtyRect, ro.b, bounds.bottom);
- }
- return canvas;
- }
上面的代码,我们可以看出,Canvas的Bitmap设备的设置了Client Surface的显示Buffer为其Bitmap pixel存储空间。
- bitmap.setPixels(info.bits);
这样Canvas的绘制空间就有了。下一步就该绘制窗口了。
draw()@ViewRoot.java
- try {
- canvas.translate(0, -yoff);
- if (mTranslator != null) {
- mTranslator.translateCanvas(canvas);
- }
- canvas.setScreenDensity(scalingRequired
- ? DisplayMetrics.DENSITY_DEVICE : 0);
- mView.draw(canvas);
- }
2.2 Client Surface的初始化
Client Surface的创建是从ViewRoot首次Lock canvas时进行的,这么做的目的可能也是为了节约空间,减少不必要的开支。
Client Surface的初始化和显示Buffer的管理过程比较复杂,下图给出了这一部分的一个静态结构图,有些东西从图上表现不出来,下面我简单的介绍一下。
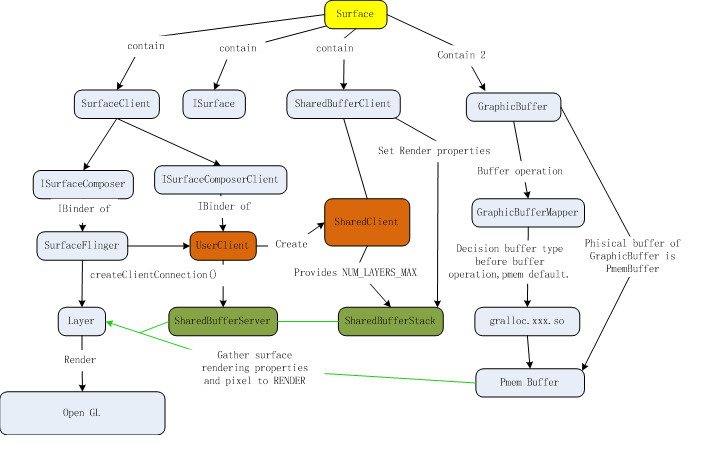
2.2.1 SharedClient
SharedClient是这一部分实现的关键所在,它并不是一个每个Client Surface创建时都会被创建的,整个系统中只有一个SharedClient对象,并且它是在共享内存上创建的,下面代码中可以看出,UserClient在初始化时,提供了一个MemoryHeapBase来供SharedClient创建,MemoryHeapBase是创建的共享内存。@SurfaceFlinger.cpp
- UserClient::UserClient(const sp<SurfaceFlinger>& flinger)
- : ctrlblk(0), mBitmap(0), mFlinger(flinger)
- {
- const int pgsize = getpagesize();
- const int cblksize = ((sizeof(SharedClient)+(pgsize-1))&~(pgsize-1));
- mCblkHeap = new MemoryHeapBase(cblksize, 0,
- "SurfaceFlinger Client control-block");
- ctrlblk = static_cast<SharedClient *>(mCblkHeap->getBase());
- if (ctrlblk) { // construct the shared structure in-place.
- new(ctrlblk) SharedClient;
- }
- }
SharedClient对象的主要目的其实很简单,就是为系统提供了SharedBufferStack::NUM_LAYERS_MAX(GB上为31)个SharedBufferStack。也就是目前系统同时支持31个Client Surface的创建。关于SharedBufferStack下面再做介绍。
为什么需要将SharedClient设计为共享内存呢?每个Client Surface需要的SharedBufferStack寄存在SharedClient中,而对于每个SharedBufferStack,一方面,Client Surface需要对它进行一些区域尺寸等的设置;另一方面,在render时,Layer需要获得当前Client Surfce对应的SharedBufferStack中获得区域尺寸等设置信息。
class SharedClient@SharedBufferStack.h
- SharedBufferStack surfaces[ SharedBufferStack::NUM_LAYERS_MAX ];
2.2.2 SharedBufferStack
- status_t setDirtyRegion(int buffer, const Region& reg);
- status_t setCrop(int buffer, const Rect& reg);
- status_t setTransform(int buffer, uint8_t transform);
- volatile int32_t head; // server's current front buffer
- volatile int32_t available; // number of dequeue-able buffers
这里将Client Surface的GraphicBuffer的创建过程以时序图的形式展现出来。
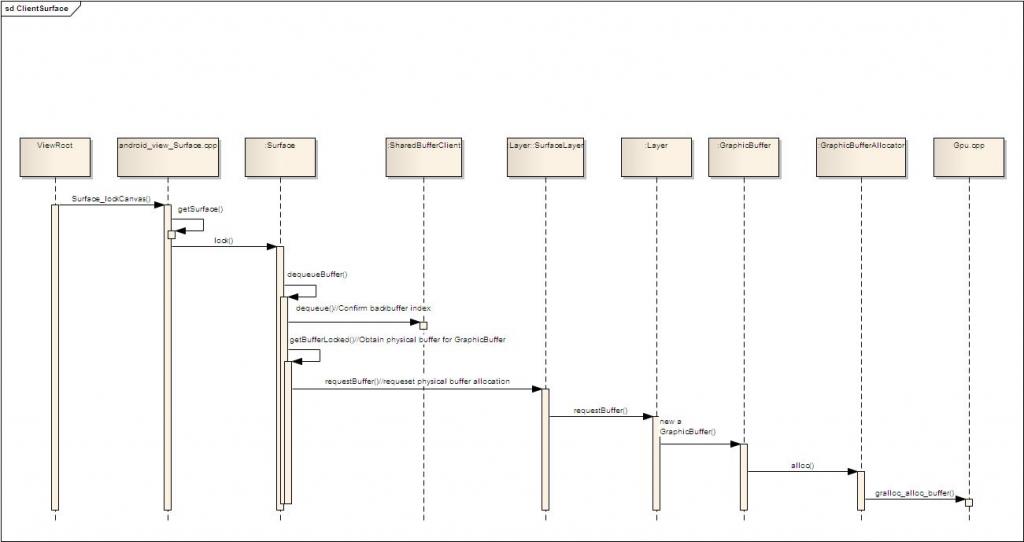
这里需要注意的是,Client Surface的2个GraphicBuffer只有在lock()时才会去创建,而不是在Client Surface被创建的时候创建的。
原文三:
android surfaceflinger研究----SurfaceFlinger loop
链接:http://blog.csdn.net/windskier/article/details/7060995
上一篇文章介绍了整个Surface机制(我是这么称呼的,主要是Surface的建立,Surface的显示存储的管理),同时我们也介绍过了整个显示系统,那么这篇文章就介绍一下SurfaceFlinger 这个核心服务层的机制。
从代码中我们可以看出SurfaceFlinger 是一个thread,运行在system_server进程中,并且其threadLoop()方法的返回值为true,因此它是一个循环的loop。这样保证了SurfaceFlinger业务的循环周期性。
首先,先来个综述,下图是我总结的一个SurfaceFlinger结构的概括图:

1. SurfaceFlinger的同步
SurfaceFlinger 并不是时时刻刻都在执行业务中,当WMS请求SurfaceFlinger创建Surface,或者WMS对Surface进行属性设置时,我们希望此时的SurfaceFlinger并不进行显示操作,以保证对Surface的线程保护,因此SurfaceFlinger 的loop中实现了同步机制。
- waitForEvent();
主要的同步情况有如下几种,当然也有其他一些要求SurfaceFlinger同步的情况,不够对于研究SurfaceFlinger就不太重要了
1. 创建Surface同步
假如当前只有一个Client,比如WMS请求SufaceFlinger创建一个Surface,那么此时应该保持SurfaceFlinger loop处在block状态,因为这个过程涉及到对一些成员变量的处理,为了保证同步而需要hold住整个loop。
2. 设置Surface属性或SurfaceFlinger属性同步
创建完Surface之后,WMS会请求SurfaceFlinger对其Layer进行属性设置或者对SurfaceFlinger的属性进行设置,如上面概括图中SurfaceComposerClient中的函数接口。
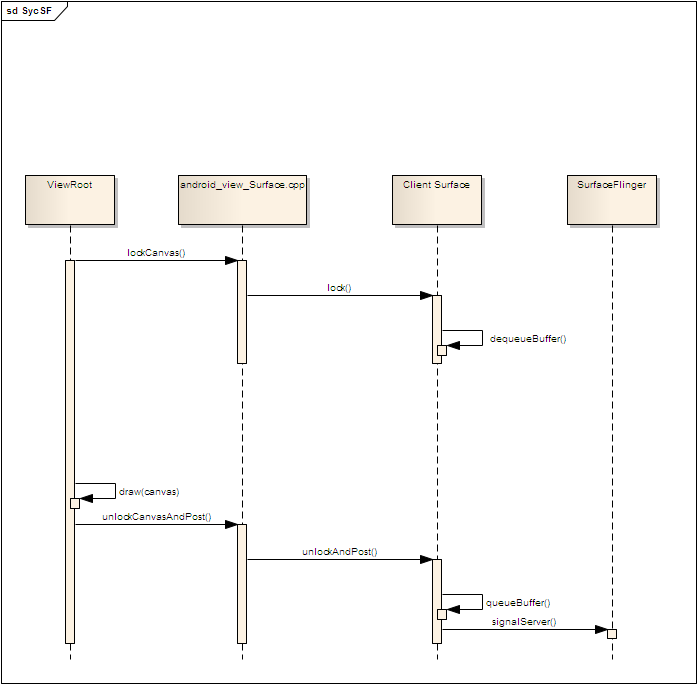
3. Surface绘制同步
当ViewRoot对Surface进行绘制时,同样需要将SurfaceFlinger hold住,当整个窗口绘制完成之后,再向SurfaceFlinger发送signal信号。如下面时序图所示。
4. freeze/unfreeze同步
当每个Activity启动的时候,AMS都会请求WMS freeze整个屏幕,当Activity启动之后,再unfreeze整个屏幕,我猜测这么做的目的是为了保证在Activity以及Activity的窗口在创建过程中,对Activity窗口的Surface进行的线程保护,以免出现屏幕的闪烁等用户体验较差的现象。
2. Layer存储
在SurfaceFlinger中,Layer是怎么样存储的呢?所有的Layer,不论是那个Client创建的Layer,均保存在一个名为layersSortedByZ的变量中,也就是说WMS请求创建的Surface的Layer和其他Client请求创建的Layer都保存在layersSortedByZ中,但是layersSortedByZ保存过程中则遵守一定的规则。下面代码中的do_compare揭示了这个规则。
@SurfaceFlinger.h
- class LayerVector : public SortedVector< sp<LayerBase> > {
- public:
- LayerVector() { }
- LayerVector(const LayerVector& rhs) : SortedVector< sp<LayerBase> >(rhs) { }
- virtual int do_compare(const void* lhs, const void* rhs) const {
- const sp<LayerBase>& l(*reinterpret_cast<const sp<LayerBase>*>(lhs));
- const sp<LayerBase>& r(*reinterpret_cast<const sp<LayerBase>*>(rhs));
- // sort layers by Z order
- uint32_t lz = l->currentState().z;
- uint32_t rz = r->currentState().z;
- // then by sequence, so we get a stable ordering
- return (lz != rz) ? (lz - rz) : (l->sequence - r->sequence);
- }
- };
1. 首先,按照Layer的Z-order值来排序,Z-order值小的,放在layersSortedByZ低索引值位置;
2. 其次,如果两个Layer Z-order值相同,sequence值小的,放在layersSortedByZ低索引值位置;
Z-order值如何确定?
WMS根据不同的Window Type来确定Z-order值,Z-order = LAYER*TYPE_LAYER_MULTIPLIER + TYPE_LAYER_OFFSET。
根据下面代码中的不同的Window Type的LAYER值,可以确定Z-order值,例如TYPE_APPLICATION窗口,其
Z-order = 2*10000+1000 = 21000。
@PhoneWindowManager.java
- // wallpaper is at the bottom, though the window manager may move it.
- static final int WALLPAPER_LAYER = 2;
- static final int APPLICATION_LAYER = 2;
- static final int PHONE_LAYER = 3;
- static final int SEARCH_BAR_LAYER = 4;
- static final int STATUS_BAR_PANEL_LAYER = 5;
- static final int SYSTEM_DIALOG_LAYER = 6;
- // toasts and the plugged-in battery thing
- static final int TOAST_LAYER = 7;
- static final int STATUS_BAR_LAYER = 8;
- // SIM errors and unlock. Not sure if this really should be in a high layer.
- static final int PRIORITY_PHONE_LAYER = 9;
- // like the ANR / app crashed dialogs
- static final int SYSTEM_ALERT_LAYER = 10;
- // system-level error dialogs
- static final int SYSTEM_ERROR_LAYER = 11;
- // on-screen keyboards and other such input method user interfaces go here.
- static final int INPUT_METHOD_LAYER = 12;
- // on-screen keyboards and other such input method user interfaces go here.
- static final int INPUT_METHOD_DIALOG_LAYER = 13;
- // the keyguard; nothing on top of these can take focus, since they are
- // responsible for power management when displayed.
- static final int KEYGUARD_LAYER = 14;
- static final int KEYGUARD_DIALOG_LAYER = 15;
- // things in here CAN NOT take focus, but are shown on top of everything else.
- static final int SYSTEM_OVERLAY_LAYER = 16;
- static final int SECURE_SYSTEM_OVERLAY_LAYER = 17;
sequence值如何确定?
sequence值是根据Layer的创建的顺序来维护这个序列值,下面代码中的LayerBase的构造函数中的sequence值,每创建一个Layer,sSequence加一赋值给sequence。
@LayerBase.cpp
- int32_t LayerBase::sSequence = 1;
- LayerBase::LayerBase(SurfaceFlinger* flinger, DisplayID display)
- : dpy(display), contentDirty(false),
- sequence(uint32_t(android_atomic_inc(&sSequence))),
- mFlinger(flinger),
- mNeedsFiltering(false),
- mOrientation(0),
- mLeft(0), mTop(0),
- mTransactionFlags(0),
- mPremultipliedAlpha(true), mName("unnamed"), mDebug(false),
- mInvalidate(0)
- {
- const DisplayHardware& hw(flinger->graphicPlane(0).displayHardware());
- mFlags = hw.getFlags();
- mBufferCrop.makeInvalid();
- mBufferTransform = 0;
- }
3. 属性更新
这一节的所描述的实现都在函数handleTransactionLocked()中。
从上面概括图中可以看出,WMS可以对SurfaceFlinger进行属性设置,也可以对当前的Surface对应的Layer进行属性设置,因此handleTransactionLocked()函数就是对SurfaceFlinger属性和设置了新属性的Layer的属性更新。
- enum {
- eTransactionNeeded = 0x01,
- eTraversalNeeded = 0x02
- };
如果SurfaceFlinger属性被设置了新内容,则SurfaceFlinger会记录标志eTransactionNeeded;如果layer属性被设置了新内容,那么
SurfaceFlinger会记录标志eTraversalNeeded。handleTransactionLocked()通过记录的标志来执行各自的属性得更新。‘
这里提到的属性的更新,主要是看SurfaceFlinger或者laye新设置的属性与旧的属性相比,哪些属性做了修改,然后
记录下来,在接下来的SurfaceFlinger loop中使用新的属性来显示图形。
类SurfaceFlinger 和Layer中各自定义了两个属性的变量,其中mCurrentState为新设置属性,mDrawingState为显示图形时用到的属性,一般为旧属性。不过类SurfaceFlinger 和Layer分别定义了不同的State类。
- State mCurrentState;
- State mDrawingState;
4. 图形缓存
这一部分的的实现在函数handlePageFlip()中。
有这么一种可能,当前显示到显示设备上的layer不止一个,而且layer是按照Z-Order的顺序来叠加到OpenGL的surface上的,那么这就需要layer的Z-Order值和坐标来确定每个layer能够被显示的区域。
4.1 page flip
前面一篇文章中介绍过,每个surface均有2个buffer供使用,一个作为FronteBuffer供SurfaceFlinger去显示,另外一个作为BackBuffer供ViewRoot去绘制窗口。因此在显示各个layer之前,我们需要做一个page flip过程,将当前的已经绘制了应用窗口的BackBuffer选择为FrontBuffer,用于显示;将之前的已经显示完成的FrontBuffer在重置为BackBuffer供ViewRoot去绘制。
而实现这个page flip的过程很简单
lockPageFlip()@Layer.cpp
- ssize_t buf = lcblk->retireAndLock();
SharedBufferServer::RetireUpdate::operator()@SharedBufferStack.cpp
- head = (head + 1) % numBuffers;

4.2 纹理初始化
为每个Buffer的纹理进行初始化,为当前的纹理创建一个EGLImageKHR,将当前的Buffer最为该EGLImageKHR的源。这样OpenGL就可以进行纹理映射。
lockPageFlip()@Layer.cpp
- /* a buffer was posted, so we need to call reloadTexture(), which
- * will update our internal data structures (eg: EGLImageKHR or
- * texture names). we need to do this even if mPostedDirtyRegion is
- * empty -- it's orthogonal to the fact that a new buffer was posted,
- * for instance, a degenerate case could be that the user did an empty
- * update but repainted the buffer with appropriate content (after a
- * resize for instance).
- */
- reloadTexture( mPostedDirtyRegion );
4.3 计算显示区域
通过layer的叠加,我们可以计算出总的显示区域以及每个layer需要显示的区域,它的实现在computeVisibleRegions()函数中。这个函数主要计算了layer叠加后的总的显示区域,以及每个layer需要显示的区域。整个的计算过程比较简单,只是需要注意不透明区域的处理,computeVisibleRegions()需要计算出一个不透明区域,通过这个不透明区域验证WMS提供给layer的区域是否正确。即下面代码中的mWormholeRegion计算,mWormholeRegion为屏幕区域减去不透明区域,正常情况mWormholeRegion应该为空,即不透明区域范围应该为屏幕区域,如果不透明区域小雨屏幕区域,那么说明当前的应用程序出现了设置的错误。今天有个网友就出现了这个问题。
handlePageFlip()
- const Region screenRegion(hw.bounds());
- if (visibleRegions) {
- Region opaqueRegion;
- computeVisibleRegions(currentLayers, mDirtyRegion, opaqueRegion);
- /*
- * rebuild the visible layer list
- */
- mVisibleLayersSortedByZ.clear();
- const LayerVector& currentLayers(mDrawingState.layersSortedByZ);
- size_t count = currentLayers.size();
- mVisibleLayersSortedByZ.setCapacity(count);
- for (size_t i=0 ; i<count ; i++) {
- if (!currentLayers[i]->visibleRegionScreen.isEmpty())
- mVisibleLayersSortedByZ.add(currentLayers[i]);
- }
- mWormholeRegion = screenRegion.subtract(opaqueRegion);
- mVisibleRegionsDirty = false;
- }
在computeVisibleRegions()叠加计算总的显示范围,layer的计算顺序从上到下的过程计算的,也就是先计算Z-Order值较大的,显示在最上层的layer开始往下计算。这么做的好处就是能够很好的计算出不透明区域的范围。
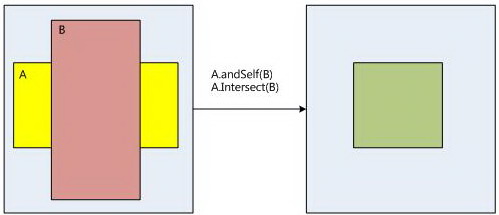
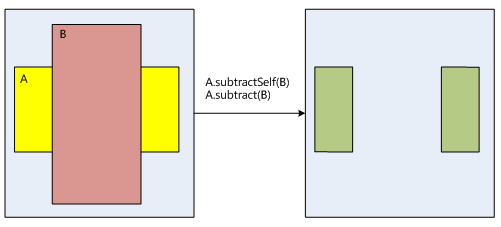
在SurfaceFlinger的区域相互之间的操作处理如下:

4.4 图形缓存
前面选择了FrontBuffer、初始化了纹理、计算了layer的显示区域,那么下一步就该将Buffer内容进行图形处理并保存到OpenGL缓存中。
调用每个layer的draw函数来进行这个操作。如下面代码所示。具体的图形处理过程很复杂,完全交给OpenGL去处理,这里我们就不去关心了。我们只需要知道最终经过图形处理的内容会被缓存到OpenGL的缓存区中。
- void SurfaceFlinger::composeSurfaces(const Region& dirty)
- {
- if (UNLIKELY(!mWormholeRegion.isEmpty())) {
- // should never happen unless the window manager has a bug
- // draw something...
- drawWormhole();
- }
- const Vector< sp<LayerBase> >& layers(mVisibleLayersSortedByZ);
- const size_t count = layers.size();
- for (size_t i=0 ; i<count ; ++i) {
- const sp<LayerBase>& layer(layers[i]);
- const Region clip(dirty.intersect(layer->visibleRegionScreen));
- if (!clip.isEmpty()) {
- layer->draw(clip);
- }
- }
- }
/dev/fb0不支持page flip模式

/dev/fb0支持page flip模式

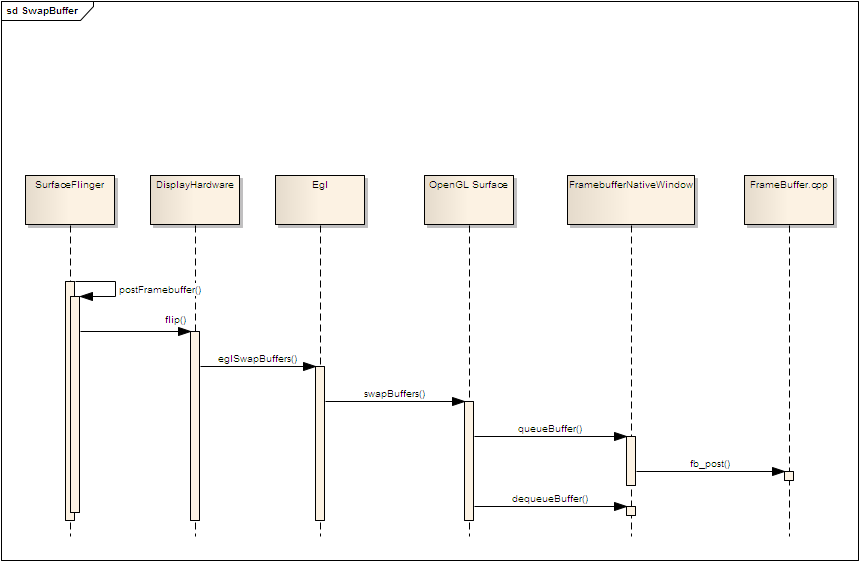
5. 图形显示
当图形内容被缓存到frameBuffer中后,最后的一步就是图形显示。代码中很明确就是SurfaceFlinger loop中的postFramebuffer()函数了。
这个函数最终回调到OpenGL的eglSwapBuffers()函数,这个函数主要有2个步骤(由于硬件加速代码不可见,我们仍然以软件加速为例)
1. 显示当前缓存buffer中内容;
首先,将原来的屏幕上的内容与最新需要显示的内容进行区域相减,将原来的内容copy到当前的缓存buffer中;
EGLBoolean egl_window_surface_v2_t::swapBuffers()@frameworks\base\opengl\libagl\egl.cpp
- /*
- * Handle eglSetSwapRectangleANDROID()
- * We copyback from the front buffer
- */
- if (!dirtyRegion.isEmpty()) {
- dirtyRegion.andSelf(Rect(buffer->width, buffer->height));
- if (previousBuffer) {
- const Region copyBack(Region::subtract(oldDirtyRegion, dirtyRegion));
- if (!copyBack.isEmpty()) {
- void* prevBits;
- if (lock(previousBuffer,
- GRALLOC_USAGE_SW_READ_OFTEN, &prevBits) == NO_ERROR) {
- // copy from previousBuffer to buffer
- copyBlt(buffer, bits, previousBuffer, prevBits, copyBack);
- unlock(previousBuffer);
- }
- }
- }
- oldDirtyRegion = dirtyRegion;
- }
2. 对2个缓存buffer进行page flip(swap)操作。
通过 queueBuffer()操作将将当前Buffer交还给FramebufferNativeWindow,同时调用fb_post进行图形显示。然后通过dequeueBuffer()操作获得另外一个FramebufferNativeWindow的缓存Buffer,实现page flip(swap)操作。
至此,整个的SurfaceFlinger的机制就分析完了。


 2836
2836


 被折叠的 条评论
为什么被折叠?
被折叠的 条评论
为什么被折叠?
 到【灌水乐园】发言


