


绝对布局
绝对布局使用写死的 frame 定位各个视图,优点是 app 性能消耗小,缺点是开发成本高(需要写代码时适配机型计算好视图起点宽高)。
autoresizingMask 布局
autoresizingMask 布局主要围绕视图的位掩码策略配置布局,其枚举类型如下:
typedef NS_OPTIONS(NSUInteger, UIViewAutoresizing) {
UIViewAutoresizingNone = 0,
UIViewAutoresizingFlexibleLeftMargin = 1 << 0,
UIViewAutoresizingFlexibleWidth = 1 << 1,
UIViewAutoresizingFlexibleRightMargin = 1 << 2,
UIViewAutoresizingFlexibleTopMargin = 1 << 3,
UIViewAutoresizingFlexibleHeight = 1 << 4,
UIViewAutoresizingFlexibleBottomMargin = 1 << 5
};
UIViewAutoresizingNone就是不自动调整。
UIViewAutoresizingFlexibleLeftMargin ,如果不使用,左侧margin不会改变,也就是左顶点的x坐标不会变化。如果使用,左侧margin会变化,具体变化值在不同情况下会有所不同(成比例放大?系统会自行按一定算法调整吧。)。
UIViewAutoresizingFlexibleRightMargin ,原理同上
UIViewAutoresizingFlexibleTopMargin 原理同上
UIViewAutoresizingFlexibleBottomMargin 原理同上
UIViewAutoresizingFlexibleWidth 自动调整自己的宽度,如果不使用,宽度不会变化,如果使用,宽度跟父view等比缩放。
UIViewAutoresizingFlexibleHeight 原理同上
另外上面这里的枚举个数和 xib 中的设置相仿,但是 xib 的设置并不和这里的变量一一对应。
比如下图,autoresizingMask 是 42,就是 101010,就是没有使用UIViewAutoresizingFlexibleLeftMargin,UIViewAutoresizingFlexibleRightMargin 和UIViewAutoresizingFlexibleHeight 其他的都用了。

再看一个例子,如下图:

打印出的 view 的 autoresizingMask 属性值是 46,也就是 二进制的 101110,其实,仅仅是没有使用UIViewAutoresizingFlexibleLeftMargin,UIViewAutoresizingFlexibleHeight!剩下的都用了。
再看一个

这个,属性值是45,101101,就是缺少UIViewAutoresizingFlexibleHeight和UIViewAutoresizingFlexibleWidth。
再看一个:

属性值是18 ,010010,就是只有 UIViewAutoresizingFlexibleHeight和UIViewAutoresizingFlexibleWidth。
这个也是让我困扰很久的问题!所以不要根据xib中的设定,想当然地写出错误的代码约束!
看完上面这些例子,我们可以总结一下,如果你希望view的长宽需要等比放大,就需要使用UIViewAutoresizingFlexibleHeight 和UIViewAutoresizingFlexibleWidth,而如果需要把某个方向的margin固定,就不要加入对应的方向的FlexibleMargin mask ,而不需要固定的方向,就要加入对应的mask。
另外,需要注意,再xib中的某些设定是冲突的,系统会自动去掉冲突的设置,比如,下面这种情况:

同时限定左右距离不变,而且长度不变,这是不可能达到的要求。系统会无视右边距离不变的约束。
一般控件默认有的 autoresizingMask 的值就是18 ,高、宽会随着父控件的变化而变化,高、宽拥有自动伸缩功能。
从 xib 里创建出来的默认的 view( Xcode 默认创建出来的 view,代码中使用 xib 创建的 view 和 xib 面板设置中保持一致),其 autoresizingMask 的值即为 18。
AutoLayout 布局
1. translatesAutoresizingMaskIntoConstraints 属性
-
把 autoresizingMask 转换为 Constraints,即:可以把 frame ,bouds,center 方式布局的视图自动转化为约束形式。(此时该视图上约束已经足够 不需要手动去添加别的约束)
- 用代码创建的所有 view(即使是代码中使用打开了 autolayout 的 xib 创建的 view), translatesAutoresizingMaskIntoConstraints 默认是 YES
- 用 IB 创建的所有 view ,translatesAutoresizingMaskIntoConstraints 默认是(autoresize 布局:YES , autolayout布局 :NO)
如何设置 translatesAutoresizingMaskIntoConstraints ?
- 视图 使用代码创建,frame 布局 ,不用去管 translatesAutoresizingMaskIntoConstraints
- 视图 使用代码创建,autolayout 布局,translatesAutoresizingMaskIntoConstraints 设置为 NO
- 视图 IB 创建,frame 布局 , translatesAutoresizingMaskIntoConstraints 不用管 (IB 帮我们设置好了:YES)
- 视图 IB 创建,autolayout 布局,translatesAutoresizingMaskIntoConstraints 不用管 (IB 帮我们设置好了,NO)
为什么 translatesAutoresizingMaskIntoConstraints 使用AutoLayout布局时候,就要设置为 NO ?
- translatesAutoresizingMaskIntoConstraints 的本意是将 frame 布局自动转化为约束布局(这种规律难以捕捉,即使设置的frame是正确的,也很容易和自己添加的约束冲突,从而引起布局出错),转化的结果是为这个视图自动添加所有需要的约束,如果我们这时给视图添加自己创建的约束就一定会约束冲突。为了避免上面说的约束冲突,我们在代码创建约束布局的控件时直接指定这个视图不要根据 frame 布局转化自动生成约束布局(即translatesAutoresizingMaskIntoConstraints=NO),可以放心的去创建自己想要的约束了。
- 例如:v1 是一个使用 autolayout 的view,v2 是一个不使用 autolayout 的 view,但 v2 成为 v1 的 subview 时,v2 需要四条隐含的 constraint 来确定 v2 的位置,这些约束都是从 v2 的 frame 转化而来(注意可在规律难以捕捉情况下,将 autoresizingMake 设置为 None,转换后的约束相当于绝对布局)。
- setTranslatesAutoresizingMaskIntoConstraints 和 setFrame 组合使用导致异常,如下代码:
[_programHeadView setTranslatesAutoresizingMaskIntoConstraints:YES];
[_programHeadView setFrame:headRect];
在调用 setTranslatesAutoresizingMaskIntoConstraints 和 setFrame 之前先把 view 从父 view 中移除,调用之后再添加回去这样就能避免当前 view 的 constraints 和默认的 constraints 产生冲突。
2. updateViewConstraints 与 updateConstraints
基本用法
updateViewConstraints与updateConstraints是AutoLayout出现后新增的api,updateConstraints主要功能是更新view的约束,并会调用其所有子视图的该方法去更新约束。
而updateViewConstraints的出现方便了viewController,不用专门去重写controller的view,当view的updateConstraints被调用时,该view若有controller,该controller的updateViewConstraints便会被调用。
两个方法都需要在方法实现的最后调用父类的该方法。并且这两个方法不建议直接调用。
在使用过程中我发现这两个方法有时候不会被系统调用。后来我看到public class func requiresConstraintBasedLayout() -> Bool方法的描述:
constraint-based layout engages lazily when someone tries to use it (e.g., adds a constraint to a view). If you do all of your constraint set up in -updateConstraints, you might never even receive updateConstraints if no one makes a constraint. To fix this chicken and egg problem, override this method to return YES if your view needs the window to use constraint-based layout.
大意是说,视图并不是主动采用constraint-based的。在非constraint-based的情况下-updateConstraints,可能一次都不会被调用,解决这个问题需要重写该类方法并返回true。
这里要注意,如果一个view或controller是由interface builder初始化的,那么这个实例的updateViewConstraints或updateConstraints方法便会被系统自动调用,起原因应该就是对应的requiresConstraintBasedLayout方法返回true。而纯代码初始化的视图requiresConstraintBasedLayout方法默认返回false。
所以在纯代码自定义一个view时,想把约束写在updateConstraints方法中,就一定要重写requiresConstraintBasedLayout方法,返回true。
至于纯代码写的viewController如何让其updateViewConstraints方法被调用。我自己的解决办法是手动调用其view的setNeedsUpdateConstraints方法。
How to use updateConstraints?
文档中对于这两个方法提的最多的就是,重写这两个方法,在里面设置约束。所以一开始我认为这两个方法是苹果提供给我们专门写约束的。于是便开始尝试使用。
直到后来在UIView中看到这样一句话:
You should only override this method when changing constraints in place is too slow, or when a view is producing a number of redundant changes.
“你只因该在添加约束过于慢的时候,或者一次要修改大量约束的情况下重写次方法。”
简直是让人觉得又迷茫又坑爹。updateConstraints方法到底应该何时使用
后来看到how to use updateConstraints这篇文章。给出了一个合理的解释:
尽量将约束的添加写到类似于viewDidLoad的方法中。
updateConstraints并不应该用来给视图添加约束,它更适合用于周期性地更新视图的约束,或者在添加约束过于消耗性能的情况下将约束写到该方法中。
当我们在响应事件时(例如点击按钮时)对约束的修改如果写到updateConstraints中,会让代码的可读性非常差。
关于性能,我也做了一个简单的测试:
class MMView: UIView {
    override init(frame: CGRect) {
        super.init(frame: frame)
        self.backgroundColor = UIColor.grayColor()
        initManyButton()
        //初始化时添加约束
        test() //每次只有一个test()不被注释就好
    }

    override func touchesBegan(touches: Set, withEvent event: UIEvent?) {
        //响应事件时添加约束
        //test()
    }

    override func updateConstraints() {
        //updateConstraints中添加约束
        //test()
        super.updateConstraints()
    }

    func test(){
        let then = CFAbsoluteTimeGetCurrent()
        addConstraintsToButton()
        let now = CFAbsoluteTimeGetCurrent()
        print(now - then)
    }

    required init?(coder aDecoder: NSCoder) {
        fatalError("init(coder:) has not been implemented")
    }

    let buttonTag = 200
    func initManyButton(){
        for index in 0...1000{
            let button = UIButton(type: .System)
            button.tag = buttonTag + index
            self.addSubview(button)
        }
    }
    func addConstraintsToButton(){
        for index in 0...1000{
            if let button = self.viewWithTag(index+buttonTag){
                button.snp_makeConstraints{ make in
                    make.center.equalTo(self)
                    make.size.equalTo(self)
                }
            }
        }
    }
}
分别对 将 设置约束 写在init中、写在updateConstraints中、写在事件响应方法中 的时间消耗进行测试,对1000个button添加约束,每个添加4个约束。
init中,时间消耗约为0.37秒
写在updateconstraints中,时间消耗约为0.52秒
写在事件响应方法中,时间消耗约为0.77秒
所以,结论,还是将约束的设置写在viewDidLoad中或者init中。没事儿尽量不去碰updateConstraints。除非对性能有要求。
关于UIView的translatesAutoresizingMaskIntoConstraints属性
最近在对AutoLayout的学习中发现,很多人似乎对translatesAutoresizingMaskIntoConstraints的误解非常大,很多时候遇到问题总有人会在下面回答到:把translatesAutoresizingMaskIntoConstraints设置成false就可以解决问题。。。实际上并没有什么用。
那么这个属性到底是做什么的呢?
其实这个属性的命名已经把这个属性的功能解释的非常清楚了。
除了AutoLayout,AutoresizingMask也是一种布局方式。这个想必大家都有了解。默认情况下,translatesAutoresizingMaskIntoConstraints = true , 此时视图的 AutoresizingMask 会被转换成对应效果的约束(这种规则很难找到规律,所以容易出现各种布局错误问题)。这样很可能就会和我们手动添加的其它约束有冲突。此属性设置成false时,AutoresizingMask就不会变成约束。也就是说当前视图的 AutoresizingMask 失效了。
那我们什么时候需要设置这个属性呢?
当我们用代码添加视图时,视图的 translatesAutoresizingMaskIntoConstraints 属性默认为true,可是 AutoresizingMask 属性默认会被设置成.None。也就是说如果我们不去动AutoresizingMask,那么AutoresizingMask就不会对约束产生影响。
当我们使用interface builder添加视图时,AutoresizingMask 虽然会被设置成非.None,但是translatesAutoresizingMaskIntoConstraints 默认被设置成了false。所以也不会有冲突。
反而有的视图是靠 AutoresizingMask 布局的,当我们修改了 translatesAutoresizingMaskIntoConstraints 为 false 后会让视图失去约束,走投无路。例如我自定义转场时就遇到了这样的问题,转场后的视图并不在视图的正中间。
所以,这个属性,基本上我们也不用设置它。
3. AutoLayout 与 Frame
在使用AutoLayout的时候你可能也会同时也会用到frame,比如需要用到layer的时候。
那么你可能会遇到这种情况,想让layer的尺寸是由其它视图尺寸设定的,而这个视图又是由约束控制布局的。如果将layer的初始化与view的初始化放在一个方法中,类似于viewDidLoad的方法中
layer.bounds = CGRectMake(0,0,view.bounds.size.width * 0.5,50)那么很可能最终layer的宽度是0。
这是因为约束被设置之后它并不会立即对view作出改变,而是要等到layout时,才会对视图的尺寸进行修改。而layout通常是在视图已经加载到父视上时。
所以我们如果在viewDidLoad中设置了约束,要等到viewDidAppear时view的尺寸才会真正改变。
那么,如果需要既用约束布局,又用frame布局,如果能让它们很好的协作呢?
一个很好的解决办法是:把frame设置写到layoutSubviews中或者写到viewDidLayoutSubviews中即可。因为约束生效时view的center或者bounds就会被修改,center或者bounds被修改时layoutSubview,就会被调用,随后viewDidLayoutSubviews就回被调用。这个时候,设置约束的视图frame就不再是(0,0,0,0)了
如果我们必须要将约束和frame写在同一方法中,写完约束就设置frame,而不是想把frame的设置写到layoutSubview中(比如我们设置好约束后马上就想根据约束的结果计算高度),那么我们还可以在设置完约束之后手动调用layoutIfNeeded方法,让视图立即layout,更新frame。在这之后就可以拿到设置约束的视图的尺寸了。
4. AutoLayout 动画
如果我们的一个视图是通过设置frame来布局的,那么我们在位移动画时直接改变frame就可以了。很简单。
可是在约束布局的视图中,设置frame这个办法就无效了。那我们怎么办?
网上有很多人的办法就是:拿到想要做动画的约束,在动画之前对约束进行修改,在动画的block中调用setNeedsLayout方法。
这个方法我觉得非常的麻烦,为了方便地拿到约束,我们通常还需要把约束设置成属性,动画一多那岂不就是完蛋了?
一种更好的方法就是设置视图的transform属性。
比如我想要让视图做一个x轴+50的位移,
self.view.transform = CGAffineTransformMakeTranslation(50, 0)这样设置即可。CGAffineTransformMakeTranslation这个方法就是设置位置。
5. AutoLayout 比例设置
如果我们用autoLayout想把一个视图的中心设置到屏幕横向和纵向的1/4处:
button.snp_makeConstraints{ make in
    make.centerX.equalTo(self.view).multipliedBy(0.25)
    make.centerY.equalTo(self.view).multipliedBy(0.25)
}
这就相当于
button.center = CGPointMake(self.view.bounds.size.width * 0.25 ,self.view.bounds.size.height * 0.25)那么AutoLayout中的倍数,具体表示什么呢?
let view = UIView()
self.view.addSubview(view)
var bottomConstraint : Constraint!
view.snp_makeConstraints { (make) in
    make.height.equalTo(50)
    make.width.equalTo(50)
    make.centerX.equalTo(self.view.snp_centerX)
    bottomConstraint = make.bottom.equalTo(self.view.snp_centerY).constraint
}
self.view.layoutIfNeeded()
print(view.frame)
//打印结果 y:318 height:50 和为368
bottomConstraint.uninstall()
view.snp_makeConstraints { (make) in
    make.bottom.equalTo(self.view.snp_centerY).multipliedBy(1.5)
}
self.view.layoutIfNeeded()
print(view.frame)
//打印结果 y:318 height:50 和为552,刚好是368的1.5倍
//所以我们可以得出结论:某条边的约束的倍数代表着这条边到相对边的距离的倍数
//上面代码中的1.5倍让bottom边到y = 0边的距离变成了1.5倍
6. Local Constraints
If we want to compose a custom view out of several subviews, we have to lay out these subviews somehow. In an Auto Layout environment it is most natural to add local constraints for these views. However, note that this makes your custom view dependent on Auto Layout, and it cannot be used anymore in windows without Auto Layout enabled. It’s best to make this dependency explicit by implementing requiresConstraintBasedLayout to return YES.
The place to add local constraints is updateConstraints. Make sure to invoke [super updateConstraints] in your implementation after you’ve added whatever constraints you need to lay out the subviews. In this method, you’re not allowed to invalidate any constraints, because you are already in the first step of the layout process described above. Trying to do so will generate a friendly error message informing you that you’ve made a “programming error.”
If something changes later on that invalidates one of your constraints, you should remove the constraint immediately and call setNeedsUpdateConstraints. In fact, that’s the only case where you should have to trigger a constraint update pass.
When layoutSubviews is called, it also calls updateConstraintsIfNeeded, so calling it manually is rarely needed in my experience. In fact, I have never called it except when debugging layouts.
Updating constraints using setNeedsUpdateConstraints is pretty rare too,as above。
In addition, in my experience, I have never had to invalidate constraints, and not set the setNeedsLayout in the next line of the code, because new constraints pretty much are asking for a new layout.
The rules of thumb are:
- If you manipulated constraints directly, call
setNeedsLayout. - If you changed some conditions (like offsets or smth) which would change constraints in your overridden
updateConstraintsmethod (a recommended way to change constraints, btw), callsetNeedsUpdateConstraints, and most of the time,setNeedsLayoutafter that. - If you need any of the actions above to have immediate effect—e.g. when your need to learn new frame height after a layout pass—append it with a
layoutIfNeeded.
Also, in the below animation code, I believe setNeedsUpdateConstraints is unneeded, since constraints are updated before the animation manually, and the animation only re-lays-out the view based on differences between the old and new ones.
[UIView animateWithDuration:1.0f delay:0.0f usingSpringWithDamping:0.5f initialSpringVelocity:1 options:UIViewAnimationOptionCurveEaseInOut animations:^{
        [self.modifConstrView setNeedsUpdateConstraints];   // 这一行可以省略
        [self.modifConstrView layoutIfNeeded];
    } completion:NULL];
7. 相关方法
1、layoutSubviews
在iOS5.1和之前的版本,此方法的缺省实现不会做任何事情(实现为空),iOS5.1之后(iOS6开始)的版本,此方法的缺省实现是使用你设置在此view上面的constraints(Autolayout)去决定subviews的position和size。 UIView的子类如果需要对其subviews进行更精确的布局,则可以重写此方法。只有在autoresizing和constraint-based behaviors of subviews不能提供我们想要的布局结果的时候,我们才应该重写此方法。可以在此方法中直接设置subviews的frame。 我们不应该直接调用此方法,而应当用下面两个方法。
2、setNeedsLayout
此方法会将view当前的layout设置为无效的,并在下一个upadte cycle里去触发layout更新。
3、layoutIfNeeded
使用此方法强制立即进行layout,从当前view开始,此方法会遍历整个view层次(包括superviews)请求layout。因此,调用此方法会强制整个view层次布局。
4、基于约束的 AutoLayout 的方法
4.1、setNeedsUpdateConstraints
当一个自定义view的某个属性发生改变,并且可能影响到constraint时,需要调用此方法去标记constraints需要在未来的某个点更新,系统然后调用updateConstraints.
4.2、needsUpdateConstraints
constraint-based layout system使用此返回值去决定是否需要调用updateConstraints作为正常布局过程的一部分。
4.3、updateConstraintsIfNeeded
立即触发约束更新,自动更新布局。
4.4、updateConstraints
自定义view应该重写此方法在其中建立constraints. 注意:要在实现在最后调用[super updateConstraints]
8. Auto Layout Process 自动布局过程
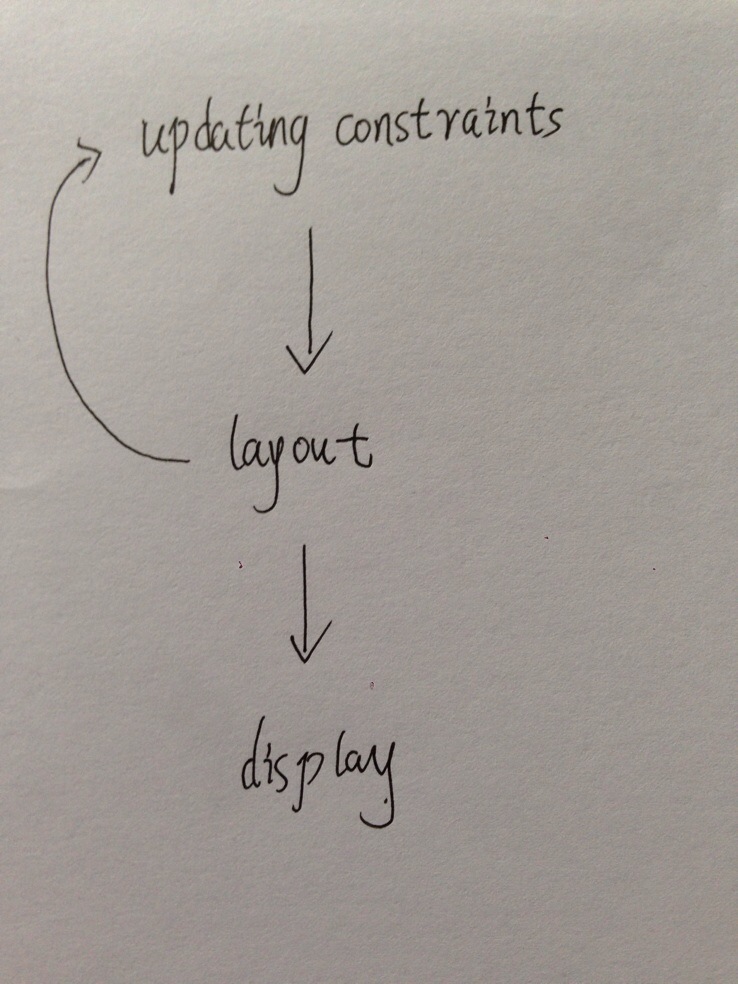
与使用springs and struts(autoresizingMask)比较,Auto layout 在 view 显示之前,多引入了两个步骤:updating constraints 和laying out views。每一个步骤都依赖于上一个。display 依赖 layout,而 layout 依赖 updating constraints。 updating constraints->layout->display
第一步:updating constraints,被称为测量阶段,其从下向上(from subview to super view),为下一步 layout 准备信息。可以通过调用方法 setNeedUpdateConstraints 去触发此步。constraints 的改变也会自动的触发此步。但是,当你自定义view的时候,如果一些改变可能会影响到布局的时候,通常需要自己去通知 Auto layout,updateConstraintsIfNeeded。
自定义 view 的话,通常可以重写 updateConstraints 方法,在其中可以添加 view 需要的局部的 contraints。
第二步:layout,其从上向下(from super view to subview),此步主要应用上一步的信息去设置 view 的 center 和 bounds。可以通过调用 setNeedsLayout 去触发此步骤,此方法不会立即应用 layout。如果想要系统立即的更新 layout,可以调用layoutIfNeeded。另外,自定义 view 可以重写方法 layoutSubViews 来在 layout 的工程中得到更多的定制化效果。
第三步:display,此步时把 view 渲染到屏幕上,它与你是否使用 Auto layout 无关,其操作是从上向下(from super view to subview),通过调用 setNeedsDisplay 触发,
因为每一步都依赖前一步,因此一个 display 可能会触发 layout,当有任何 layout 没有被处理的时候,同理,layout 可能会触发updating constraints,当 constraint system 更新改变的时候。
需要注意的是,这三步不是单向的,constraint-based layout 是一个迭代的过程,layout 过程中,可能去改变 constraints,又一次触发 updating constraints,进行一轮 layout 过程。
注意:如果你每一次调用自定义 layoutSubviews 都会导致另一个布局传递,那么你将会陷入一个无限循环中。
如下图:


 5170
5170

 被折叠的 条评论
为什么被折叠?
被折叠的 条评论
为什么被折叠?
 到【灌水乐园】发言


