iOS学习笔记(七)——UI基础UIButton

前面写了UIWindow、UIViewController,那些都是一些框架,框架需要填充上具体的view才能组成我们的应用,移动应用开发中UI占了很大一部分,最基础的UI实现是使用系统提供的各种控件,其他的就是自定义实现了,作者目前是入门状态,只能写写基础控件了。

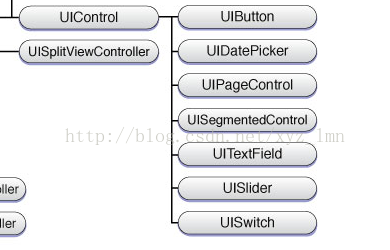
iOS中提供了UIButton、UILable、UITextField、UIImageView等基础UI控件,继承于UIView。这里先拿UIButton练练手,为什么拿UIButton呢,因为UIbutton继承自UIControl,UIControl派生自UIView类,每个控件都有很多视图的特性,包括附着于其他视图的能力,所有控件都拥有一套共同的属性和方法,包含显示内容,点击事件等等,UIControl的子类都有事件处理能力。

图、UIControl


UIButton的定义:

UIButton可使用initWithFrame、buttonWithType两种方式创建:

1)initWithFrame

  UIButton *btn=[[UIButton alloc]initWithFrame:CGRectMake(60, 60, 200, 60)];
    btn.backgroundColor=[UIColor greenColor];
    [btn setTitle:@"btn1" forState:UIControlStateNormal];
    [self.view addSubview:btn];

2)buttonWithType

UIButton *btn2=[UIButton buttonWithType:UIButtonTypeRoundedRect];
    CGRect rect=CGRectMake(60, 160, 200, 60);
    btn2.frame=rect;
    btn2.tag=1001;
    btn2.backgroundColor=[UIColor colorWithRed:30/255.0 green:200/255.0 blue:125/255.0 alpha:1.0];
    [btn2 setTitle:@"btn2" forState:UIControlStateNormal];

    [btn2 addTarget:self action:@selector(btn2Pressed) forControlEvents:UIControlEventTouchDown];
    [self.view addSubview:btn2];
btn2Pressed方法:

-(void)btn2Pressed{

    NSLog(@"button pressed");
}

UIButtonType:

typedef enum {
    UIButtonTypeCustom = 0,           // no button type   自定义,无风格
    UIButtonTypeRoundedRect,          // rounded rect, flat white button, like in address card 白色圆角矩形,类似偏好设置表格单元或者地址簿卡片
    UIButtonTypeDetailDisclosure,//蓝色的披露按钮,可放在任何文字旁
    UIButtonTypeInfoLight,//微件(widget)使用的小圆圈信息按钮,可以放在任何文字旁
    UIButtonTypeInfoDark,//白色背景下使用的深色圆圈信息按钮
    UIButtonTypeContactAdd,//蓝色加号(+)按钮,可以放在任何文字旁
} UIButtonType;

UIButton常用属性:

//设置对应状态的标题内容default is nil. title is assumed to be single line

- (void)setTitle:(NSString *)title forState:(UIControlState)state;

//设置对应状态的标题颜色

- (void)setTitleColor:(UIColor *)color forState:(UIControlState)state;

//设置对应状态的标题阴影颜色

- (void)setTitleShadowColor:(UIColor *)color forState:(UIControlState)state;

//设置对应状态的按钮的图片

- (void)setImage:(UIImage *)image forState:(UIControlState)state;

//设置对应状态的按钮背景图片

- (void)setBackgroundImage:(UIImage *)image forState:(UIControlState)state;


UIButton的UIControlState :

typedef NS_OPTIONS(NSUInteger, UIControlState) {
    UIControlStateNormal       = 0,
    UIControlStateHighlighted  = 1 << 0,                  // used when UIControl isHighlighted is set
    UIControlStateDisabled     = 1 << 1,
    UIControlStateSelected     = 1 << 2,                  // flag usable by app (see below)
    UIControlStateApplication  = 0x00FF0000,              // additional flags available for application use
    UIControlStateReserved     = 0xFF000000               // flags reserved for internal framework use
};


更多属性可参考官方文档。

UIButton添加事件:

UIButton使用如下方法添加事件。

[btn addTarget:<#(id)#> action:<#(SEL)#> forControlEvents:<#(UIControlEvents)#>]

这些事件都是基于触摸、基于值、基于编辑。可相应如下事件。

typedef NS_OPTIONS(NSUInteger, UIControlEvents) {
    UIControlEventTouchDown           = 1 <<  0,      // on all touch downs
    UIControlEventTouchDownRepeat     = 1 <<  1,      // on multiple touchdowns (tap count > 1)
    UIControlEventTouchDragInside     = 1 <<  2,
    UIControlEventTouchDragOutside    = 1 <<  3,
    UIControlEventTouchDragEnter      = 1 <<  4,
    UIControlEventTouchDragExit       = 1 <<  5,
    UIControlEventTouchUpInside       = 1 <<  6,
    UIControlEventTouchUpOutside      = 1 <<  7,
    UIControlEventTouchCancel         = 1 <<  8,

    UIControlEventValueChanged        = 1 << 12,     // sliders, etc.

    UIControlEventEditingDidBegin     = 1 << 16,     // UITextField
    UIControlEventEditingChanged      = 1 << 17,
    UIControlEventEditingDidEnd       = 1 << 18,
    UIControlEventEditingDidEndOnExit = 1 << 19,     // 'return key' ending editing

    UIControlEventAllTouchEvents      = 0x00000FFF,  // for touch events
    UIControlEventAllEditingEvents    = 0x000F0000,  // for UITextField
    UIControlEventApplicationReserved = 0x0F000000,  // range available for application use
    UIControlEventSystemReserved      = 0xF0000000,  // range reserved for internal framework use
    UIControlEventAllEvents           = 0xFFFFFFFF
};


/**
* @author 张兴业
* iOS入门群:83702688
* android开发进阶群:241395671
* 我的新浪微博:@张兴业TBOW
*/

参考:

http://developer.apple.com/library/ios/#documentation/UIKit/Reference/UIButton_Class/UIButton/UIButton.html
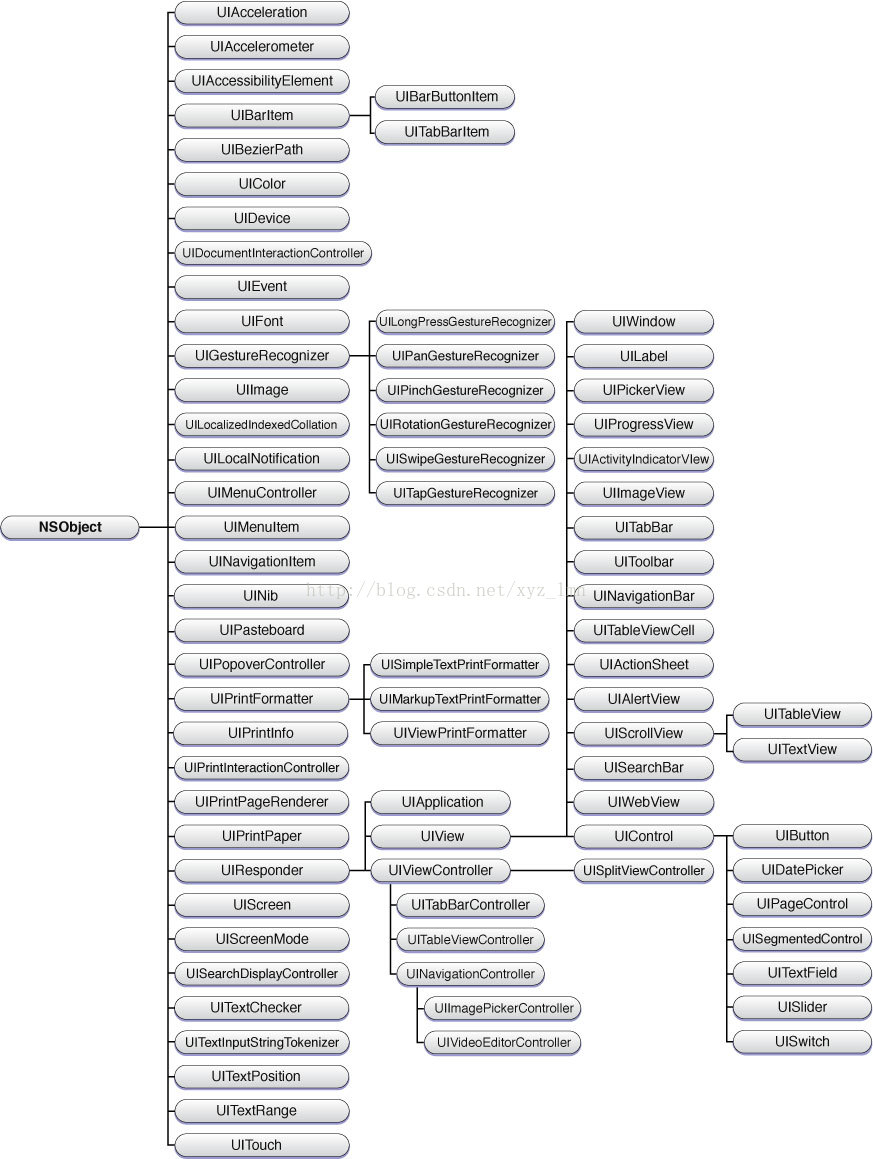

http://developer.apple.com/library/ios/#documentation/uikit/reference/UIKit_Framework/Introduction/Introduction.html#//apple_ref/doc/uid/TP40006955-CH1-SW1


一、UIKit结构图


  • 0
    点赞
  • 0
    收藏
    觉得还不错? 一键收藏
  • 0
    评论
好的,这是一个手势解锁的Demo,你可以参考一下: ``` import UIKit class GestureLockViewController: UIViewController { // MARK: - Properties var buttons = [UIButton]() var selectedButtons = [UIButton]() var lines = [CAShapeLayer]() var touchPoint: CGPoint? var isTouching = false // MARK: - Lifecycle override func viewDidLoad() { super.viewDidLoad() view.backgroundColor = .white let margin: CGFloat = 40 let distance: CGFloat = 80 let buttonWidth: CGFloat = 60 let buttonHeight: CGFloat = 60 let viewWidth = view.bounds.width let viewHeight = view.bounds.height for i in 0..<9 { let row = CGFloat(i / 3) let col = CGFloat(i % 3) let x = margin + col * (buttonWidth + distance) let y = margin + row * (buttonHeight + distance) let button = UIButton(frame: CGRect(x: x, y: y, width: buttonWidth, height: buttonHeight)) button.layer.cornerRadius = buttonWidth / 2 button.layer.borderWidth = 2 button.layer.borderColor = UIColor.lightGray.cgColor button.tag = i view.addSubview(button) buttons.append(button) } } // MARK: - Gesture Methods override func touchesBegan(_ touches: Set<UITouch>, with event: UIEvent?) { guard let touch = touches.first else { return } let point = touch.location(in: view) for button in buttons { if button.frame.contains(point) && !selectedButtons.contains(button) { touchPoint = button.center selectedButtons.append(button) isTouching = true break } } } override func touchesMoved(_ touches: Set<UITouch>, with event: UIEvent?) { guard isTouching, let touch = touches.first else { return } let point = touch.location(in: view) touchPoint = point for button in buttons { if button.frame.contains(point) && !selectedButtons.contains(button) { button.isSelected = true selectedButtons.append(button) let line = CAShapeLayer() line.strokeColor = UIColor.gray.cgColor line.fillColor = UIColor.clear.cgColor line.lineWidth = 3 view.layer.addSublayer(line) lines.append(line) break } } drawLines() } override func touchesEnded(_ touches: Set<UITouch>, with event: UIEvent?) { isTouching = false touchPoint = nil for button in buttons { button.isSelected = false } validatePassword() clearSelectedButtons() clearLines() } override func touchesCancelled(_ touches: Set<UITouch>, with event: UIEvent?) { isTouching = false touchPoint = nil for button in buttons { button.isSelected = false } clearSelectedButtons() clearLines() } // MARK: - Private Methods private func drawLines() { guard let point = touchPoint else { return } let linePath = UIBezierPath() linePath.move(to: point) for button in selectedButtons { linePath.addLine(to: button.center) } if let lastButton = selectedButtons.last, isTouching { linePath.addLine(to: lastButton.convert(lastButton.center, to: view)) } lines.last?.path = linePath.cgPath } private func clearSelectedButtons() { for button in selectedButtons { button.isSelected = false } selectedButtons.removeAll() } private func clearLines() { for line in lines { line.removeFromSuperlayer() } lines.removeAll() } private func validatePassword() { let password = selectedButtons.map { "\($0.tag)" }.joined() print("Gesture password: \(password)") } } ``` 这个Demo实现了一个3x3的手势解锁界面,使用了`UIButton`和`CAShapeLayer`来实现。当用户滑动手指时,会根据手指位置,自动连接之前选中的按钮,形成一条线。当用户抬起手指时,会根据选中的按钮的顺序,输出一个密码。

“相关推荐”对你有帮助么?

  • 非常没帮助
  • 没帮助
  • 一般
  • 有帮助
  • 非常有帮助
提交
评论
添加红包

请填写红包祝福语或标题

红包个数最小为10个

红包金额最低5元

当前余额3.43前往充值 >
需支付:10.00
成就一亿技术人!
领取后你会自动成为博主和红包主的粉丝 规则
hope_wisdom
发出的红包
实付
使用余额支付
点击重新获取
扫码支付
钱包余额 0

抵扣说明:

1.余额是钱包充值的虚拟货币,按照1:1的比例进行支付金额的抵扣。
2.余额无法直接购买下载,可以购买VIP、付费专栏及课程。

余额充值