


前言
原本以为搭建一个编译环境很简单,理想很丰满,现实很骨感,前前后后花了一周时间,不水了,水多了都是泪。
Win10下安装ubuntu虚拟机
按照[VMware Ubuntu安装详细过程](http://blog.csdn.net/u013142781/article/details/50529030)一步一步操作即可。
下载jdk
本次编译选择的是OpenJDK7u,官方源码包:https://jdk7.java.net/source.html--下载完后进行解压。
Bootstrap jdk选择oraclejdk7u80,官方源码包:
http://www.oracle.com/technetwork/java/javase/downloads/java-archive-downloads-javase7-521261.html#jdk-7u80-oth-JPR,然后进行解压:
sudo mkdir /usr/lib/jvm
sudo tar zxvf jdk-7u67-linux-x64.tar.gz -C /usr/lib/jvm
ubuntu获取root权限
参考[ubuntu获取root权限](http://jingyan.baidu.com/article/0bc808fc6184c81bd585b948.html)
登陆的账户有些文件或目录只能读不能写,而root有所有的权限。下面操作都用root进行操作。
编译环境具体配置
1.安装依赖包
sudo apt-get install build-essential gawk m4 libasound2-dev libcups2-dev libxrender-dev xorg-dev xutils-dev x11proto-print-dev binutils libmotif-common libmotif-dev ant
sudo apt-get install libx11-dev
sudo apt-get install libxt-dev
sudo apt-get install libxext-dev
sudo apt-get install libxtst-dev
2.环境变量配置
OpenJDK在编译时会读取许多环境变量,所以必须对Linux的环境变量进行配置。 gedit /etc/profile(如果还没gedit,那就安装)
具体在profile中添加的环境变量如下
  #!/bin/bash
  #设置语言
  export LANG=C
  export ALT_BOOTDIR=/usr/lib/jvm/jdk7/
  #允许自动下载依赖包
  export ALLOW_DOWNLOADS=true

  #使用预编译头文件,不加这个编译会更慢
  export USE_PRECOMPILED_HEADER=true

  #要编译的内容
  export BUILD_LANGTOOLS=true
  export BUILD_JAXP=true
  export BUILD_JAXWS=true
  export BUILD_CORBA=true
  export BUILD_HOSTPOT=true
  export BUILD_JDK=true

  #要编译的版本
  export SKIP_DEBUG_BUILD=false
  export SKIP_FASTDEBUG_BUILD=true
  export DEBUG_NAME=debug

  #把它设置为FALSE可以避免javaws和浏览器Java插件之类的部分build
  BUILD_DEPLOY=false

  #把它设置为false就不会build出安装包。因为安装包里有一些奇怪的依赖
  #但即便不build出它也已经得到完整的JDK镜像,所以还是不用build它
  BUILD_INSTALL=false

  #存放编译结果
  export ALT_OUTPUTDIR=/home/xiaokedou/openjdk/build

  unset CLASSPATH
  unset JAVA_HOME
  make 2>&1 | tee $ALT_OUTPUTDIR/build.log
再调用source /etc/profile 使其生效。
完成后,进入openjdk源码路径,通过make sanity命令来检查设置是否正确,如果正确,会返回Sanity check passed。
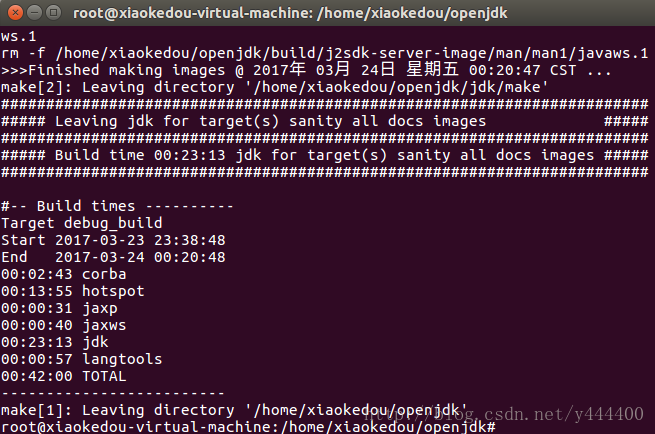
在openjdk目录下,输入make命令,正常情况下大概需要30分钟左右,具体速度根据机器性能决定。编译正常结束后,会出现日志清单展示内容,如图
3.编译中遇到的问题
一、error: X11/Intrinsic.h: No such file or directory
[X11/XXXX.h: No such file or directory](http://blog.csdn.net/bedisdover/article/details/51840639)
1.报错信息
[plain] view plain copy
make[6]: Entering directory /home/jvm/jdkbuild/build/hotspot/outputdir/linux_amd64_compiler2/product' /home/jvm/jdkbuild/build/hotspot/outputdir/linux_amd64_compiler2/product’
echo "**NOTICE** Dtrace support disabled: "/usr/include/sys/sdt.h not found""
**NOTICE** Dtrace support disabled: /usr/include/sys/sdt.h not found
make[6]: Leaving directory
All done.
make[5]: Leaving directory `/home/jvm/jdkbuild/build/hotspot/outputdir/linux_amd64_compiler2/product’
cd linux_amd64_compiler2/product && ./test_gamma
Using java runtime at: /usr/java/jdk1.7.0_80/jre
./gamma: relocation error: /usr/java/jdk1.7.0_80/jre/lib/amd64/libjava.so: symbol JVM_FindClassFromCaller, version SUNWprivate_1.1 not defined in file libjvm.so with link time reference
据说这是OpenJDK 和 Oracle JDK 版本冲突引起的 BUG,经过多种方法的尝试后,确定一种方法有效:
cd 到 openjdk/hotspot/make/linux ,将 Makefile 里 test_gamma 行全部注释掉。
2.报错信息
[plain] view plain copy
Error: time is more than 10 years from present: 1136059200000
java.lang.RuntimeException: time is more than 10 years from present: 1136059200000
at build.tools.generatecurrencydata.GenerateCurrencyData.makeSpecialCaseEntry(GenerateCurrencyData.java:285)
at build.tools.generatecurrencydata.GenerateCurrencyData.buildMainAndSpecialCaseTables(GenerateCurrencyData.java:225)
at build.tools.generatecurrencydata.GenerateCurrencyData.main(GenerateCurrencyData.java:154)
make[4]: * [/home/jvm/jdkbuild/build/lib/currency.data] Error 1
./jdk/src/share/classes/java/util/CurrencyData.properties
通过修改/jdk/src/share/classes/java/util/CurrencyData.properties文件, 把10年之前的时间修改为10年之内即可(把所有的时间格式的时间改为2015以前的十年以内的年数)例如:
[plain] view plain copy
[plain] view plain copy
VENEZUELA
VE=VEB;2014-12-22-20-00-00;VEF
注意日期要小于2015年,前在十年之内,原日期可能超出十年了
其他常见的错误
1.ERROR: You do not have access to valid Cups header files.
需要安装cpus的dev包
sudo apt-get install libcups2-dev
2.ERROR: The version of ant being used is older than the required version of ‘1.7.1’. The version of ant found was ”.
这说明没有装ant
sudo apt-get install ant
3. ERROR: FreeType version 2.3.0 or higher is required.
安装freetype的dev包
sudo apt-get install libfreetype6-dev
4. ERROR: You seem to not have installed ALSA 0.9.1 or higher.
不需要从ALSA官网下载alsa-dev和alsa-drive, ubuntu提供包的
sudo apt-get install libasound2-dev
5. ERROR: echo “* This OS is not supported:” ‘uname -a’; exit 1;
很奇怪的错误,anyway,注释掉hotspot/make/linux/Makefile里面的checkOS
check_os_version:
ifeq ( (DISABLEHOTSPOTOSVERSIONCHECK) (EMPTY_IF_NOT_SUPPORTED),)
$(QUIETLY) >&2 echo “* This OS is not supported:” uname -a; exit 1;
endif
Update: 最好的办法是在make参数后面添加 DISABLE_HOTSPOT_OS_VERSION_CHECK=OK 即可


 767
767


 被折叠的 条评论
为什么被折叠?
被折叠的 条评论
为什么被折叠?
 到【灌水乐园】发言


