


List 就是链表,这个我们在很久之前就学习过了单向链表,双向链表。之前对STL有过大概的剖析,但没涉及到链表,早几天使用到了STL中的<list>,对其中的有些细节不明了,特意重新阅读了下源码,对STL中的List 加深一下理解。。。。论指针(地址)的重要性。
附带说一句,阅读源码,建议使用Source Insight,非常好的源码阅读工具,没有其二。
1、List 概述
list 和 vector 是两个最常用的容器(序列式容器)。二者最显著的区别自然就是vector是连续线性空间,list则是不连续线性空间,相比于vector(动态数组),它的好处是每次插入和删除一个元素,只需配置或释放一个元素空间,对于任何位置的元素插入或元素移除,list永远是常数时间。尺有所长,寸有所短,list 寻址某一元素也没有vector(常数时间)方便。那么什么时机下最适合使用哪一种容器呢?必须视元素的多寡,元素的构造复杂度,元素存取行为的特定而定。
2、list 的节点
侯捷先生剖析的是STL203版的源码,我们这里紧跟下时尚,来剖析最新的STL源码http://www.sgi.com/tech/stl/download.html
以下是STL list的节点结构:
struct _List_node_base {
  _List_node_base* _M_next;
  _List_node_base* _M_prev;
};

template <class _Tp>
struct _List_node : public _List_node_base {
  _Tp _M_data;
};3、list 的迭代器
因为链表节点在储存空间中不一定是连续存在的,自然也就不能像vector一样用普通指针作为迭代器。list迭代器必须有能力指向list的节点,并有能力正确的递增。递减。取值、成员存取等操作。这是作为任何一个容器的迭代器必须具备的。对于非连续空间的递增,递减等操作自然是针对该容器的属性来的,就list而言,则是指向上一个节点,下一个节点,以及获取指定节点。
STL list是一个双向链表,迭代器必须具备前移,后移的能力,所以list提供的是bidirectional iterator (双向一个个移动)。关于迭代器的分类,参见STL迭代器。vector是随机迭代器类型(random access iterator),这也是符合vector 可随机存取的能力。
以下是list迭代器的设计:
struct _List_iterator_base {
	typedef size_t                     size_type;
	typedef ptrdiff_t                  difference_type;
	typedef bidirectional_iterator_tag iterator_category;

	_List_node_base* _M_node;

	//构造函数
	_List_iterator_base(_List_node_base* __x) : _M_node(__x) {}
	_List_iterator_base() {}

	//增加和减少,就是指向上一个节点和下一个节点
	void _M_incr() { _M_node = _M_node->_M_next; }
	void _M_decr() { _M_node = _M_node->_M_prev; }

	//运算符重载
	bool operator==(const _List_iterator_base& __x) const {
		return _M_node == __x._M_node;
	}
	bool operator!=(const _List_iterator_base& __x) const {
		return _M_node != __x._M_node;
	}
};

template<class _Tp, class _Ref, class _Ptr>
struct _List_iterator : public _List_iterator_base {
	typedef _List_iterator<_Tp, _Tp&, _Tp*>             iterator;
	typedef _List_iterator<_Tp, const _Tp&, const _Tp*> const_iterator;
	typedef _List_iterator<_Tp, _Ref, _Ptr>             _Self;

	typedef _Tp value_type;
	typedef _Ptr pointer;
	typedef _Ref reference;
	typedef _List_node<_Tp> _Node;

	//下面是子类指针赋值给父类指针,is-a原则(反过来不行)
	_List_iterator(_Node* __x) : _List_iterator_base(__x) {}
	_List_iterator() {}
	_List_iterator(const iterator& __x) : _List_iterator_base(__x._M_node) {}

	//对迭代器取值,获取节点的数据
	reference operator*() const { return ((_Node*)_M_node)->_M_data; }

	//对迭代器的成员存取,返回的是地址
#ifndef __SGI_STL_NO_ARROW_OPERATOR
	pointer operator->() const { return &(operator*()); }
#endif /* __SGI_STL_NO_ARROW_OPERATOR */

	//前缀和后缀++和--自增自减符重载
	_Self& operator++() {
		this->_M_incr();
		return *this;//返回引用,可链式操作
	}
	_Self operator++(int) {
		_Self __tmp = *this;
		this->_M_incr();
		return __tmp;//返回变量,不可链式操作
	}
	_Self& operator--() {
		this->_M_decr();
		return *this;
	}
	_Self operator--(int) {
		_Self __tmp = *this;
		this->_M_decr();
		return __tmp;
	}
};4、list 的数据结构
表示源码中list的数据结构有点大,这里只贴出重要的核心部分,省略了一部分语义重复或结构重复的部分,面向对象编程就是所有的成员及操作均封装在一个类中,私有成员也都必须用成员函数(友元)访问,应用时,一个实例化对象直接调用这些操作。
template <class _Tp, class _Alloc = __STL_DEFAULT_ALLOCATOR(_Tp) >
class list : protected _List_base<_Tp, _Alloc> {

protected:
	//创建一个数据节点,带初始化数据
	_Node* _M_create_node(const _Tp& __x)
	{
		_Node* __p = _M_get_node();//配置一个节点空间

		__STL_TRY{
			_Construct(&__p->_M_data, __x);//构造函数:构造对象在预先准备好了的缓冲区中进行
			                               //将数据植入
		}
		//异常处理
		__STL_UNWIND(_M_put_node(__p));//释放空间
		return __p;
	}
	//不带初始化数据
	_Node* _M_create_node()
	{
		_Node* __p = _M_get_node();
		__STL_TRY{
			_Construct(&__p->_M_data);
		}
		__STL_UNWIND(_M_put_node(__p));
		return __p;
	}

public:
	explicit list(const allocator_type& __a = allocator_type()) : _Base(__a) {}

	//指向第一个数据节点
	iterator begin()             { return (_Node*)(_M_node->_M_next); }
	const_iterator begin() const { return (_Node*)(_M_node->_M_next); }
	//指向最后一个数据节点的下一个节点,也就是头节点
	//在STL中,所有序列式容器都是前闭后开区间
	iterator end()             { return _M_node; }
	const_iterator end() const { return _M_node; }

	//判断链表是否为空,即是否还有数据节点
	bool empty() const { return _M_node->_M_next == _M_node; }

	//返回链表的大小
	size_type size() const {
		size_type __result = 0;
		distance(begin(), end(), __result);
		return __result;
	}
	//最大空间
	size_type max_size() const { return size_type(-1); }

	//返回第一个节点数据(元素)
	reference front() { return *begin(); }
	const_reference front() const { return *begin(); }
	//返回最后一个节点数据
	reference back() { return *(--end()); }
	const_reference back() const { return *(--end()); }

	//交换两个链表,一看代码,就是直接交换一下头节点指针,几多方便,链表的优越性,通过指针穿针引线
	void swap(list<_Tp, _Alloc>& __x) { __STD::swap(_M_node, __x._M_node); }

	//在指定位置插入数据节点,是插入到指定位置position的前面,返回插入节点
	iterator insert(iterator __position, const _Tp& __x) {
		_Node* __tmp = _M_create_node(__x);//创建一个数据节点
		//双向链表的插入操作,处理好前后指针的指向
		//处理新节点的指向
		__tmp->_M_next = __position._M_node;//新节点next指针指向position的节点
		__tmp->_M_prev = __position._M_node->_M_prev;//新节点的prev指针指向position前面的那个节点
		//修正新节点前后两个节点的指向
		__position._M_node->_M_prev->_M_next = __tmp;
		__position._M_node->_M_prev = __tmp;
		return __tmp;
	}

	//在头部插入一个节点,成为头节点(表头的后面那个数据节点)
	void push_front(const _Tp& __x) { insert(begin(), __x); }
	void push_front() { insert(begin()); }
	//插入一个尾节点
	void push_back(const _Tp& __x) { insert(end(), __x); }
	void push_back() { insert(end()); }

	//删除指定节点,并返回下一个节点
	iterator erase(iterator __position) {
		//记录待删除节点的前后两个节点
		_List_node_base* __next_node = __position._M_node->_M_next;
		_List_node_base* __prev_node = __position._M_node->_M_prev;
		_Node* __n = (_Node*)__position._M_node;//定位待删除数据节点
		//修正节点前后指针
		__prev_node->_M_next = __next_node;
		__next_node->_M_prev = __prev_node;
		//销毁数据并释放空间
		_Destroy(&__n->_M_data);
		_M_put_node(__n);
		return iterator((_Node*)__next_node);//返回删除节点的下一个节点
	}

	void clear() { _Base::clear(); }

	//重新调整链表大小,多退少补方针
	void resize(size_type __new_size, const _Tp& __x);
	void resize(size_type __new_size) { this->resize(__new_size, _Tp()); }

	//删除头节点(第一个数据节点)
	void pop_front() { erase(begin()); }
	//删除尾节点
	void pop_back() {
		iterator __tmp = end();
		erase(--__tmp);
	}

	~list() { }

	list<_Tp, _Alloc>& operator=(const list<_Tp, _Alloc>& __x);

public:
	// assign(), a generalized assignment member function.  Two
	// versions: one that takes a count, and one that takes a range.
	// The range version is a member template, so we dispatch on whether
	// or not the type is an integer.

	void assign(size_type __n, const _Tp& __val) { _M_fill_assign(__n, __val); }

	void _M_fill_assign(size_type __n, const _Tp& __val);


protected:
	//迁移操作,将[first,last)之间的所有元素移动到position之前
	//原来是这样纸:one,two,position,three,four,first,five,last,six
	//操作之后是酱紫:one,two,first,five,position,three,four,last,six
	//很简单,调整临界区的几个指针就行了,指针(地址)真方便
	void transfer(iterator __position, iterator __first, iterator __last) {
		if (__position != __last) {
			// Remove [first, last) from its old position.调出来
			//以上面例子为例
			__last._M_node->_M_prev->_M_next = __position._M_node;//five->next = position
			__first._M_node->_M_prev->_M_next = __last._M_node;//four->next = last
			__position._M_node->_M_prev->_M_next = __first._M_node;//two->first

			// Splice [first, last) into its new position.移进去
			_List_node_base* __tmp = __position._M_node->_M_prev;//tmp = three
			__position._M_node->_M_prev = __last._M_node->_M_prev;//position->prev = five
			__last._M_node->_M_prev = __first._M_node->_M_prev;//last->prev = four
			__first._M_node->_M_prev = __tmp;//four->prev = three
		}
	}
	//上面这个函数再次将链表的优越性显露无疑,这得归功于非连续空间指针的灵活性

public:
	//将链表x接合与position所指位置之前,x必须不同于*this
	//不过下面这个函数似乎没有有效性处理
	/*添加下面语句会更好
		if(&__x != this)
	*/
	void splice(iterator __position, list& __x) {
		if (!__x.empty())
			this->transfer(__position, __x.begin(), __x.end());
	}
	//将i所指元素移动到position位置之前
	void splice(iterator __position, list&, iterator __i) {
		iterator __j = __i;
		++__j;
		if (__position == __i || __position == __j) return;//是否为空
		this->transfer(__position, __i, __j);
	}
	//将[first,last)移动到position位置之前
	void splice(iterator __position, list&, iterator __first, iterator __last) {
		if (__first != __last)
			this->transfer(__position, __first, __last);
	}
	void remove(const _Tp& __value);
	void unique();
	void merge(list& __x);
	void reverse();
	void sort();

};
5、list的构造与内存管理
template <class _Tp, class _Alloc>
class _List_base
{
public:
	typedef _Alloc allocator_type;
	allocator_type get_allocator() const { return allocator_type(); }

	//构造函数,构造一个环状链表
	_List_base(const allocator_type&) {
		_M_node = _M_get_node();//只是配置一个空间,并没有存入数据,可以认为是表头
		_M_node->_M_next = _M_node;
		_M_node->_M_prev = _M_node;
	}
	//析构函数
	~_List_base() {
		clear();//清除数据节点和回收空间
		_M_put_node(_M_node);//释放表头节点空间
	}

	void clear();

protected:
	//第一级空间配置器
	typedef simple_alloc<_List_node<_Tp>, _Alloc> _Alloc_type;

	//配置一个节点
	_List_node<_Tp>* _M_get_node() { return _Alloc_type::allocate(1); }
	//释放一个指定节点
	void _M_put_node(_List_node<_Tp>* __p) { _Alloc_type::deallocate(__p, 1); }

protected:
	_List_node<_Tp>* _M_node;
};template <class _Tp, class _Alloc>
void
_List_base<_Tp, _Alloc>::clear()
{
//_M_node 头节点,不带数据
_List_node<_Tp>* __cur = (_List_node<_Tp>*) _M_node->_M_next;//指向链表中的第一个数据
//环状链表,逐个清除数据和释放节点空间
while (__cur != _M_node) {
_List_node<_Tp>* __tmp = __cur;//保存当前节点
__cur = (_List_node<_Tp>*) __cur->_M_next;//指向下一个数据节点
_Destroy(&__tmp->_M_data);//清除数据,转调用该数据对应的析构函数
_M_put_node(__tmp);//释放该节点空间
}
//初始化
_M_node->_M_next = _M_node;
_M_node->_M_prev = _M_node;
}6、list的元素操作
看看list数据结构中外部实现的函数:
template <class _Tp, class _Alloc>
void list<_Tp, _Alloc>::resize(size_type __new_size, const _Tp& __x)
{
	iterator __i = begin();
	size_type __len = 0;
	//计算原本链表实际大小
	for (; __i != end() && __len < __new_size; ++__i, ++__len)
		;
	//大于重调整空间大小,多退
	if (__len == __new_size)
		erase(__i, end());
	//少补,补差额个x
	else                          // __i == end()
		insert(end(), __new_size - __len, __x);
}

//删除链表中所有值为value的元素
template <class _Tp, class _Alloc>
void list<_Tp, _Alloc>::remove(const _Tp& __value)
{
	iterator __first = begin();
	iterator __last = end();
	while (__first != __last) {
		iterator __next = __first;
		++__next;
		if (*__first == __value) erase(__first);//找到==value的就删除
		__first = __next;
	}
}

//去掉链表中的重复元素
template <class _Tp, class _Alloc>
void list<_Tp, _Alloc>::unique()
{
	iterator __first = begin();
	iterator __last = end();
	if (__first == __last) return;
	iterator __next = __first;
	//下面这个程序有点意思,咋一看就一个while循环,以为时间复杂度为O(N),
	//实际上最后还有个修正区段范围操作,时间复杂度为O(N!)
	while (++__next != __last) {//调用了++重载函数,遍历每个节点
		if (*__first == *__next)//有相同元素就移除
			erase(__next);
		else
			__first = __next;//调整指针
		__next = __first;//修正区段范围
	}
}

//将list x有序地合并到原链表中,默认小于号,
//两个已经排序好的链表合成一个排序的链表,时间复杂度O(m)
template <class _Tp, class _Alloc>
void list<_Tp, _Alloc>::merge(list<_Tp, _Alloc>& __x)
{
	//原有链表
	iterator __first1 = begin();
	iterator __last1 = end();
	//新链表
	iterator __first2 = __x.begin();
	iterator __last2 = __x.end();
	//前提,这两个链表都已经排序好(递增)
	//所以这个函数的功能实际上就是将两个已经排序好的链表合成一个排序好的链表
	while (__first1 != __last1 && __first2 != __last2)//谁先终止
	if (*__first2 < *__first1) {
		iterator __next = __first2;
		transfer(__first1, __first2, ++__next);
		__first2 = __next;
	}
	else
		++__first1;

	if (__first2 != __last2) transfer(__last1, __first2, __last2);//剩下的直接追加
}

//反转链表,其实双向链表反转没什么意思,有前指针
inline void __List_base_reverse(_List_node_base* __p)
{
	_List_node_base* __tmp = __p;//表头
	do {
		//这里就是交换一下指针
		__STD::swap(__tmp->_M_next, __tmp->_M_prev);//tmp前后指针交换
		__tmp = __tmp->_M_prev;     // Old next node is now prev.
	} while (__tmp != __p);
}

template <class _Tp, class _Alloc>
inline void list<_Tp, _Alloc>::reverse()
{
	__List_base_reverse(this->_M_node);
}list中的sort函数比较拗口,不易理解,这里单独列出来,剖析一下:
//list不能使用STL中的sort算法,因为stl中的sort只接受random access iterator,也就是连续空间
//所以对于list 得有自己的sort
//分而治之
template <class _Tp, class _Alloc>
void list<_Tp, _Alloc>::sort()
{
	// Do nothing if the list has length 0 or 1.
	if (_M_node->_M_next != _M_node && _M_node->_M_next->_M_next != _M_node) {
		//中间数据存放区
		list<_Tp, _Alloc> __carry;
		list<_Tp, _Alloc> __counter[64];//大小为64的链表数组
		int __fill = 0;

        /*排序部分,下面的排序部分主要是借助merge函数来实现的。
		先归并两个元素,然后归并后面两个,再将四个归并,依次进行8个、16个……排好序的元素,
		*/
		while (!empty()) {
            //分割
			__carry.splice(__carry.begin(), *this, begin());//调用splice(第二个),将begin()接合(移动)到carry.begin()之前
                                                            //它取代了carry.begin(),就是将list中第一个数据,移动存入carry
			int __i = 0;
			while (__i < __fill && !__counter[__i].empty()) {
				//合并,排好序的元素归并到counter中
				__counter[__i].merge(__carry);//将carry中的数据,合并到counter链中
                                              //排序两个已排序的链表,可以看出是归并算法。侯捷先生的解释是错的
				__carry.swap(__counter[__i++]);//排序好的链表部分数据划到carry中,i++
			}
			__carry.swap(__counter[__i]);//数据交换,此时carry中为空,数据到counter[i]中了(while中i++)
			if (__i == __fill) ++__fill;
		}
      //最后一轮合并
		for (int __i = 1; __i < __fill; ++__i)
			__counter[__i].merge(__counter[__i - 1]);

		swap(__counter[__fill - 1]);//*this.swap
	}
}那么上面这个排序的时间复杂度如何呢? 归并算法的时间复杂度为O(NlogN)。上面这个排序的时间复杂度也是O(NlogN)。
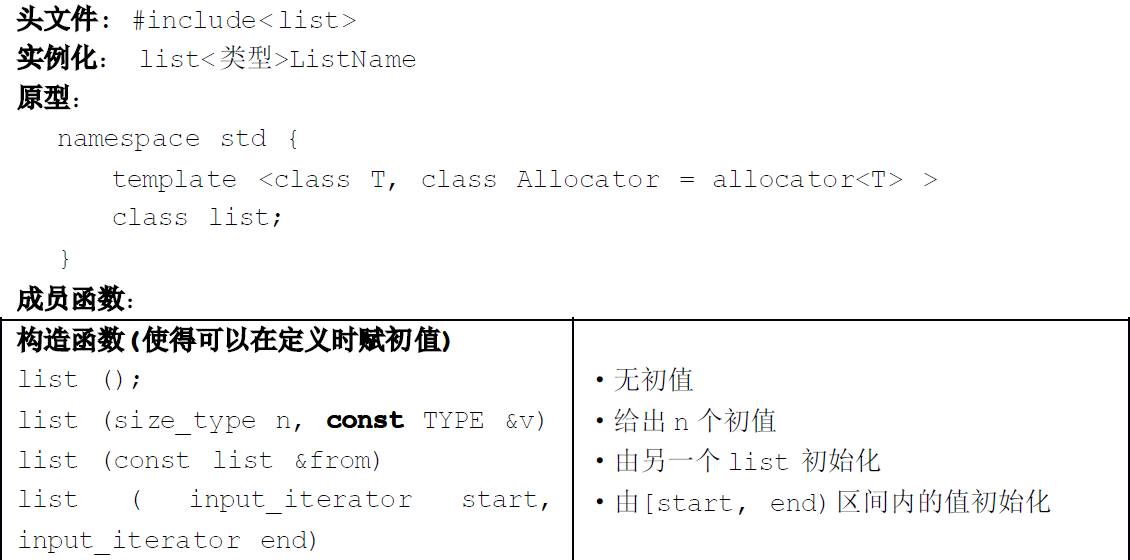
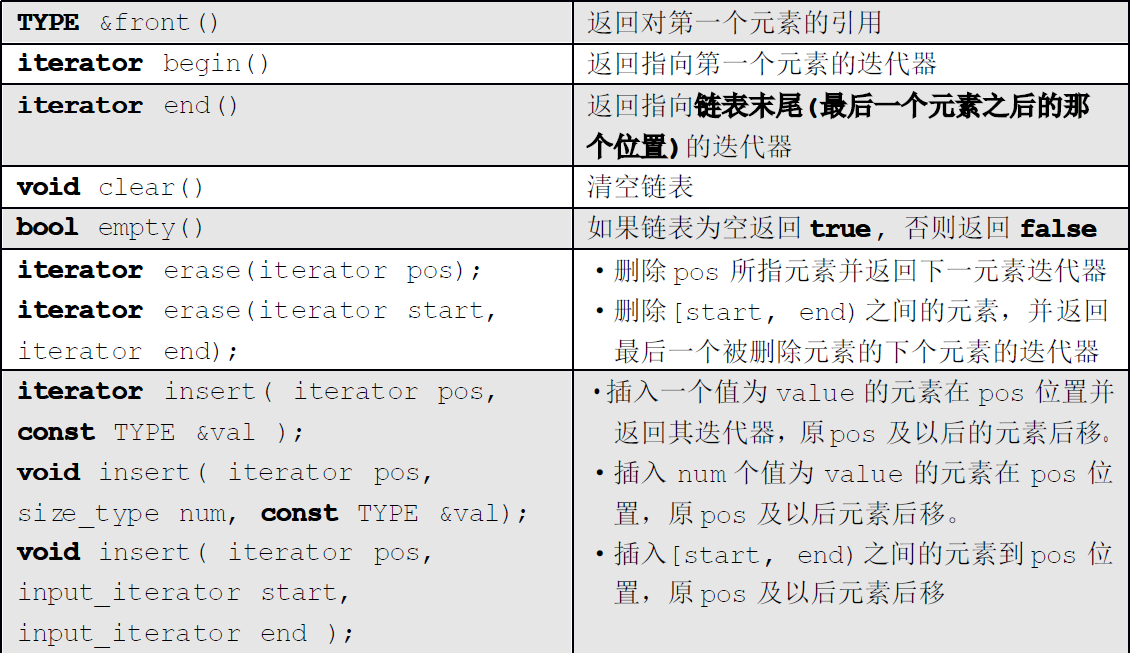
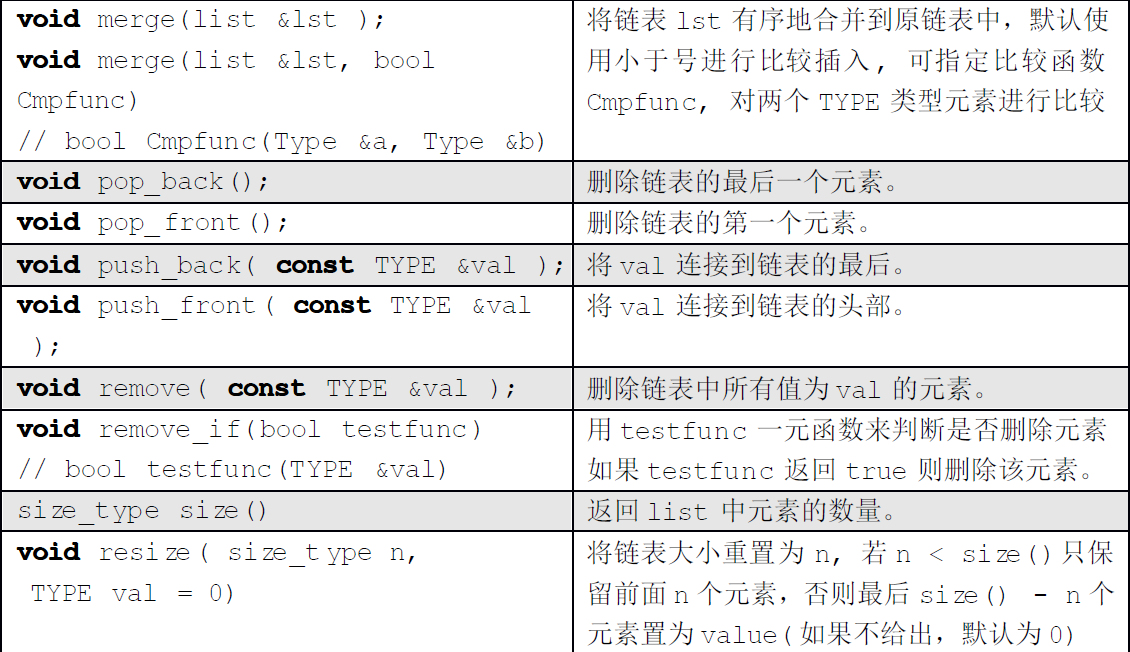
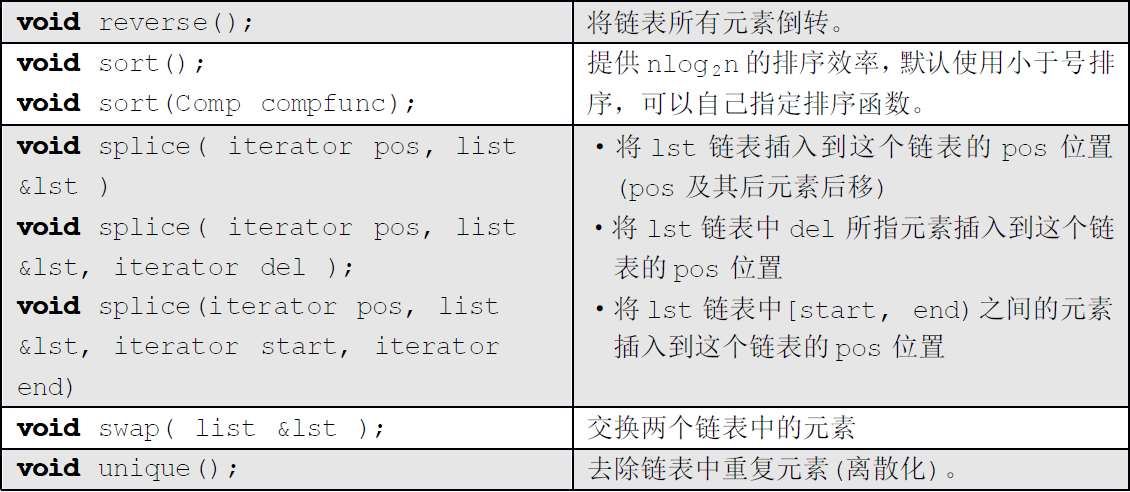
最后面补充一下STL中的list成员函数及其相应功能,如果只是单纯的使用STL来加快开发速度,下面这个表格够用了,但熟悉内部原理总是好的,知己知彼。借用西方的的一句话:不要重复造轮子。已经有这么优秀的list了,(Linux内核中的list,本人认为更精妙)。就直接拿来用吧,或者适当修改以满足自己的实际开发需求。


参考资料《STL源码剖析》。


 172
172


 被折叠的 条评论
为什么被折叠?
被折叠的 条评论
为什么被折叠?
 到【灌水乐园】发言


