


长文预警,本文为源码分析部分,夹杂大量源码可能会引起不适,请选择性阅读。如果你只想知道Bootstrap的使用,可以阅读前一篇文章:自顶向下深入分析Netty(三)--Bootstrap
2.源码分析
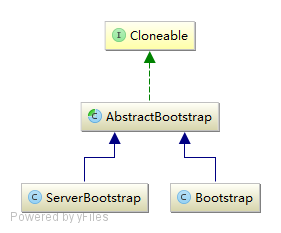
首先看Bootstrap类图,可见类图比较简单。在分析时也使用自顶向下的方法,首先分析顶层的AbstractBootstrap,然后分析其子类Bootstrap和ServerBootstrap。
2.1 AbstractBootstrap
首先看其中的类签名:
    public abstract class
        AbstractBootstrap<B extends AbstractBootstrap<B, C>, C extends Channel>
implements Cloneable这个泛型这么复杂,我已经不想继续了。别急,这个泛型其实也是一个标准用法,在JDK的Enum中就有类似的使用方法:Enum<E extends Enum<E>>。还记得在ServerBootstarp中可以使用.group().channel().option().handler()这样的形式吗?这正是这个泛型的功能:在子类中返回子类本身,无需转型。更多的细节,可到这个连接查看。
再看其中的字段含义:
    // reactor线程池
    volatile EventLoopGroup group;
    // 通道工厂,主要用来创建初始的Channel,比如服务端的第一个执行bind()方法的serverChannel,
    // 客户端第一个执行connect()方法的Channel
    private volatile ChannelFactory<? extends C> channelFactory;
    private volatile SocketAddress localAddress;
    // channel相关的选项参数
    private final Map<ChannelOption<?>, Object> options = new LinkedHashMap<>();
    // 初始化channel的属性值
    private final Map<AttributeKey<?>, Object> attrs = new LinkedHashMap<>();
    // 业务逻辑Handler,主要是HandlerInitializer,也可能是普通Handler
    private volatile ChannelHandler handler;
接着看其中的关键方法说明:
    // 设置Channel的无参构造工厂
    public B channel(Class<? extends C> channelClass);
    // 设置Channel工厂
    public B channelFactory(ChannelFactory<? extends C> channelFactory);
    // 创建一个Channel并绑定到本地端口
    public ChannelFuture bind(SocketAddress localAddress);
    // 初始化Channel并且注册到线程池
    final ChannelFuture initAndRegister();
    // 初始化一个Channel
    abstract void init(Channel channel) throws Exception;
2.1.1 channelFactory方法
bootstrap包中有一个ChannelFactory接口,代码如下:
    public interface ChannelFactory<T extends Channel> {
        T newChannel();
}其中仅声明了一个newChannel()方法用来创建一个Channel,一般使用时,会有以下两种情况:
- 在服务端创建一个ServerChannel用于接受客户端的连接
- 在客户端创建一个Channel用于连接服务端
在这两种情况下,仅仅创建一个Channel似乎使用Factory过于大材小用。考虑这种情况:在构造一个代理服务器时,服务端需要创建大量的Channel连接目标服务器,这样使用Factory就很好。并且,当Channel的无参构造方法不能满足需求时,可以方便用户定义自己独有的工厂创建满足需求的Channel。
接下来分析channelFacotry()方法,这是一个简单的setter方法(代码中的null检查不再列出):
    public B channelFactory(ChannelFactory<? extends C> channelFactory) {
        this.channelFactory = channelFactory;
        return (B) this;
    }
以及另一个默认提供无参构造方法Channel的工厂setter方法:
    public B channel(Class<? extends C> channelClass) {
        return channelFactory(new BootstrapChannelFactory<C>(channelClass));
}其中的BootstrapChannelFactory用于反射调用无参构造方法创建一个Chanel,代码如下:
    public T newChannel() {
        try {
            return clazz.newInstance();
        } catch (Throwable t) {
            throw new ChannelException("Unable to create Channel from class ");
        }
    }
2.1.2 bind方法
bind()方法是AbstarctBootstrap的核心方法,用于绑定前述工厂创建的Channel到本地的一个端口,其中有很多变体方法,关键的一个如下:
    public ChannelFuture bind(SocketAddress localAddress) {
        validate(); //确保关键参数设置正确
        return doBind(localAddress);
}validate()对参数进行验证,确保关键参数设置正确,由于其实现简单,不贴出代码。再分析关键的doBind()方法:
    private ChannelFuture doBind(final SocketAddress localAddress) {
        final ChannelFuture regFuture = initAndRegister(); // 创建Channel并注册到线程池
        final Channel channel = regFuture.channel();
        if (regFuture.cause() != null) {
            return regFuture;
        }

        if (regFuture.isDone()) {
            // 一般情况下,channel注册完成且注册成功
            ChannelPromise promise = channel.newPromise();
            doBind0(regFuture, channel, localAddress, promise);
            return promise;
        } else {
            // 由于注册是异步事件,可能此时没有注册完成,那么使用异步操作
            final PendingRegistrationPromise promise =
                      new PendingRegistrationPromise(channel);
            regFuture.addListener(new ChannelFutureListener() {
                @Override
                // 该方法在注册完成时调用
                public void operationComplete(ChannelFuture future) throws Exception {
                    Throwable cause = future.cause();
                    if (cause != null) {
                        // 注册过程中有异常则失败
                        promise.setFailure(cause);
                    } else {
                        // 注册完成且成功
                        promise.executor = channel.eventLoop(); // 设置为注册到的线程
                        doBind0(regFuture, channel, localAddress, promise);
                    }
                }
            });
            return promise;
        }
}为了更好的理解这段代码,先回顾Netty的特点:事件驱动,比如上面代码中的两个动作:注册和绑定,在Netty实现中是两个异步事件,其中注册是指Channel注册到reactor线程池,绑定是指Channel获得了本机的一个TCP端口。如果你熟悉javascript或者GUI编程,对回调函数也不会陌生,Netty也采用类似的机制,所以能在Netty源代码里看到大量的ChannelFuture(细节可看这一章),当一个事件完成时,会回调注册到ChannelFuture上的FutureListener从而实现异步操作。此外,Netty4为了简化逻辑处理逻辑,遵循这样一条规则:一个Channel产生的IO事件始终由其注册到的线程处理,可知注册和绑定事件都将在同一个线程也就是Channel注册到的线程执行。
从代码中可以看出bind分为两步:initAndRegister()以及doBind0()。initAndRegister()用于创建Channel、绑定用户定义的Handler、以及将该Chanel注册到一个Reactor中,代码如下:
    final ChannelFuture initAndRegister() {
        Channel channel = null;
        try {
            // 创建一个Channel
            channel = channelFactory().newChannel();
            // 初始化处理器Handler
            init(channel);
        } catch (Throwable t) {
            if (channel != null) {
                channel.unsafe().closeForcibly();
            }
            // 还没有注册到线程池,使用默认线程GlobalEventExecutor
            return new DefaultChannelPromise(channel,
                            GlobalEventExecutor.INSTANCE).setFailure(t);
        }
        // 将channel注册到Reactor线程池
        ChannelFuture regFuture = group().register(channel);
        if (regFuture.cause() != null) {
            if (channel.isRegistered()) {
                channel.close();
            } else {
                channel.unsafe().closeForcibly();
            }
        }
        return regFuture;
    }

abstract void init(Channel channel) throws Exception;其中的init()主要用于初始化处理器Handler,可视为一个模板方法,由子类Bootstrap或ServerBootstrap实现具体的初始化细节。
接着分析实现绑定本地端口的doBind0()方法:
    private static void doBind0(final ChannelFuture regFuture, final Channel channel,
            final SocketAddress localAddress, final ChannelPromise promise) {
        channel.eventLoop().execute(new Runnable() {
            @Override
            public void run() {
                if (regFuture.isSuccess()) {
                    channel.bind(localAddress, promise)
                            .addListener(ChannelFutureListener.CLOSE_ON_FAILURE);
                } else {
                    promise.setFailure(regFuture.cause());
                }
            }
        });
}如果你对channel.eventLoop().execute()的用法有疑问,再次回顾这条规则:一个Channel产生的IO事件始终由其注册到的线程处理。绑定事件是一个类似write的出站事件,所以需要由channel注册到的线程完成。为什么不使用regFuture直接添加Futurelistener完成绑定处理呢?代码中的解释是注册不一定成功,失败后可能执行的线程并不是注册的线程(我查看代码在这里仅仅调用register(Channel)并不会有这样的情况)。
这个bind过程夹杂很多私货,总结一下流程:
- 使用ChannelFactory创建一个Channel
- 调用init()方法初始化Channel,主要是绑定处理器
- 注册到一个Reactor线程池
- 对注册的异步结果处理:注册成功进行绑定操作,此时绑定失败将会关闭Channel返回异步绑定失败,绑定成功返回异步成功;注册失败直接返回异步注册失败。
2.2 ServerBootstrap
关键字段如下:
    // 为accept的客户端channel设置的选项参数
    private final Map<ChannelOption<?>, Object> childOptions = new LinkedHashMap<>();
    // 为accept的客户端channel设置的属性键值对
    private final Map<AttributeKey<?>, Object> childAttrs = new LinkedHashMap<>();
    // subReactor线程池,父类的group成为mainReactor线程池
    private volatile EventLoopGroup childGroup;
    // subReactor线程池的事件处理器,一般为ChannelInitializer初始化处理器链
private volatile ChannelHandler childHandler;ServerBootstrap中的关键方法只有父类中的模板方法init(channel)。
2.2.1 init方法
ServerBootstrap的init(channel)方法,完成的工作有:
- 设置serverChannel的选项参数
- 设置serverChannel的属性键值对
- 添加处理serverChannel的IO事件处理器
其中1和2两条都比较简单,不再列出代码,主要看3的处理,代码如下:
    void init(Channel channel) throws Exception {
        // 1.设置serverChannel的选项参数
        // 2.设置serverChannel的属性键值对
        // 3.添加处理serverChannel事件的处理器
        ChannelPipeline p = channel.pipeline();
        p.addLast(new ChannelInitializer<Channel>() {
            @Override
            public void initChannel(Channel ch) throws Exception {
                final ChannelPipeline pipeline = ch.pipeline();
                ChannelHandler handler = handler();
                if (handler != null) {
                    pipeline.addLast(handler);
                }
                ch.eventLoop().execute(new Runnable() {
                    @Override
                    public void run() {
                        pipeline.addLast(new ServerBootstrapAcceptor(
                                currentChildGroup,currentChildHandler,
                                currentChildOptions, currentChildAttrs));
                    }
                });
            }
        });
}可见,向serverChannel添加是一个初始化处理器ChannelInitializer,完成的主要工作是将用户Handler以及一个ServerBootstrapAcceptor添加到serverChannel的处理器链中。此处需要注意的是,结合文章最开始的示例,p.addLast()方法在main线程中执行,而initChannel()方法将在Channel注册到的线程中执行,执行的时机是该ChannelInitializer被添加到ChannelPipeline中时但晚于p.addLast()方法。明白了这点,继续分析ch.eventLoop().execute()的使用,这是因为需要保证ServerBootstrapAcceptor被添加到处理器链的最尾部以便不破坏mainReactor将accept接受的Channel连接传递给subReactor。但是当通过handler()获得的用户Handler也是一个ChannelInitializer,如果只是常规的使用pipeline.addLast(acceptor)将导致acceptor并不在处理器链的最尾部。
2.2.2 ServerBootstrapAcceptor静态内部类
在前面的分析中,不断提到了ServerBootstrapAcceptor,正对应文章最开始图中绿色的acceptor。Netty默认实现了这个acceptor处理器,主要功能是将mainReactor接受的Channel传递给subReactor。该类的字段如下:
    private final EventLoopGroup childGroup;
    private final ChannelHandler childHandler;
    private final Entry<ChannelOption<?>, Object>[] childOptions;
private final Entry<AttributeKey<?>, Object>[] childAttrs;与ServerBootstrap类的关键字段一致,由此可见这个内部类是一个关键点,首先看该类的类签名:
private static class ServerBootstrapAcceptor extends ChannelInboundHandlerAdapter该类继承自ChannelInboundHandlerAdapter,作为Netty的使用者对这个类很熟悉,如果你只是初学,可在学完本章之后继续查看这个链接。首先明确这个Handler处理器是一个inbound事件处理器,需要注意的是:Netty将ServerChannel接受客户端连接的accept事件抽象为Read读取事件。因此,我们重点关注channelRead()方法,其完成的工作有:
- 配置Channel,包括Channel上的处理器链,Channel的选项参数及属性键值对。
- 将服务端accept的客户端Channel注册到subReactor线程池的一个线程上
其中的代码清晰易懂,代码如下:
    public void channelRead(ChannelHandlerContext ctx, Object msg) {
        // 服务器accept的客户端channel
        final Channel child = (Channel) msg;
        // 设置处理器链
        child.pipeline().addLast(childHandler);
        // 设置channel的选项参数
        for (Entry<ChannelOption<?>, Object> e: childOptions) {
            try {
                if (!child.config().setOption(
                             (ChannelOption<Object>) e.getKey(), e.getValue())) {
                    logger.warn("Unknown channel option: " + e);
                }
            } catch (Throwable t) {
                logger.warn("Failed to set a channel option: " + child, t);
            }
        }
        // 设置channel的属性键值对
        for (Entry<AttributeKey<?>, Object> e: childAttrs) {
            child.attr((AttributeKey<Object>) e.getKey()).set(e.getValue());
        }

        // 将客户端channel注册到subReactor线程池,注册失败或者抛出异常则关闭channel
        try {
            childGroup.register(child).addListener(new ChannelFutureListener() {
                @Override
                public void operationComplete(ChannelFuture future) throws Exception {
                    if (!future.isSuccess()) {
                        forceClose(child, future.cause());
                    }
                }
            });
        } catch (Throwable t) {
            forceClose(child, t);
        }
    }

    private static void forceClose(Channel child, Throwable t) {
        child.unsafe().closeForcibly();
        logger.warn("Failed to register an accepted channel: " + child, t);
}其中的exceptionCaught()方法也值得关注,当ServerChannel事件在执行中产生异常时,用户并不希望ServerChannel被关闭,因为还有其他的客户端连接需要处理。为此,Netty处理异常时使用这样的极致:产生异常后暂停接受客户端连接,1s以后再恢复接受连接。
    public void exceptionCaught(ChannelHandlerContext ctx, Throwable cause)
                    throws Exception {
        final ChannelConfig config = ctx.channel().config();
        if (config.isAutoRead()) {
            // 停止accept客户端channel的连接
            config.setAutoRead(false);
            // 1s以后重新接受客户端channel连接
            ctx.channel().eventLoop().schedule(new Runnable() {
                @Override
                public void run() {
                   config.setAutoRead(true);
                }
            }, 1, TimeUnit.SECONDS);
        }
        ctx.fireExceptionCaught(cause);
    }
2.3 Bootstrap
Bootstrap是客户端启动器,只增加了一个字段:
private volatile SocketAddress remoteAddress; // 服务端地址2.1 init方法
客户端的init()方法很简单,只完成配置Channel的工作,包括Channel上的处理器链,Channel的选项参数及属性键值对。代码如下:
    void init(Channel channel) throws Exception {
        ChannelPipeline p = channel.pipeline();
        // 设置处理器链
        p.addLast(handler());
        // 设置channel的选项参数
        final Map<ChannelOption<?>, Object> options = options();
        synchronized (options) {
            for (Entry<ChannelOption<?>, Object> e: options.entrySet()) {
                try {
                    if(!channel.config().setOption(
                            (ChannelOption<Object>)e.getKey(), e.getValue())) {
                        logger.warn("Unknown channel option: " + e);
                    }
                } catch (Throwable t) {
                    logger.warn("Failed to set a channel option: " + channel, t);
                }
            }
        }
        // 设置channel的属性键值对
        final Map<AttributeKey<?>, Object> attrs = attrs();
        synchronized (attrs) {
            for (Entry<AttributeKey<?>, Object> e: attrs.entrySet()) {
                channel.attr((AttributeKey<Object>) e.getKey()).set(e.getValue());
            }
        }
    }
2.2 connect方法
客户端需要连接到远程服务端,才能进行网络通讯,所以Bootstrap作为客户端启动器必然要有connect(remoteAddr)方法。该方法有很多变种,关键的一个如下:
    public ChannelFuture connect(SocketAddress remoteAddress,
                    SocketAddress localAddress) {
        if (remoteAddress == null) {
            throw new NullPointerException("remoteAddress");
        }
        validate();
        return doConnect(remoteAddress, localAddress);
}继续分析doConnect()方法:
    private ChannelFuture doConnect(final SocketAddress remoteAddress,
                                                final SocketAddress localAddress) {
        final ChannelFuture regFuture = initAndRegister();  //创建Channel并注册到线程池
        final Channel channel = regFuture.channel();
        if (regFuture.cause() != null) {
            return regFuture;
        }

        final ChannelPromise promise = channel.newPromise();
        if (regFuture.isDone()) {
            // 注册异步操作完成,再提交一个连接异步任务
            doConnect0(regFuture, channel, remoteAddress, localAddress, promise);
        } else {
            // 注册异步操作未完成,当注册异步完成时提交一个连接异步任务
            regFuture.addListener(new ChannelFutureListener() {
                @Override
                public void operationComplete(ChannelFuture future) throws Exception {
                    doConnect0(regFuture, channel, remoteAddress, localAddress, promise);
                }
            });
        }
        return promise;
}此处的处理与ServerBootstrap的bind()方法很类似,可类比分析。由此推知,doConnect0()方法将向channel注册的线程池提交一个异步连接任务。的确如此,代码如下:
    private static void doConnect0(final ChannelFuture regFuture, final Channel channel,
                                final SocketAddress remoteAddress,
                                final SocketAddress localAddress,
                                final ChannelPromise promise) {
        channel.eventLoop().execute(new Runnable() {
            @Override
            public void run() {
                if (regFuture.isSuccess()) {
                    if (localAddress == null) {
                        channel.connect(remoteAddress, promise);
                    } else {
                        channel.connect(remoteAddress, localAddress, promise);
                    }
                    promise.addListener(ChannelFutureListener.CLOSE_ON_FAILURE);
                } else {
                    promise.setFailure(regFuture.cause());
                }
            }
        });
    }


 2200
2200

 被折叠的 条评论
为什么被折叠?
被折叠的 条评论
为什么被折叠?
 到【灌水乐园】发言


