


跨域(非同源策略请求)
同源策略请求 ajax/fetch
跨域传输
部署到同一个web服务器上:同源策略
xampp 修改本地的host文件
127.0.0.1:1234 http://api.qq.com
http: //127.0.0.1:1234/index.html
http://api.qq/.com/getData
服务器拆分
web服务器 :静态资源
data服务器 :业务逻辑和数据分析
图片服务器:
三者都一样就是同源,只要有一个不同就是跨域
- 协议
- 域名
- 端口号
web服务器地址:http://127.0.0.1:3000/index.html
数据接口地址:http://127.0.0.1:4000/list
跨域问题产生及其价值意义
以下不存在跨域请求的限制包括:
- script
- img
- link
- iframe
1. JSONP跨域解决方案的底层原理
利用script标签解决跨域问题
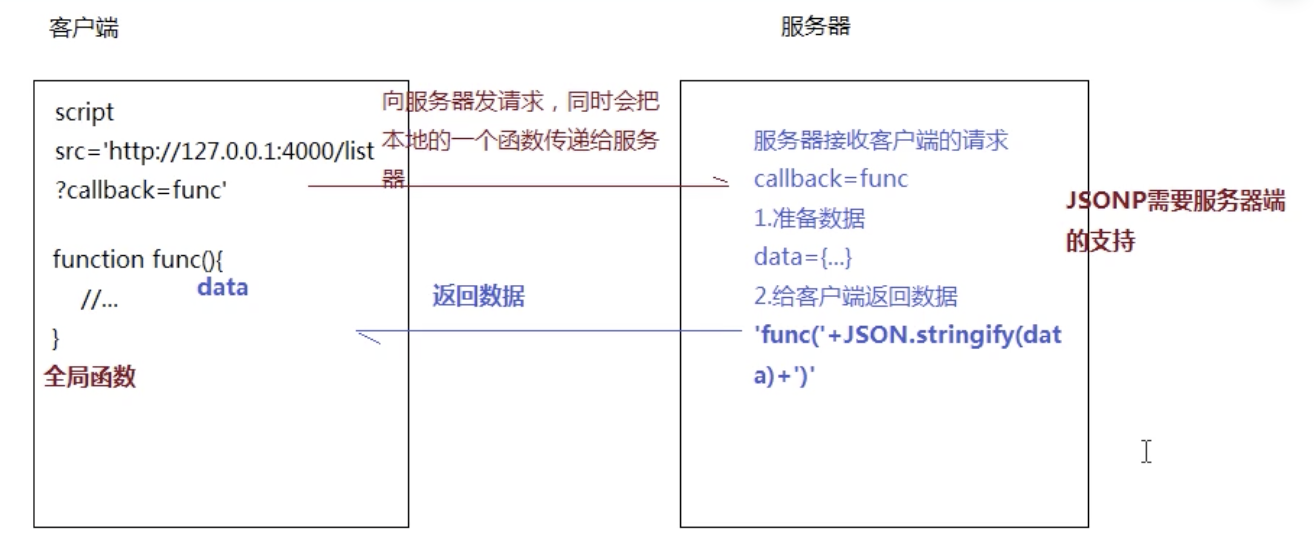
JSONP只能处理get请求,存在安全问题(资源文件请求,get请求,安全问题)
jquery实现的一个jsonp请求的例子
客户端代码如下
import $ from 'jquery'

$(document).ready(function() {
  $.ajax({
    url: 'http://127.0.0.1:8001/list',
    method: 'get',
    dataType:'jsonp',
    success: function(res){
      console.log(res.message)
    }
  })
})
服务器端代码,用node express模拟接口返回数据
let express = require('express')
app = express();
app.listen(8001,_=> {
  console.log('ok')
})
app.get('/list',(req, res)=> {
  let {callback =Function.prototype }=req.query
  let data = {
    code: 0,
    message: '前端岚枫'
  }
  res.send(callback+ '('+ JSON.stringify(data)+')')
})
2. CORS跨域资源共享
CORS是一个W3C标准,全称是"跨域资源共享"(Cross-origin resource sharing)。
CORS 需要浏览器和后端同时支持。IE 8 和 9 需要通过 XDomainRequest 来实现。
浏览器会自动进行 CORS 通信,实现 CORS 通信的关键是后端。只要后端实现了 CORS,就实现了跨域。
服务端设置 Access-Control-Allow-Origin 就可以开启 CORS。 该属性表示哪些域名可以访问资源,如果设置通配符则表示所有网站都可以访问资源。
例子:
客户端:
$.ajax({
    url: 'http://127.0.0.1:8001/list',
    method: 'post',
    dataType:'text',
    success: function(res){
      console.log(res) // ‘hello’
    }
  })
})
服务端:
let express = require('express')
app = express();
app.post("/list",(req,res)=>{
  let origin = req.headers.origin
  res.header("Access-Control-Allow-Origin", origin); // 设置哪个源可以访问
  res.header('Access-Control-Allow-Credentials','true'),  // 允许携带cookie
  res.header('Access-Control-Allow-Methods', 'PUT, GET, POST, DELETE, OPTIONS'); //允许方法访问
  // res.header("Access-Control-Allow-Headers", "X-Requested-With");
  res.header('Access-Control-Allow-Headers','X-Requested-With', 'Content-Type');
  res.send("hello")
})
app.listen(8001,_=> {
  console.log("监听成功!")
})
上述代码由http://127.0.0.1:8000向http://127.0.0.1:8001/跨域请求,正如我们上面所说的,后端是实现 CORS 通信的关键。
与jsonp相比较:
CORS与JSONP都能解决跨越问题,但是比JSONP更强大。
JSONP只支持GET请求,CORS支持所有类型的HTTP请求。JSONP的优势在于支持老式浏览器,以及可以向不支持CORS的网站请求数据。
3. 基于http proxy 实现跨域请求
http proxy => webpack webpack-dev-server
这个主要前端使用的一个代理,解决开发环境的跨域问题
webpack.config.js 配置:
const path = require('path');

module.exports = {
  entry: './src/index.js',
  output: {
    filename: 'bundle.js',
    path: path.resolve(__dirname, 'dist')
  }
  ,
  devServer: {
    contentBase: path.join(__dirname, "/"),
    compress: true,
    host: '127.0.0.1',
    port: 8000,

    proxy: {
      // 设置代理
      '/api': {
        target: 'http://127.0.0.1:8001/',
        changeOrigin: true,
        pathRewrite: {'^/api' : ''}
      }
    }
  }
};
客户端代码:
 $.ajax({
    url: '/api/list',
    method: 'get',
    dataType:'text',
    success: function(res){
      console.log(res)
    }
服务器端代码:
let express = require('express')
app = express();
app.listen(8001,_=> {
  console.log('ok')
})
app.get('/list',(req, res)=> {
  // let {callback =Function.prototype }=req.query
  let data = {
    code: 0,
    message: '前端岚枫'
  }
  res.send(data)
})
4. 基于post message 实现跨域处理
1.页面和其打开的新窗口的数据传递
2.多窗口之间消息传递
3.页面与嵌套的iframe消息传递
postMessage()方法
在HTML5中新增了postMessage方法,postMessage可以实现跨文档消息传输(Cross Document Messaging),Internet Explorer 8, Firefox 3, Opera 9, Chrome 3和 Safari 4都支持postMessage。
该window.postMessage()方法安全地启用Window对象之间的跨源通信;例如,在页面和它产生的弹出窗口之间,或者在页面和嵌入其中的iframe之间。
通常,当且仅当它们源自的页面共享相同的协议、端口号和主机(也称为“同源策略”)时,允许不同页面上的脚本相互访问。window.postMessage()提供一种受控制的机制来安全地规避这种限制(如果使用得当)。
从广义上讲,一个窗口可以获得对另一个窗口的引用(例如,可以使用targetWindow=window.opener),然后使用targetWindow.postMessage() 在其上发送一个MessageEvent。然后,接收窗口可根据需要自由处理此事件。传递给window.postMessage()的参数(即“message”)通过事件对象暴露给接收窗口。
项目中用的例子:星轨询盘企业微信登录
例子demo
父级页面:
<!doctype html>
<html>
  <head>
    <title>起步</title>
  </head>
  <body>
    <div>
      <p>客户端页面</p>
      <iframe id="iframe" src="http://127.0.0.1:8001/iframe.html" height="600" width="800"></iframe>
    </div>
    <script src="./dist/bundle.js"></script>
  </body>
</html>

// index
var $iframe = document.getElementById('iframe')
$iframe.onload = function() {
  $iframe.contentWindow.postMessage({a: 1}, 'http://127.0.0.1:8001');
}

// 获取从iframe传来数据
window.onmessage = function(e) {
  console.log(e.data)
}
iframe页面代码:
<!doctype html>
<html>
  <head>
    <title>iframe</title>
  </head>
  <body>
    <div>
      <p>postMessage</p>

    </div>
    <!-- <script src="./dist/bundle.js"></script> -->
    <script>
      window.addEventListener("message", receiveMessage, false);
      function receiveMessage(event)
        {

          var origin = event.origin
          if (origin !== "http://0.0.0.0:8000")
            return;
          // console.log(event.data)

          // 像父级页面传送数据
          event.source.postMessage('iframe数据:' + JSON.stringify(event.data), event.origin)
          // ...
        }
    </script>
  </body>
</html>
服务端代码
let express = require('express')
app = express();
app.listen(8001,_=> {
  console.log('ok')
})
app.use(express.static('./'))
详细了解相关的知识:https://developer.mozilla.org/zh-CN/docs/Web/API/Window/postMessage
当然postmessage也有一些不足的地方:
- ie8,ie9下传递的数据类型值支持字符串类型,可以使用 **JSON对象和字符串之间的相互转换,**来解决这个问题;
- ie6,ie7需要写兼容方案,window.name比较靠谱;
5. 基于iframe的跨域解决方案
window.name/document.domain/location.hash
1. document.domain + iframe
只能实现同一个主域名,不同子域名之间的操作
document.domain这个方法使用极其简单,但是也有较大的限制,主要用于主域相同的域之间的数据通信。
访问协议、端口号一致,域名不一致,但具有相同上级域名的页面
2. window.name + iframe (三个页面)
- 0.0.0.0/index.html:应用页面。
- 0.0.0.0/proxy.html:代理文件,一般是一个没有任何内容的html文件,需要和应用页面在同一域下。
- 127.0.0.1/data.html:应用页面需要获取数据的页面,可称为数据页面。
- 在应用页面(0.0.0.0/index.html)中创建一个iframe,把其src指向数据页面(127.0.0.1/data.html)。
数据页面会把数据附加到这个iframe的window.name上,data.html代码如下:
<!doctype html>
<html>
  <head>
    <title>起步</title>
  </head>
  <body>
    <div>
      <p>data</p>

    </div>
    <script type="text/javascript">
      window.name = 'lanfeng!';    // 这里是要传输的数据,大小一般为2M,IE和firefox下可以大至32M左右                               // 数据格式可以自定义,如json、字符串
  </script>
  </body>
</html>
- 在应用页面(0.0.0.0/index.html)中监听iframe的onload事件,在此事件中设置这个iframe的src指向本地域的代理文件(代理文件和应用页面在同一域下,所以可以相互通信)。index.html部分代码如下:
<!doctype html>
<html>
  <head>
    <title>起步</title>
  </head>
  <body>
    <div>
      <p>客户端页面</p>
      </div>
    <script src="./dist/bundle.js"></script>
    <script type="text/javascript">
      var state = 0,
      iframe = document.createElement('iframe'),
      loadfn = function() {
          if (state === 1) {
              var data = iframe.contentWindow.name;    // 读取数据
              alert(data);    //'lanfeng'
          } else if (state === 0) {
              state = 1;
            // 需要先把地址指向同源才可以
              iframe.contentWindow.location = "http://0.0.0.0:8000/proxy.html";    // 设置的代理文件
          }

          // 获取数据后清除
      iframe.contentWindow.document.write('');
      iframe.contentWindow.close();
      document.body.removeChild(iframe);
      };

      iframe.src = 'http://127.0.0.1:8001/data.html';
      if (iframe.attachEvent) {
          iframe.attachEvent('onload', loadfn);
      } else {
          iframe.onload  = loadfn;
      }
      document.body.appendChild(iframe);

  </script>
  </body>
</html>
- 获取数据以后销毁这个iframe,释放内存;这也保证了安全(不被其他域frame js访问)。
	iframe.contentWindow.document.write('');
  iframe.contentWindow.close();
  document.body.removeChild(iframe);
启动服务代码:
let express = require('express')
app = express();
app.listen(8001,_=> {
  console.log('ok')
})
app.use(express.static('./'))
iframe的src属性由外域转向本地域,跨域数据即由iframe的window.name从外域传递到本地域。这个就巧妙地绕过了浏览器的跨域访问限制,但同时它又是安全操作
3. location.hash
利用location.hash实现跨域iframe自适应
页面域关系:
a.html所属域A:www.A.com
b.html所属域B:www.B.com
问题本质:
js对跨域iframe访问问题,因为要控制a.html中iframe的高度和宽度就必须首先读取得到b.html的大小,A、B不属于同一个域,浏览器为了安全性考虑,使js跨域访问受限,读取不到b.html的高度和宽度.
解决方案:
引入代理代理页面c.html与a.html所属相同域A,c.html是A域下提供好的中间代理页面,假设c.html的地址:www.A.com/c.html ,它负责读取location.hash里面的width和height的值,然后设置与它同域下的a.html中的iframe的宽度和高度.
a.html代码:
首先a.html中通过iframe引入了b.html
<iframe id=”b_iframe” height=”0″ width=”0″ src=”http://www.B.com/b.html” ></iframe>
b.html代码如下:
<script type=”text/javascript”>
var b_width = Math.max(document.documentElement.clientWidth,document.body.clientWidth);
var b_height = Math.max(document.documentElement.clientHeight,document.body.clientHeight);
var c_iframe = document.getElementById(”c_iframe”);
c_iframe.src = c_iframe.src+ '#' +b_width+”|”+b_height
</script>
<iframe id=”c_iframe” height=”0″ width=”0″ src=”http://www.A.com/c.html” style=“display:none” ></iframe>
  // –js读取b.html的宽和高,把读取到的宽和高设置到和a.html在同一个域的中间代理页面车c.html的src的hash里面
c.html 部分代码
<script type=”text/javascript”>
var b_iframe = parent.parent.document.getElementById(”b_iframe”);
var hash_url = window.location.hash;
var hash_width = hash_url.split('#')[1].split(”|”)[0]+”px”;
var hash_height = hash_url.split('#')[1].split(”|”)[1]+”px”;
b_iframe.style.width = hash_width;
b_iframe.style.height = hash_height;
</script>
a.html中的iframe就可以自适应为b.html的宽和高了.
6. webScoket
WebSocket protocol是HTML5一种新的协议。它实现了浏览器与服务器全双工通信,同时允许跨域通讯,是server push技术的一种很好的实现。所以我们可以利用webSocket来进行非同源之间的通信。我们使用Socket.io,它很好地封装了webSocket接口,提供了更简单、灵活的接口,也对不支持webSocket的浏览器提供了向下兼容。
原理:利用webSocket的API,可以直接new一个socket实例,然后通过open方法内send要传输到后台的值,也可以利用message方法接收后台传来的数据。后台是通过new WebSocket.Server({port:3000})实例,利用message接收数据,利用send向客户端发送数据。
WebSocket通信是点对点:
一是建立WebSocket链接的URL加上时间戳保证通信会话是唯一的;
二是在服务端保证父子页面WebSocket一一对应关系。父子页面的WebSocket在Open时都会向服务端发出消息进行注册,建立Senssion之间的对应关系。然后父子页面就可通过双方约束的通信协议进行通信了。
demo例子:
客户端代码:
<!doctype html>
<html>
  <head>
    <title>起步</title>
  </head>
  <body>
    <div>
      <p>客户端页面</p>
      </div>
    <script src="./dist/bundle.js"></script>
    <script>
      let socket = new WebSocket("ws://127.0.0.1:8001");//ws协议是webSocket自己创造的
      socket.onopen = function(){
      socket.send("蓝枫");
      }
      socket.onmessage = function(e){
      console.log(e.data); //你好,蓝枫!
      }
    </script>
  </body>
</html>
// index.js
// socket.io
  let socket = io("http://127.0.0.1:8001");
      socket.on('connect',function(){
        //  监听服务器端消息
        socket.on('message',function(data){
          console.log('data from server'+ data)
        })

        // 监听服务器关闭
        socket.on('disconnect',function(){
          console.log('sever is closed')
        })

        })
        // 发送消息给服务器
      socket.send('岚枫')
服务端代码:
let express = require("express");
 let app = express();
 let WebSocket = require("ws");
 let wss = new WebSocket.Server({port:8001});
 wss.on("connection",function(ws){//先连接
  ws.on("message",function(data){//用message来监听客户端发来的消息
   console.log(data);//岚枫
   ws.send("你好,"+data+"!");
  })
 })

// socket.io
import io from 'socket.io'
let express = require("express");
 let app = express();
 const server = require('http').createServer(app);
 const io = require('socket.io')(server);
 io.on("connection",function(client){//先连接
  console.log(client)
  client.on("event",function(data){//用message来监听客户端发来的消息
   console.log(data);//俞华
   client.send("你好,"+data+"!");
  })
 })
 server.listen(8001);
7. nginx反向代理
nginx反向代理 => 不需要前端干啥
总结:
以上7种方法是暂时总结出的一些解决跨域方案,每种方法都有各自的特点。经常用到的JSONP、CORS跨域资源共享、postMessage


 864
864


 被折叠的 条评论
为什么被折叠?
被折叠的 条评论
为什么被折叠?
 到【灌水乐园】发言


