


free源码调试
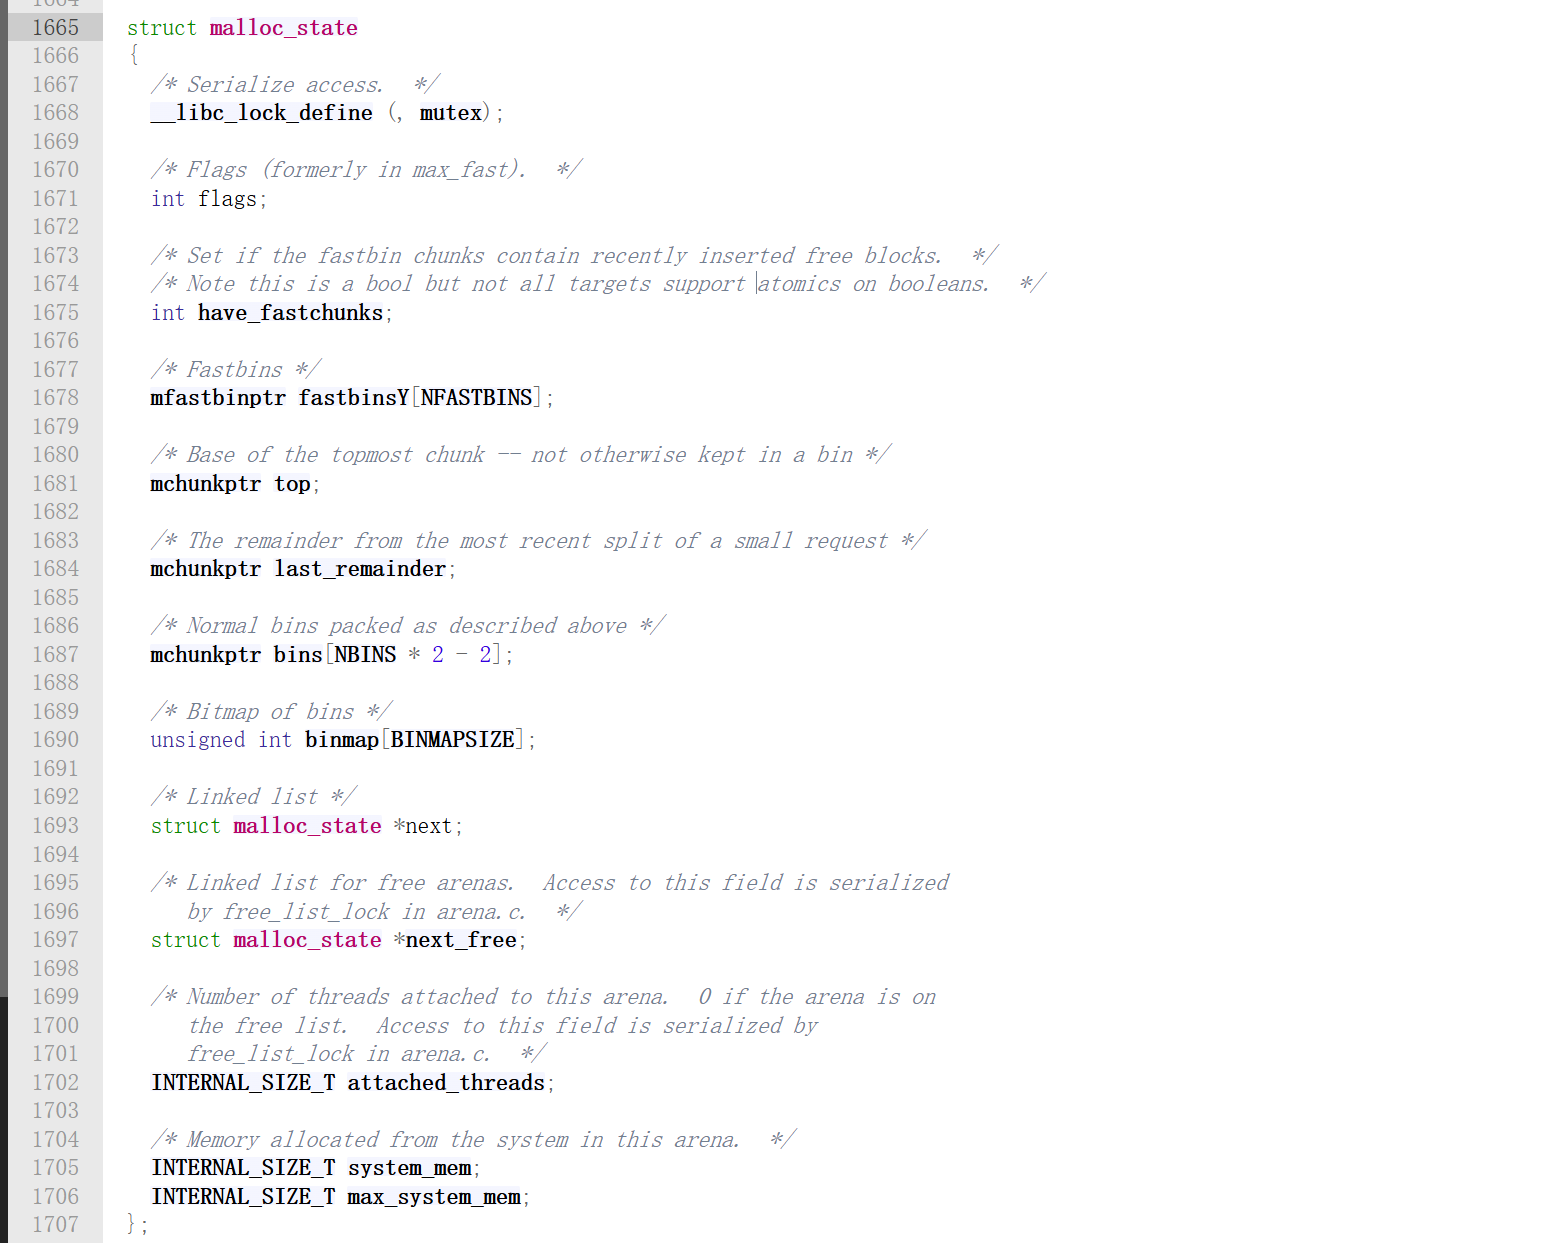
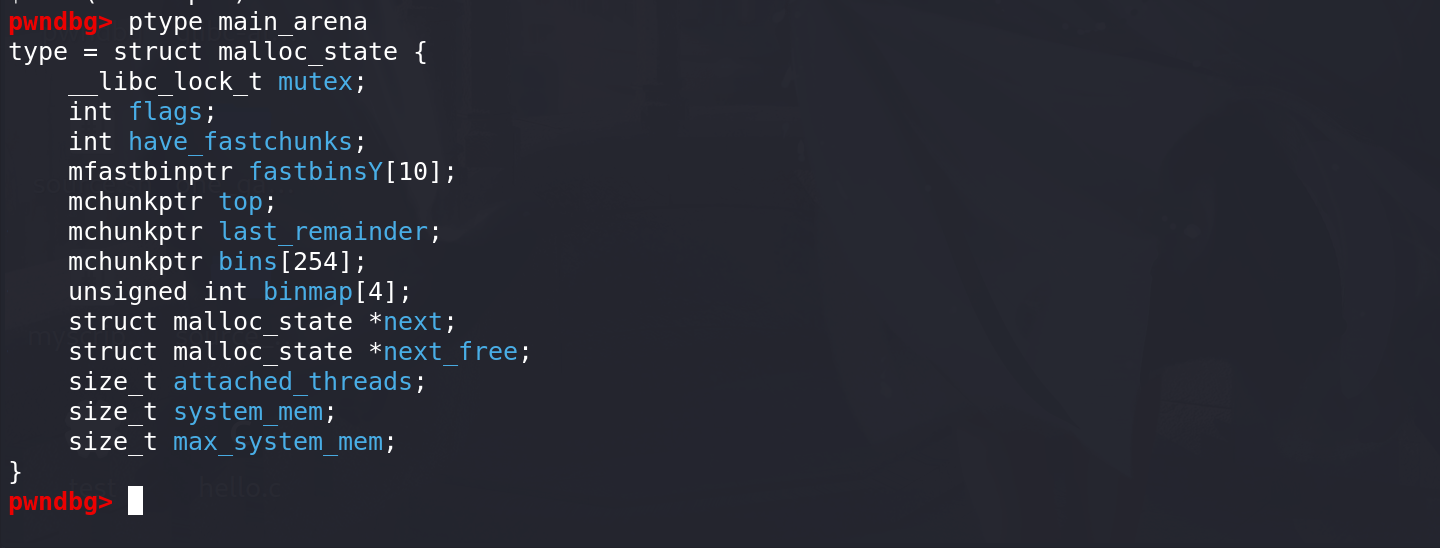
main_arena结构:
-
整体看一下main_arena的结构:
free_hook
-
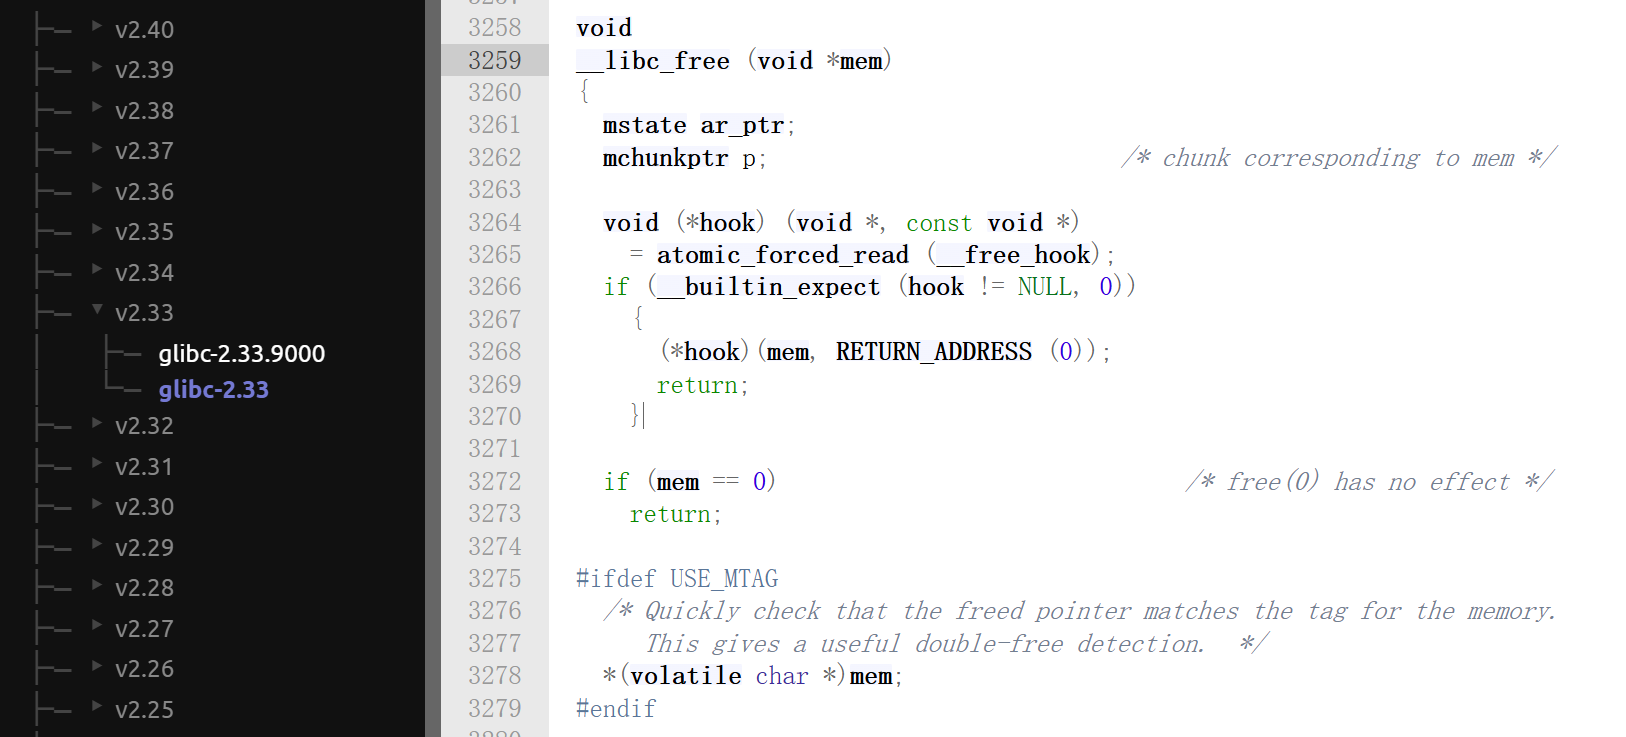
free_hook,在
glibc-2.34前,在调用free前都会检查free_hook中是否存在指针,如果指针存在就会直接去执行对应的函数,此时的rdi值就是释放的chunk地址(准确来说是用户控制的地址):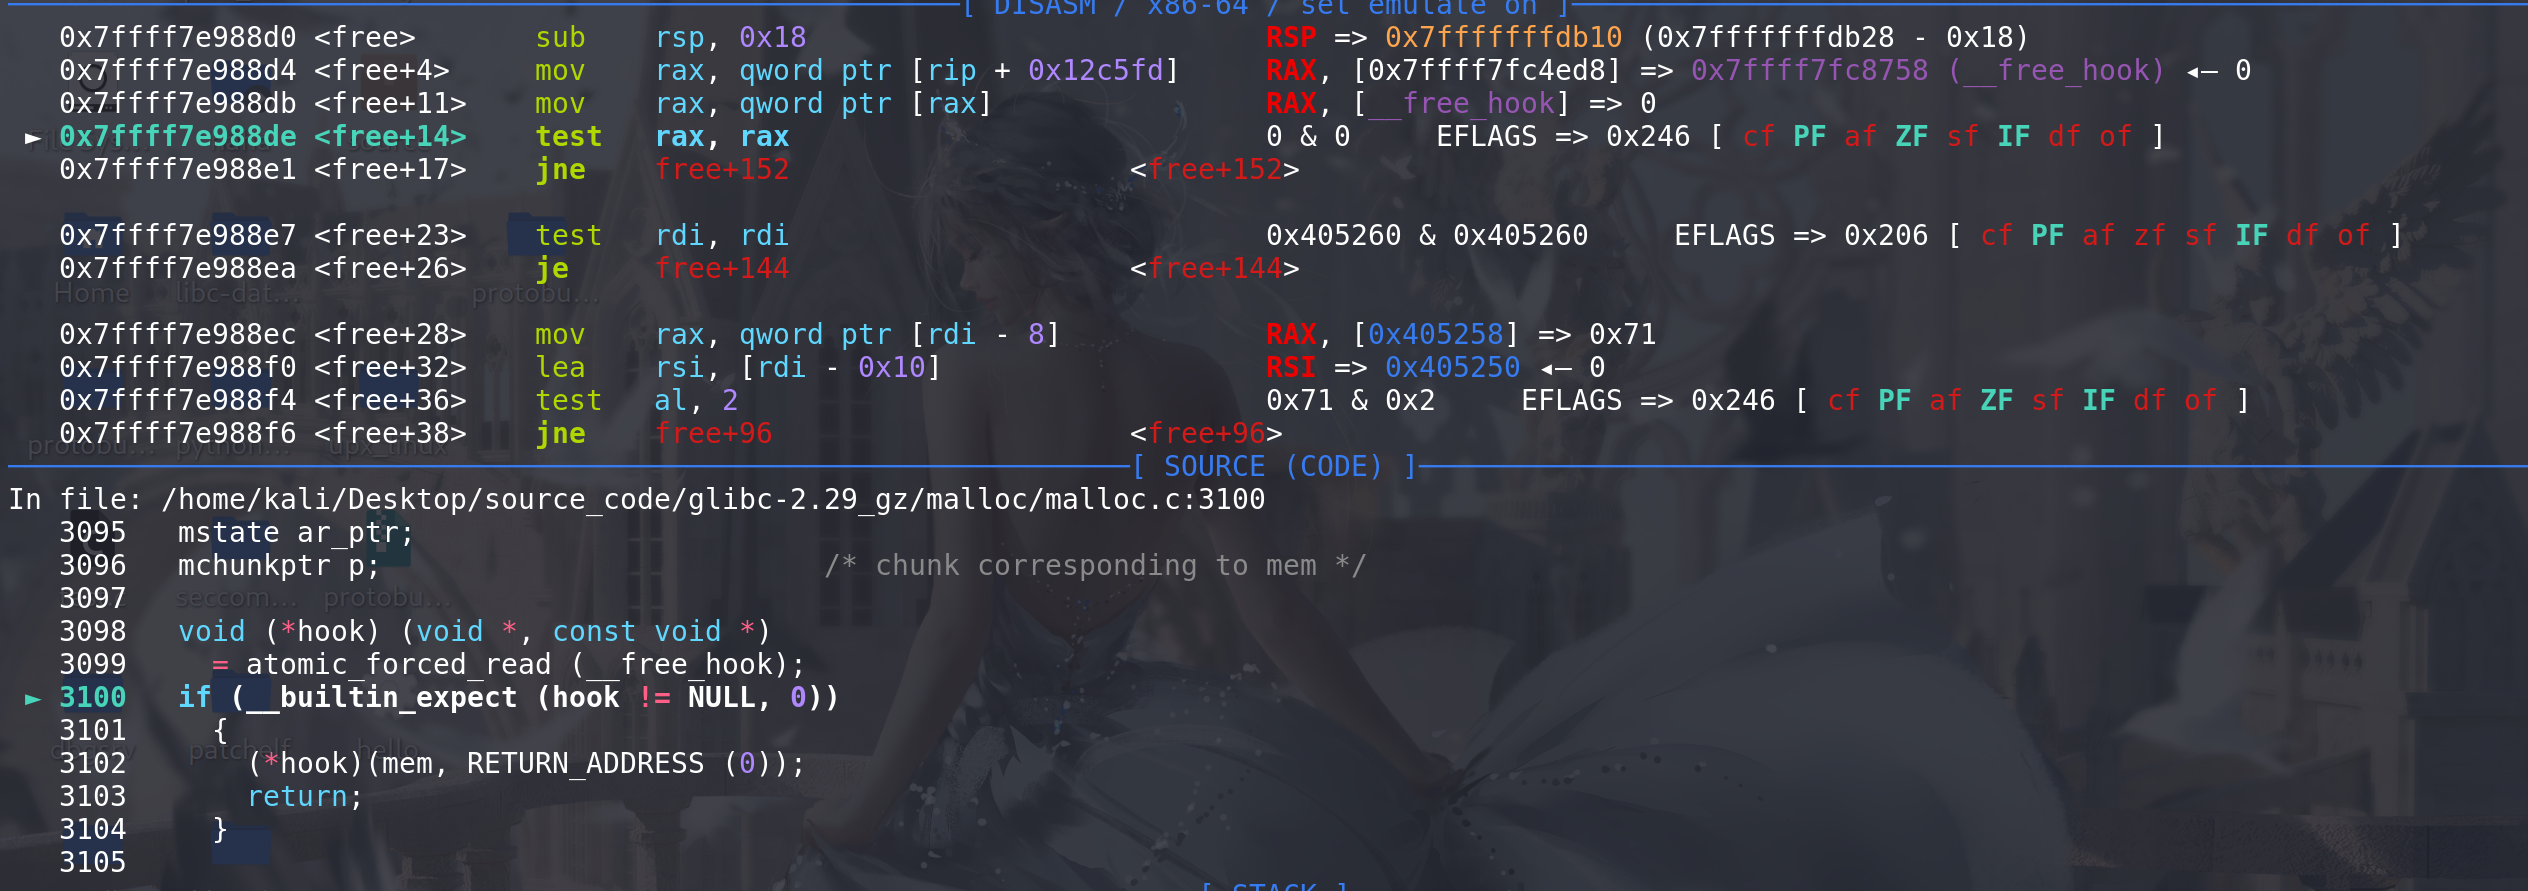
-
覆盖free_hook,并伪造适当的rdi的chunk,可以
直接getshell,或者free_hook + gadget打ORW。 -
glibc-2.33 和 glibc-2.34 在开头的比较,明显
glibc-2.34在free前直接取消了free_hook: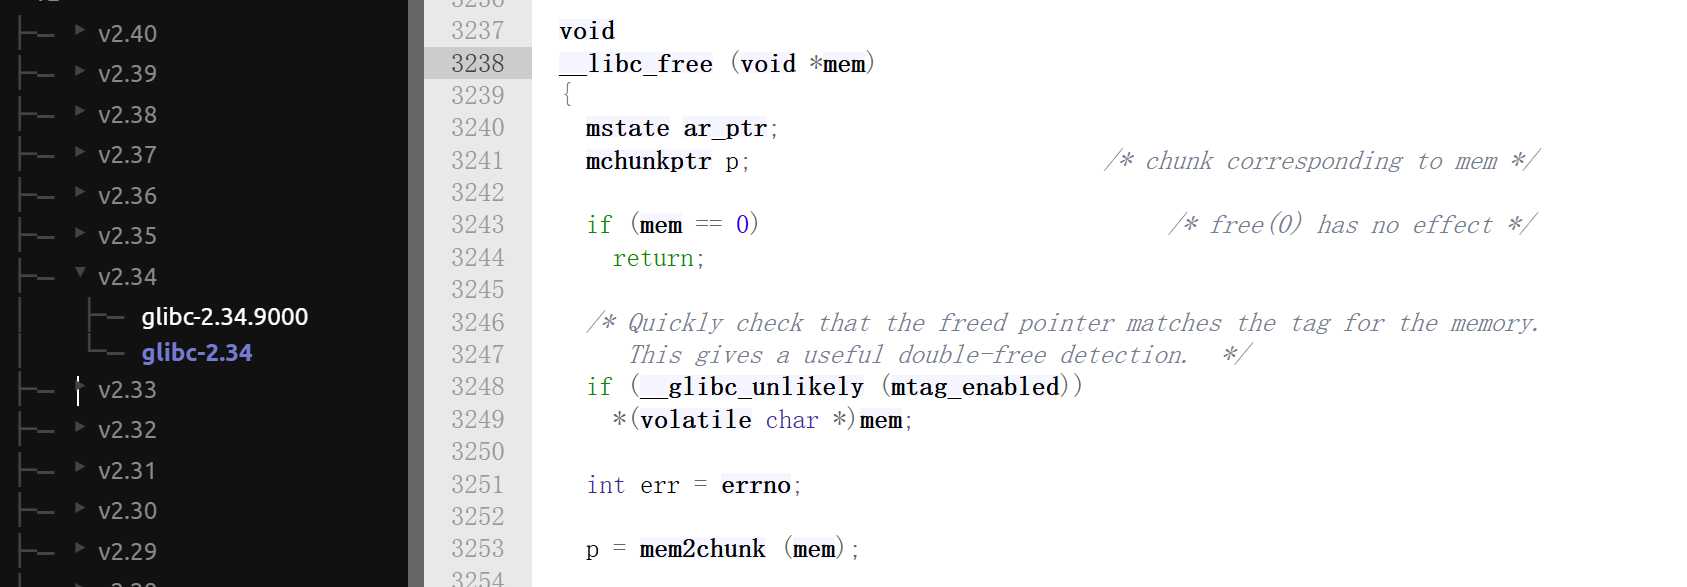
tcache
tcache的结构
-
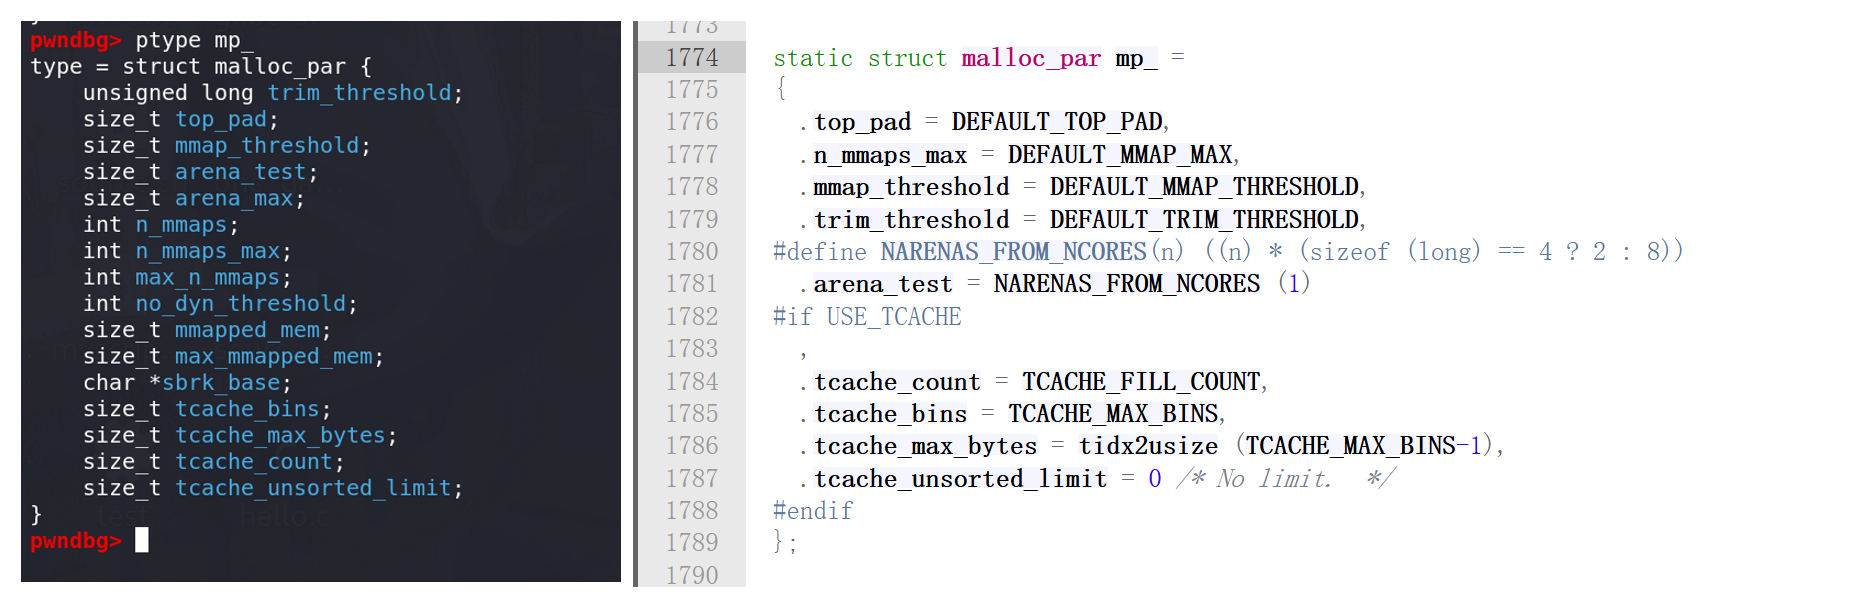
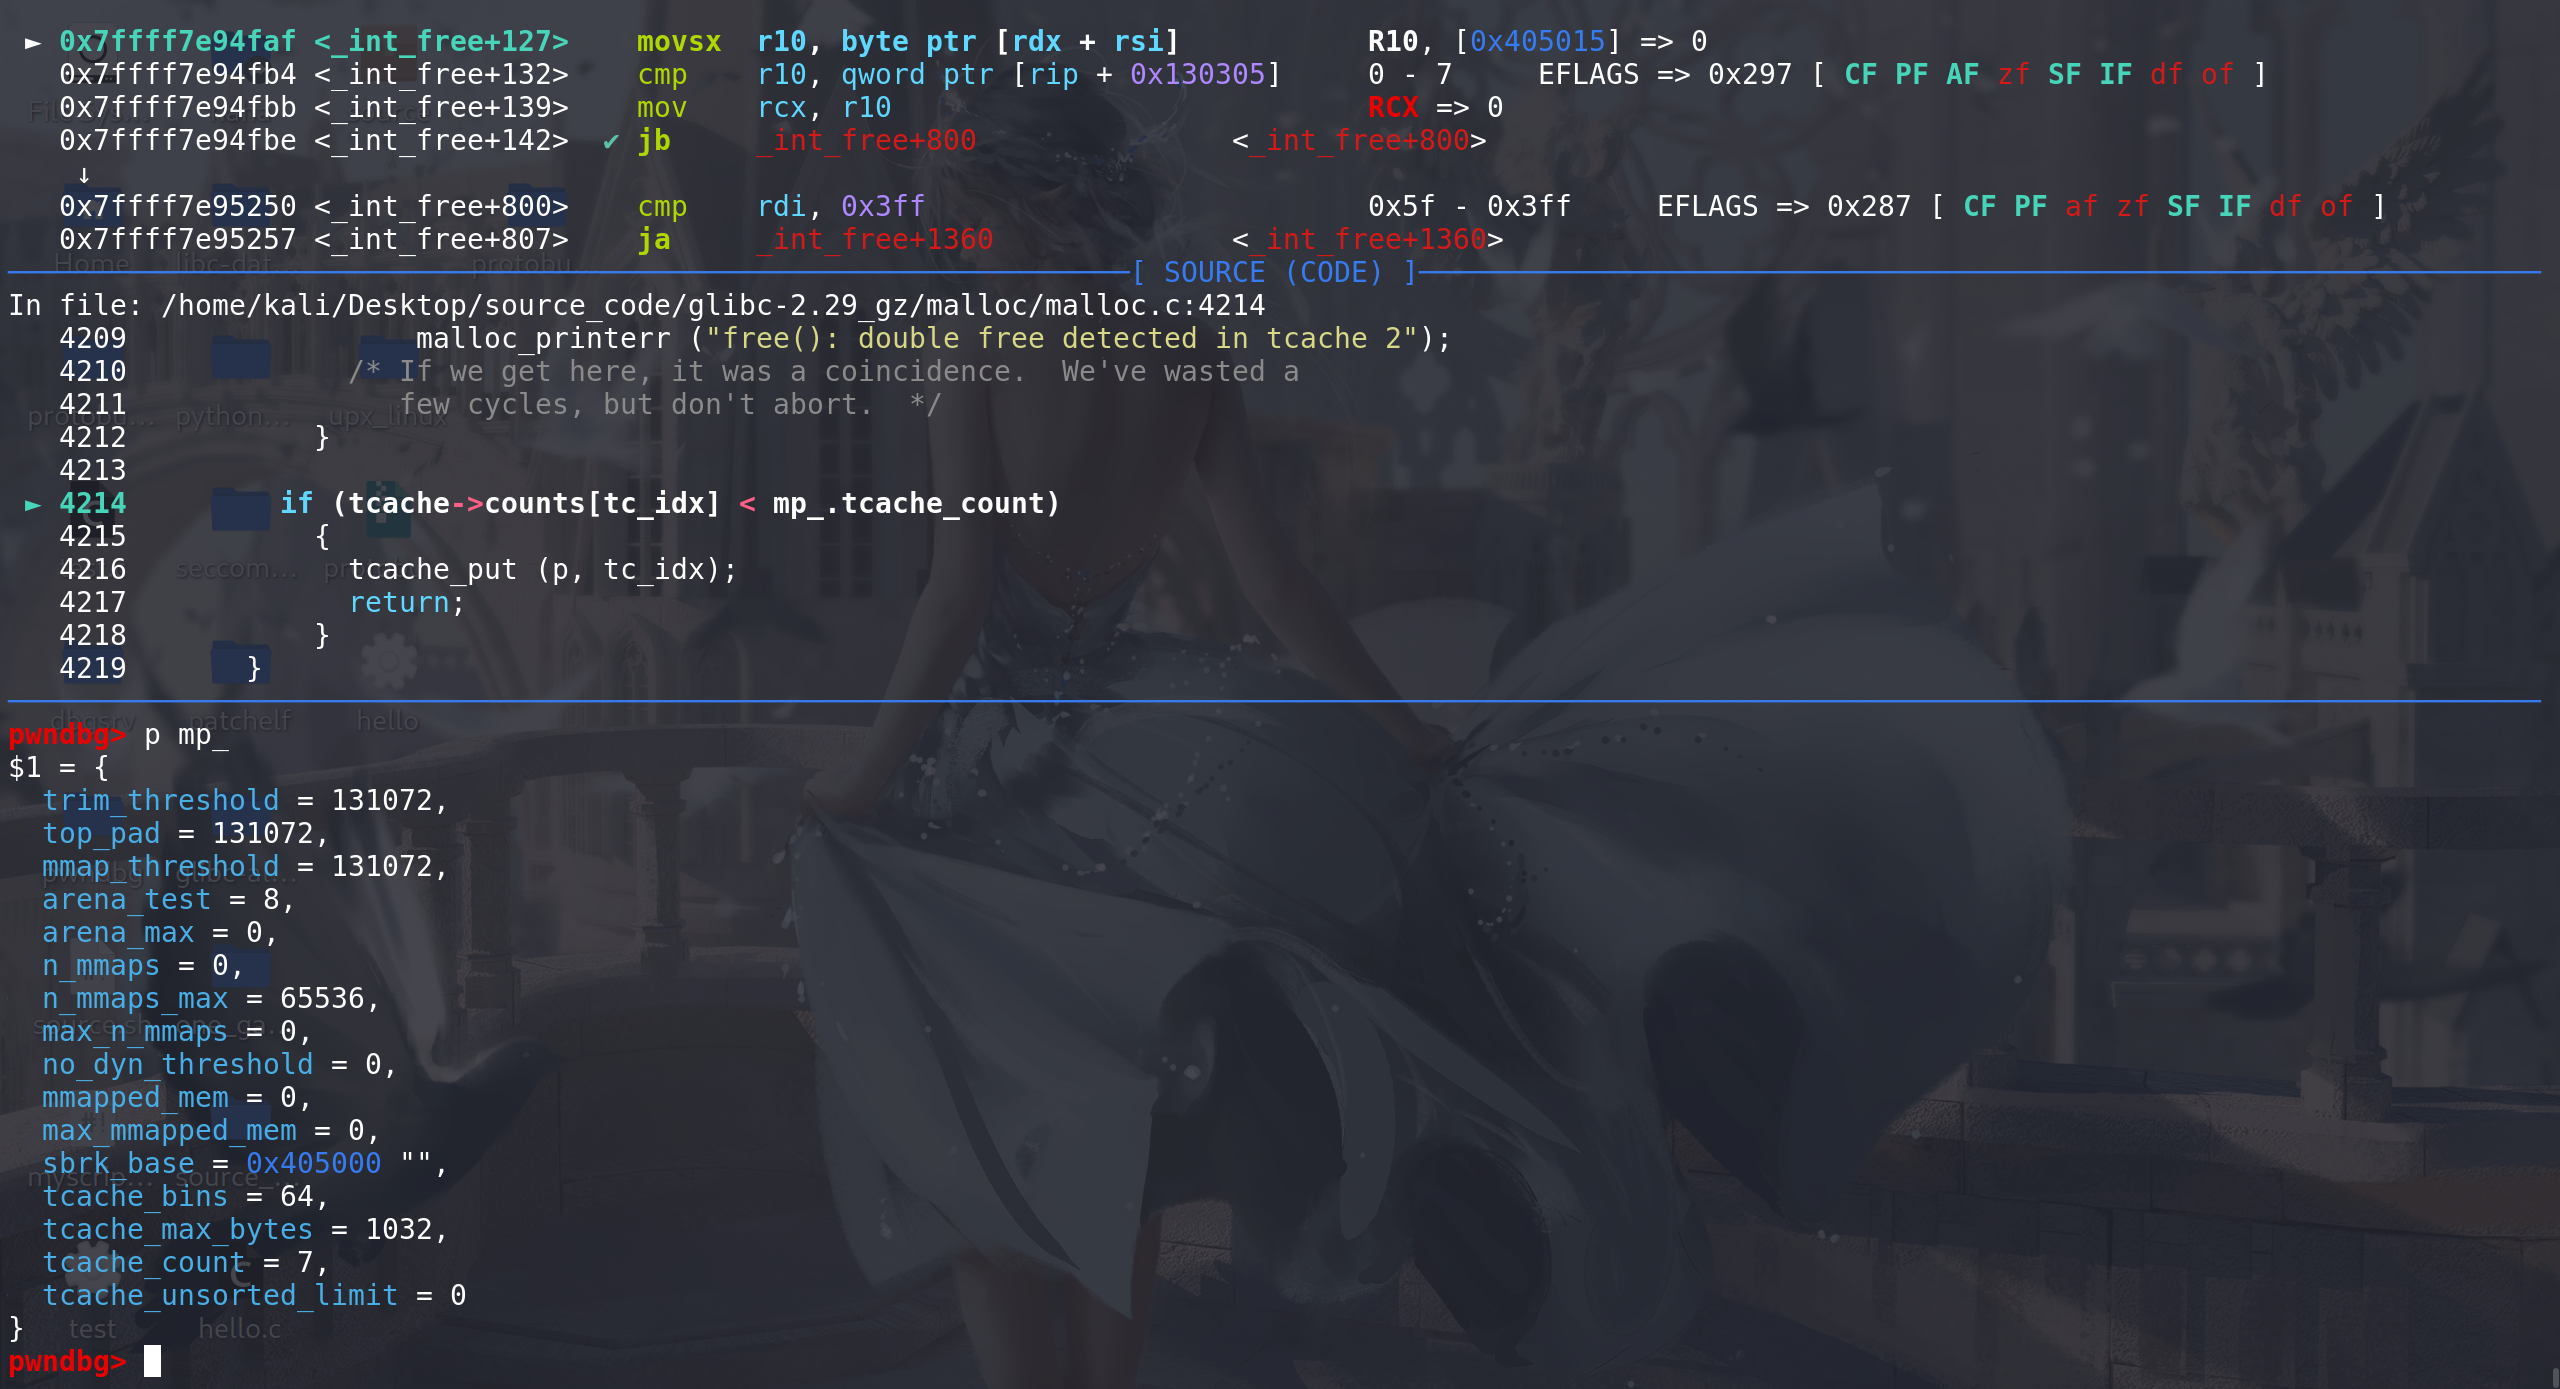
mp_ 结构体,存储了有关tcache的一些全局信息:
tcache_count==> 一个tcache中能放入的chunk的最大个数tcache_bins==> tcachce中能放入的最大chunk在counts中对应的下标
tcache对应的结构体
tcache_perthread_struct:count==> 在tcachce中,同一size大小的chunk的个数entries==> 存放tcachce中,一个chunk链的头指针
下面
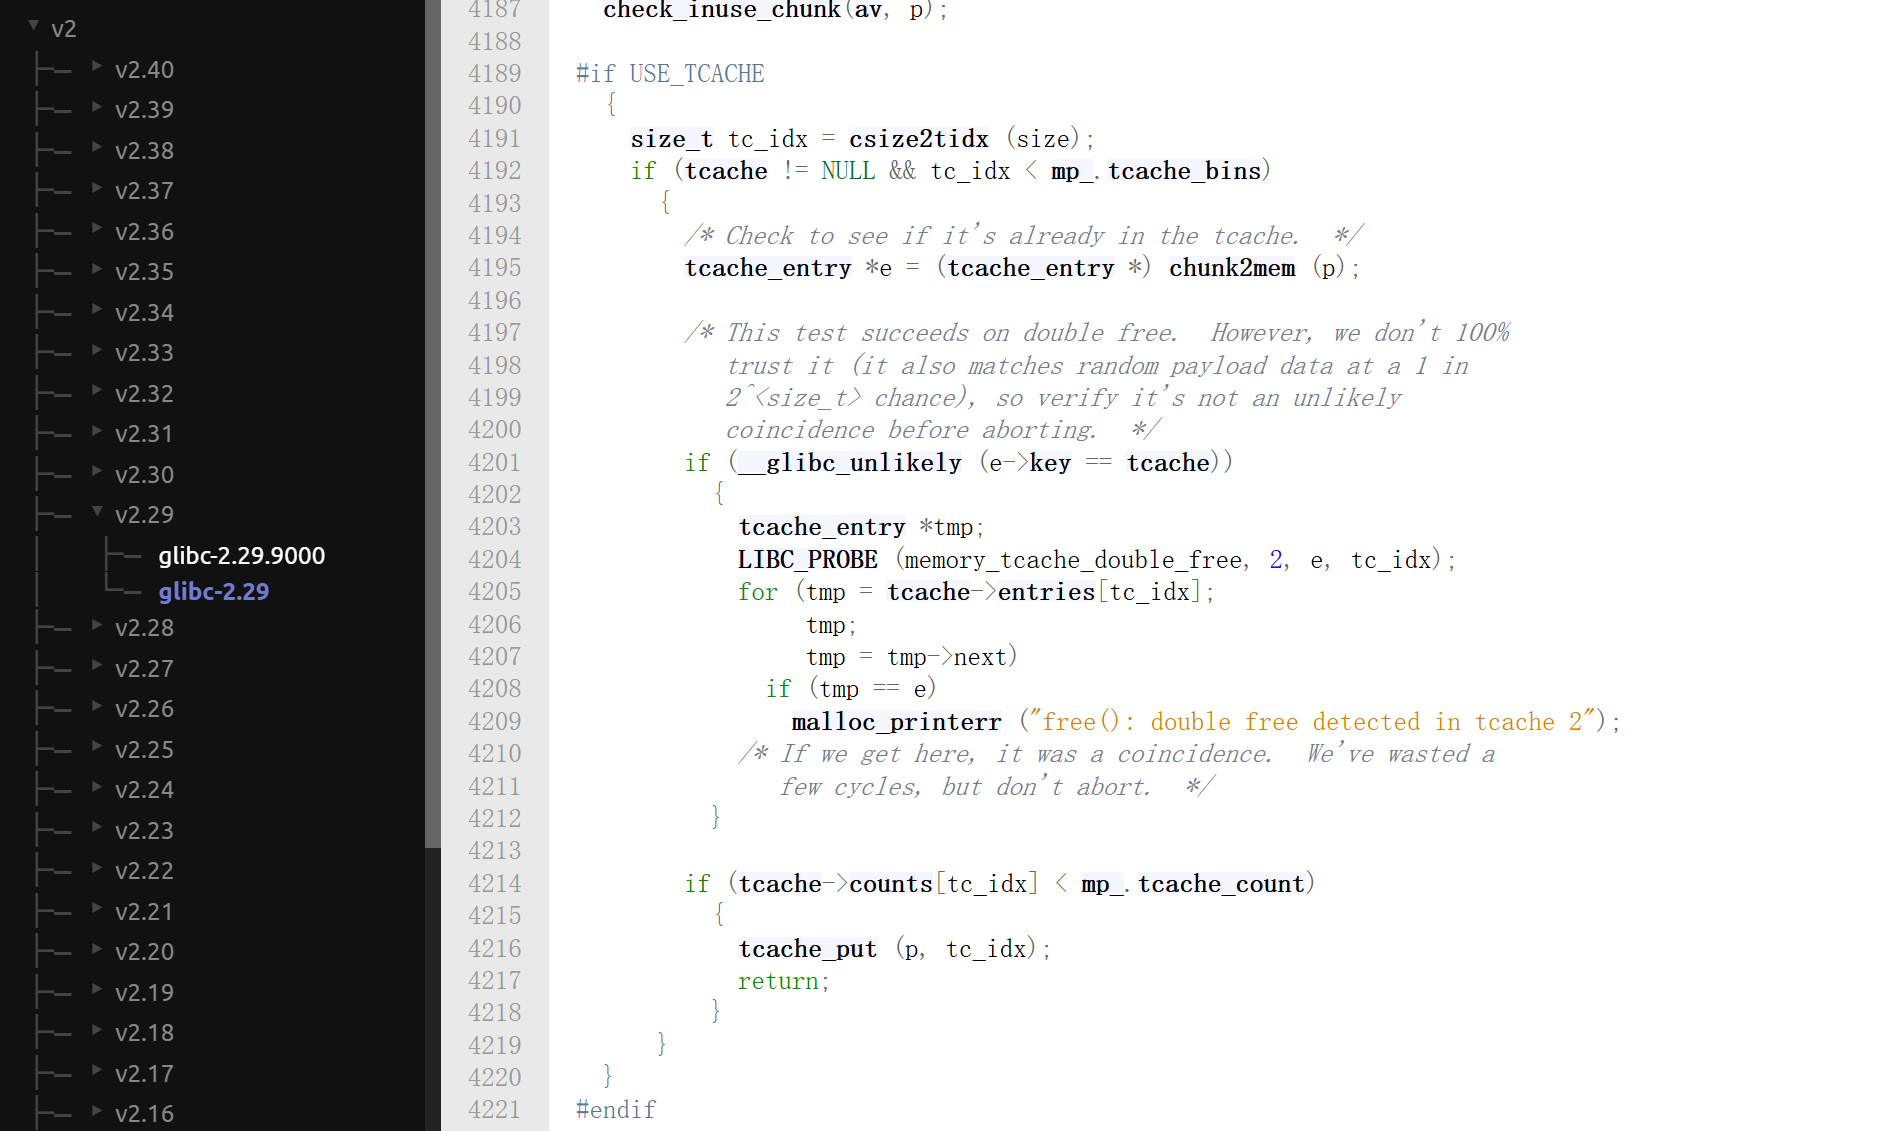
tcache_entry中key是用来判断tcache中是否存在double free的(从glibc-2.29开始):
free_chunk进入tcache:
-
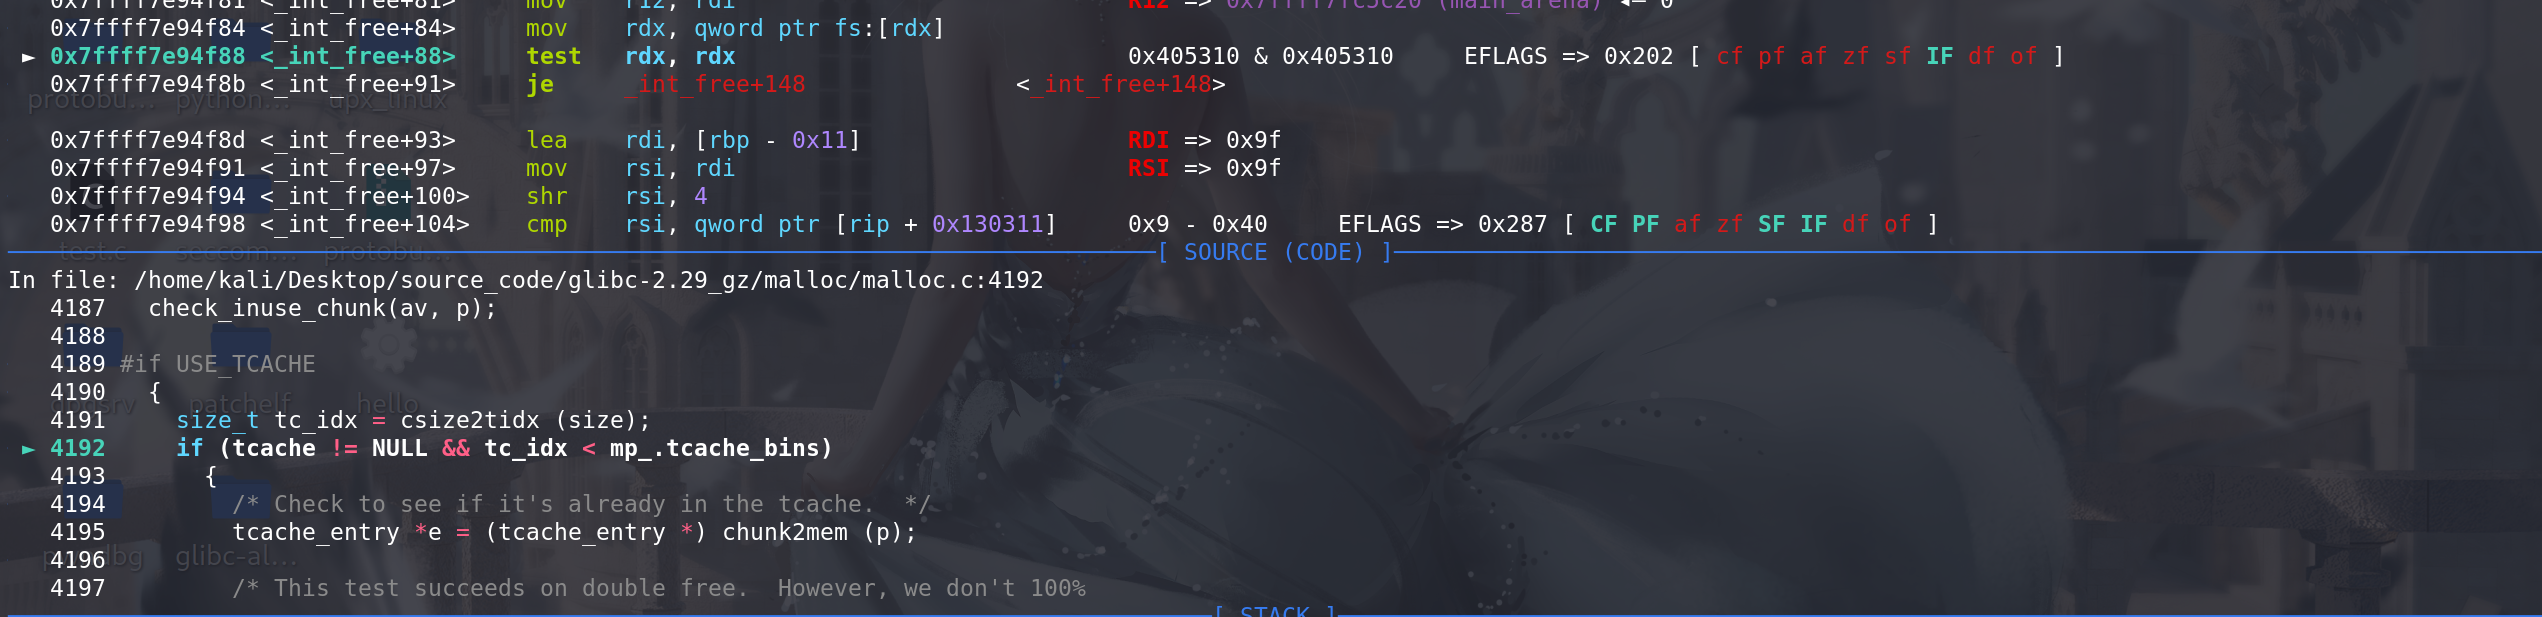
堆tcachce部分的处理:
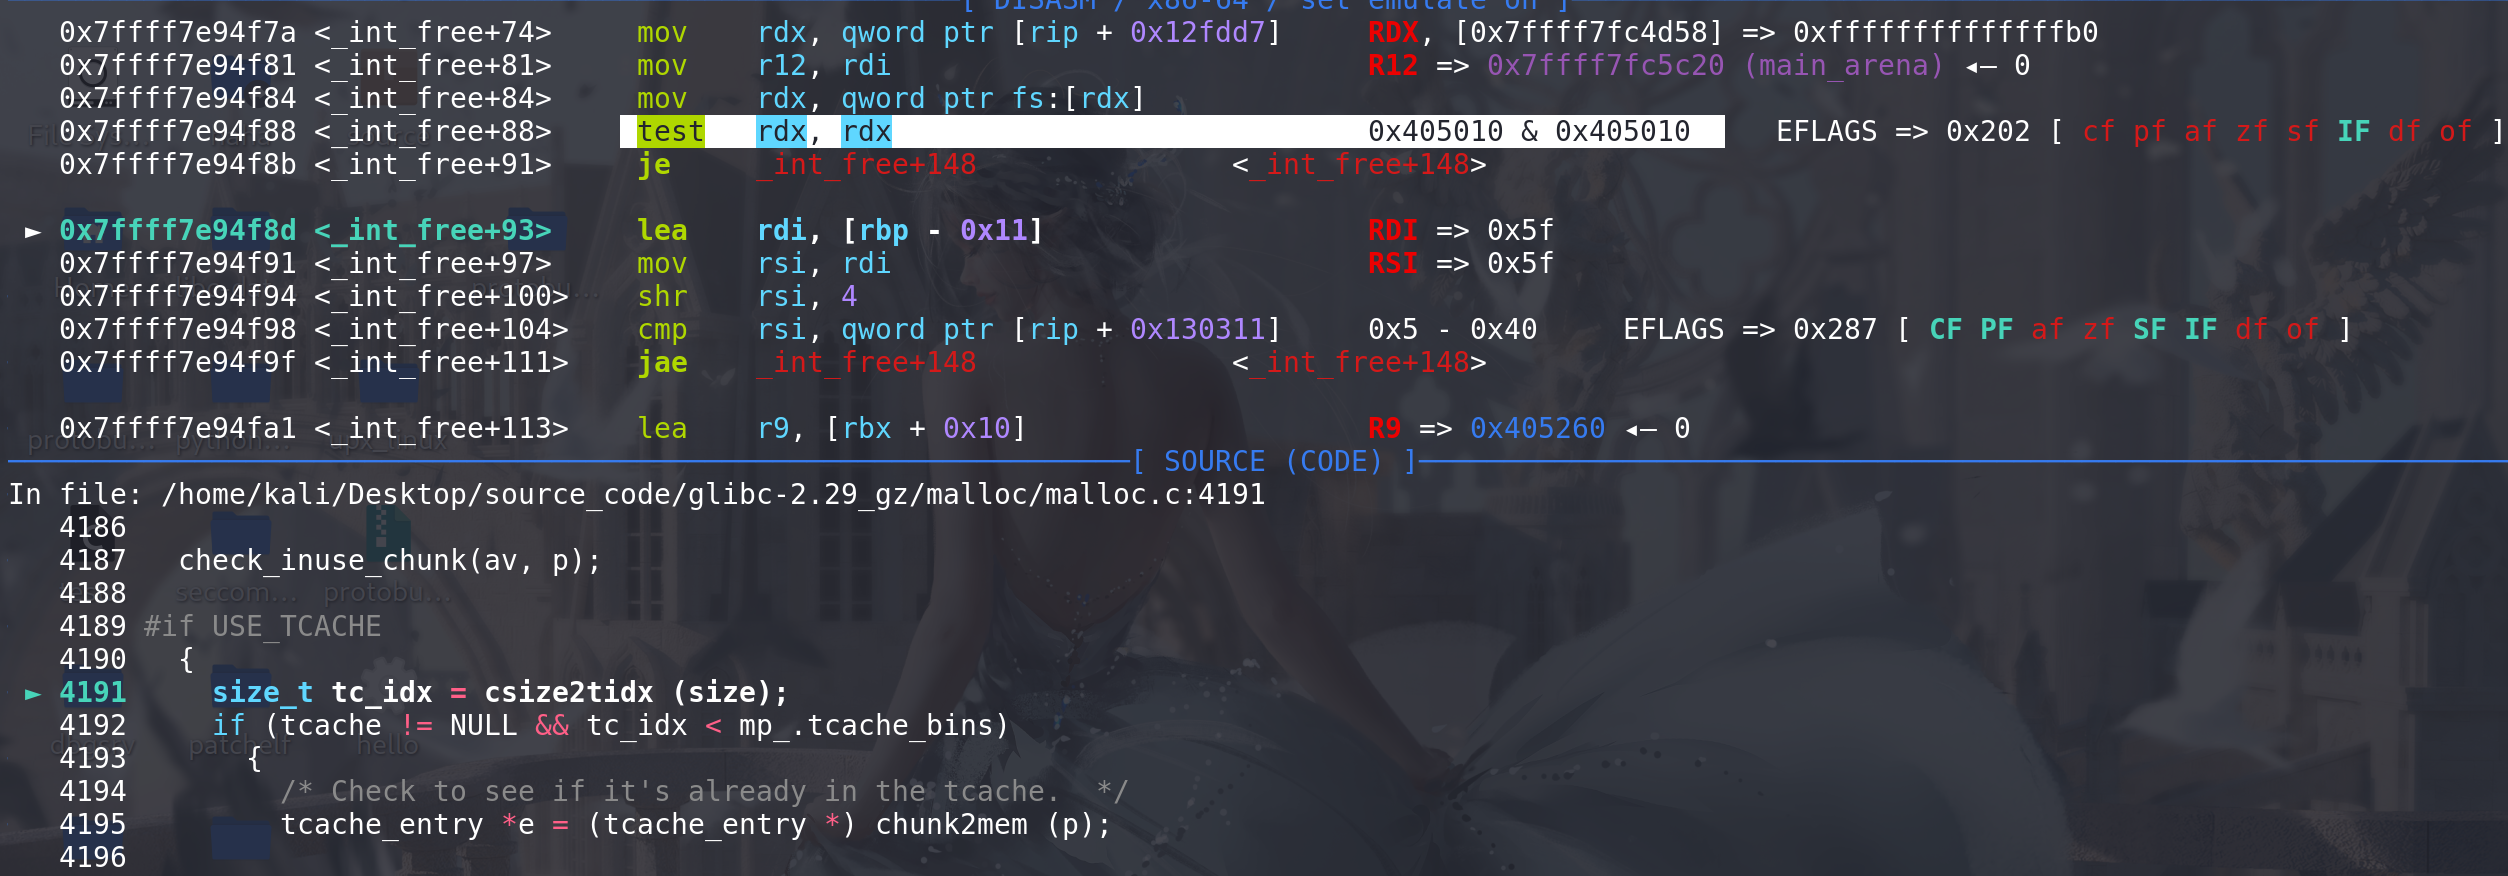
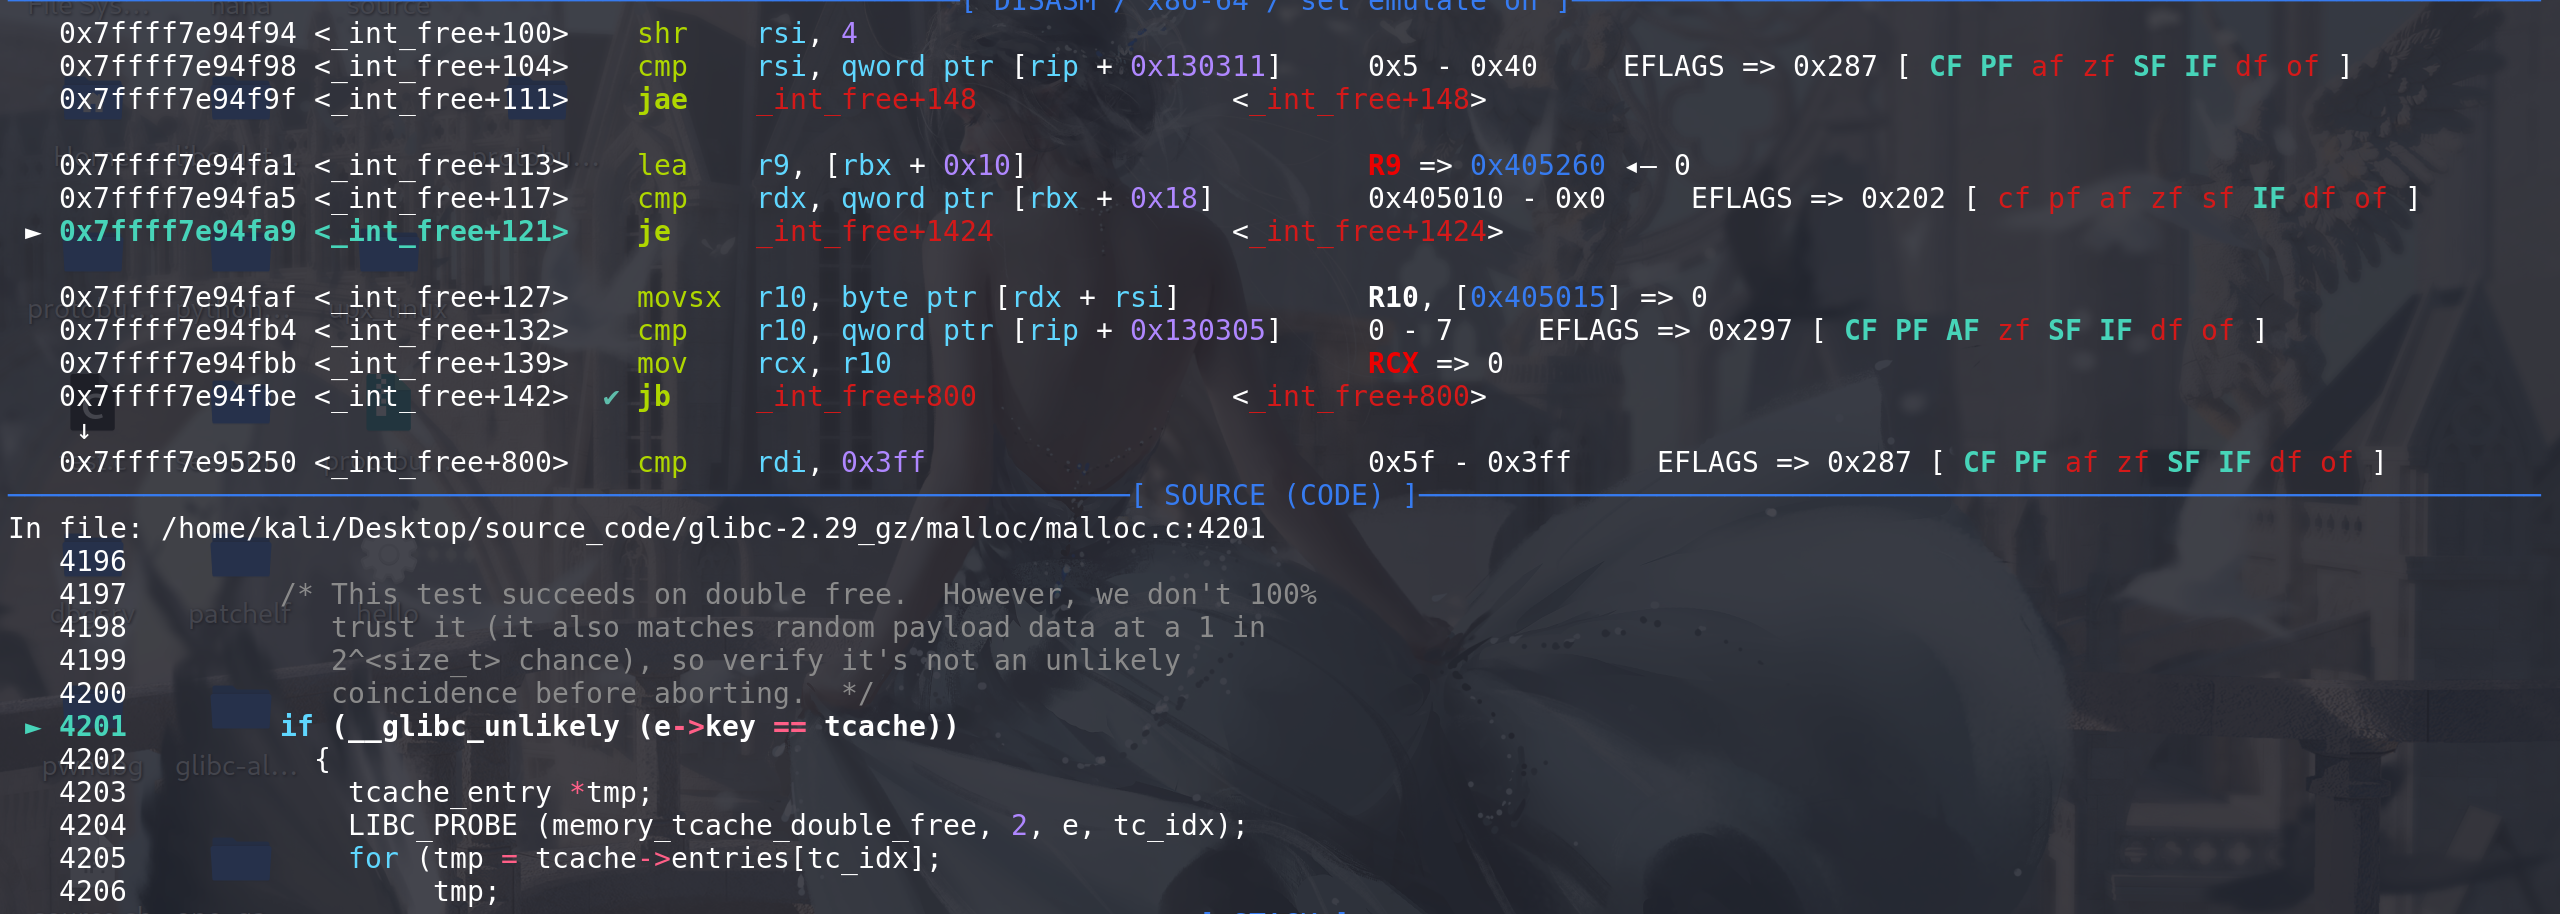
#glibc-2.29
size = chunksize (p);
····
check_inuse_chunk(av, p);
#if USE_TCACHE
  {
    size_t tc_idx = csize2tidx (size); //获得 释放的chunk 在count中对应的下标
    if (tcache != NULL && tc_idx < mp_.tcache_bins) // tcache已经初始化 并且tc_idx在tcache存放chunk的范围内
      {
	/* Check to see if it's already in the tcache.  */
	tcache_entry *e = (tcache_entry *) chunk2mem (p); // 类型转化

	/* This test succeeds on double free.  However, we don't 100%
	   trust it (it also matches random payload data at a 1 in
	   2^<size_t> chance), so verify it's not an unlikely
	   coincidence before aborting.  */
	if (__glibc_unlikely (e->key == tcache)) // 检查key字段,防止double free
	  {
	    tcache_entry *tmp;
	    LIBC_PROBE (memory_tcache_double_free, 2, e, tc_idx);
	    for (tmp = tcache->entries[tc_idx] ; tmp ; tmp = tmp->next)
	      if (tmp == e) // 如果找到相同的chunk则证明确实存在double free,因为可能key字段相同 但是两个chunk确实是不同的情况 这时就不存在double free
		malloc_printerr ("free(): double free detected in tcache 2");
	    /* If we get here, it was a coincidence.  We've wasted a
	       few cycles, but don't abort.  */
	  }

	if (tcache->counts[tc_idx] < mp_.tcache_count) // 如果对应的count未满 则将chunk进入tcache
	  {
	    tcache_put (p, tc_idx);
	    return;
	  }
      }
  }
#endif


static __always_inline void
tcache_put (mchunkptr chunk, size_t tc_idx)// tcache_put没有任何检查
{
  tcache_entry *e = (tcache_entry *) chunk2mem (chunk);
  assert (tc_idx < TCACHE_MAX_BINS);

  /* Mark this chunk as "in the tcache" so the test in _int_free will
     detect a double free.  */
  e->key = tcache; // 在key字段 置入key值

  e->next = tcache->entries[tc_idx]; // 头插法
  tcache->entries[tc_idx] = e; // tcachce链的新头
  ++(tcache->counts[tc_idx]); // 对应的count++
}
tcache已经初始化(0x405010) 并且tc_idx在tcache存放chunk的范围内(0x5 < 0x40):
先检查key字段,防止释放的chunk重复:
如果对应的count未满 则将chunk进入tcache:
-
glibc-2.29 和 glibc-2.28 在tcache处理部分的比较,可以看到
glibc-2.28之前对进入tcache的chunk是没有double检查: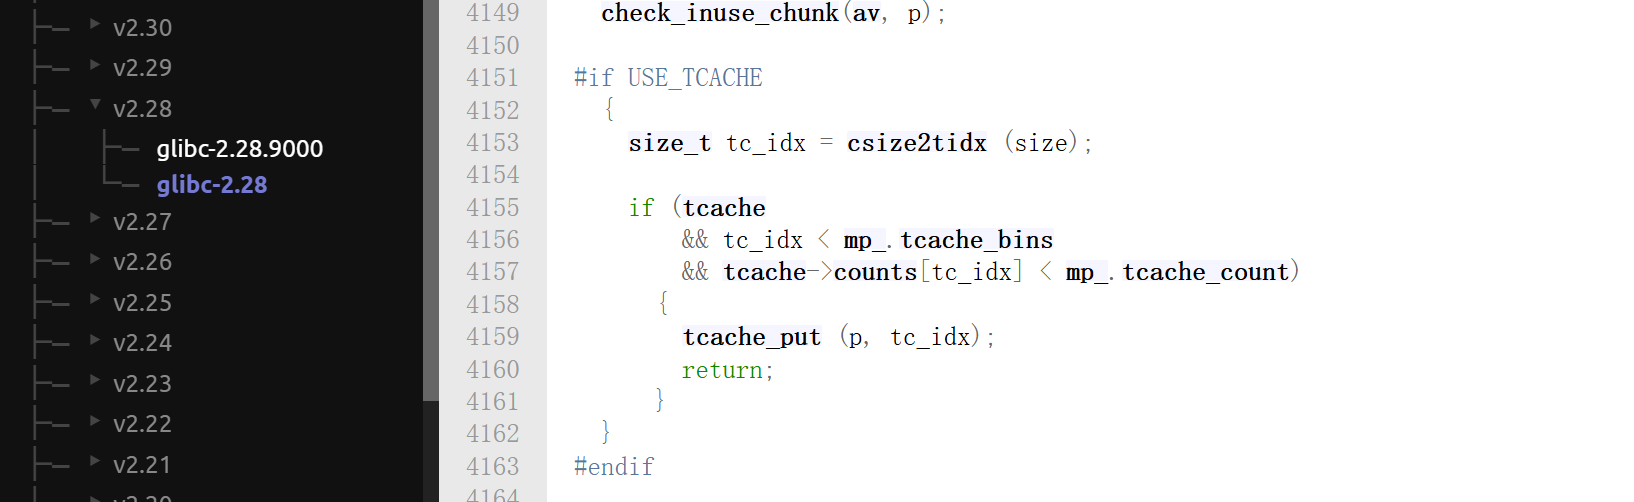
-
看一下,对tcache的
next指针加密,glibc-2.31 和 glibc-2.32 的 tcachce_put 函数上的比较,从glibc-2.32开始对next字段进行加密: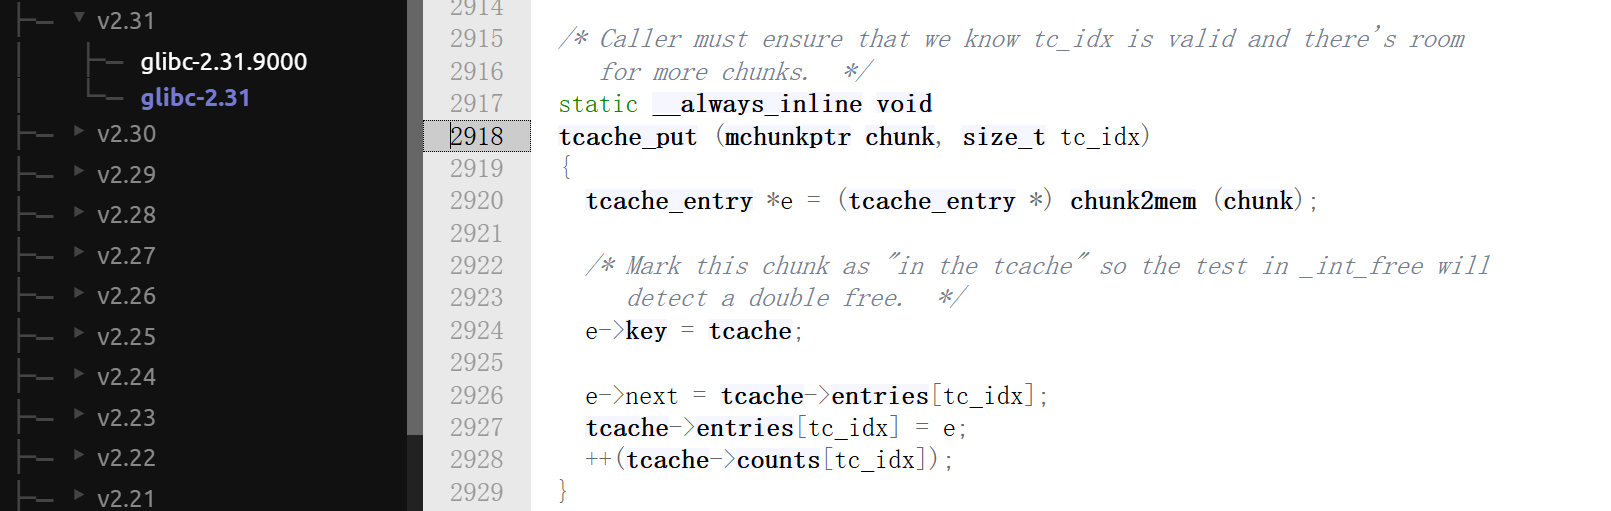
这里可以看到 在赋值
新的chunk的next指针时,先调用了PROTECT_PTR函数将chunk的next字段的地址和要加密的指针值(原tcache链的头chunk地址)一起传入: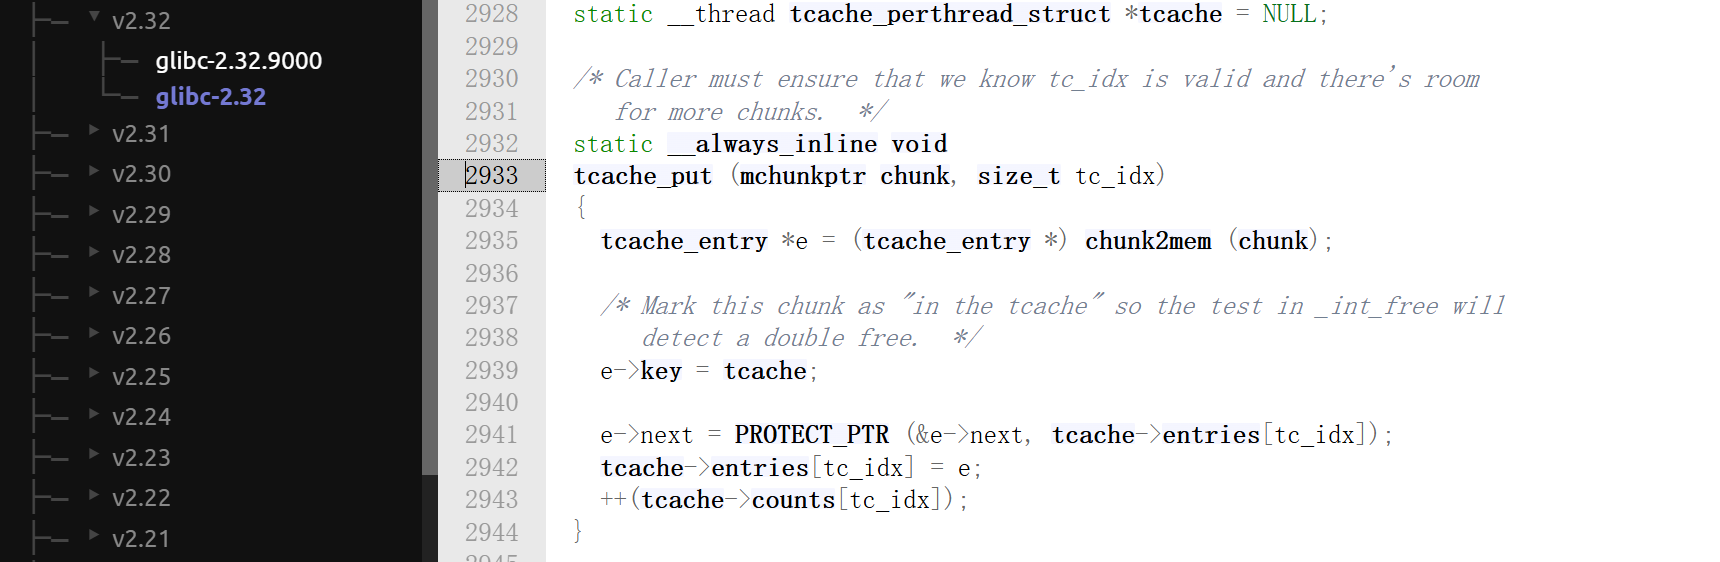
加密的逻辑:
next字段地址右移12位xor要加密的值。解密的逻辑:
待解密的指针地址右移12位xor待解密的值(刚好和加密的相逆)。这里存在一个利用,在第一个chunk进入tcache时,从
tcache->entries[tc_idx]中取出的值一定为0,所以异或的结果 存入新chunk的next字段 直接是next字段的地址右移12位而chunk地址偏移在 0~0x1000 内的都是公用一个((size_t) pos) >> 12值(tcache_key),所以泄漏最初的chunk的next字段后就能获得tcache_key,从而能控制next字段的值(再取出时要进行解密,所以伪造next字段时要先加密)。这里的加密仅针对next字段,在
tcache->entries[tc_idx]中的头chunk地址,是没有加密的: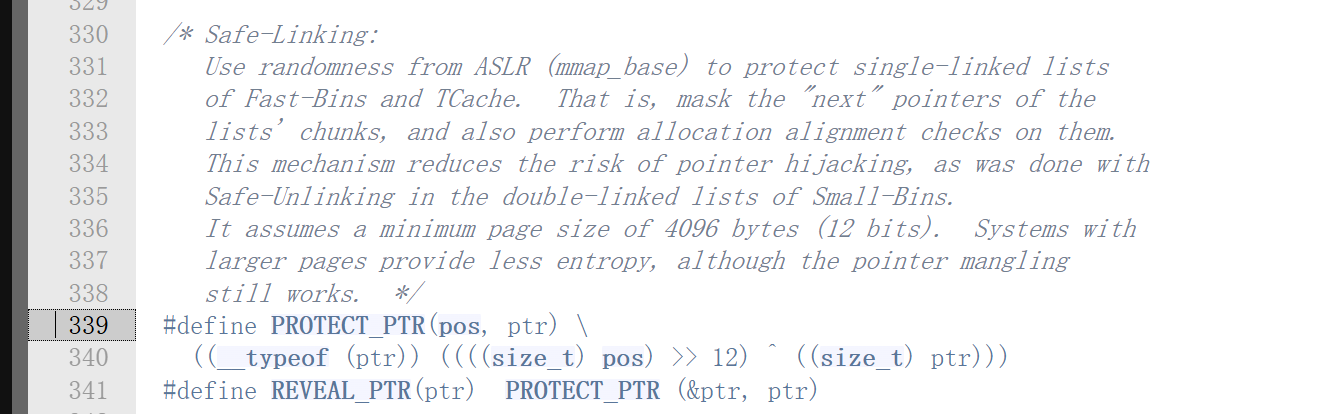
-
tcache在控制chunk进入对应的链时,是根据其释放时 size字段的大小来确定,所以可以将较小的chunk的size字段值改大,将其释放进入较大的tcache链中,再申请出来时就能造成overlapping(这种方法一般用在fastbin中,因为fastbin中取出chunk时 会检查size字段)。当然如果能直接修改next字段,则可以实现任意地址分配chunk(因为tcache中取出chunk 时不进行size检查 ==> malloc源码 中有体现)。
-
另外,经调试发现,
tcache的地址是存储在tls段,如果能修改这个值,那么tcache就会转移位置: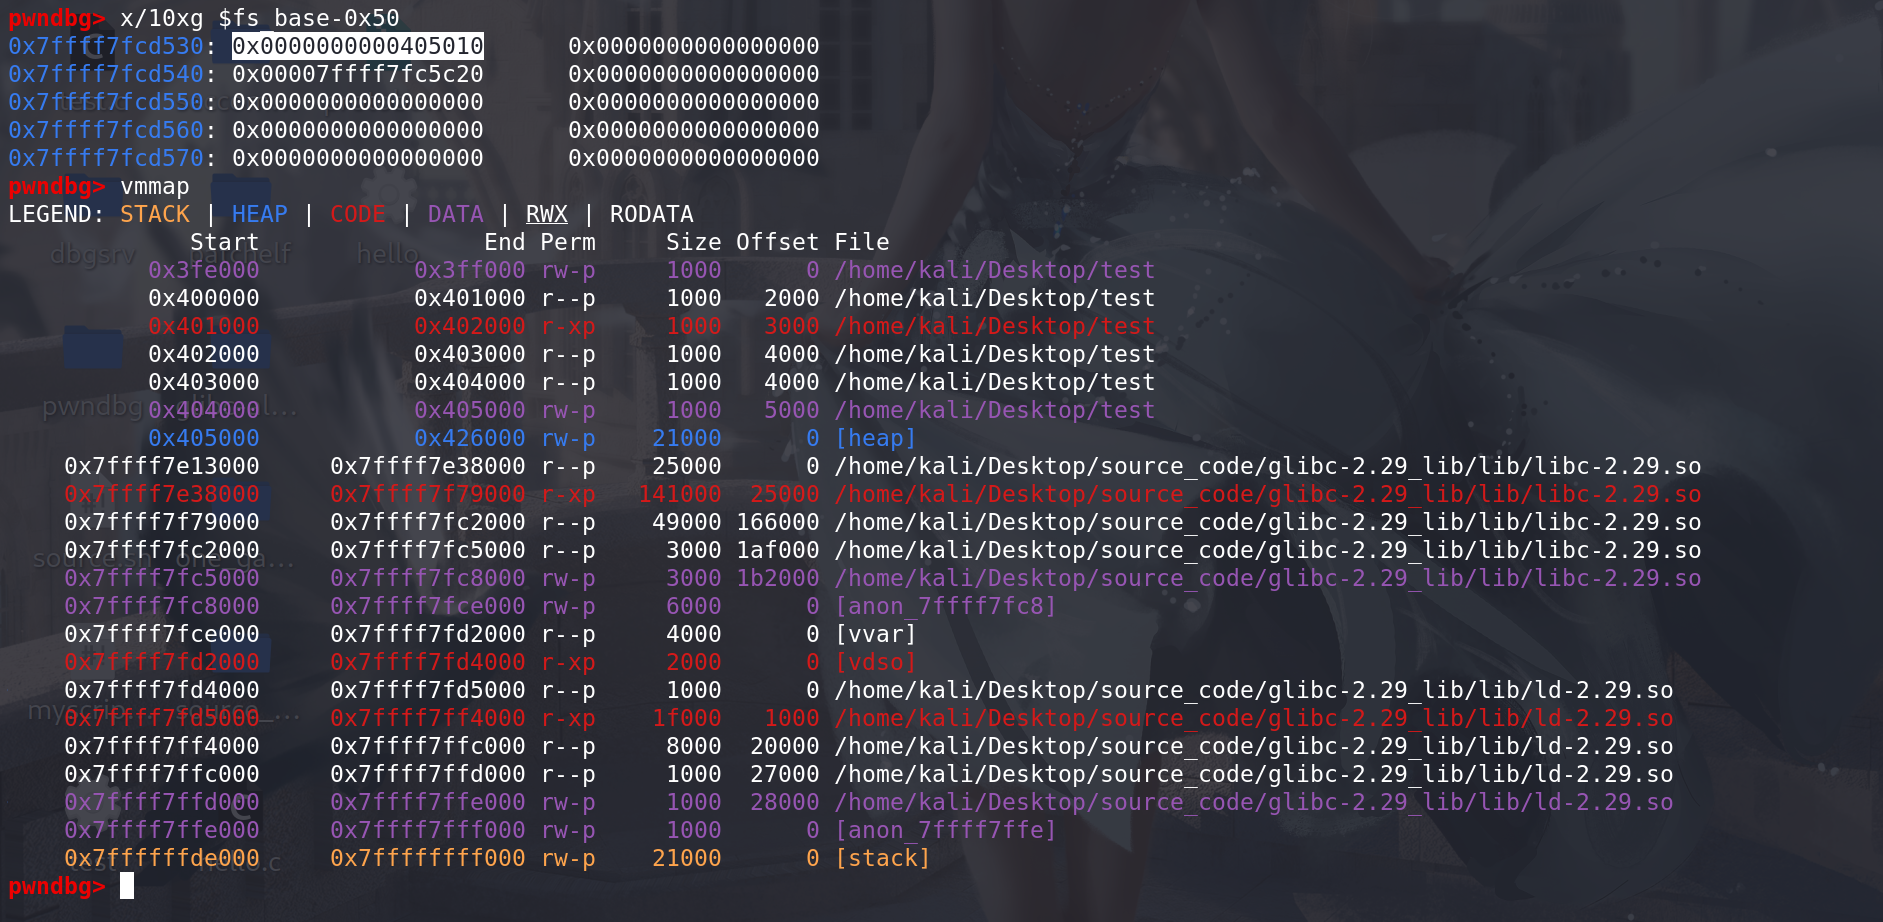
修改这个值为一个堆地址,那么tcache位置就会改变,再释放的chunk就不会进入原本的tcache了:
改成一个堆地址:
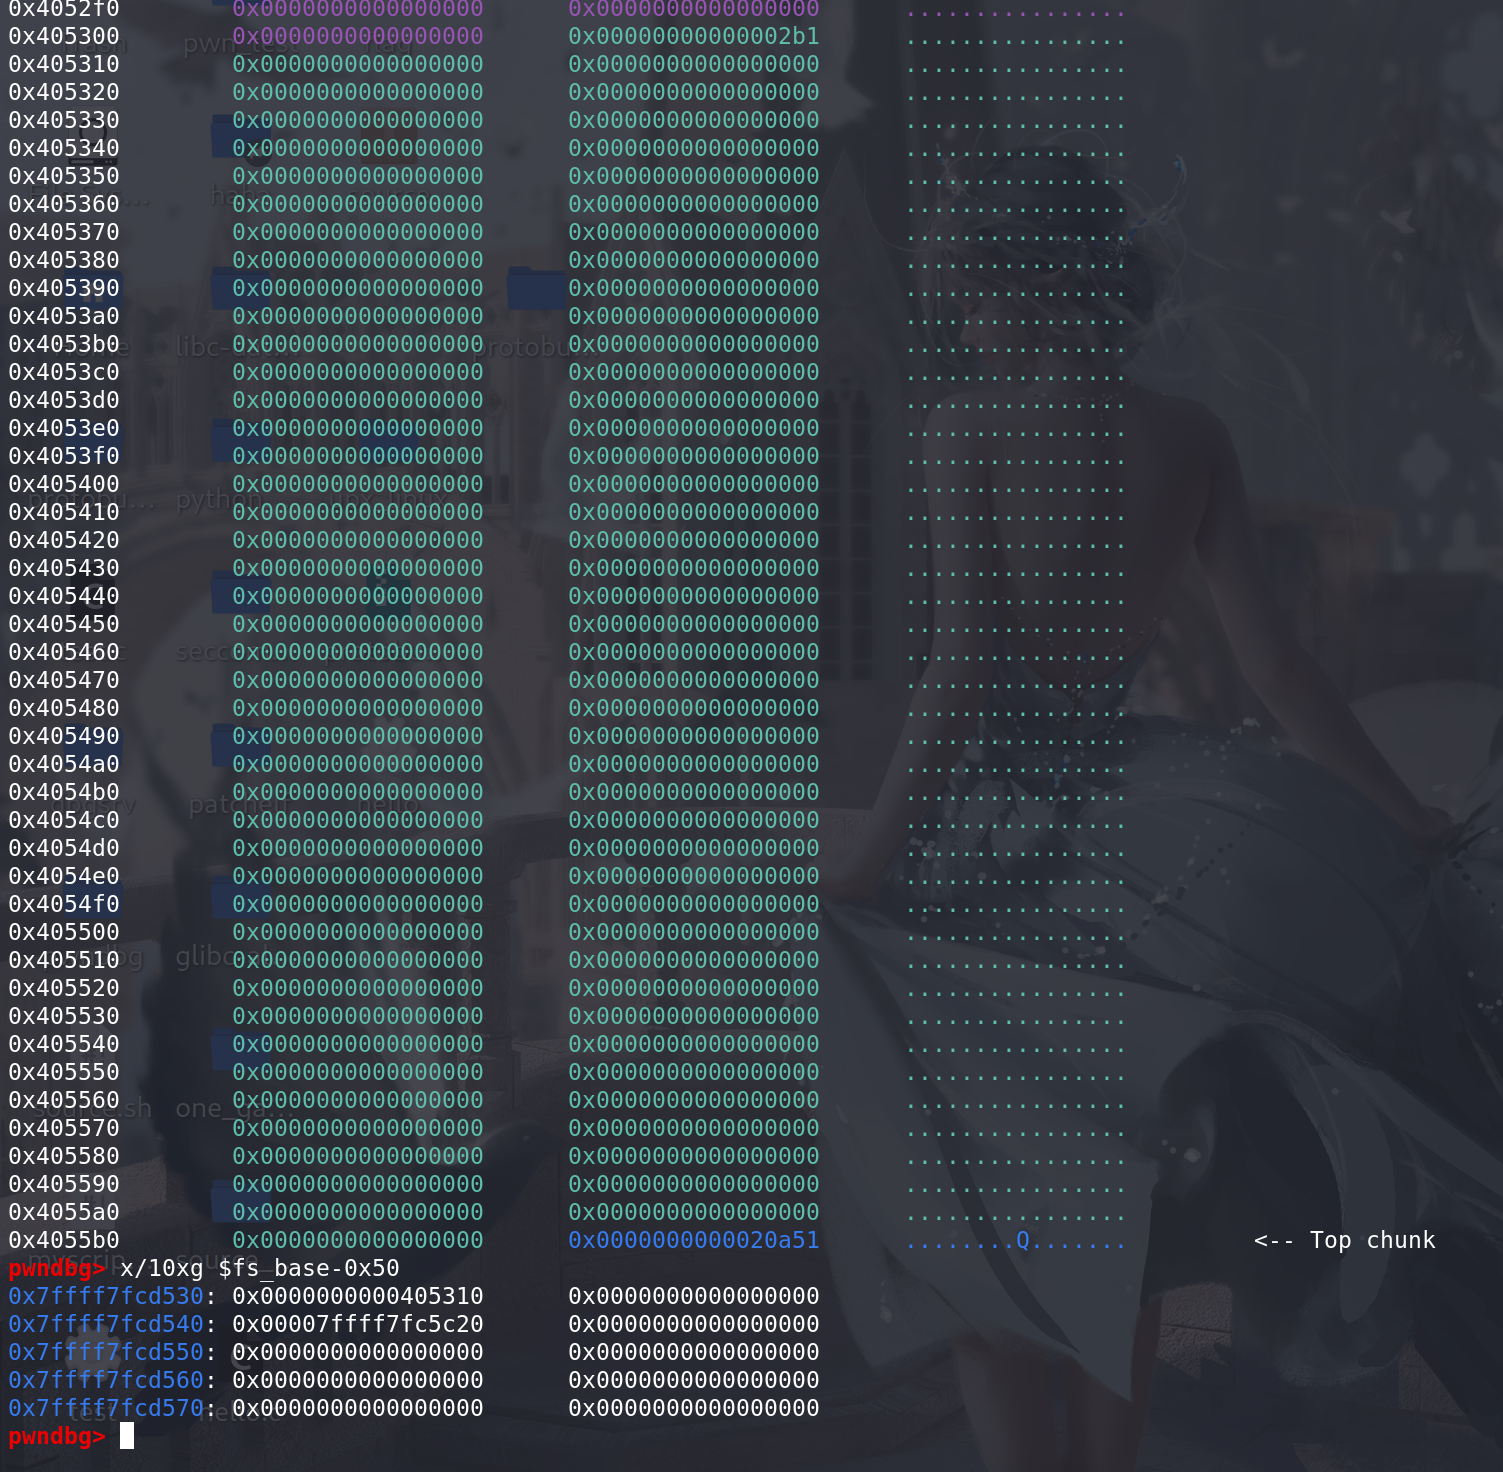
再free一个chunk,看看堆上的变化:
这里取出了我们伪造的tcache地址
最后释放的chunk顺利进入伪造的tcachce中,相当于变向劫持了
tcache_perthread_struct,实际的利用可能用不上,远程tls的偏移可能需要爆破: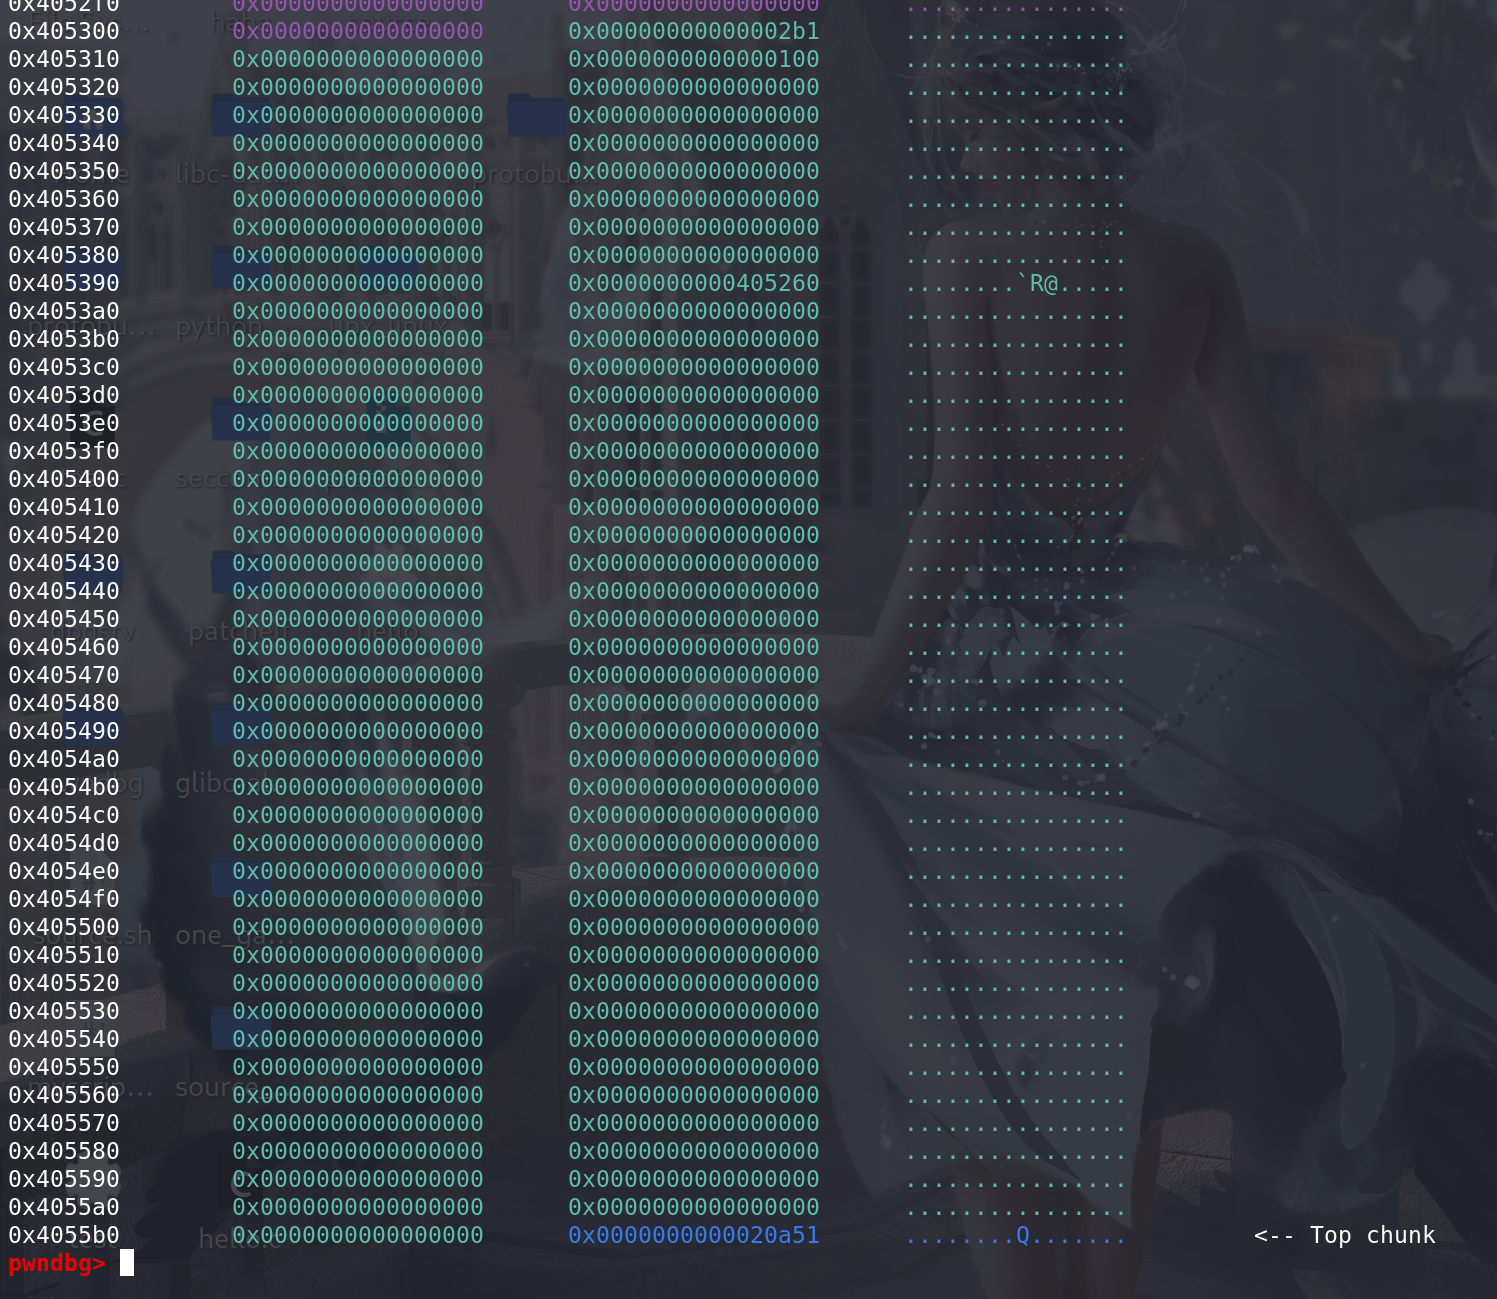
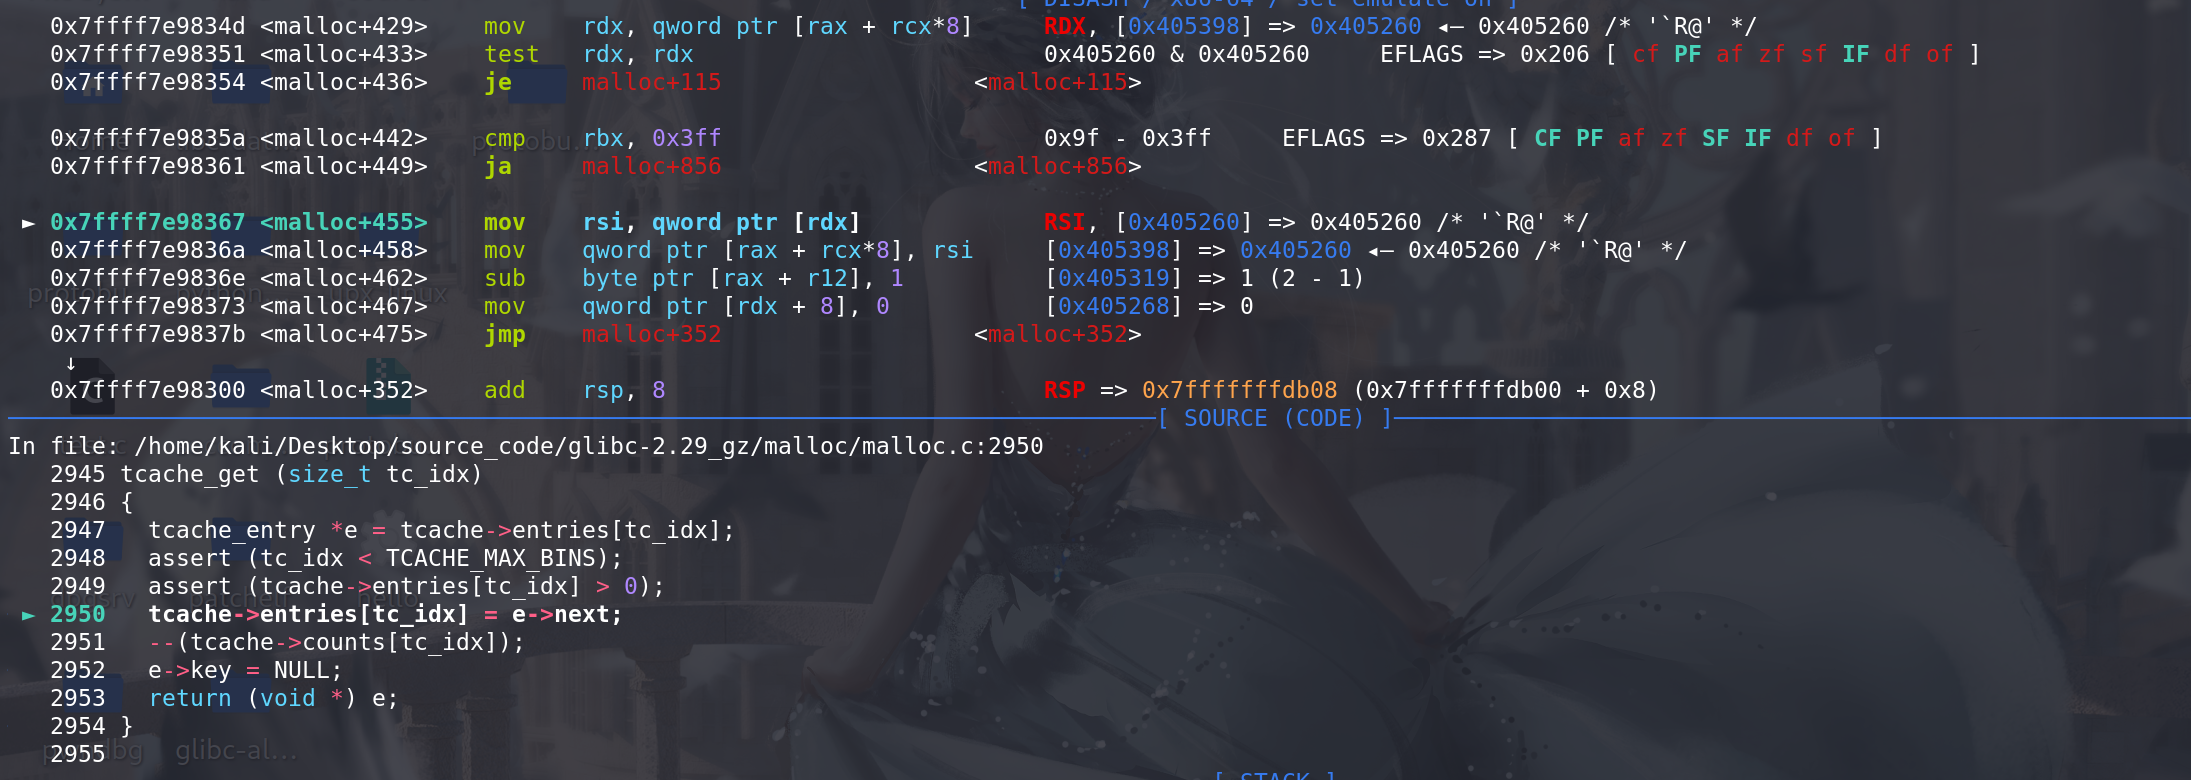
再次申请chunk 也是直接从伪造的tcache 中拿:
fastbin
-
当前面的tcachce占满时,会将一定大小的chunk 放入fastbin中:
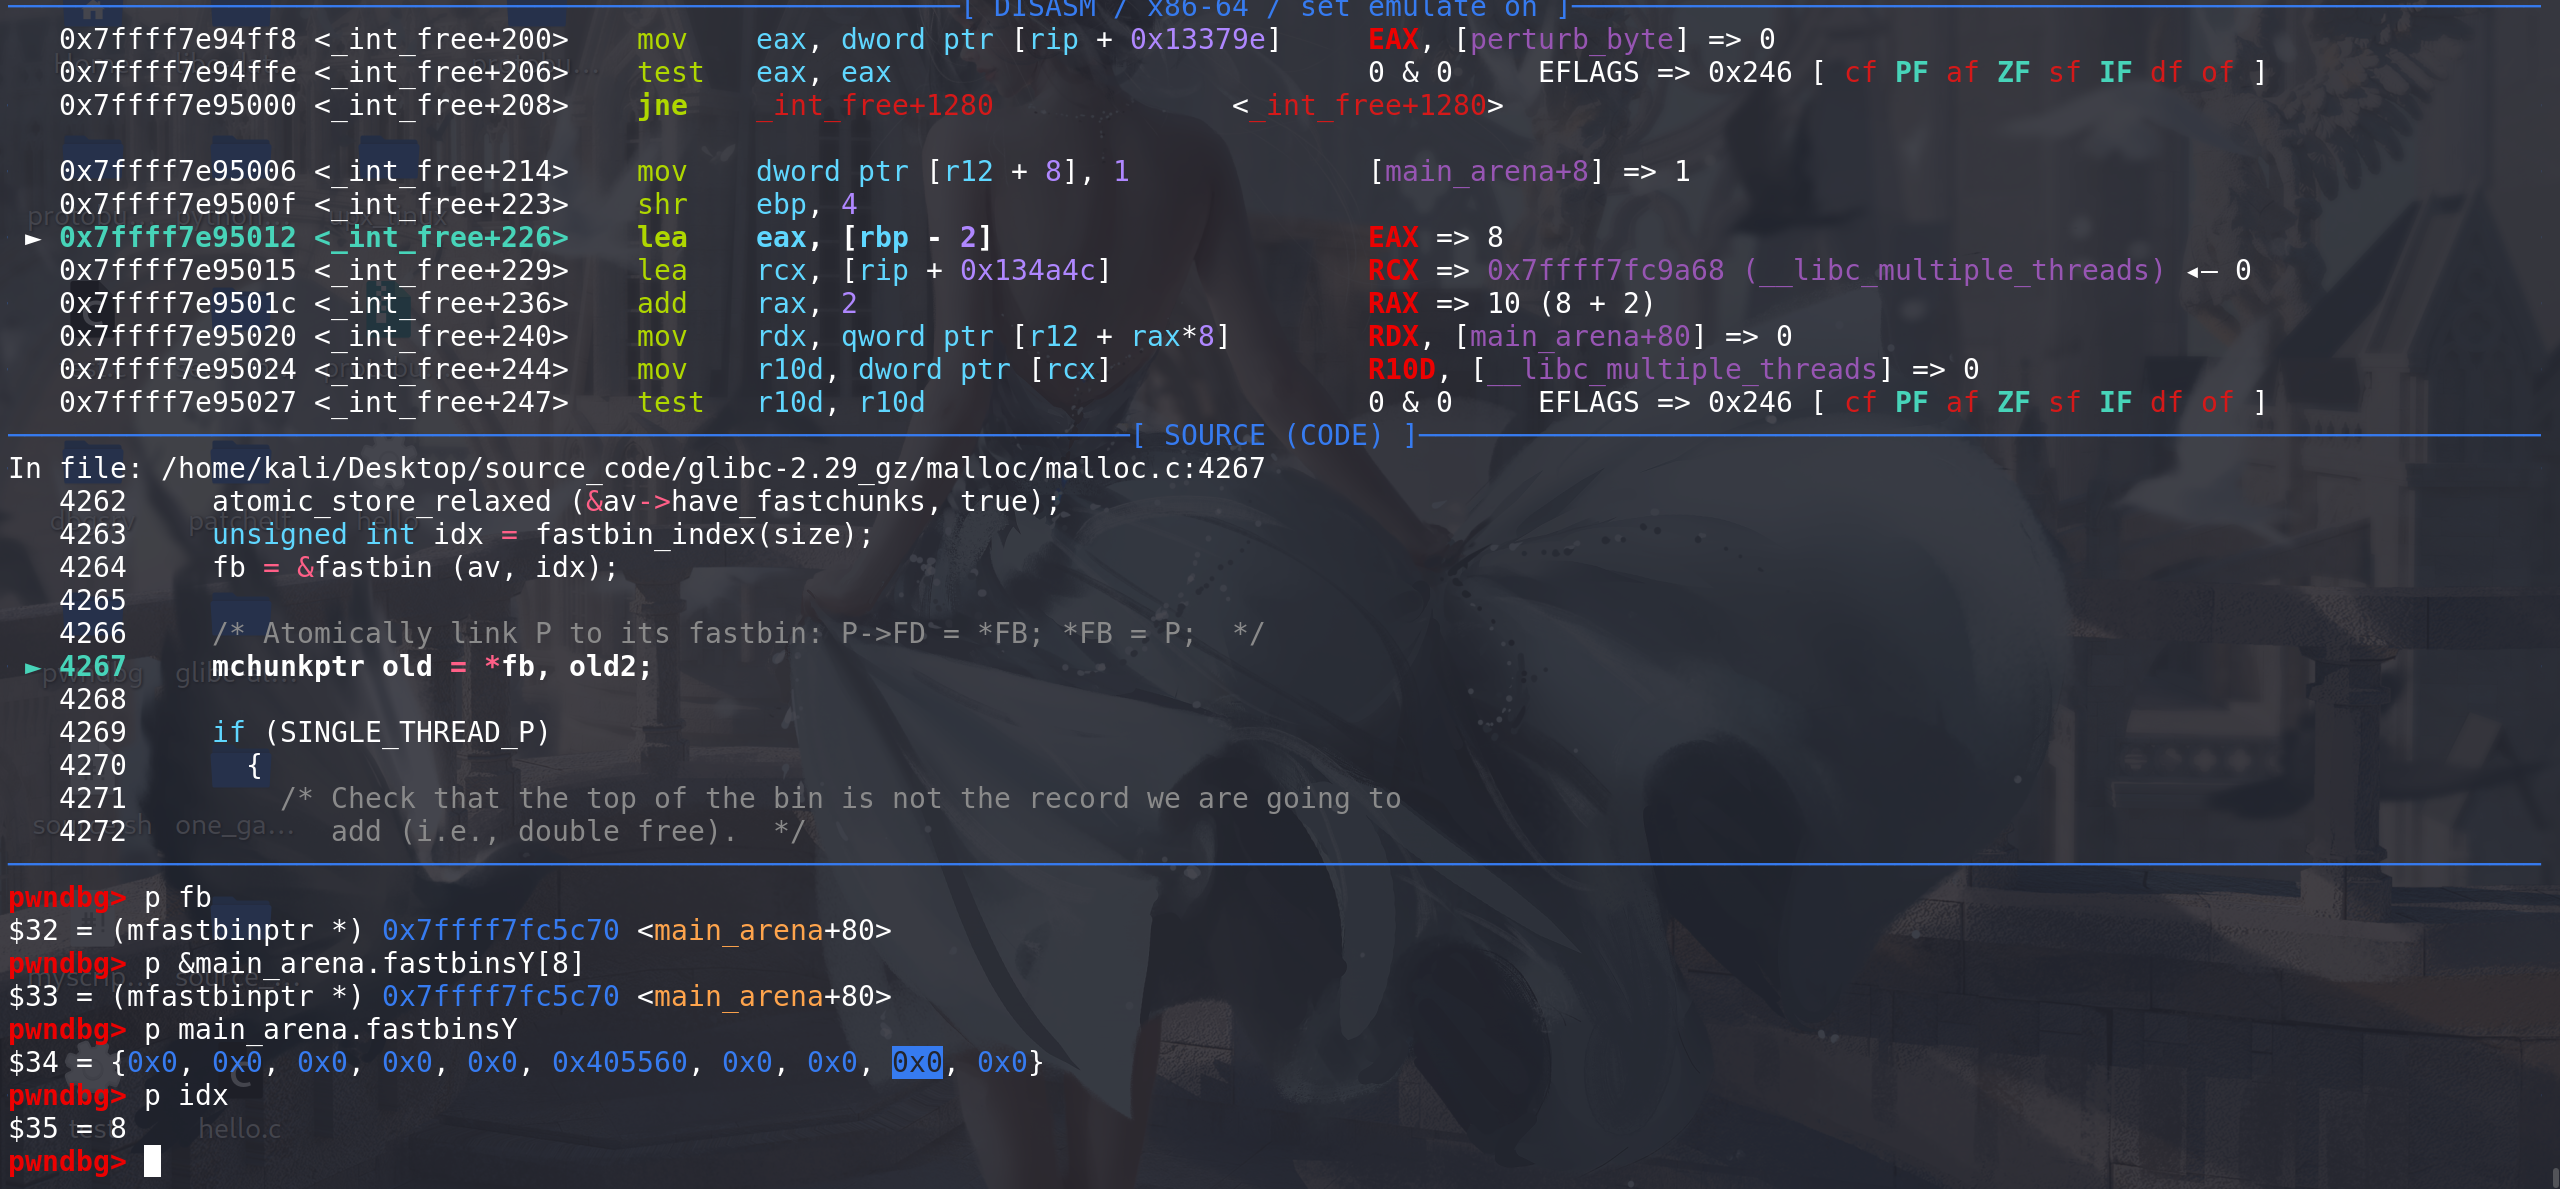
  /*
    If eligible, place chunk on a fastbin so it can be found
    and used quickly in malloc.
  */

  if ((unsigned long)(size) <= (unsigned long)(get_max_fast ()) // 释放的chunk大小在fastbin范围内 get_max_fast () ==> 0x80

#if TRIM_FASTBINS
      /*
	If TRIM_FASTBINS set, don't place chunks
	bordering top into fastbins
      */
      && (chunk_at_offset(p, size) != av->top)
#endif
      ) {

    if (__builtin_expect (chunksize_nomask (chunk_at_offset (p, size))
			  <= 2 * SIZE_SZ, 0)
	|| __builtin_expect (chunksize (chunk_at_offset (p, size))
			     >= av->system_mem, 0))
      {
	bool fail = true;
	/* We might not have a lock at this point and concurrent modifications
	   of system_mem might result in a false positive.  Redo the test after
	   getting the lock.  */
	if (!have_lock)
	  {
	    __libc_lock_lock (av->mutex);
	    fail = (chunksize_nomask (chunk_at_offset (p, size)) <= 2 * SIZE_SZ
		    || chunksize (chunk_at_offset (p, size)) >= av->system_mem);
	    __libc_lock_unlock (av->mutex);
	  }

	if (fail)
	  malloc_printerr ("free(): invalid next size (fast)");
      }

    free_perturb (chunk2mem(p), size - 2 * SIZE_SZ);

    atomic_store_relaxed (&av->have_fastchunks, true);
    unsigned int idx = fastbin_index(size); // 根据size获取对应的fastbin下标
    fb = &fastbin (av, idx); // 根据下标拿到 对应fastbin链的地址 这里有指向 对应fastbin链的头chunk的指针

    /* Atomically link P to its fastbin: P->FD = *FB; *FB = P;  */
    mchunkptr old = *fb, old2; // old是对应原fastbin链的头chunk的地址

    if (SINGLE_THREAD_P)
      {
	/* Check that the top of the bin is not the record we are going to
	   add (i.e., double free).  */
	if (__builtin_expect (old == p, 0)) // 进行double free 检查 ,但是仅检查了头chunk 是否与新的chunk相同
	  malloc_printerr ("double free or corruption (fasttop)");
	p->fd = old; // 头插法
	*fb = p; // 更新 新的链首
      }
    else
      do
	{
	  /* Check that the top of the bin is not the record we are going to
	     add (i.e., double free).  */
	  if (__builtin_expect (old == p, 0))
	    malloc_printerr ("double free or corruption (fasttop)");
	  p->fd = old2 = old;
	}
      while ((old = catomic_compare_and_exchange_val_rel (fb, p, old2))
	     != old2);

    /* Check that size of fastbin chunk at the top is the same as
       size of the chunk that we are adding.  We can dereference OLD
       only if we have the lock, otherwise it might have already been
       allocated again.  */
    if (have_lock && old != NULL
	&& __builtin_expect (fastbin_index (chunksize (old)) != idx, 0))
      malloc_printerr ("invalid fastbin entry (free)");
  }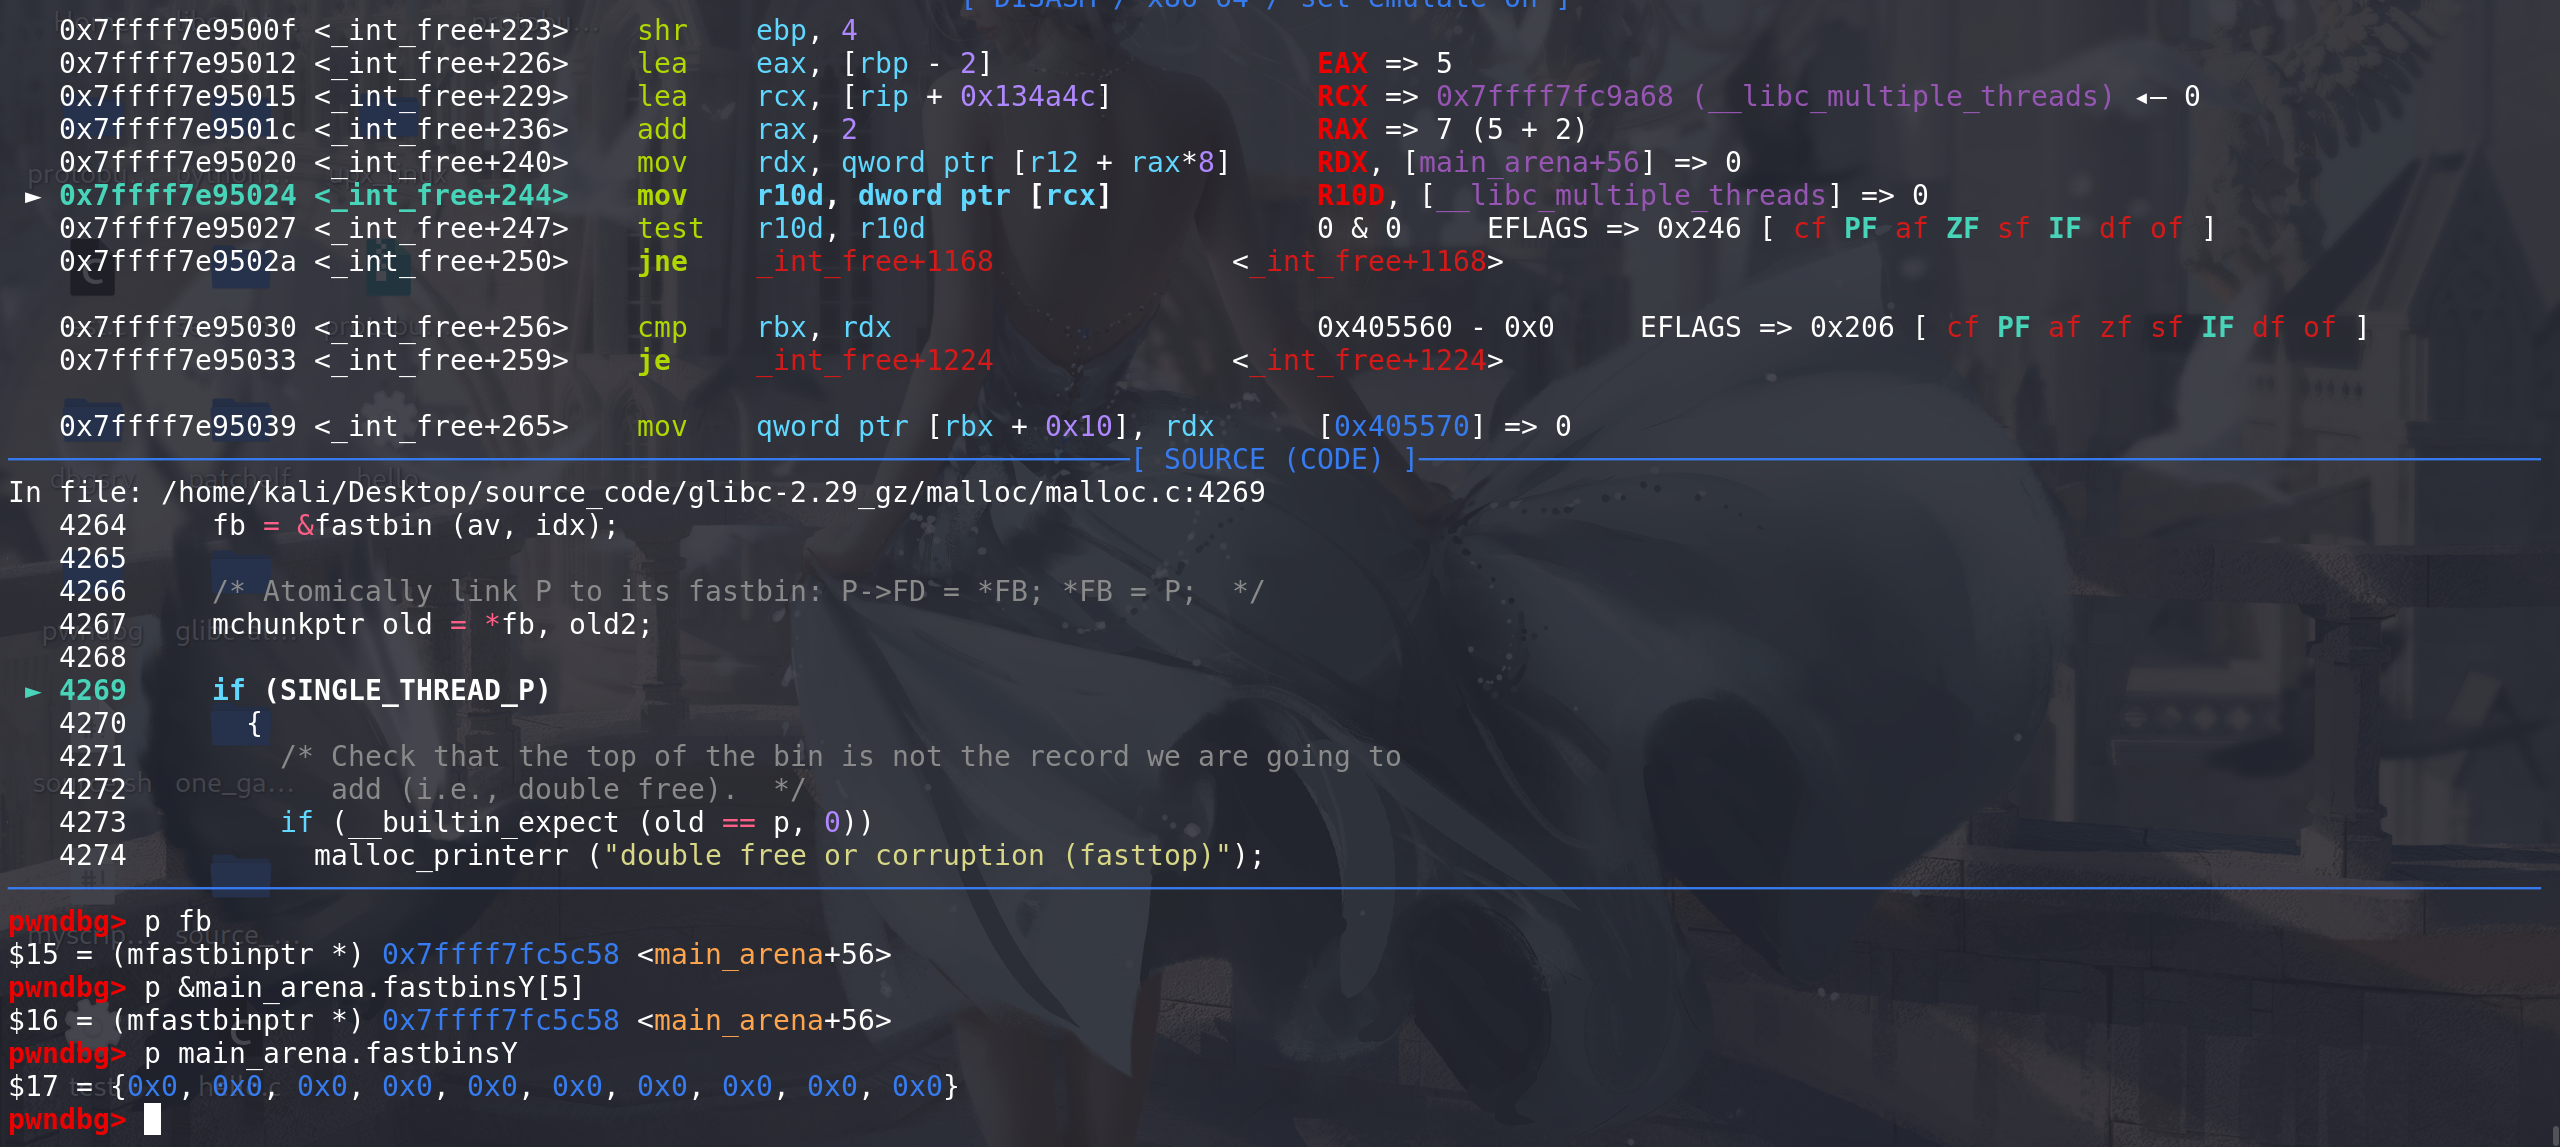

-
在free函数对于fastbin的处理中存在的利用:
-
利用fastbin 处理
double free 仅对链首进行比较,并且fastbin采用的头插法,这里可以绕过检查实现double free ==> free(chunk1) -> free(chunk2)新的链首 -> free(chunk1) ,这样对chunk1就实现了double free。 -
覆盖
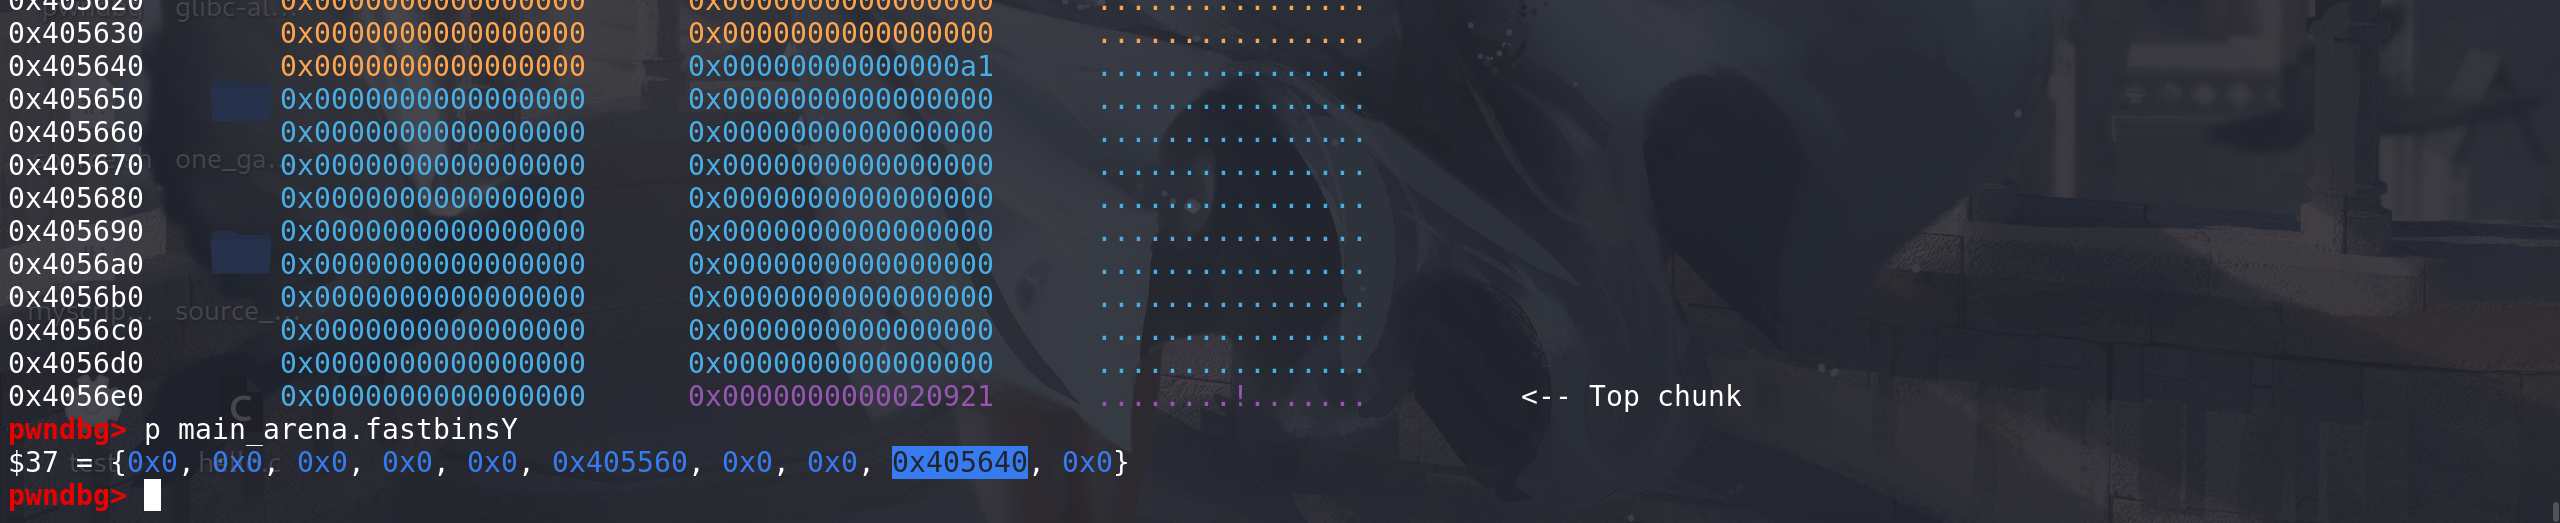
global_max_fast(global_max_fast所处的段具有写的权限) 将更大的chunk置入fastbin中处理:将global_max_fast改为0x100,将0xa0大小的chunk放入fastbin中处理:
这里将释放的chunk的size 与 global_max_fast 比较:

拿到下标(idx = 8) 和 main_arena中Yfastbin数组的地址,在一般情况下fastbin中最大的chunk的size是0x80,也就是下标只能到6 ==> 0x80:
置入fastbin中(这里gdb没有显示不影响,只要main_arena中有就行了):
-
-
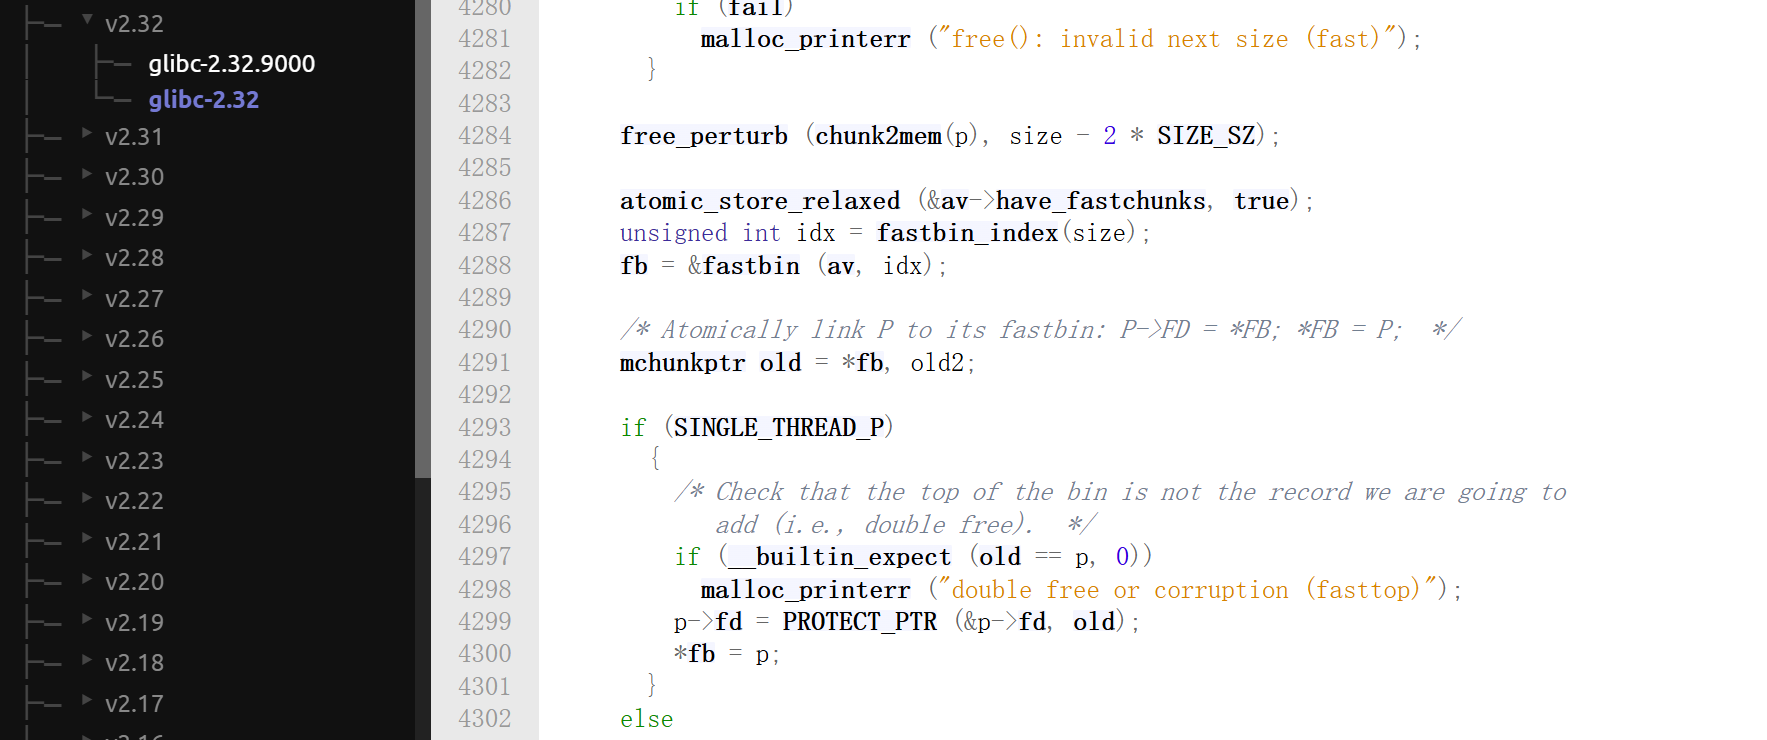
fastbin的fd字段加密处理,glibc-2.31 和 glibc-2.32 比较,可以看到从glibc-2.32开始 对fastbin的fd字段也进行了加密(同上面的tcache加密模式),所以要利用的必须先泄漏堆地址拿到右移12位的那个异或值后才能伪造fd字段,进行任意地址申请chunk: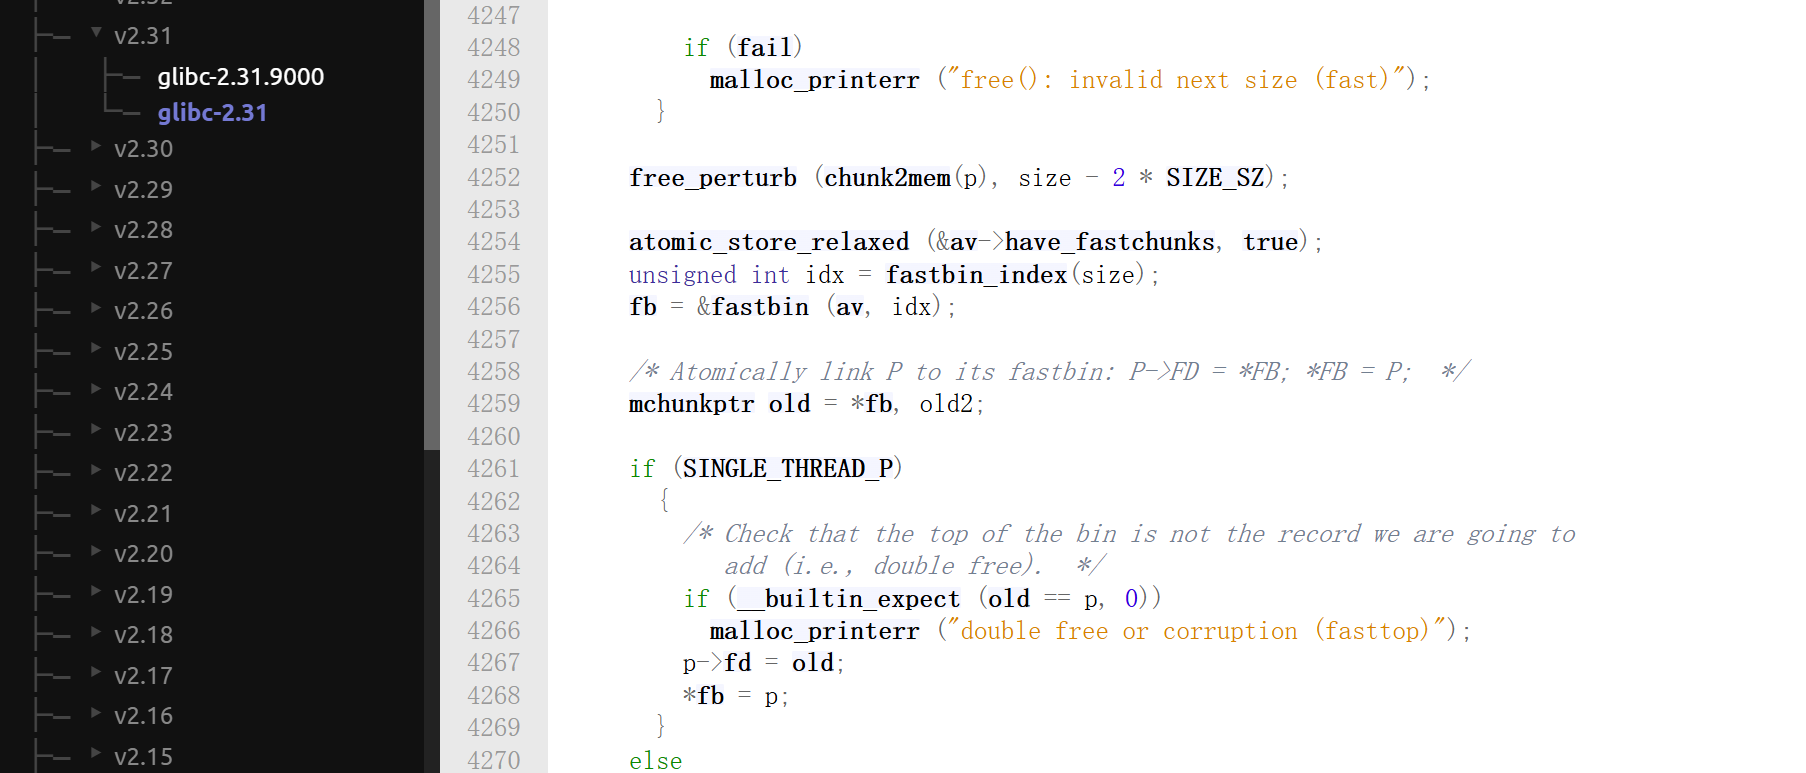
unlink + 合并
-
释放的chunk 在tcache中已经装满,并且不在fastbin的范围内时,会先进行合并操作。结合前面堆tcache和fastbin的处理,可以发现
处于 tcache 和 fastbin中的chunk是不会被其高地址的chunk标记为被释放(即相邻的高地址处的chunk的prev_inuse位一直为1),所以tcache 和 fastbin中的chunk 是不可能被合并的:/* Consolidate other non-mmapped chunks as they arrive. */ else if (!chunk_is_mmapped(p)) { /* If we're single-threaded, don't lock the arena. */ if (SINGLE_THREAD_P) have_lock = true; if (!have_lock) __libc_lock_lock (av->mutex); nextchunk = chunk_at_offset(p, size); /* Lightweight tests: check whether the block is already the top block. */ if (__glibc_unlikely (p == av->top)) malloc_printerr ("double free or corruption (top)"); /* Or whether the next chunk is beyond the boundaries of the arena. */ if (__builtin_expect (contiguous (av) && (char *) nextchunk >= ((char *) av->top + chunksize(av->top)), 0)) malloc_printerr ("double free or corruption (out)"); /* Or whether the block is actually not marked used. */ if (__glibc_unlikely (!prev_inuse(nextchunk))) malloc_printerr ("double free or corruption (!prev)"); nextsize = chunksize(nextchunk); if (__builtin_expect (chunksize_nomask (nextchunk) <= 2 * SIZE_SZ, 0) || __builtin_expect (nextsize >= av->system_mem, 0)) malloc_printerr ("free(): invalid next size (normal)"); free_perturb (chunk2mem(p), size - 2 * SIZE_SZ); /* consolidate backward */ if (!prev_inuse(p)) { // 向后合并(向低地址) prevsize = prev_size (p); // 拿到该chunk的prev_size字段的值,如果后一个chunk被释放了,那么该chunk的prev_size字段会启用(存储后一个chunk的大小,即对应其size值) size += prevsize; p = chunk_at_offset(p, -((long) prevsize)); // 拿到后一个chunk地址 if (__glibc_unlikely (chunksize(p) != prevsize)) // 合并unlink前检查 待合并的chunk的size是否与前一个chunk(待释放的chunk) 的prev_size字段值相同 malloc_printerr ("corrupted size vs. prev_size while consolidating"); unlink_chunk (av, p); // 解链 } if (nextchunk != av->top) // 保证相邻的高地址处的chunk不是top chunk { /* get and clear inuse bit */ nextinuse = inuse_bit_at_offset(nextchunk, nextsize); /* consolidate forward */ if (!nextinuse) { // 向前合并(向高地址) unlink_chunk (av, nextchunk); // 解链 size += nextsize; } else clear_inuse_bit_at_offset(nextchunk, 0); /* Place the chunk in unsorted chunk list. Chunks are not placed into regular bins until after they have been given one chance to be used in malloc. */ bck = unsorted_chunks(av); fwd = bck->fd; if (__glibc_unlikely (fwd->bk != bck)) // unsorted bin链的检查 malloc_printerr ("free(): corrupted unsorted chunks"); p->fd = fwd; p->bk = bck; if (!in_smallbin_range(size)) { p->fd_nextsize = NULL; p->bk_nextsize = NULL; } bck->fd = p; fwd->bk = p; set_head(p, size | PREV_INUSE); set_foot(p, size); check_free_chunk(av, p); } /* If the chunk borders the current high end of memory, consolidate into top */ else { // 与top chunk相邻的,直接合并进入top chunk size += nextsize; set_head(p, size | PREV_INUSE); av->top = p; check_chunk(av, p); } /* Take a chunk off a bin list. */ static void unlink_chunk (mstate av, mchunkptr p) { if (chunksize (p) != prev_size (next_chunk (p))) // 又做一次待合并的chunk的size 和 prev_size 的检查(确保向前合并(向高地址)) malloc_printerr ("corrupted size vs. prev_size"); mchunkptr fd = p->fd; // 找到链上 chunk_p的前一个chunk mchunkptr bk = p->bk; // 找到链上 chunk_p的后一个chunk if (__builtin_expect (fd->bk != p || bk->fd != p, 0)) // 双向链表检查 一个指针不存在都错误 malloc_printerr ("corrupted double-linked list"); fd->bk = bk; // 将p解链 bk->fd = fd; // 将p解链 if (!in_smallbin_range (chunksize_nomask (p)) && p->fd_nextsize != NULL) // large bin chunk { if (p->fd_nextsize->bk_nextsize != p || p->bk_nextsize->fd_nextsize != p) malloc_printerr ("corrupted double-linked list (not small)"); if (fd->fd_nextsize == NULL) { if (p->fd_nextsize == p) fd->fd_nextsize = fd->bk_nextsize = fd; else { fd->fd_nextsize = p->fd_nextsize; fd->bk_nextsize = p->bk_nextsize; p->fd_nextsize->bk_nextsize = fd; p->bk_nextsize->fd_nextsize = fd; } } else { p->fd_nextsize->bk_nextsize = p->bk_nextsize; p->bk_nextsize->fd_nextsize = p->fd_nextsize; } } }glibc-2.28 和 glibc-2.29 在合并前对prev_size检查的,区别:


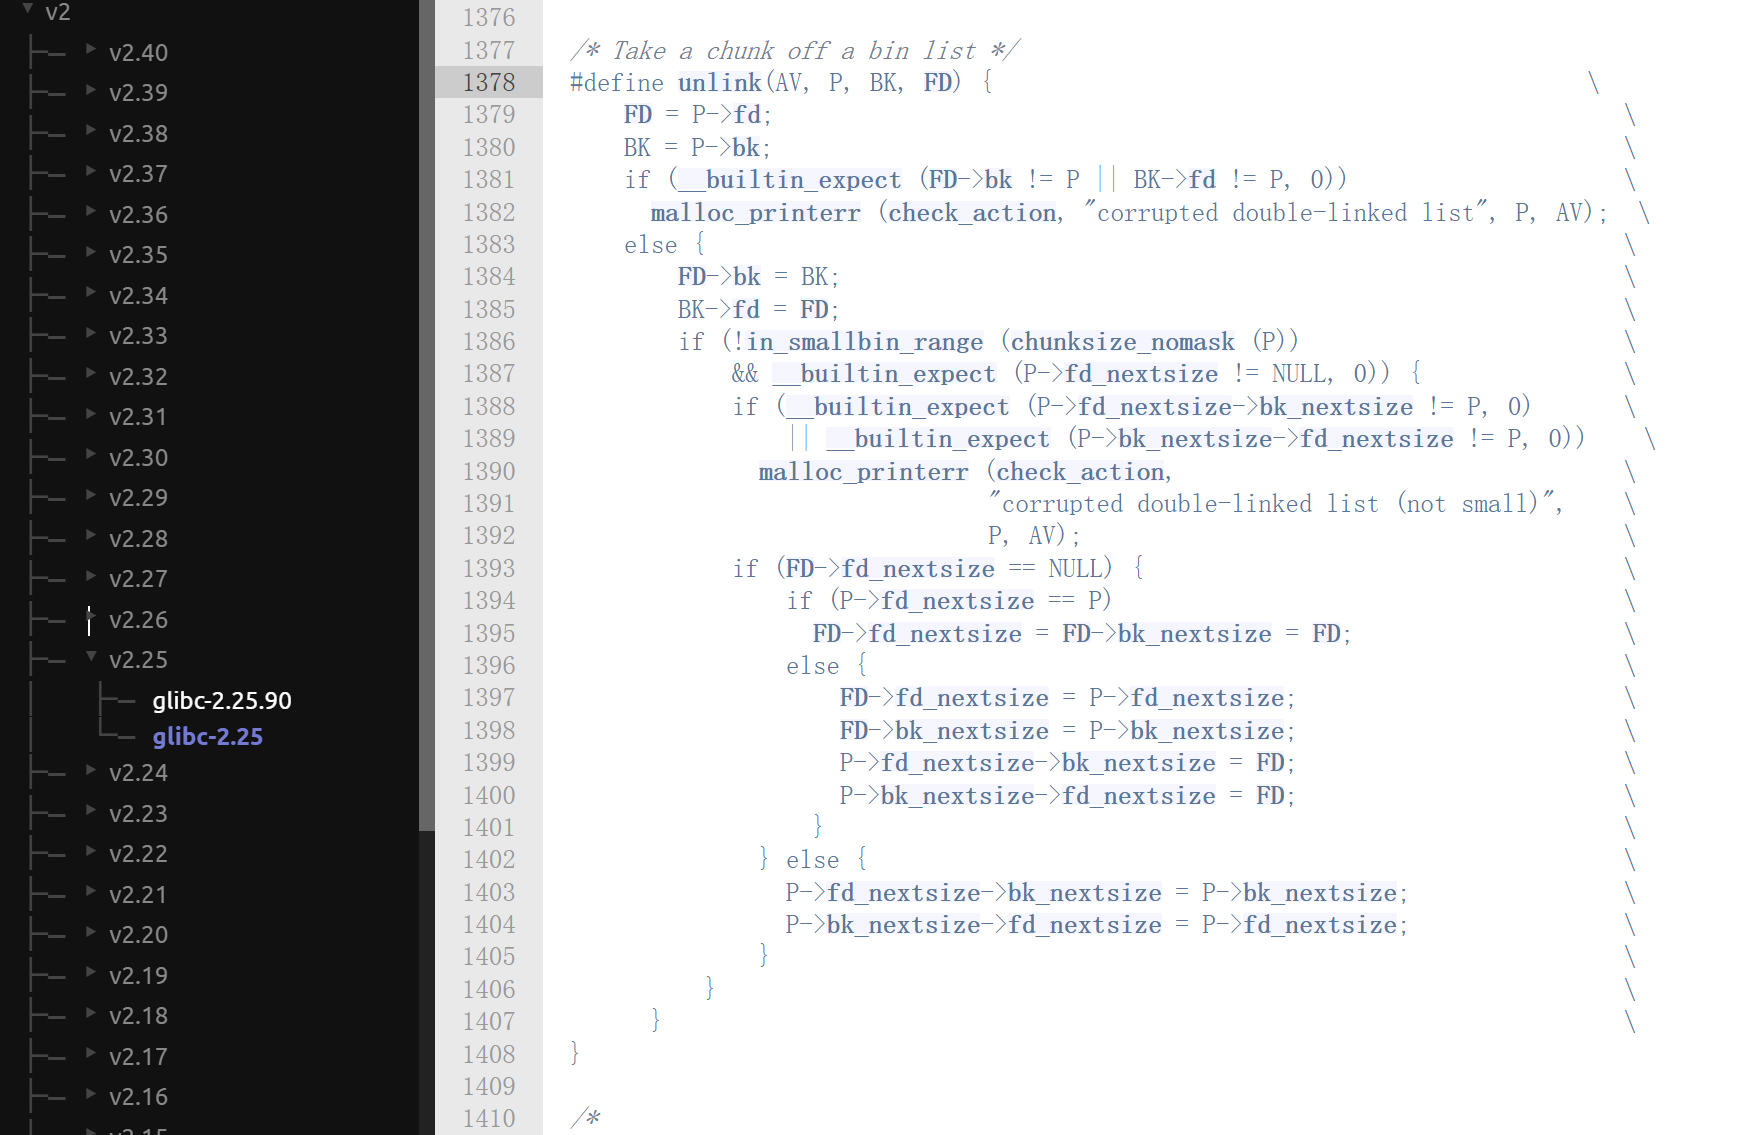
但是glibc-2.28 在unlink里面 对待合并的chunk的size 和 prev_size 做了检查(这个检查单纯针对
待合并的chunk):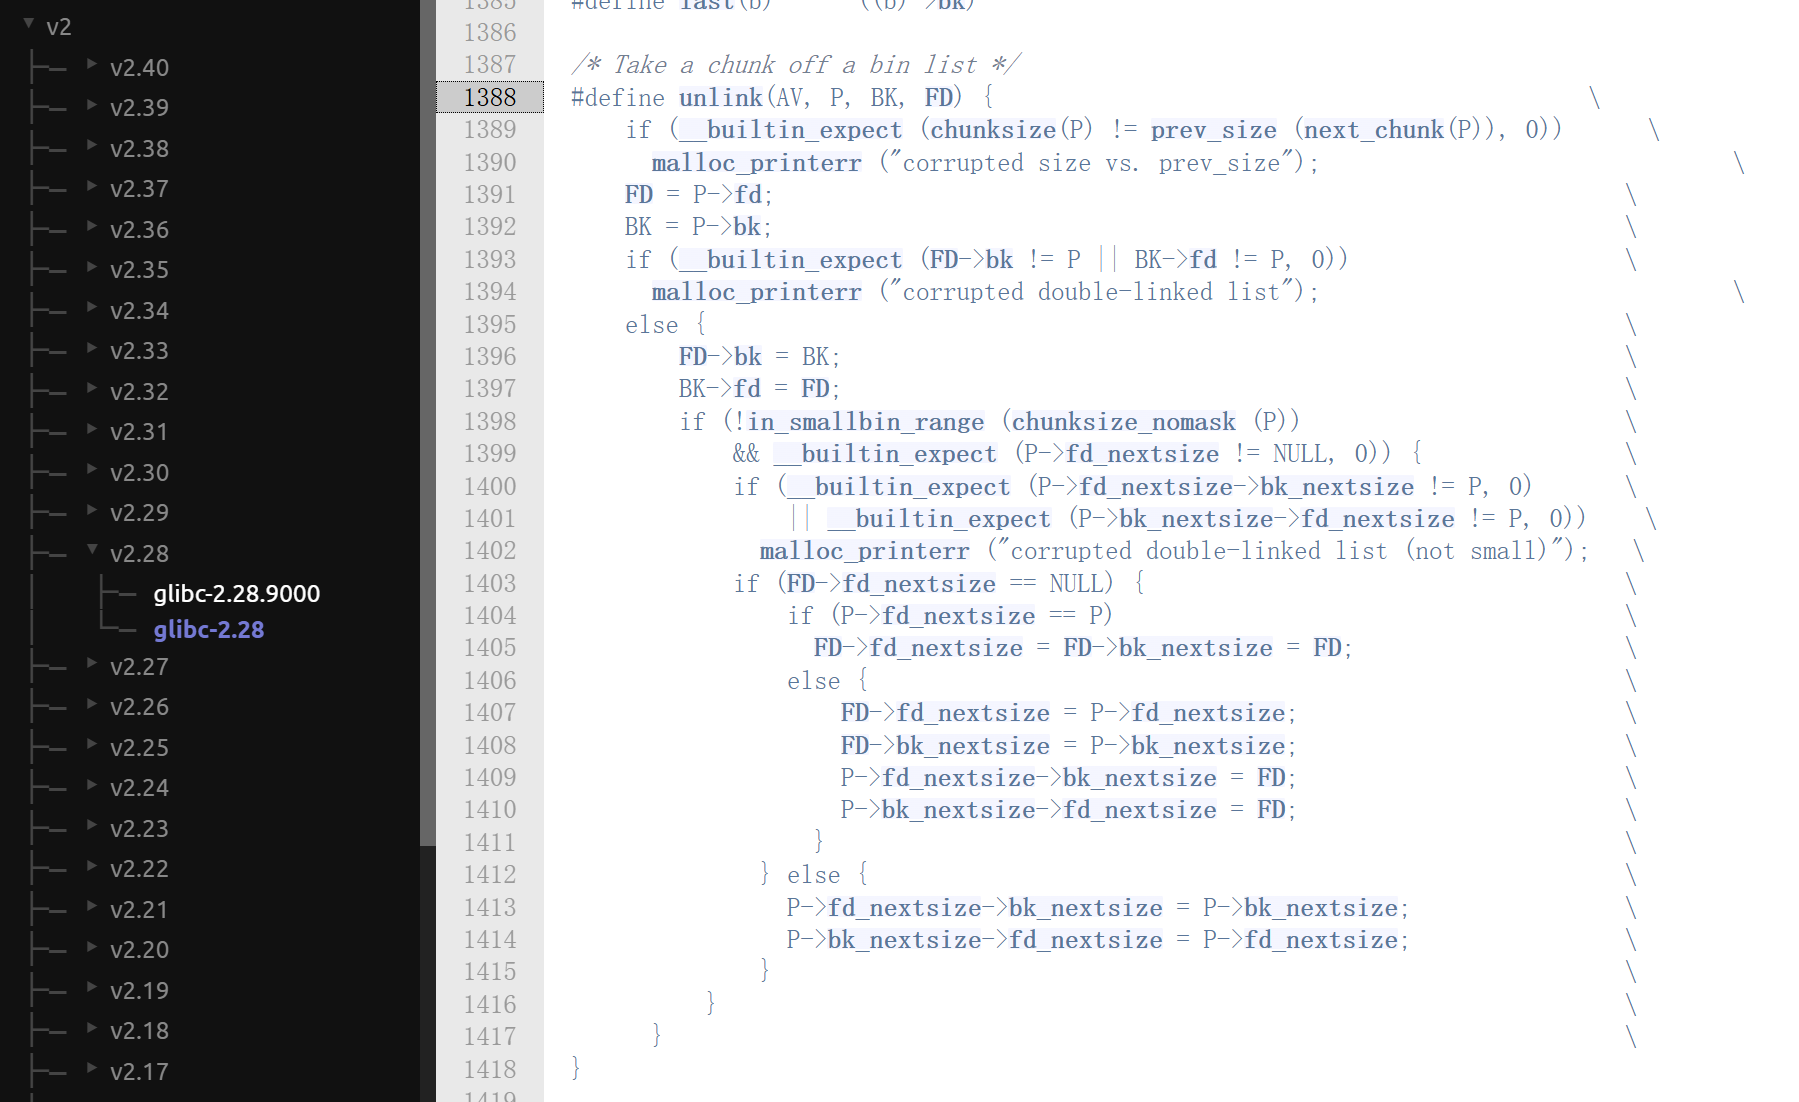
到glibc-2.25 以及之前是没有这个检查的:
-
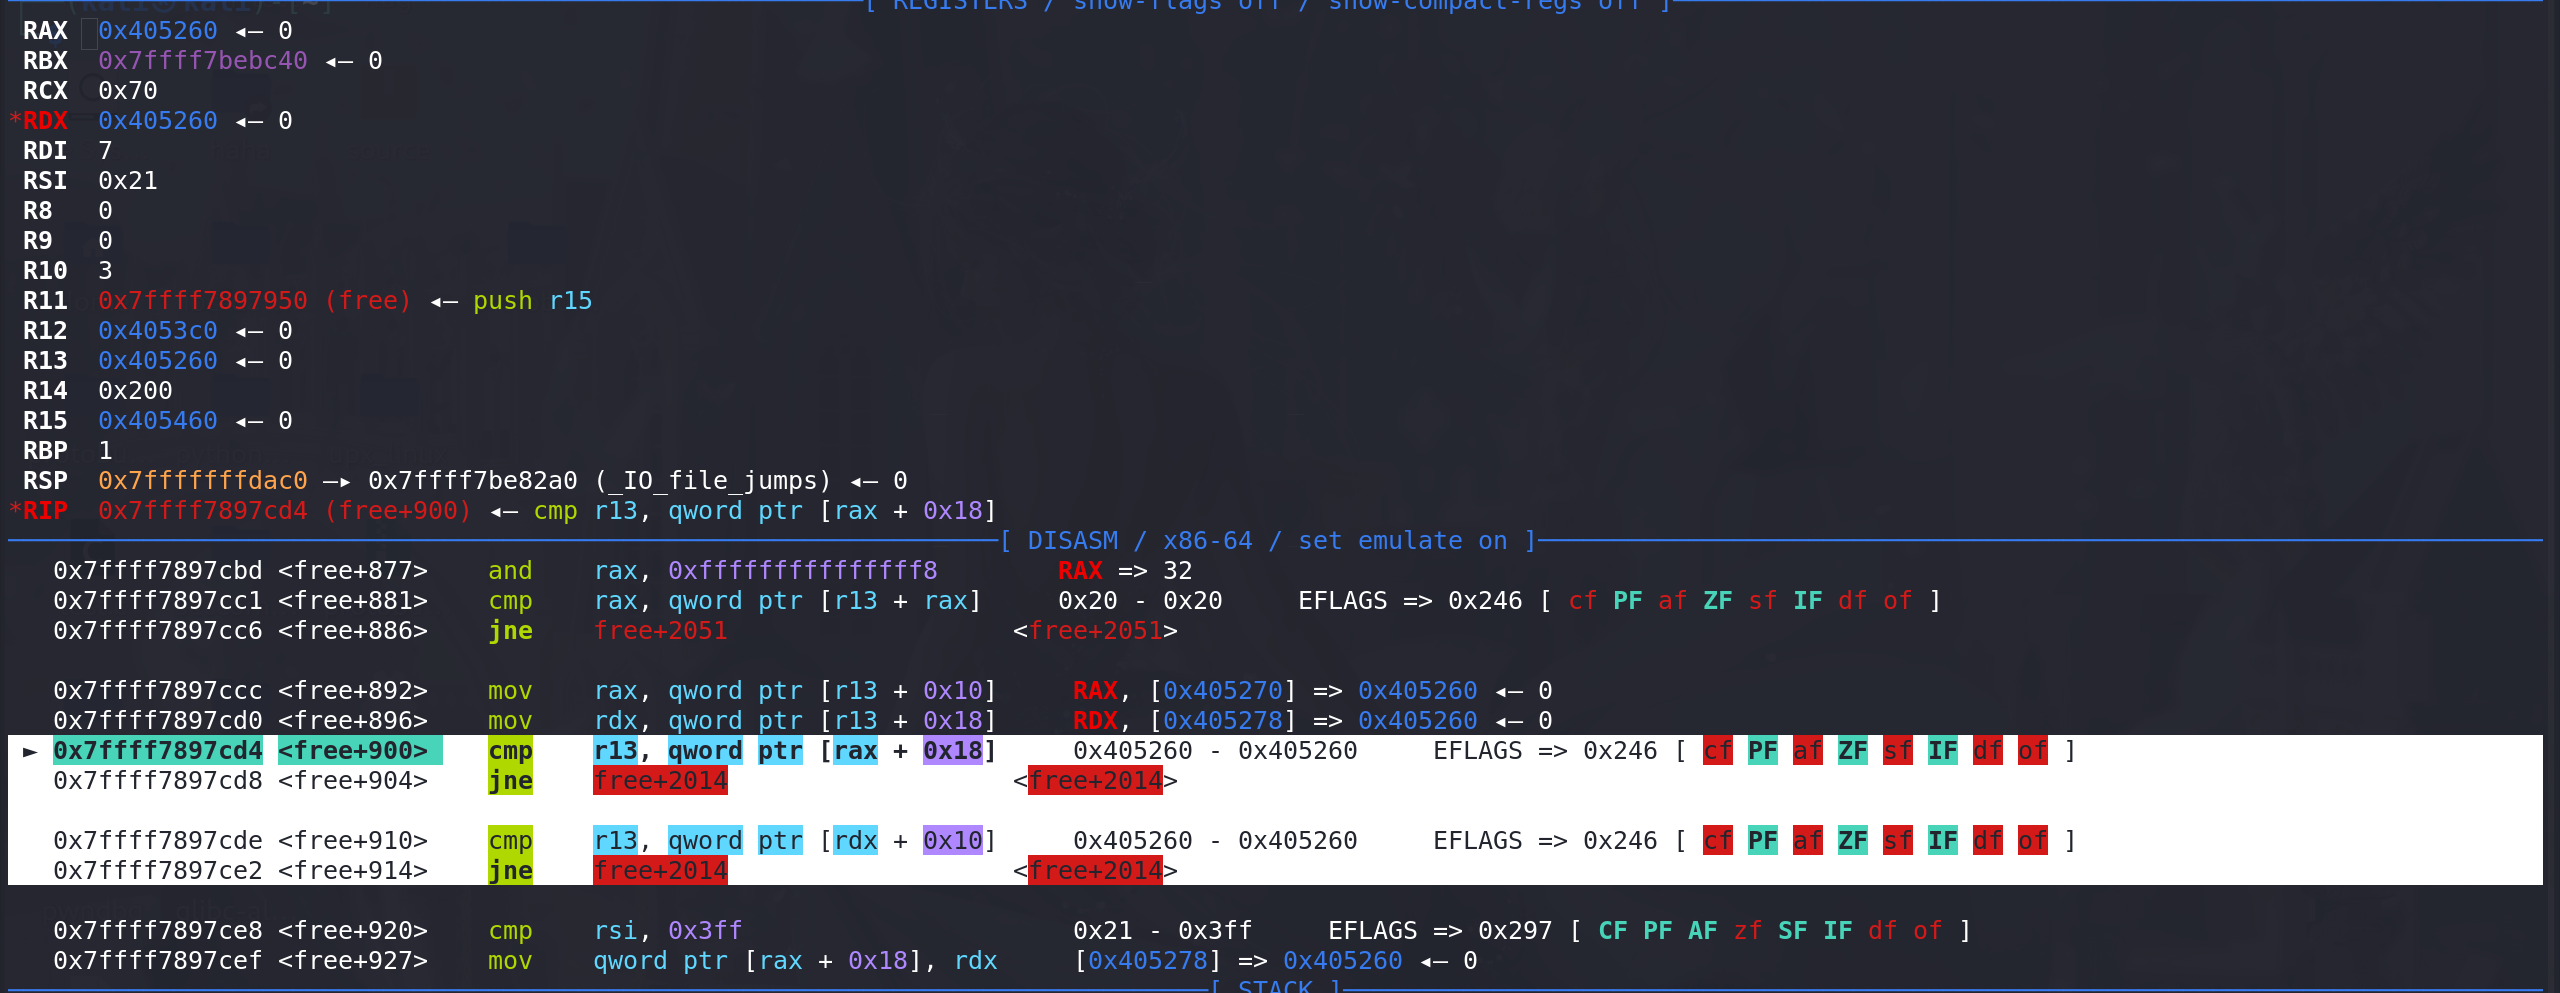
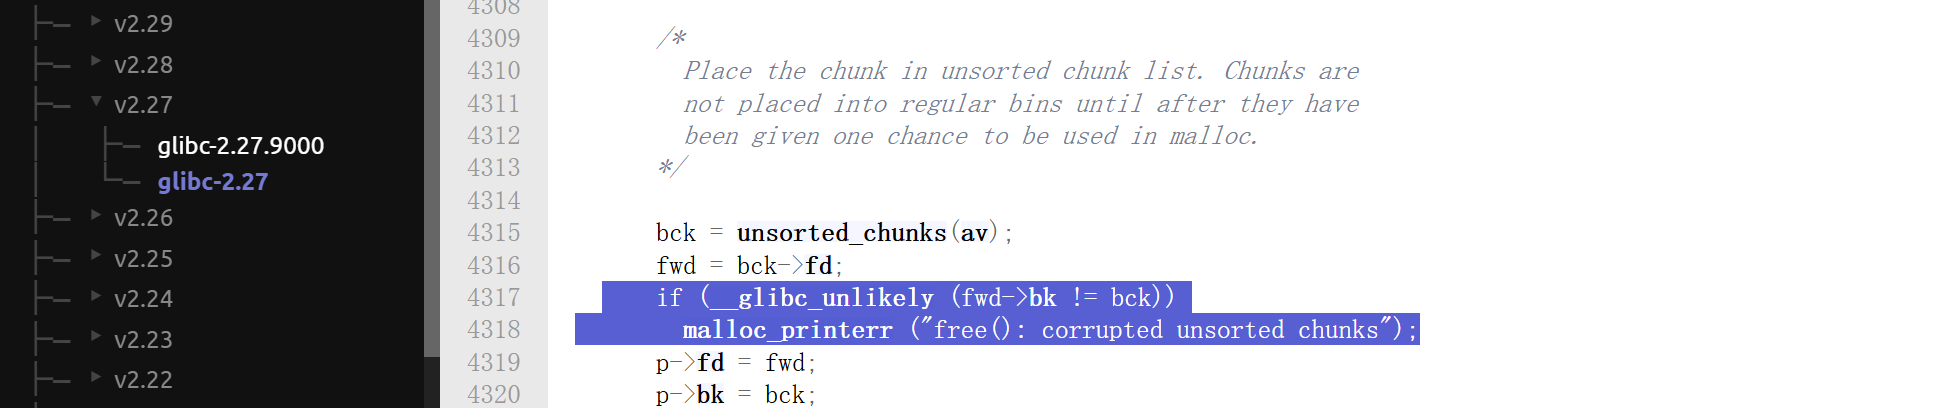
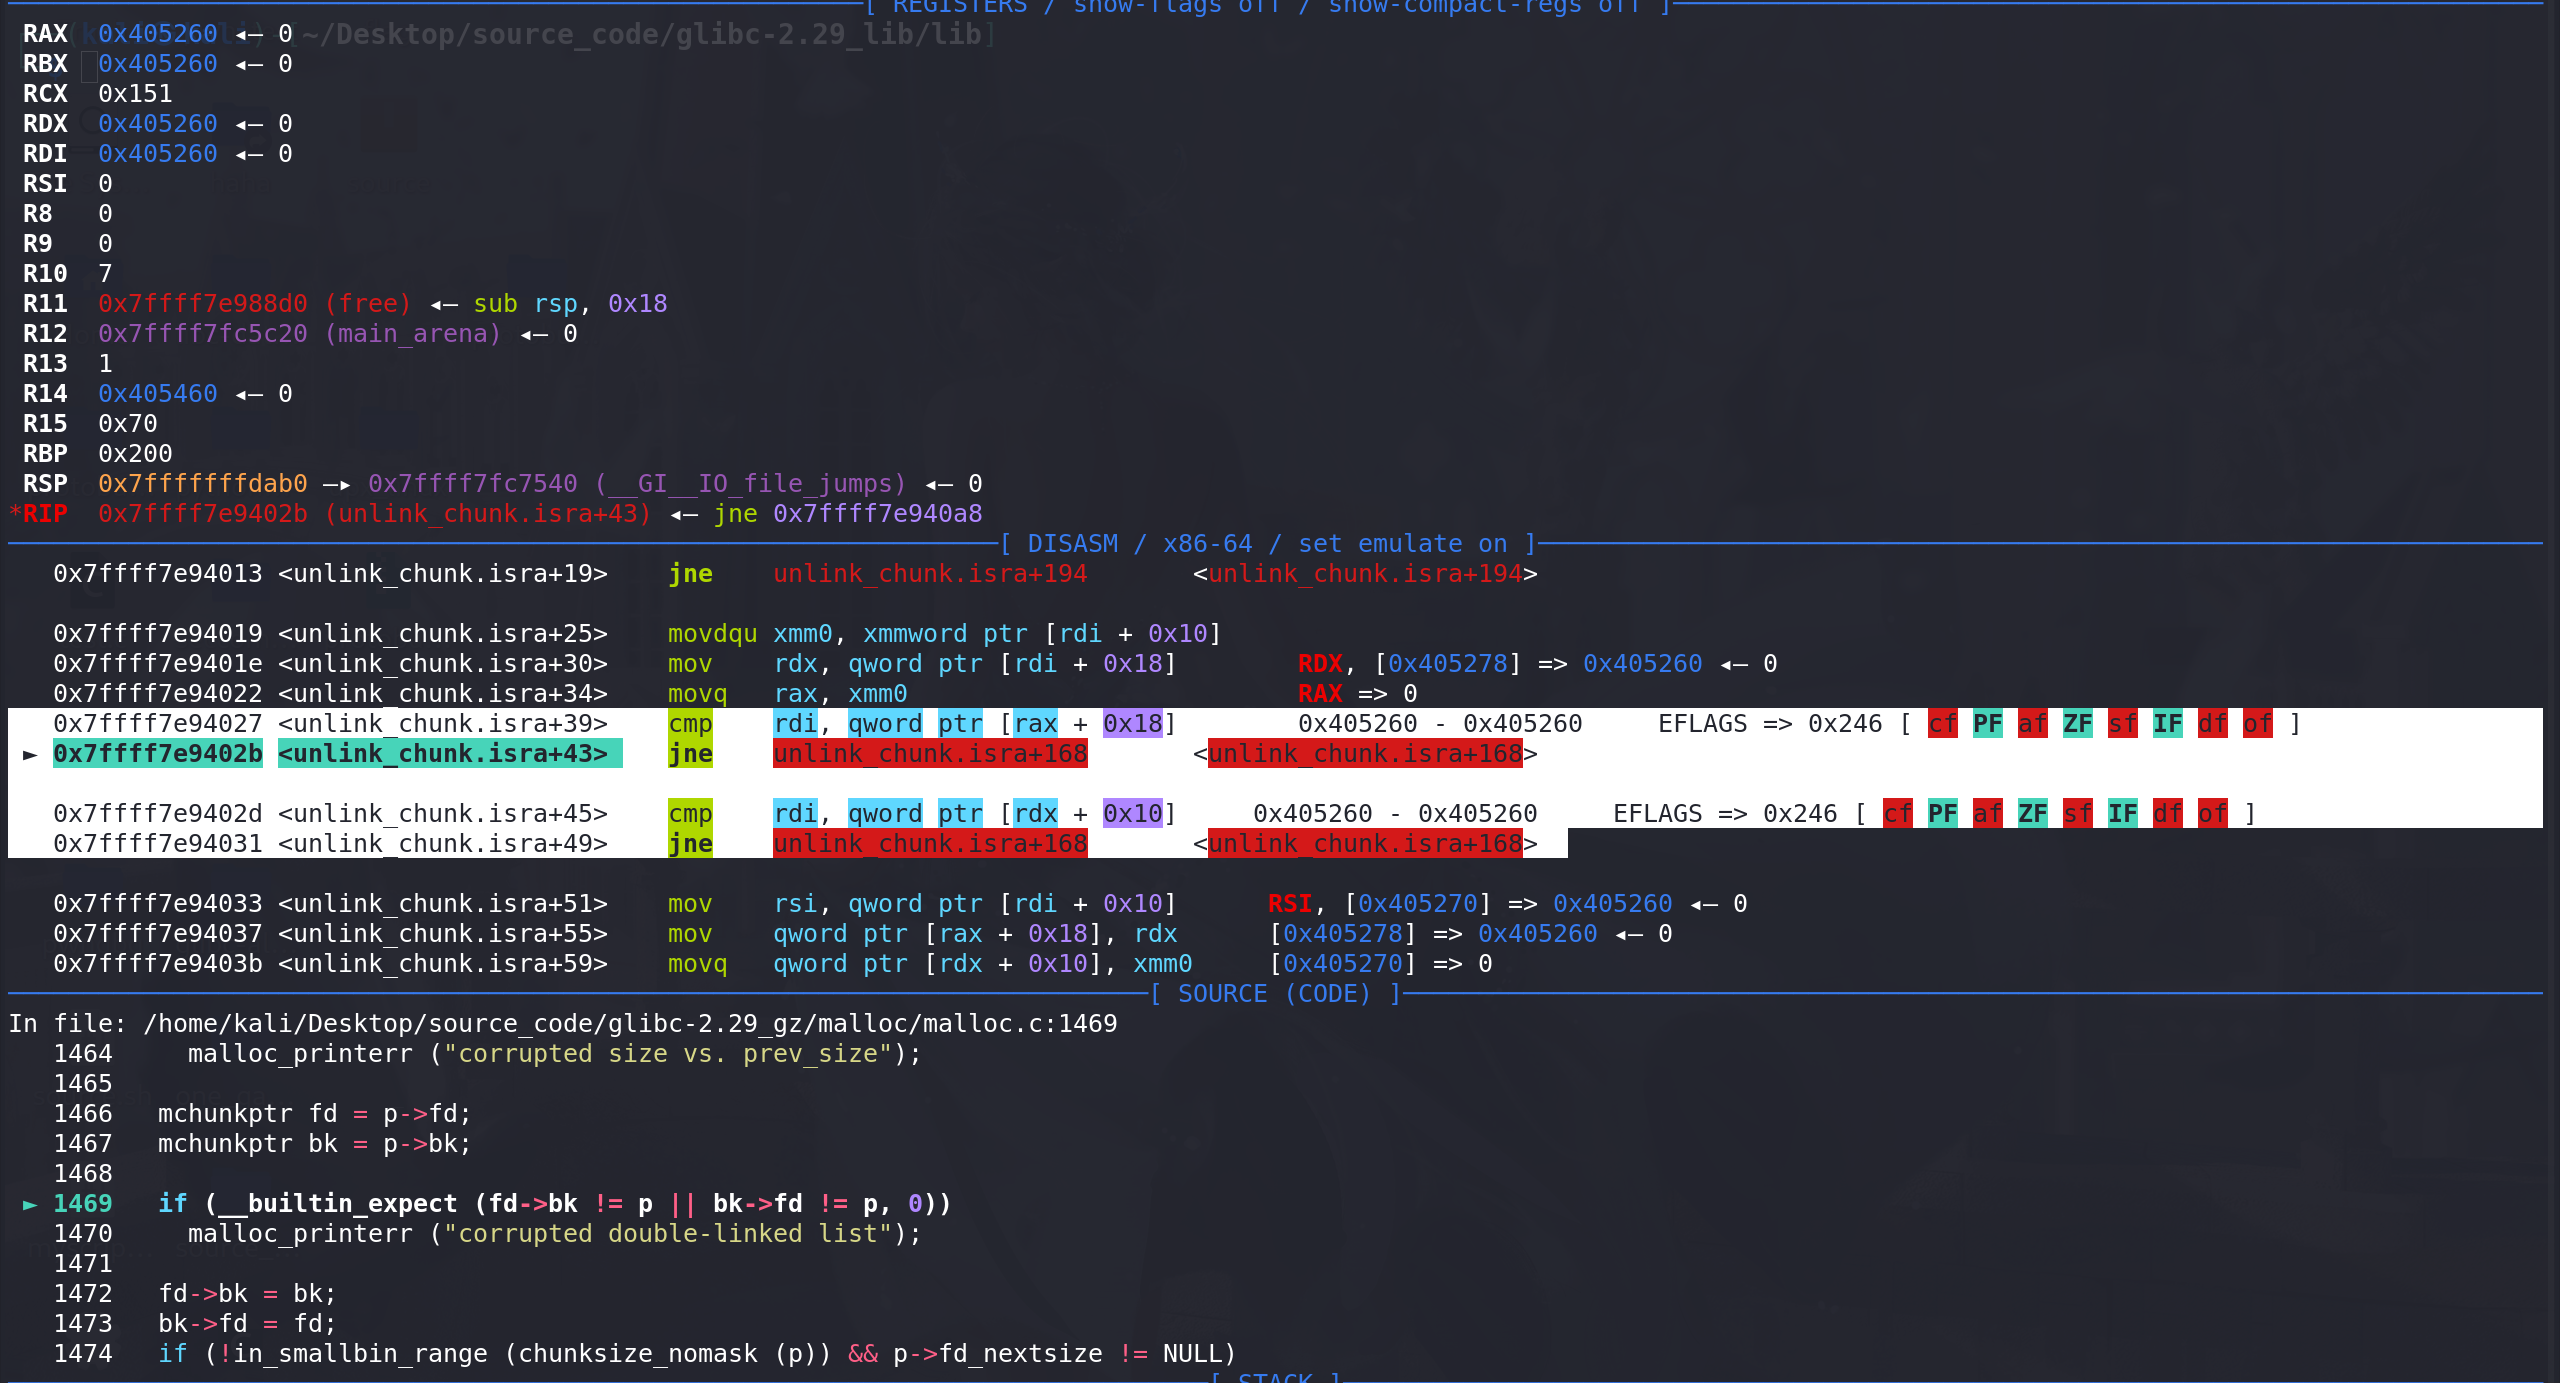
这里看一下在glibc-2.27 合并时如果 size 和 prev_size 不匹配会怎么样:
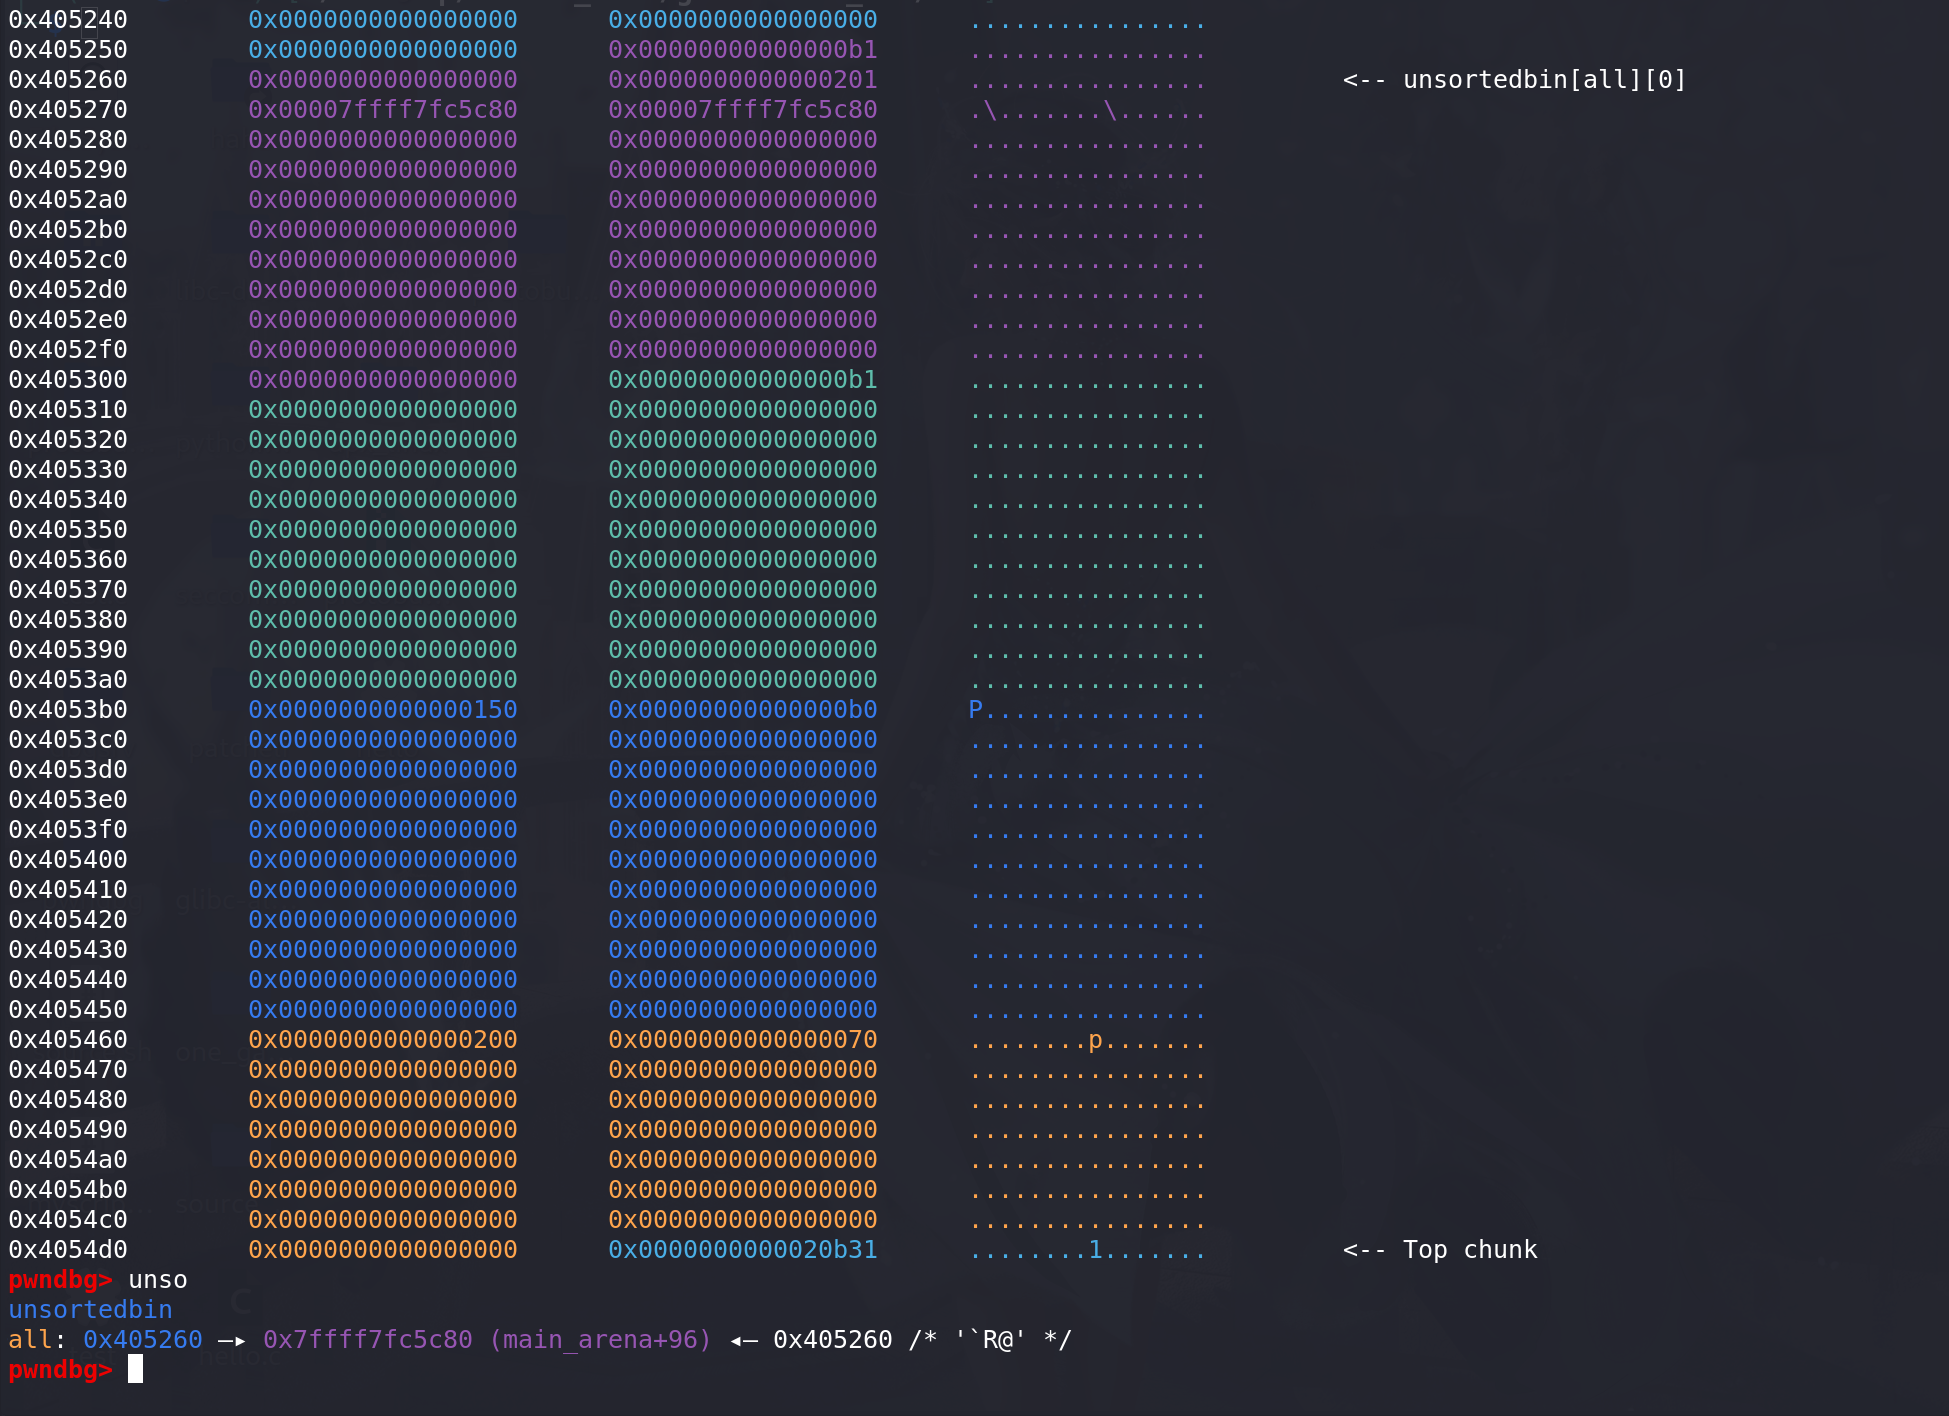
伪造蓝色chunk的prev_inuse位 和 prev_size 字段,并将tcache伪造满:
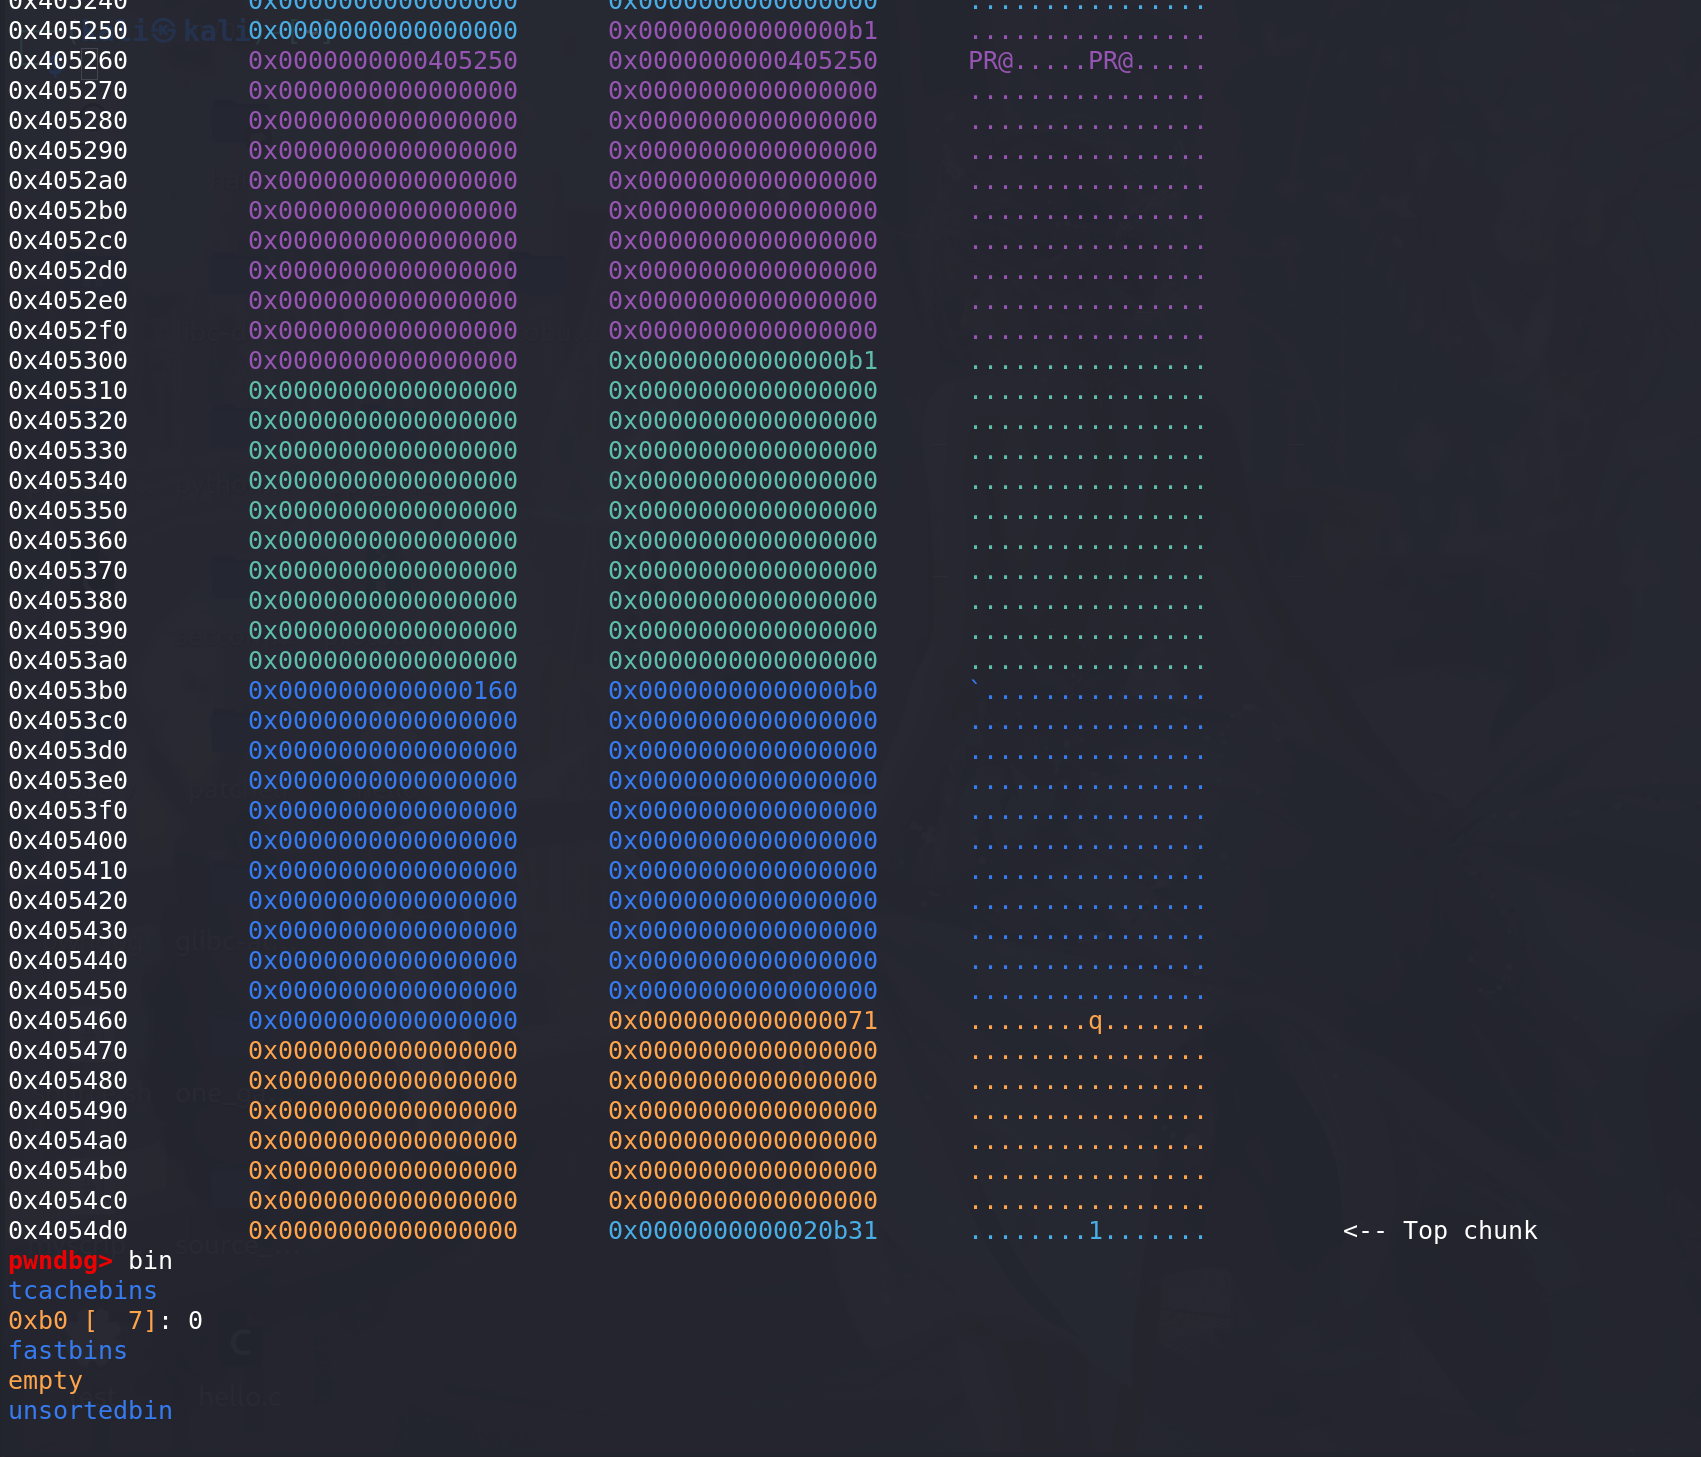
free掉蓝色chunk ,其会直接向上合并到unsorted bin中的chunk:
调试,这里检查到 待合并的chunk 0x405250 的size 与 prev_size(相邻高地址的chunk 即图中的绿色chunk的prev_size) 不同:

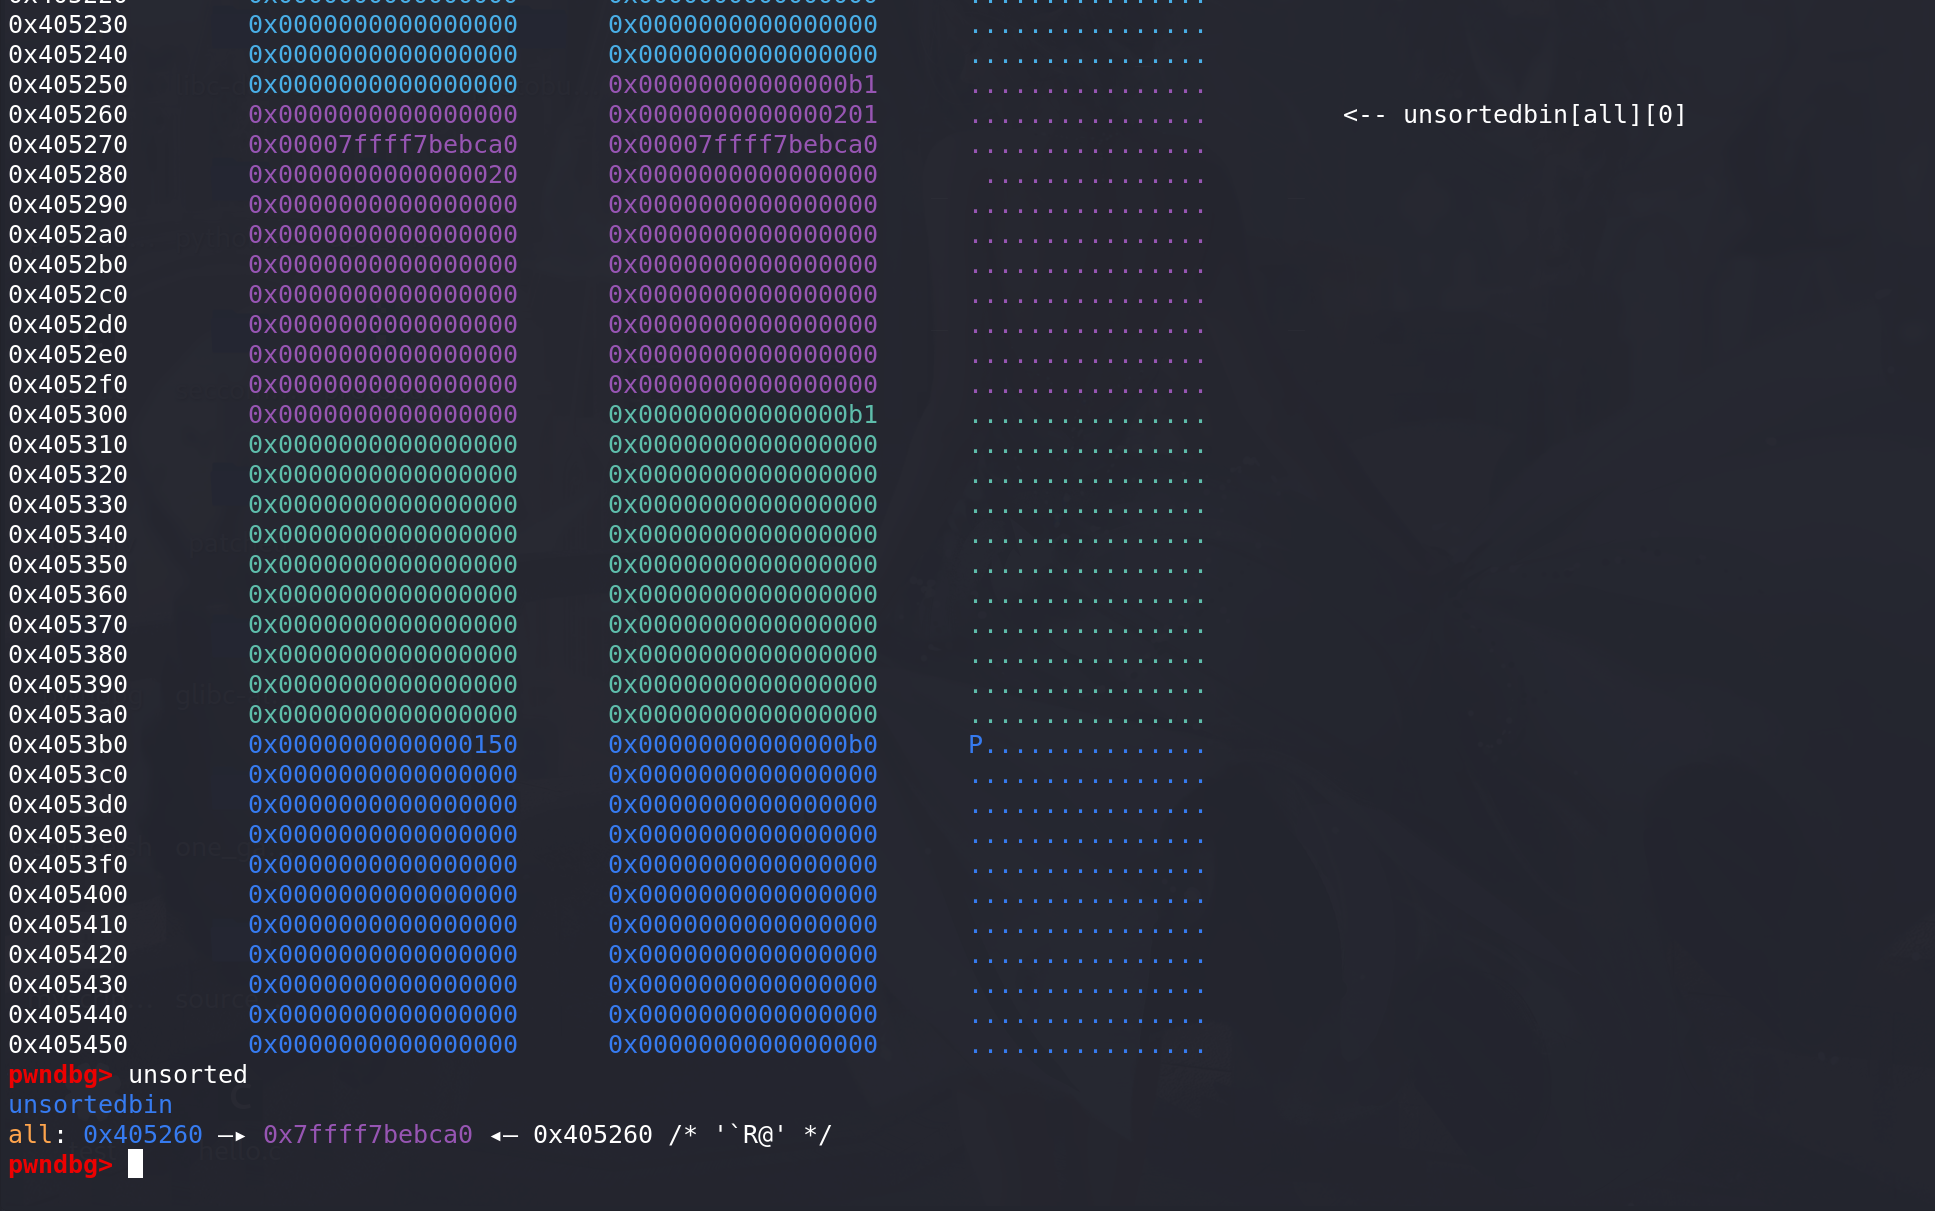
如果改为相同:
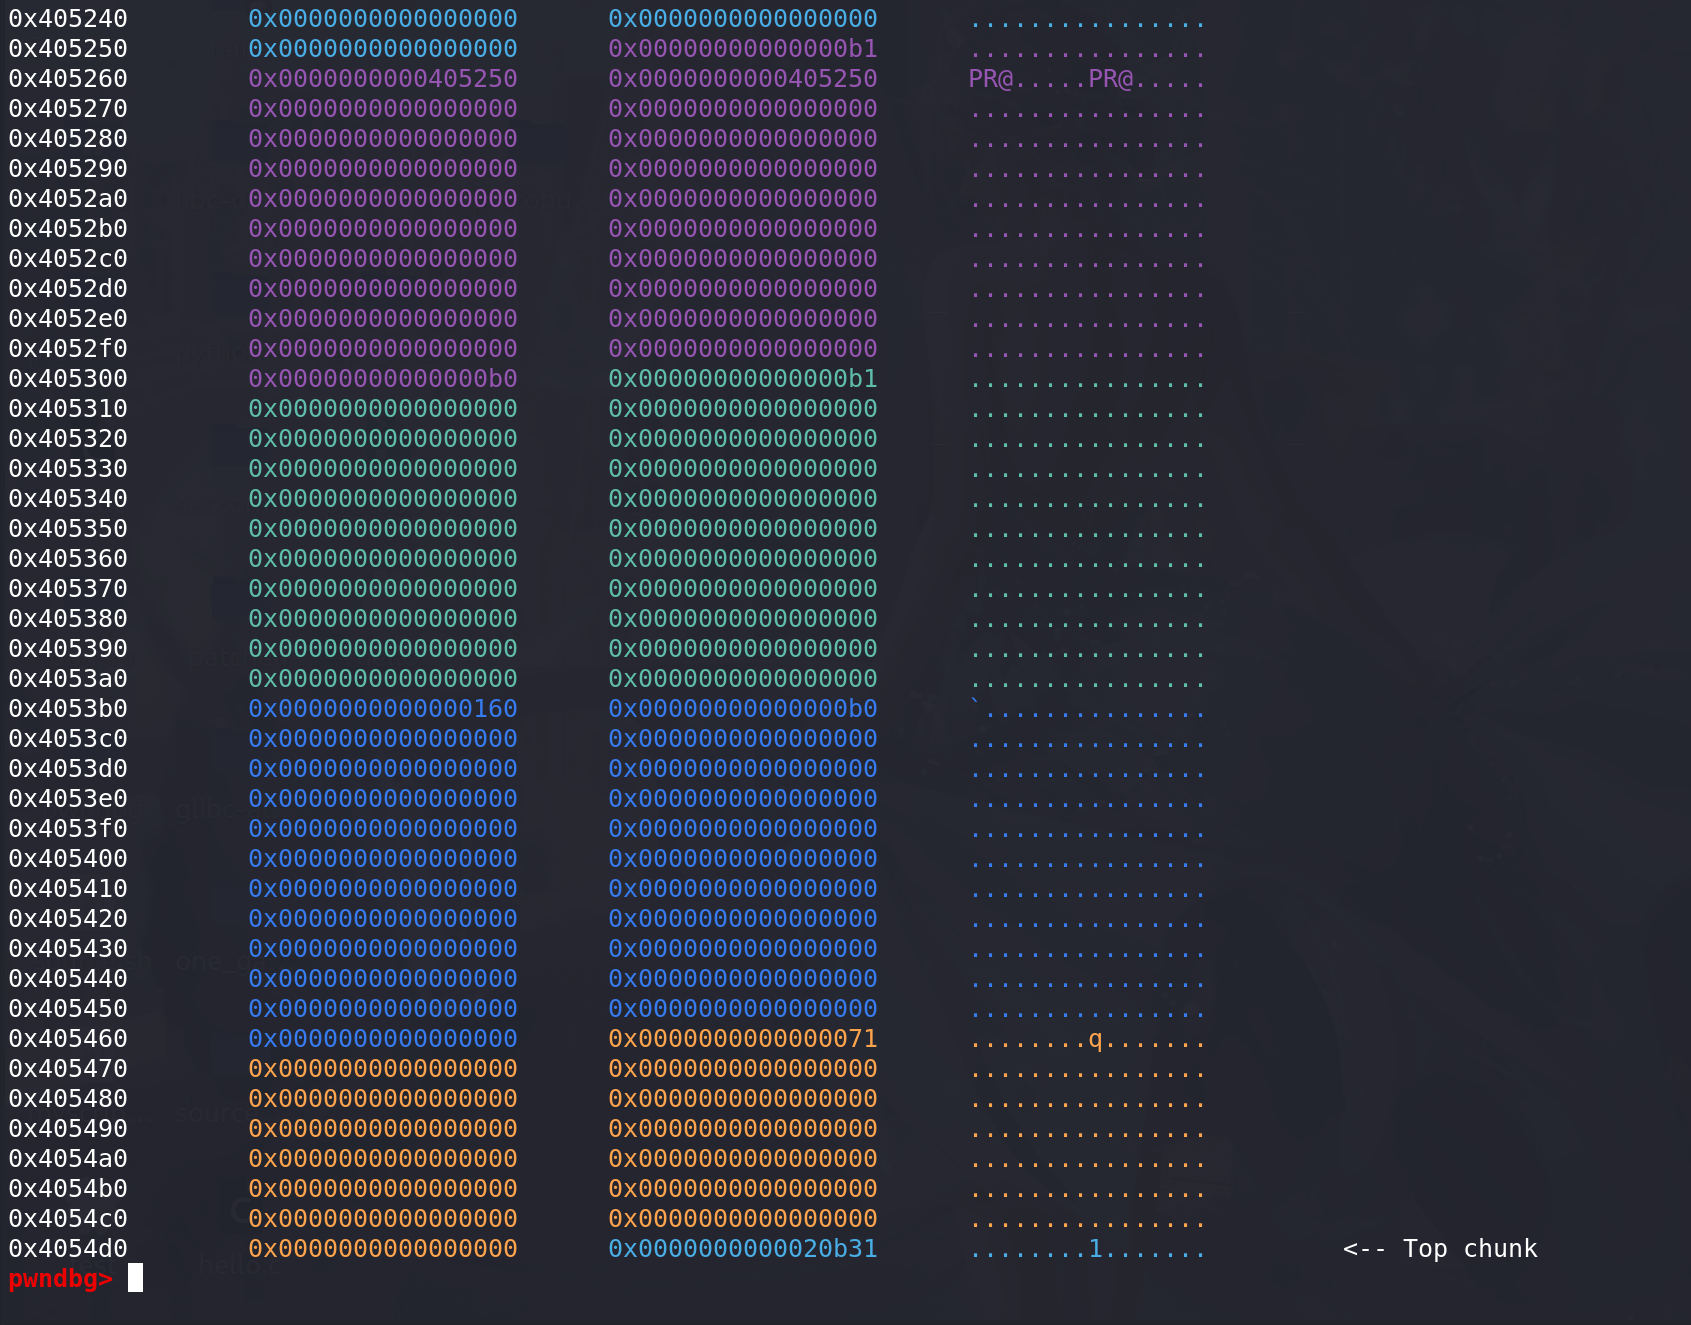
检查顺利通过,随后进入unlink:

进入unlink 后进行 双向链表检查,检查完成后顺利 解链:
最后完成 合并 + unlink 进入到unsorted bin中,实现overlapping:
-
所以这里可以得出一个利用:伪造chunk 后利用 unlink + 合并 实现overlapping 只需要
提前泄漏heap地址,能覆盖prev_inuse位为0即可:在glibc-2.28即以前,向前合并,和向后和并都适用:这里以glibc-2.27演示向前合并:
伪造好chunk_0x21 和 待释放的chunk的prev_inuse 和prev_size字段:
通过伪造的prev_size 找到了伪造的chunk,再通过伪造的chunk_0x21 找到
prev_size(伪造的0x20),两则比较通过size == prev_size 检查: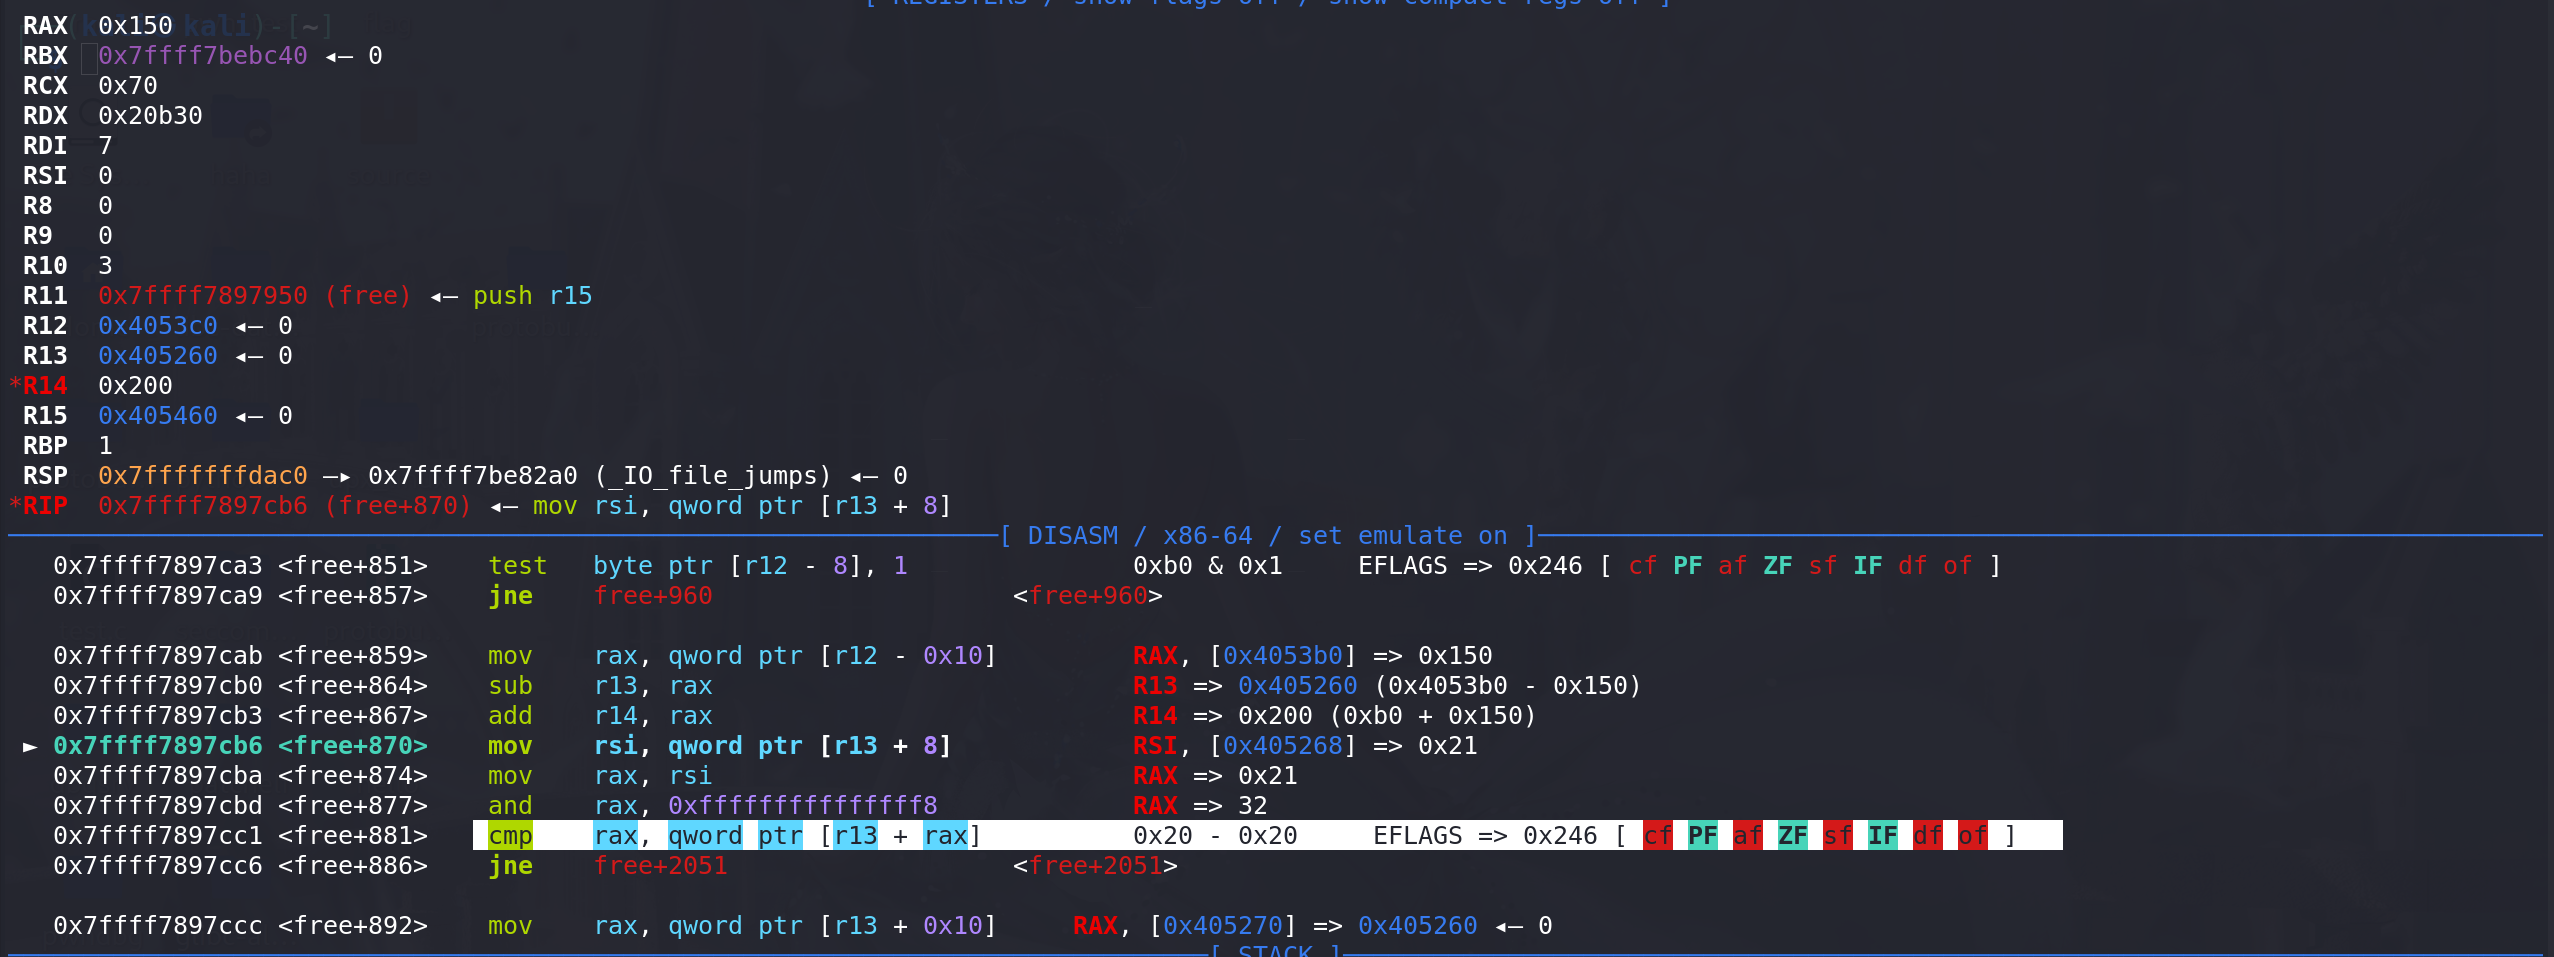
随后 利用伪造的 fd 和 bk 通过双向链表检查:
最后顺利进入unsorted bin 中(因为我们没有动unsorted bin 所以后面放入unsorted bin时的检查肯定能顺利通过):
这里向后合并造成overlapping的,需要能
修改chunk的size字段,参考这篇:伪造unsortedbin释放时 top chunk的衔接问题再看glibc-2.29以及之后的libc是否同样适用,以glibc-2.29实验:
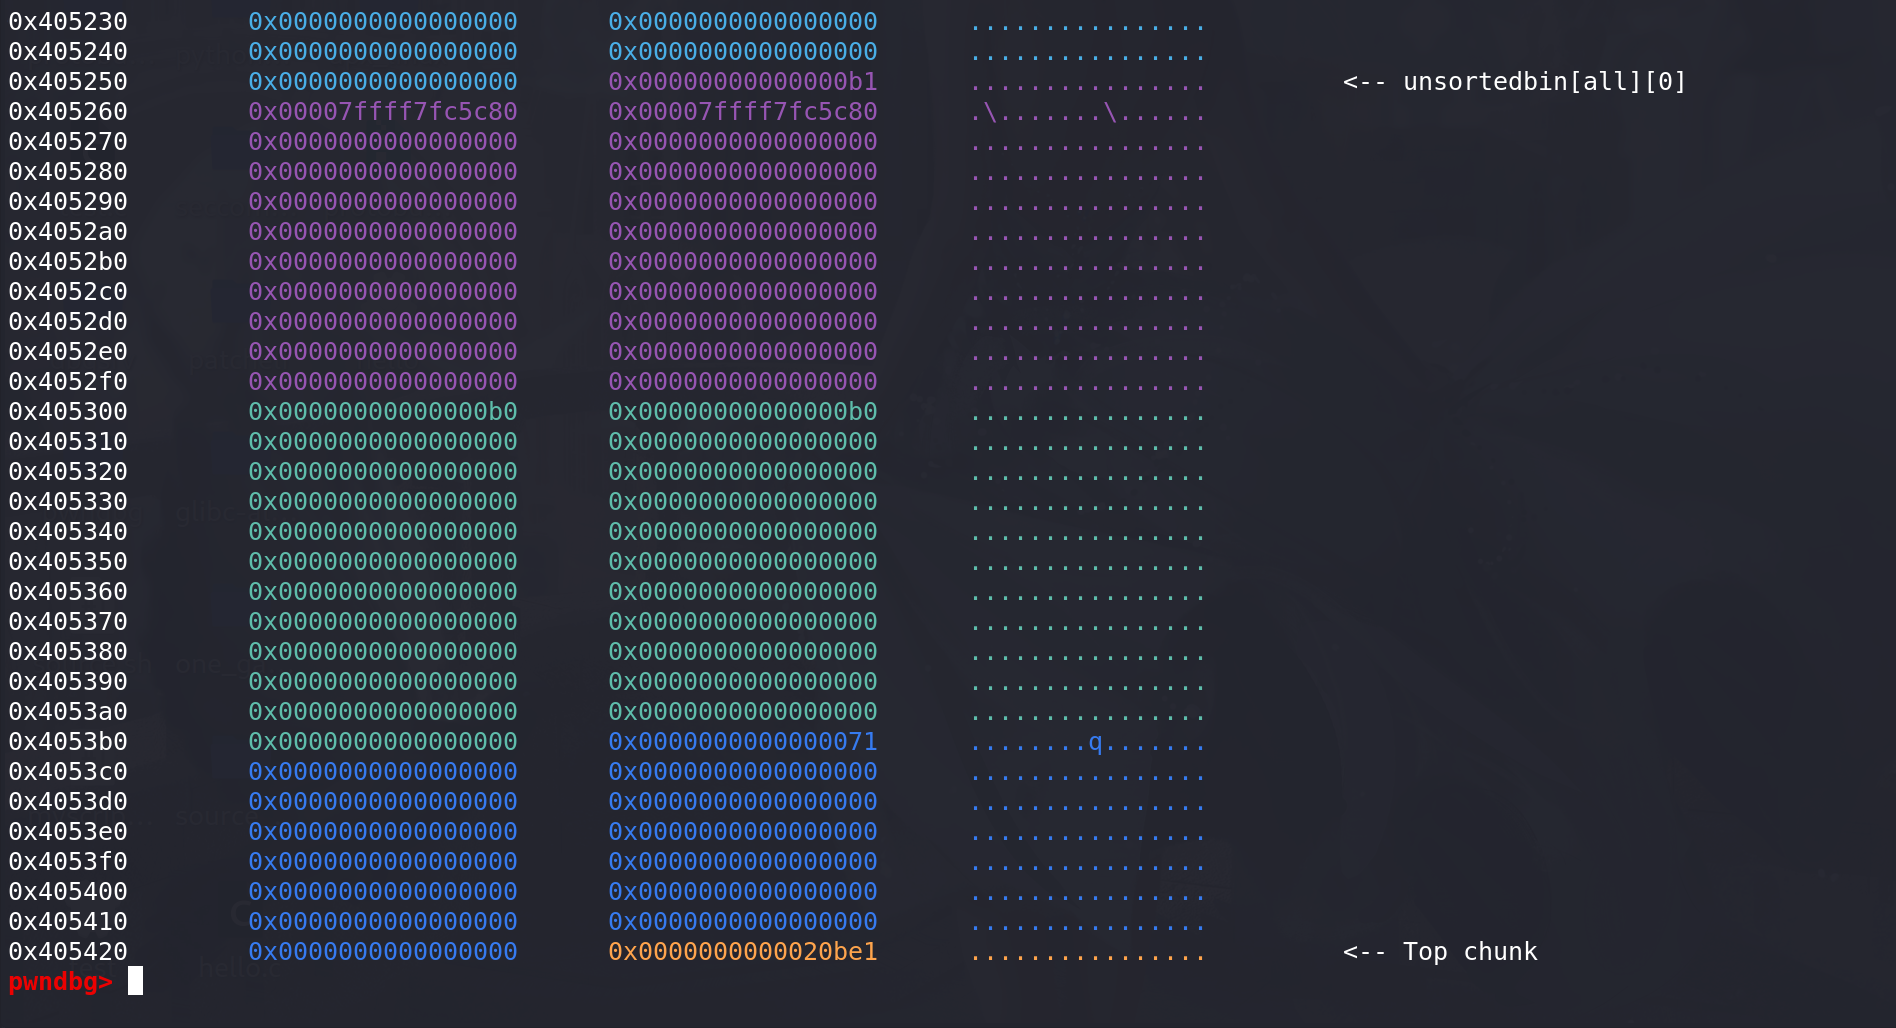
同样的方式伪造好chunk:
到这里 由于
释放的chunk的prev_size位和待合并的chunk的size不相等导致检查不能通过: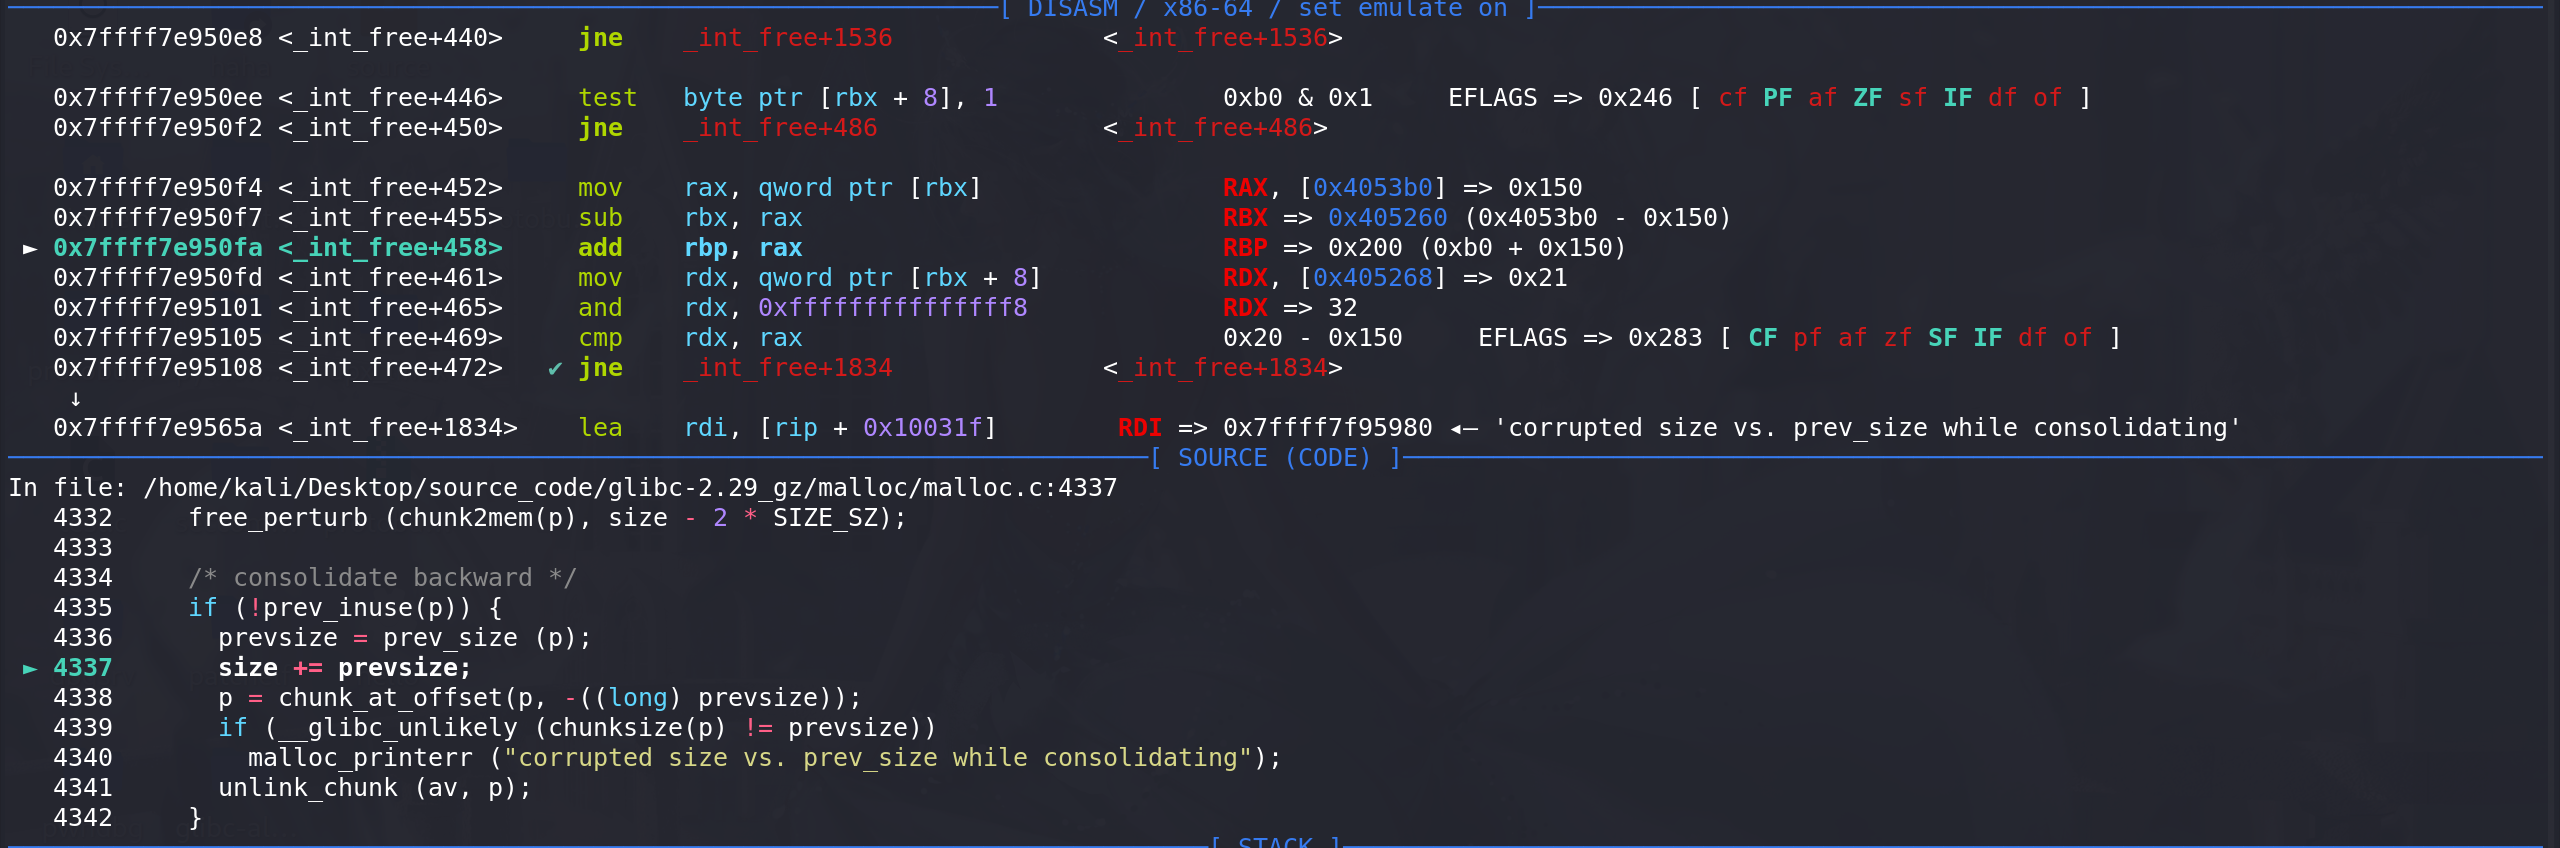
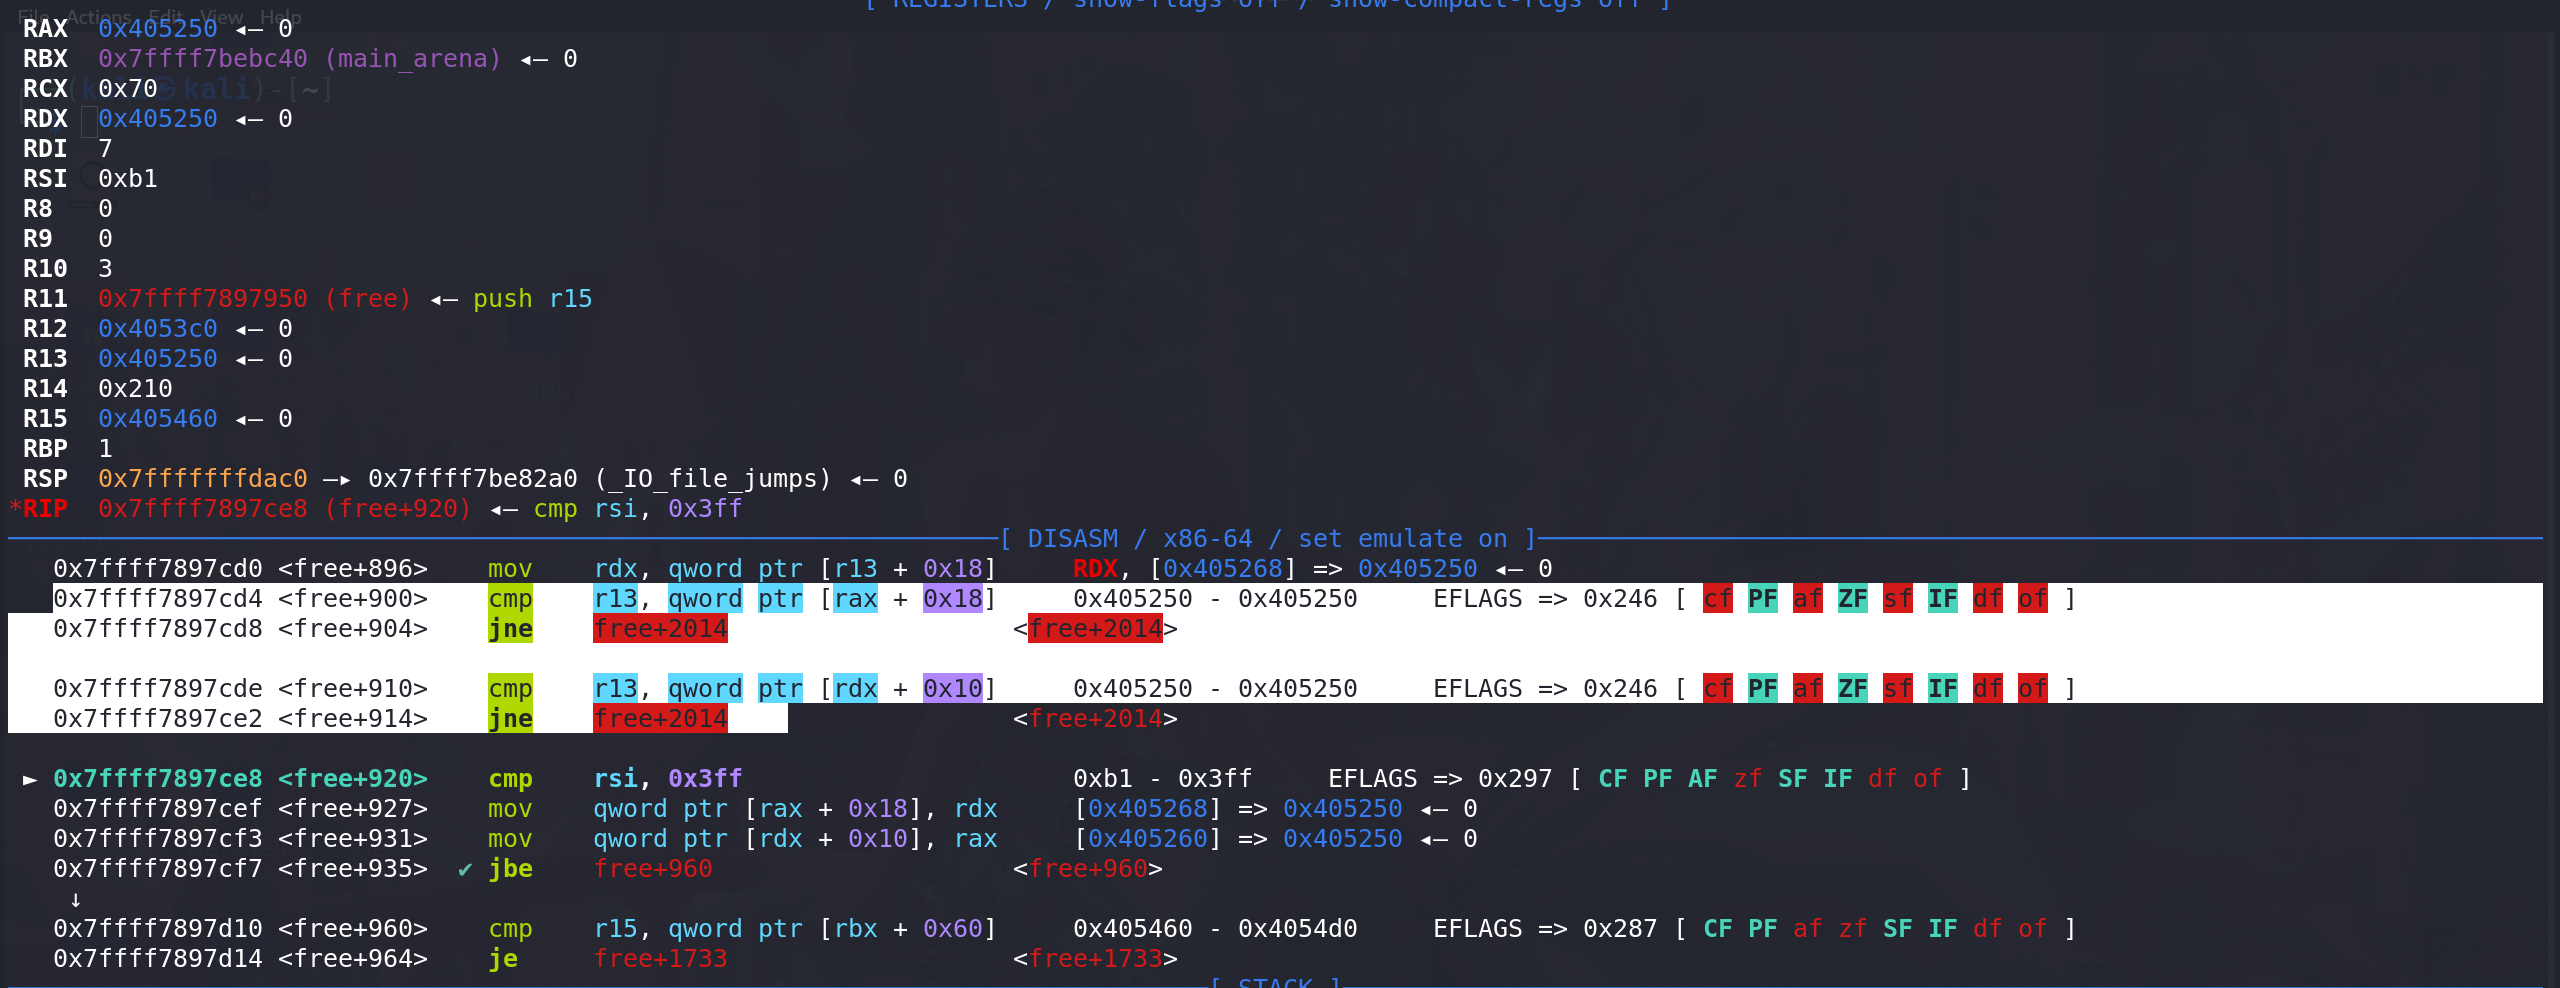
但是如果将伪造的chunk 的size给成0x150,即伪造成如下的样式:
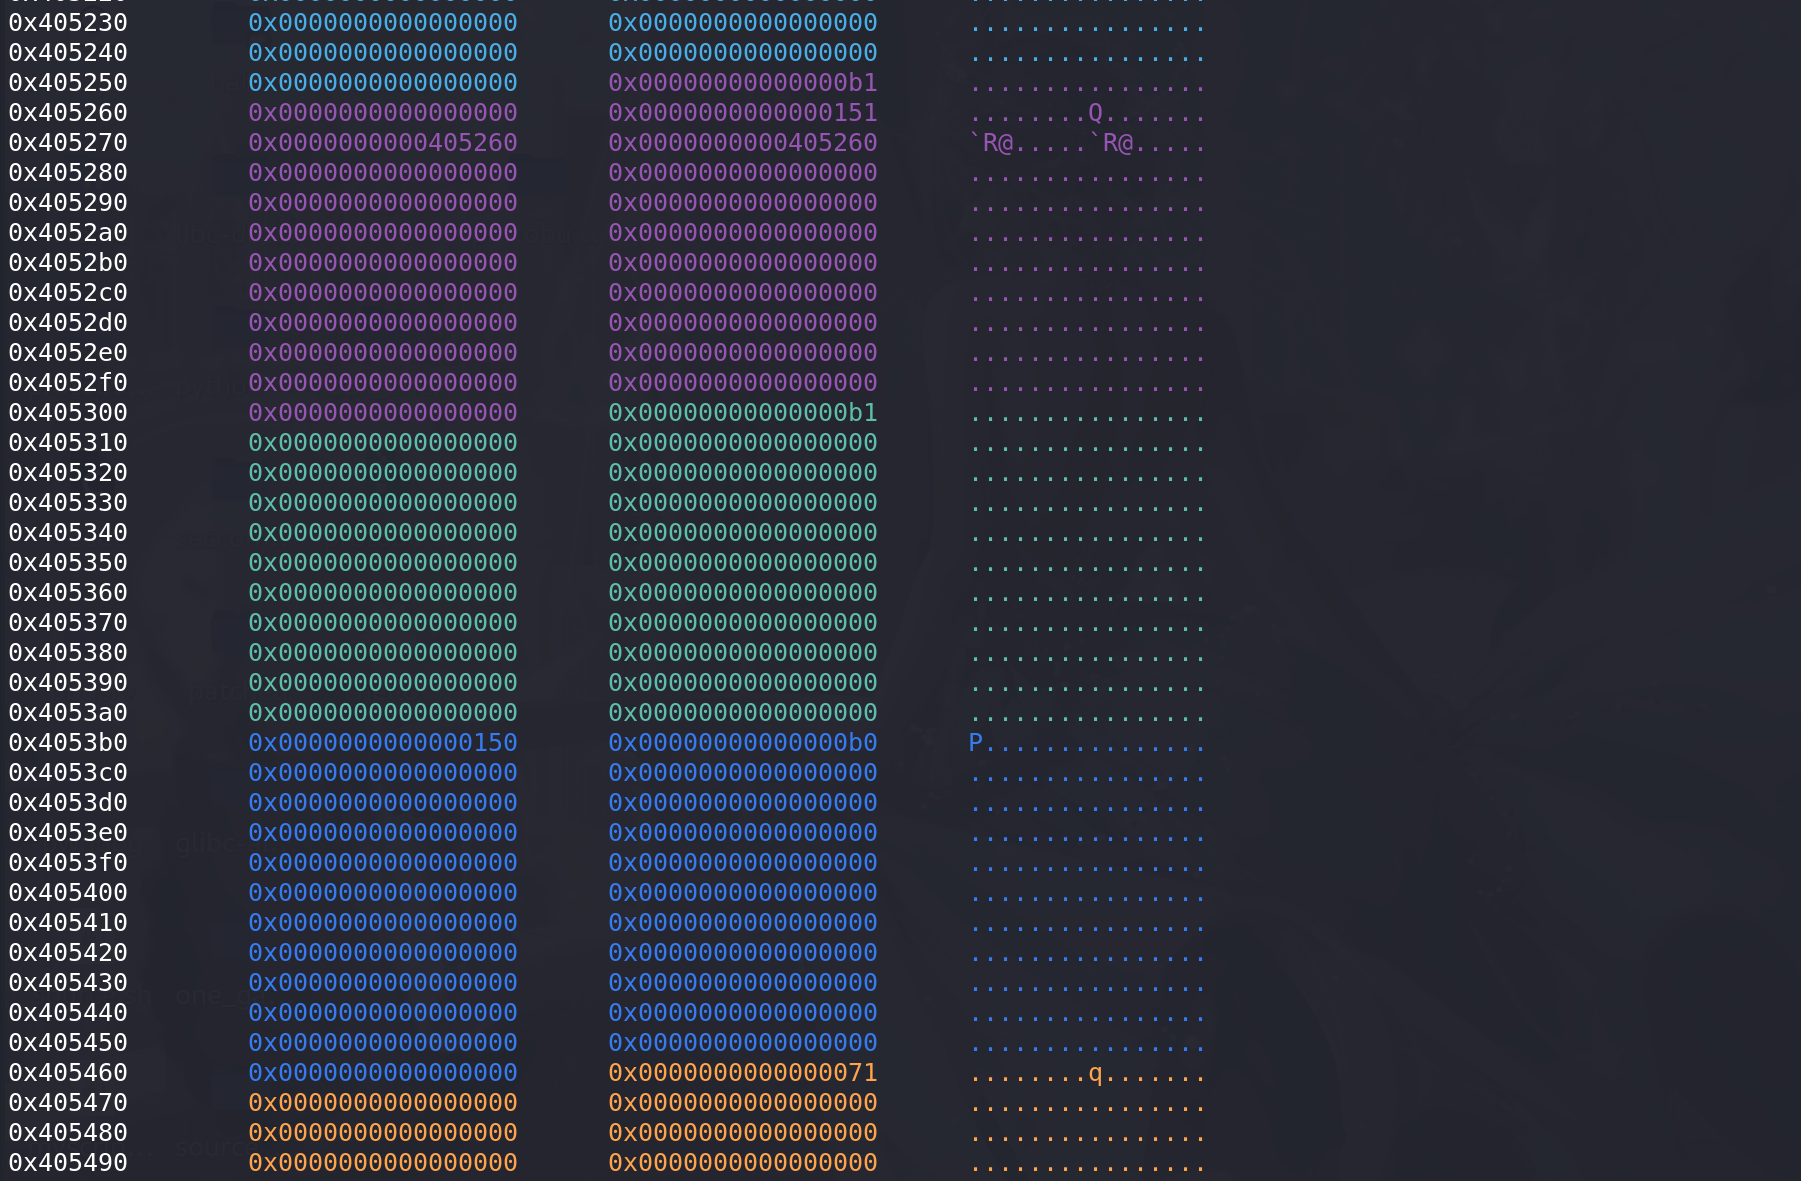
第一个检查顺利通过:
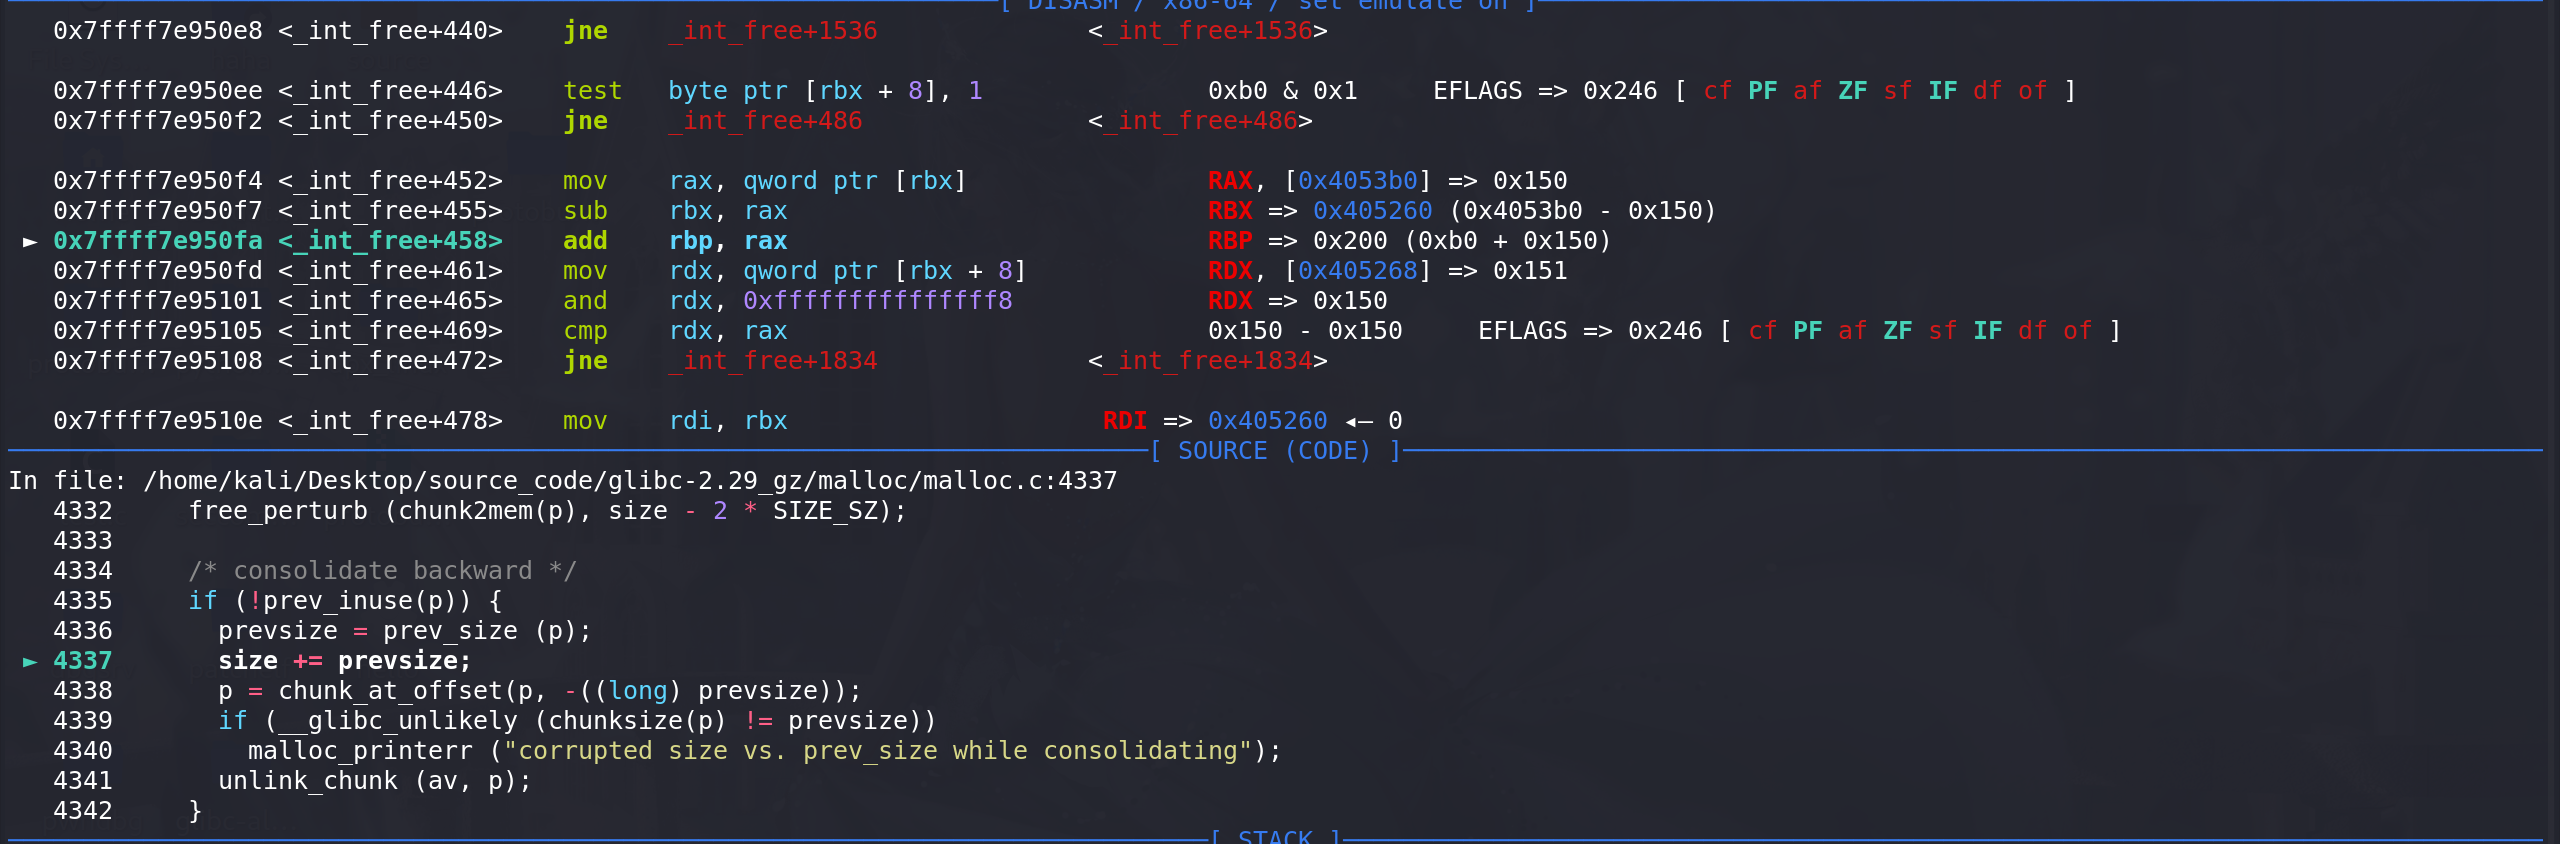
随后进入unlink_chunk:
检查
待合并的chunk(即我们伪造的chunk) 和 其相邻的高地址chunk的prev_size位(即蓝色chunk的prev_size)位,通过检擦: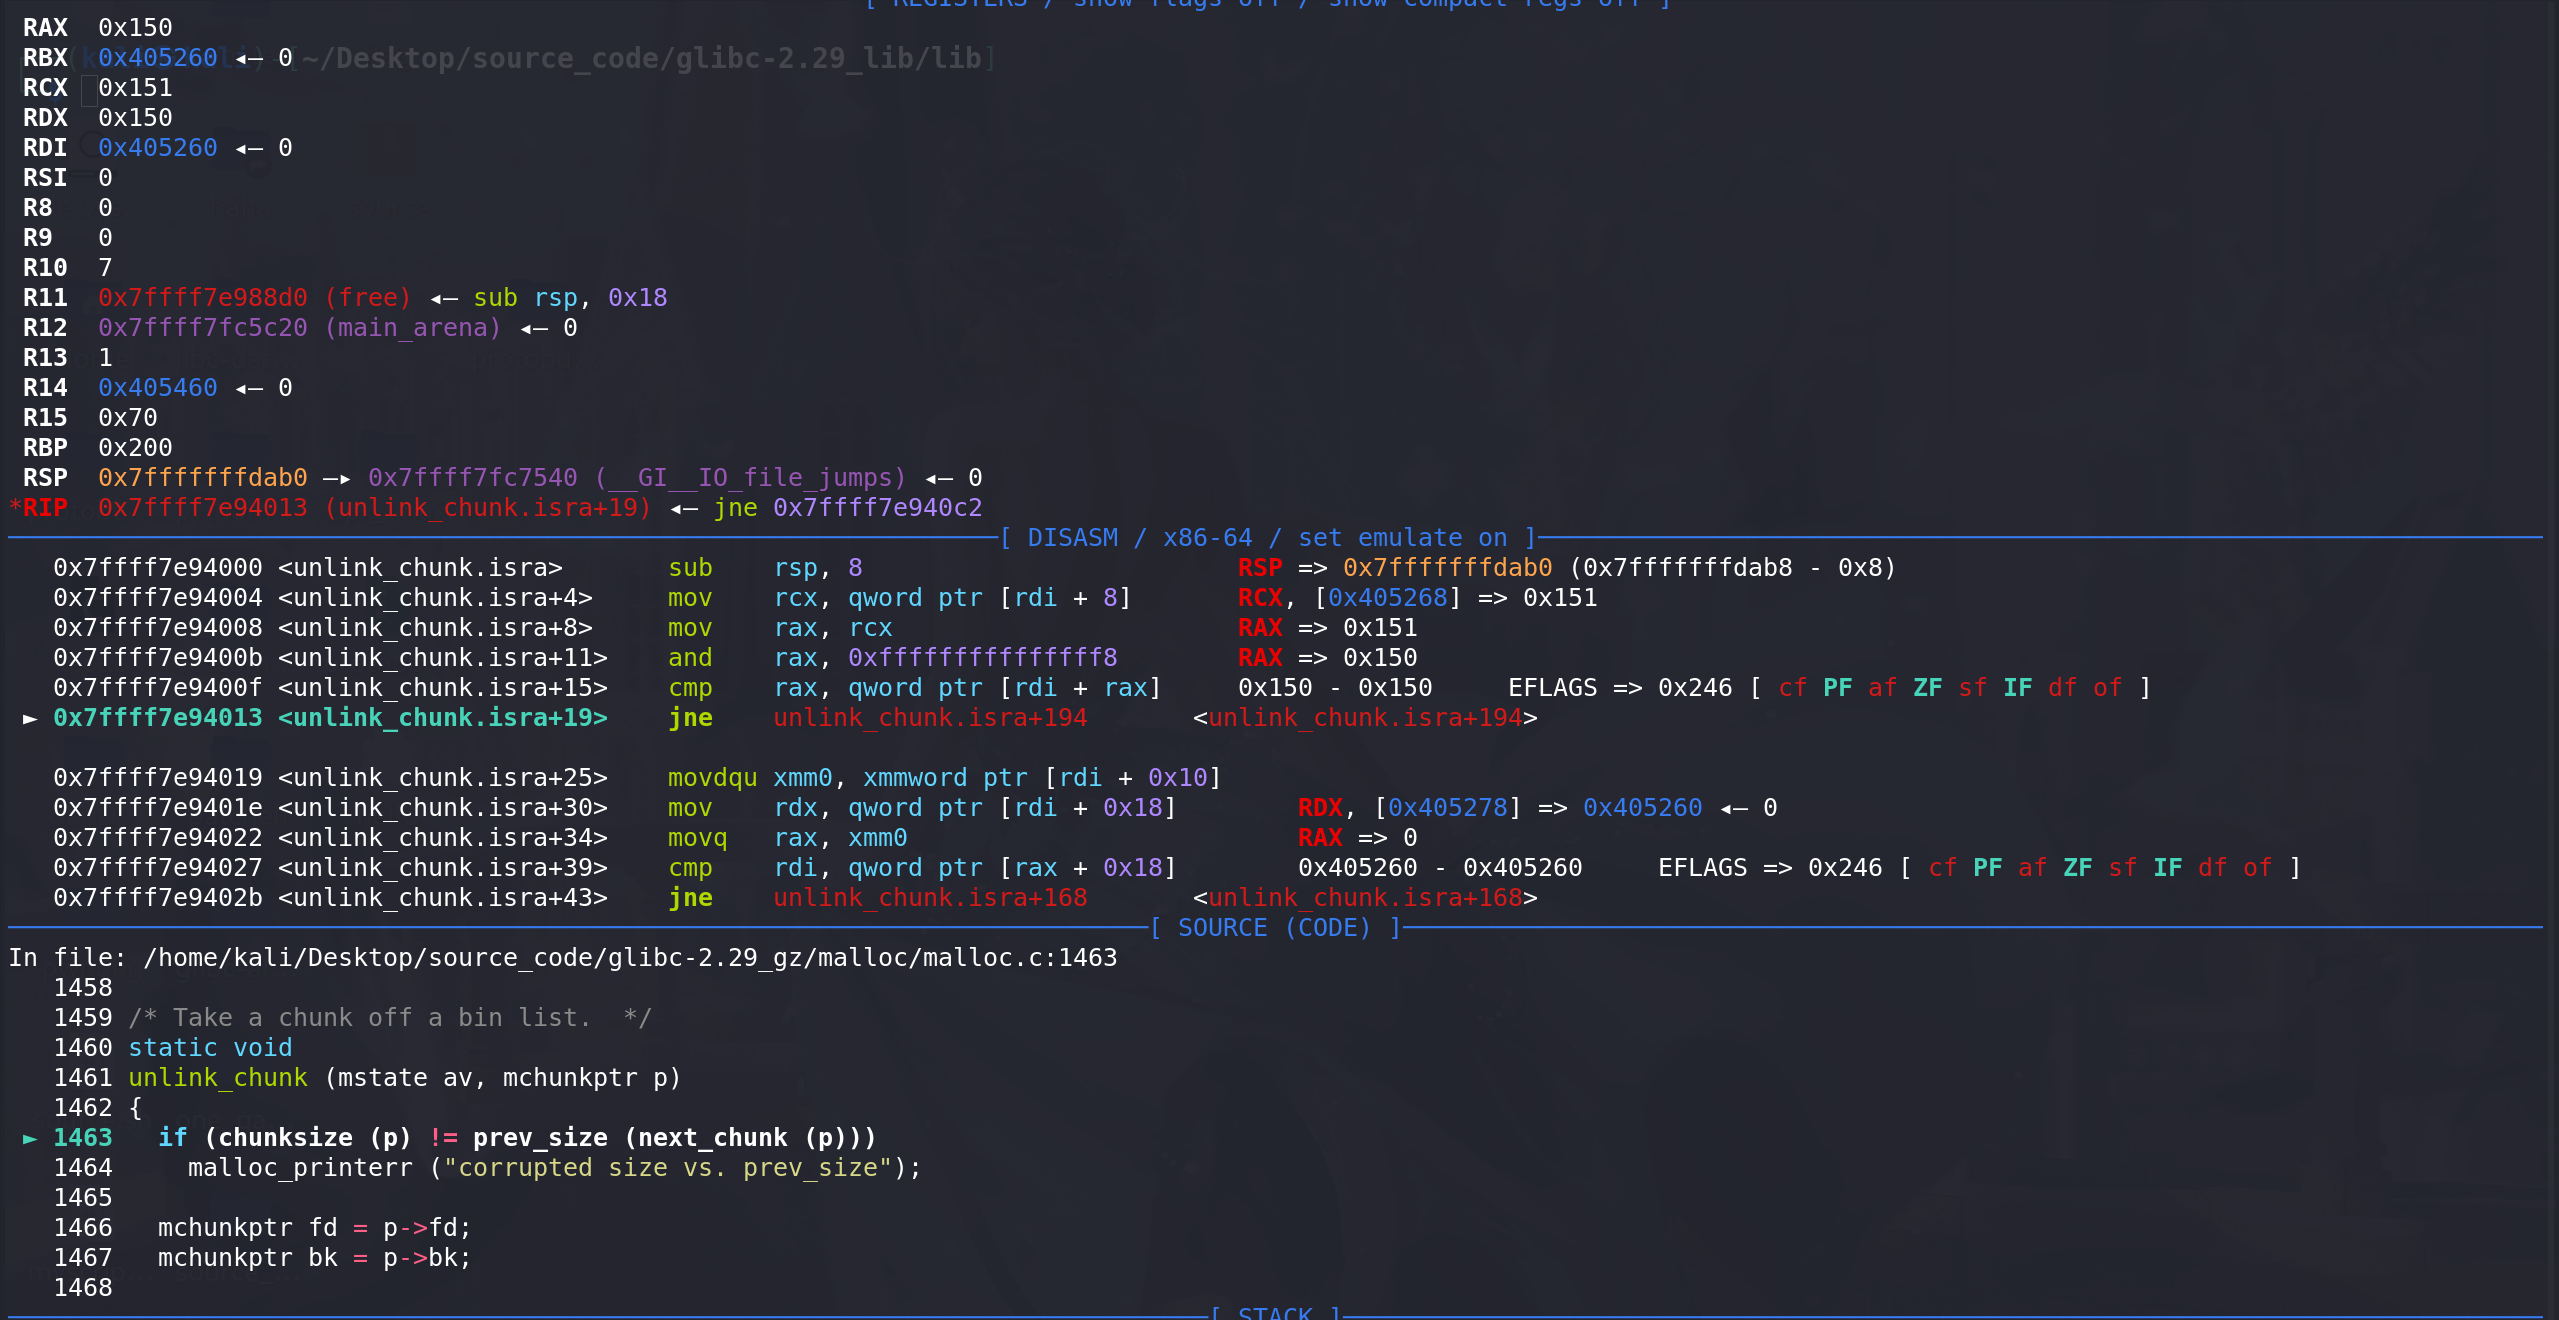
随后双向链表的检查也通过:
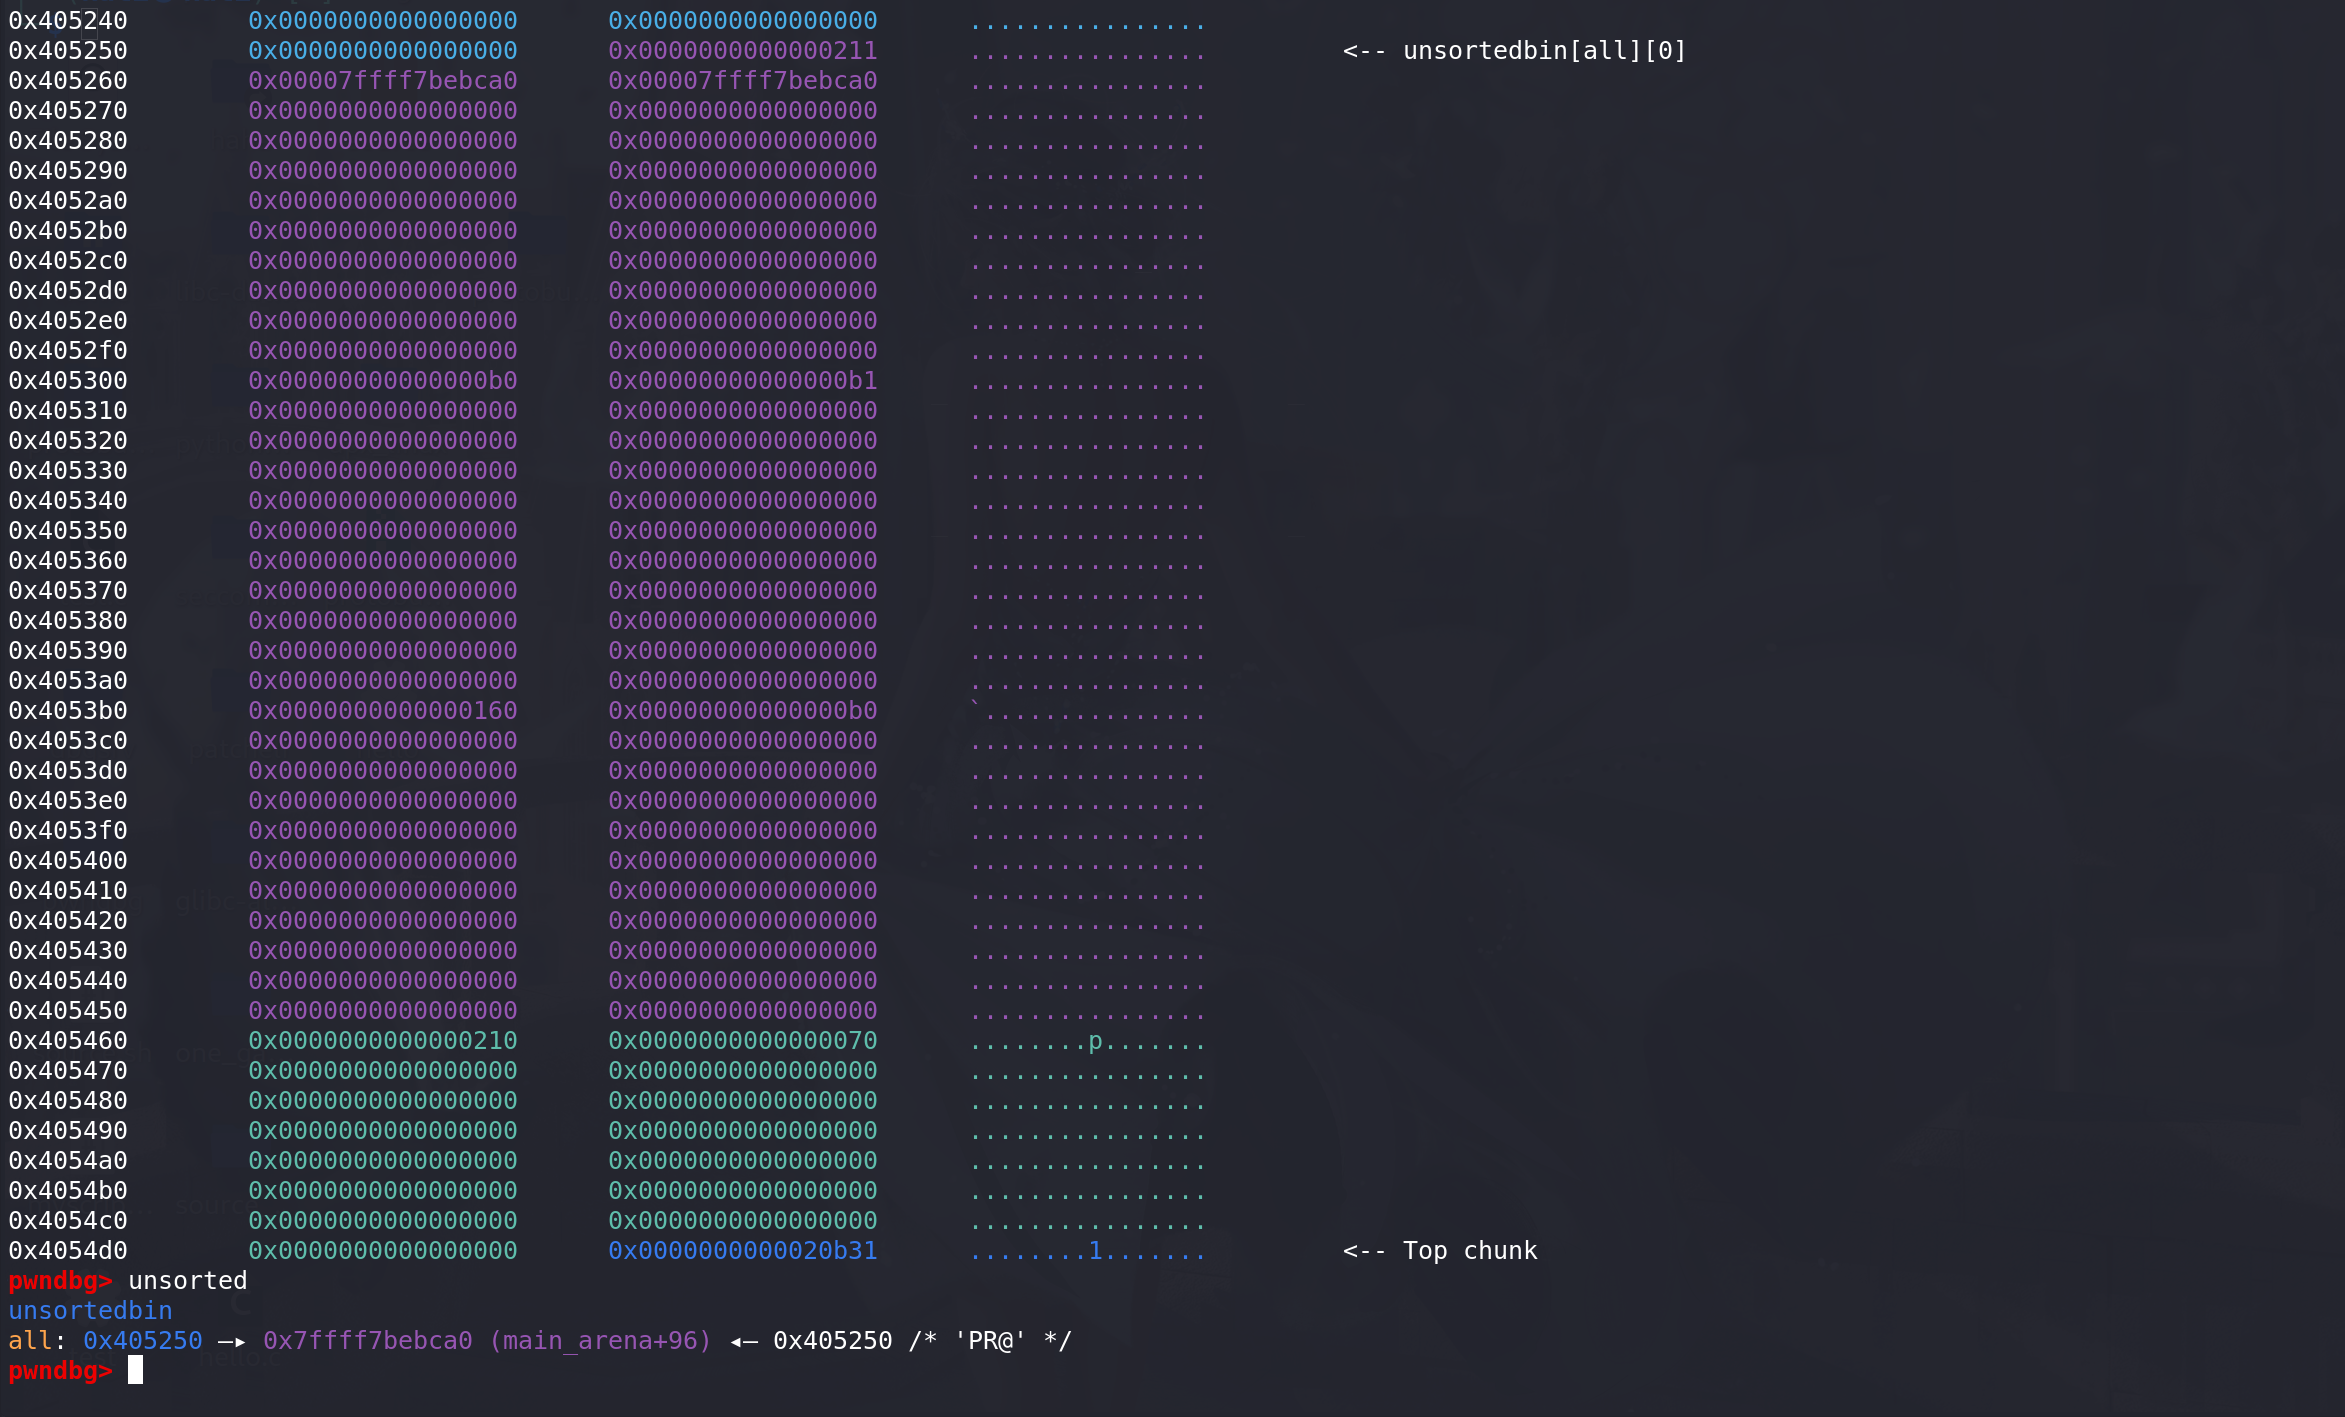
最后 进入到unsorted bin中:
注意点:unlink合并 进入unsorted bin 最后时没有将prev_size字段清空的,这样在我们
无法伪造相邻高地址的chunk的prev_size时可以借此先free掉chunk填充prev_size字段后,再申请回来,就会出现一个天然的prev_size值。这种适合在我们
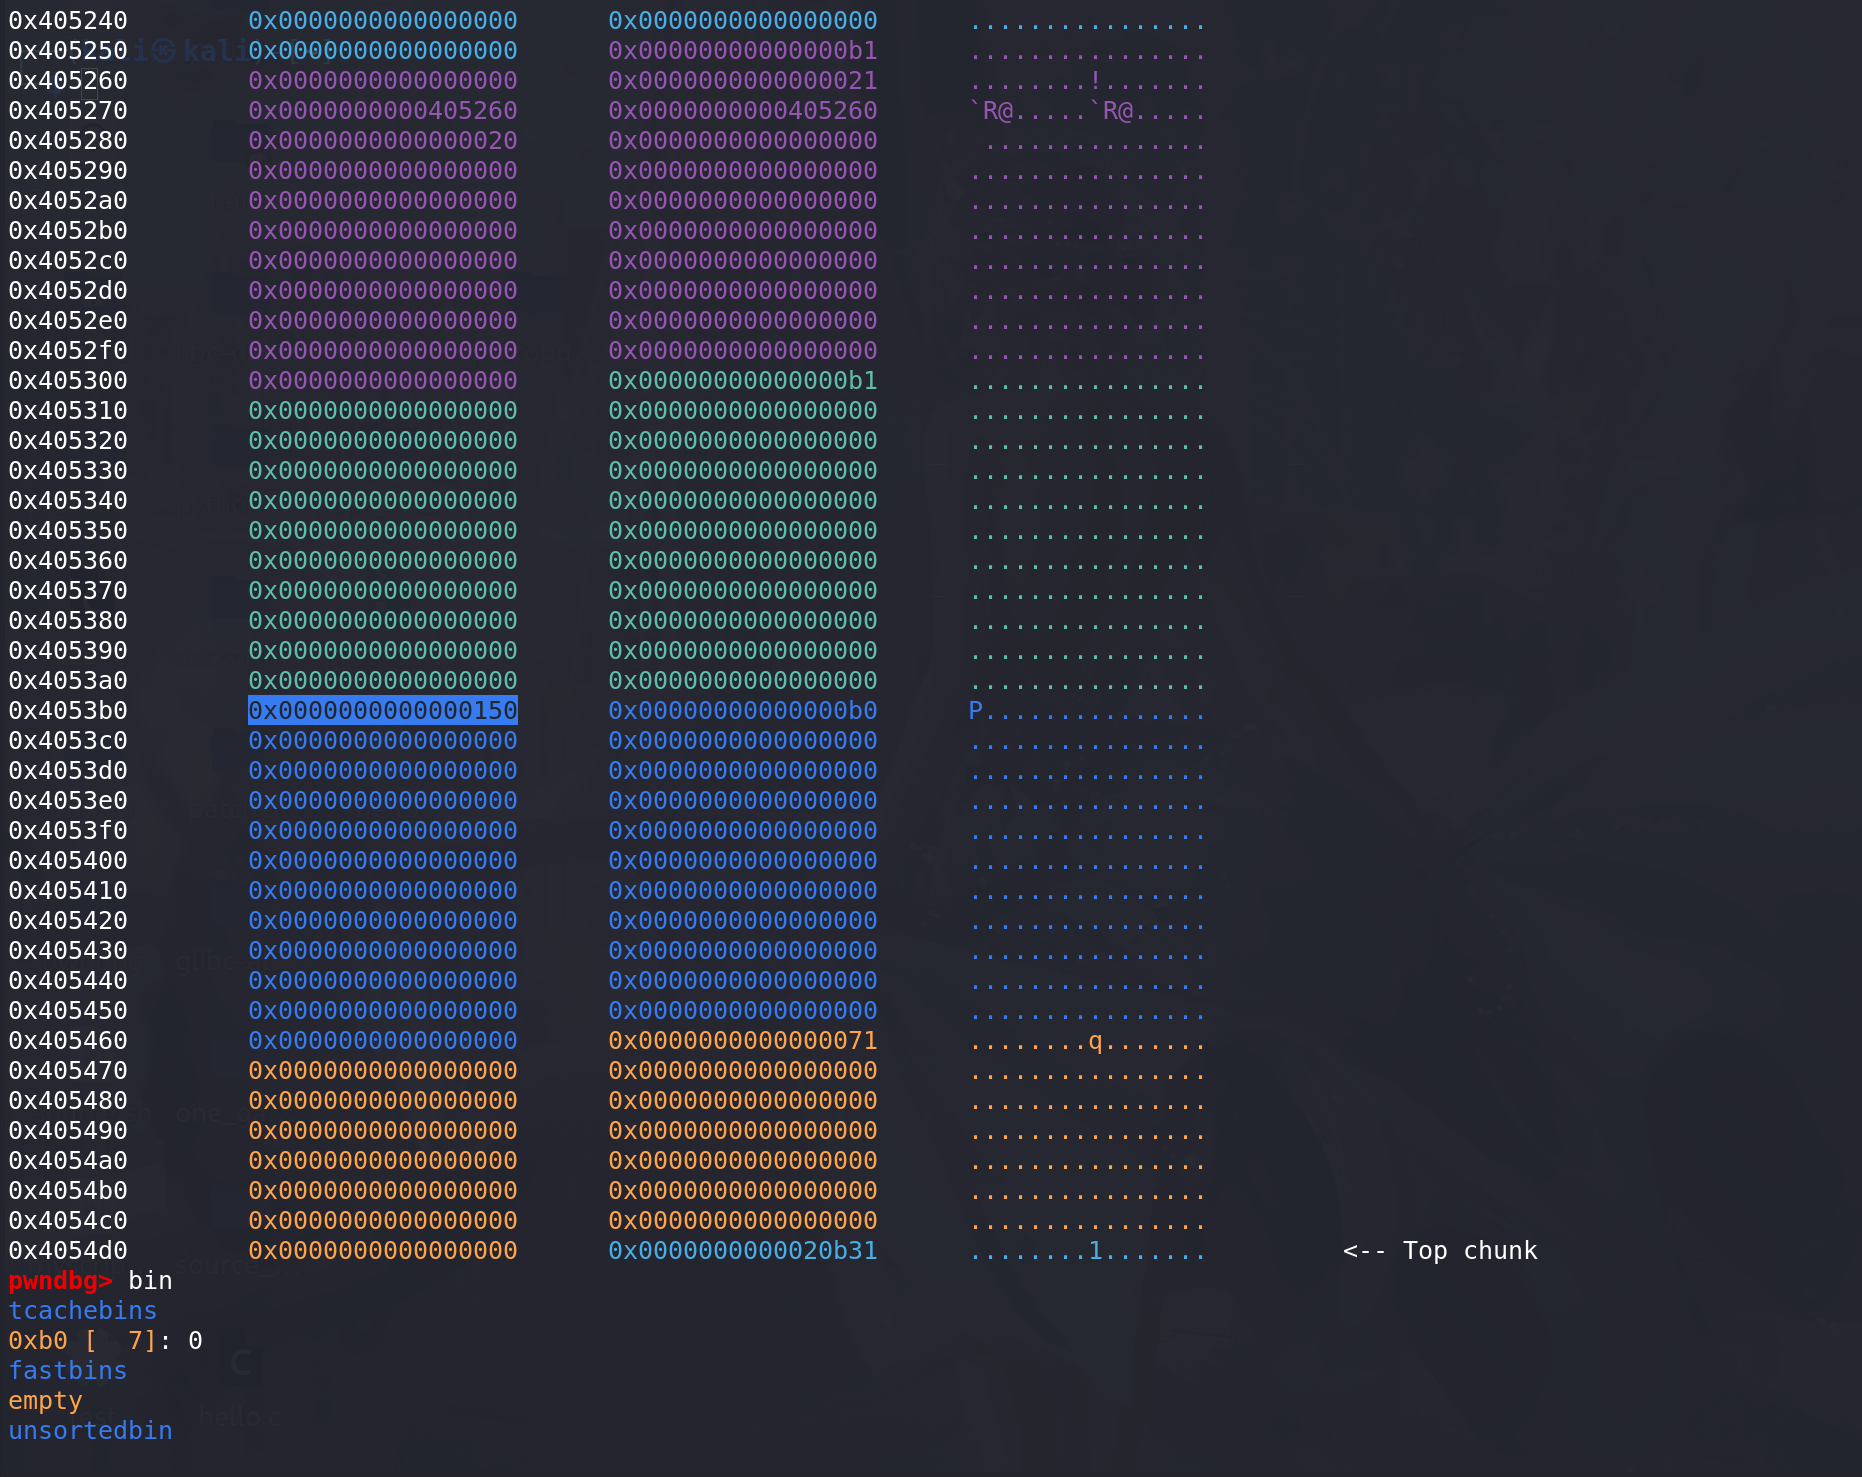
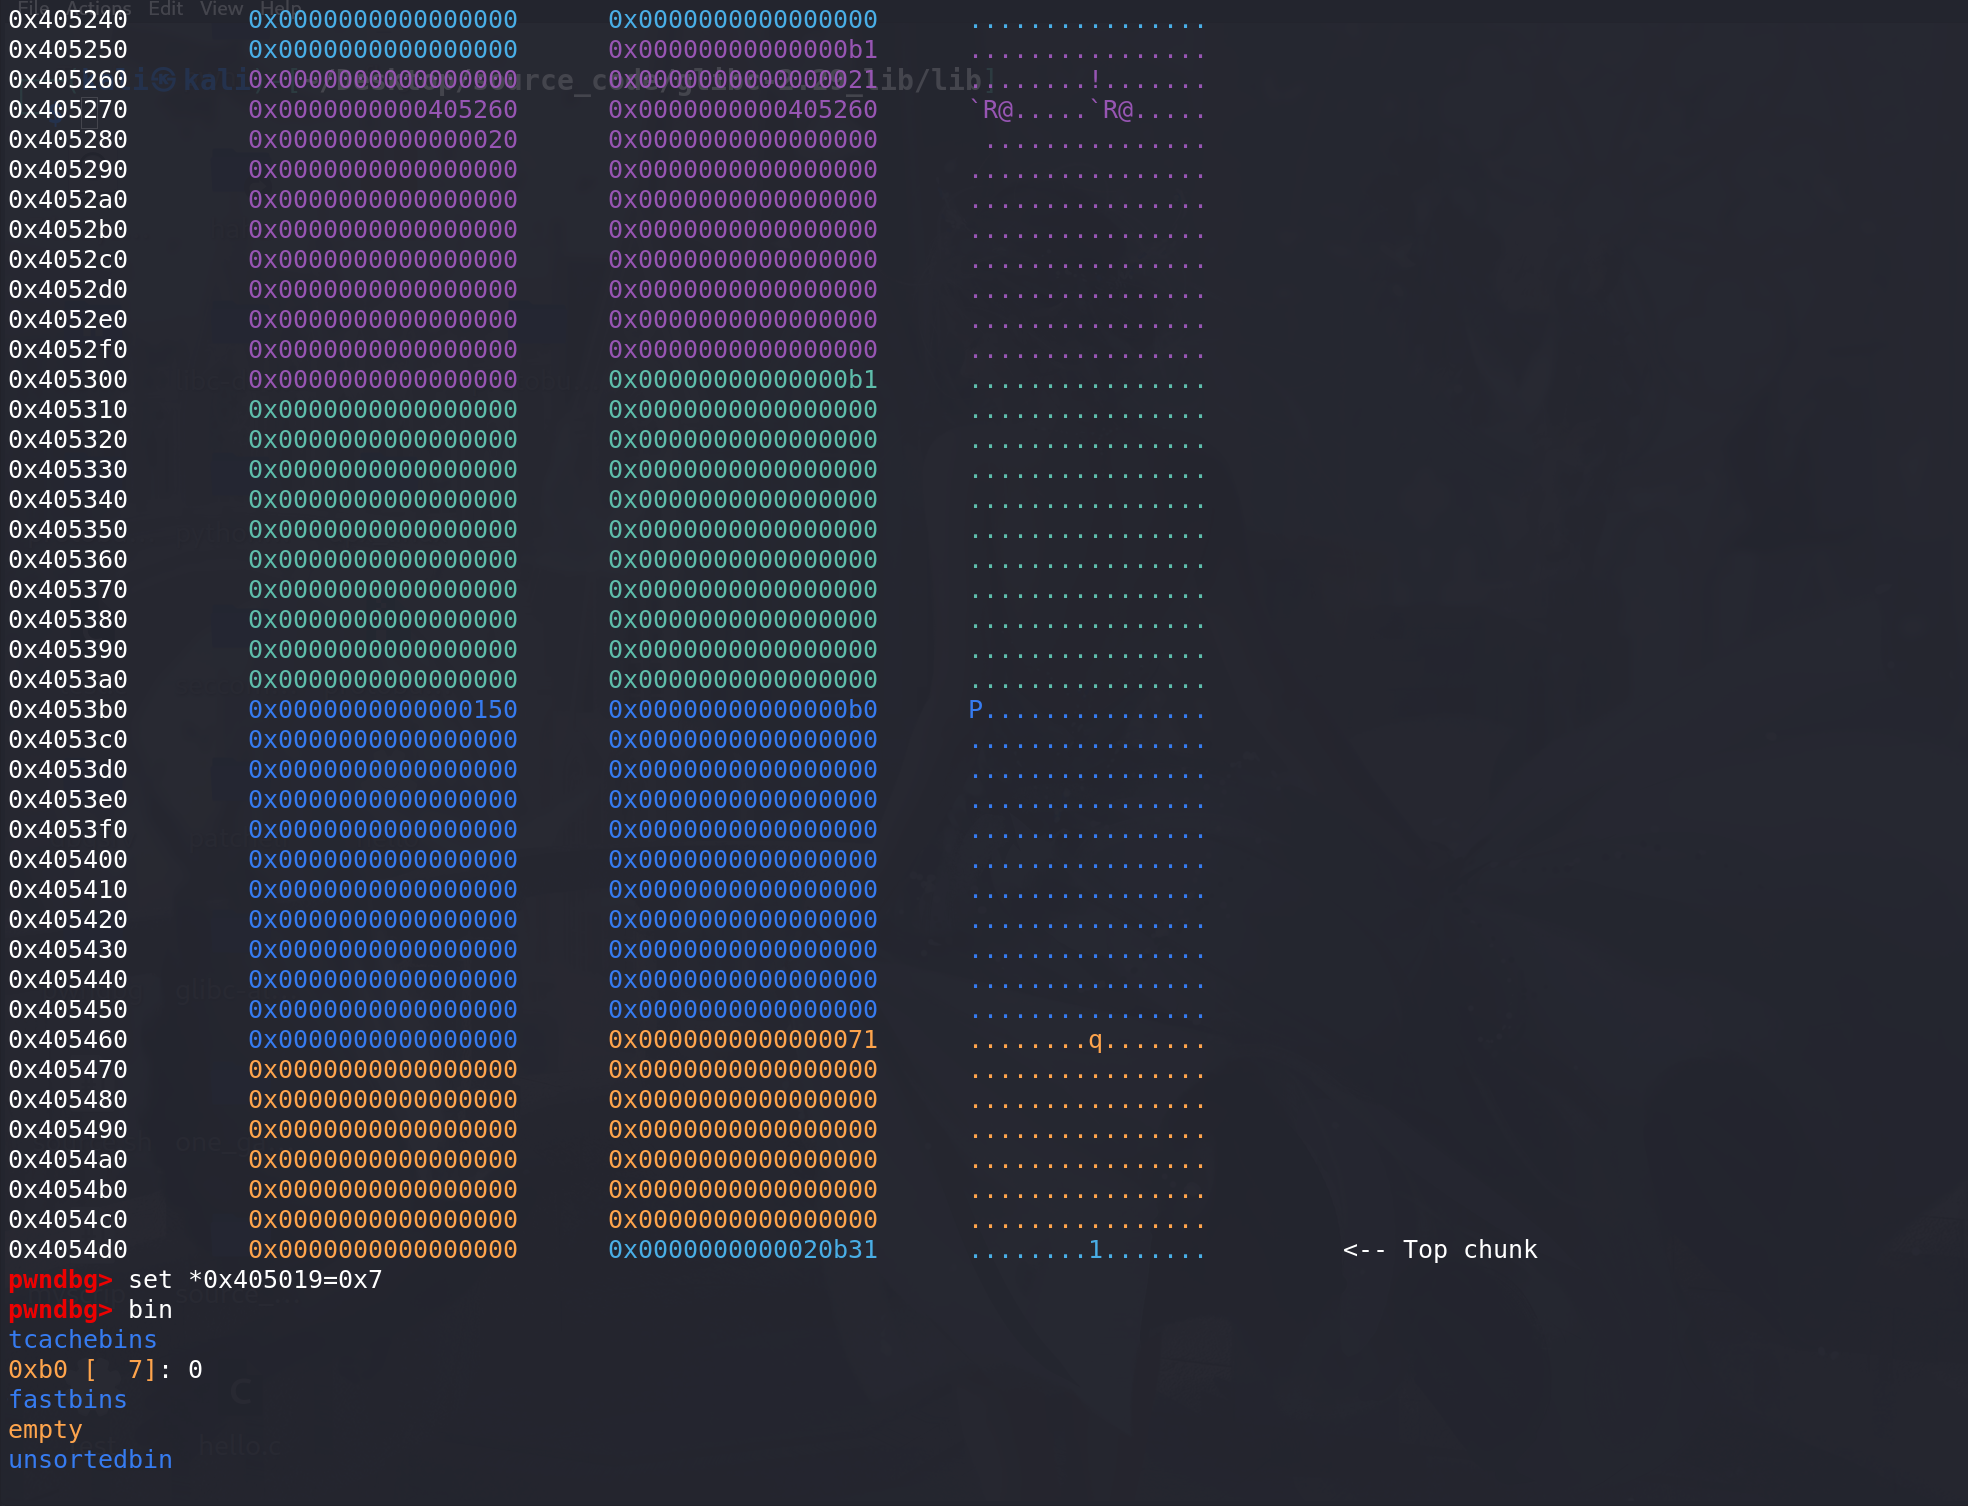
可以控制相邻的高地址的chunk的prev_inuse位,但是不能控制其prev_size字段的情况下时使用(后面的例题):这里先释放掉chunk1,将其size置入到相邻的高地址的chunk的prev_size中:
再将其申请回来,这时
相邻的高地址的chunk的prev_size中就填充上了该chunk的size大小: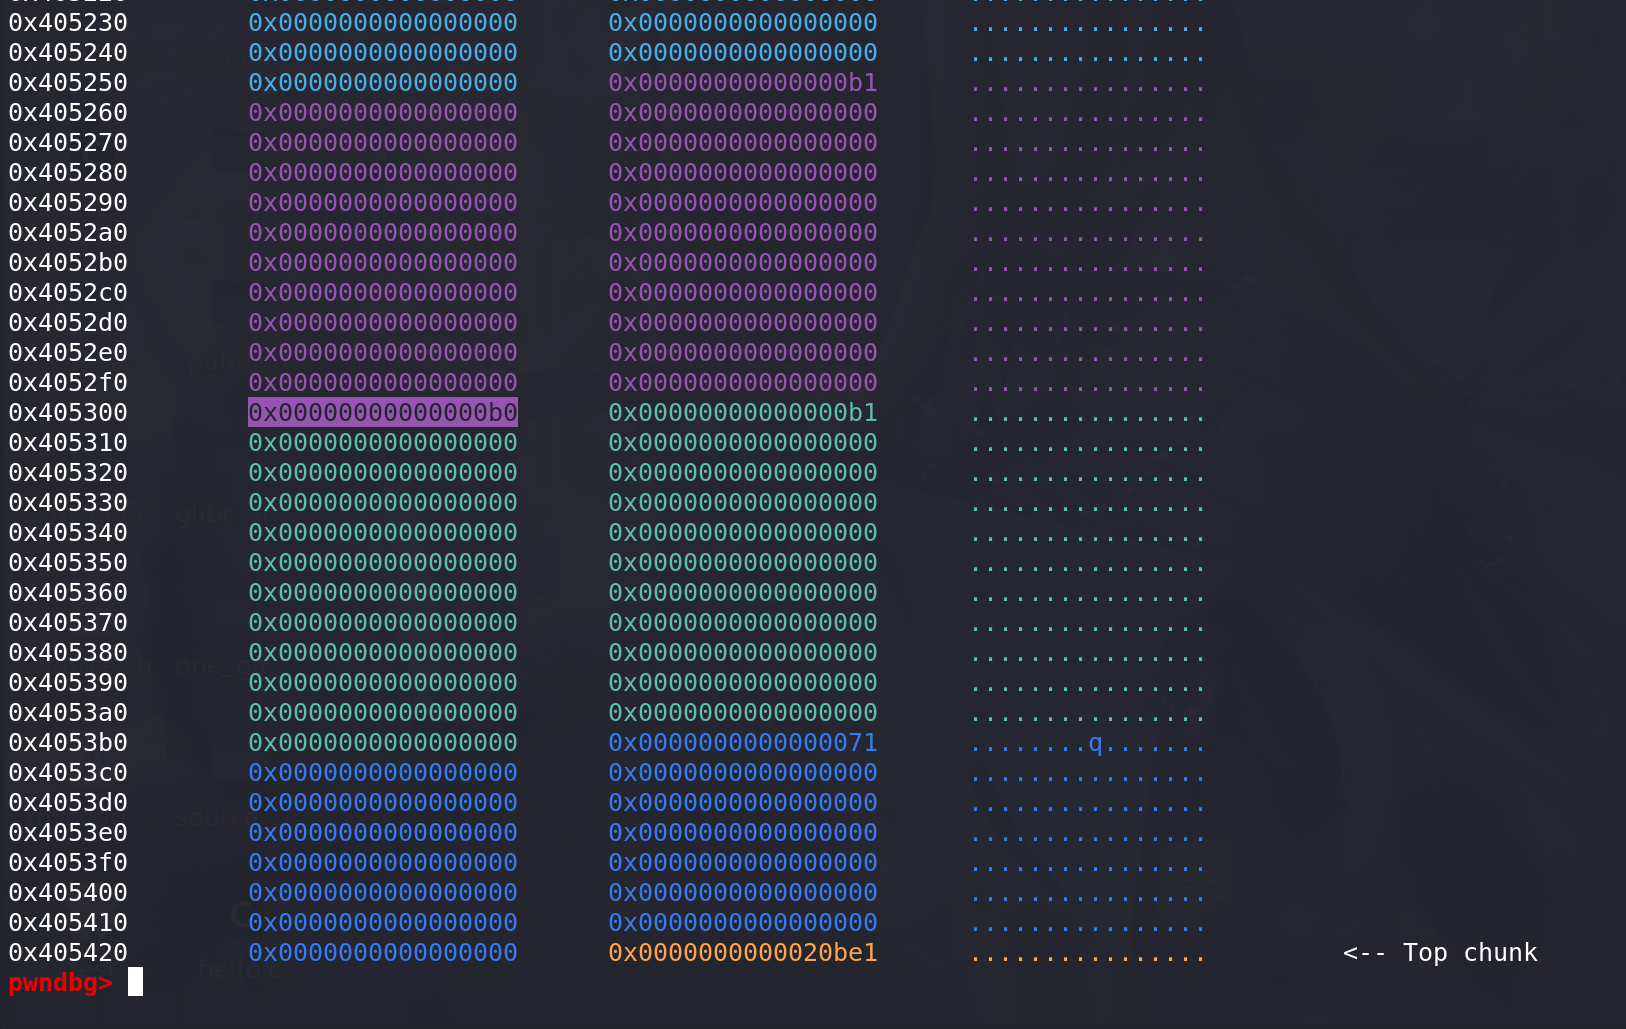
top
-
tcache填满,不属于fastbin,且与top chunk相邻时,会直接向top chunk合并:
    else { // 与top chunk相邻的,直接合并进入top chunk
      size += nextsize;
      set_head(p, size | PREV_INUSE);
      av->top = p;
      check_chunk(av, p);
    }
计算新的top chunk的size,释放的chunk地址作为新的top chunk地址,放入main_arena的top字段中:


 466
466

 被折叠的 条评论
为什么被折叠?
被折叠的 条评论
为什么被折叠?
 到【灌水乐园】发言


