


目录
0、注解方式IOC/DI
在本知识点中,将演示如何使用注解的方式完成注入对象中的效果
1、修改applicationContext.xml
1) 在15行添加
<context:annotation-config/>
表示告诉Spring要用注解的方式进行配置
2) 注入对象的21行注释掉,这个行为在后面将使用注解来完成
<?xml version="1.0" encoding="UTF-8"?>
<beans xmlns="http://www.springframework.org/schema/beans"
    xmlns:xsi="http://www.w3.org/2001/XMLSchema-instance" xmlns:aop="http://www.springframework.org/schema/aop"
    xmlns:tx="http://www.springframework.org/schema/tx" xmlns:context="http://www.springframework.org/schema/context"
    xsi:schemaLocation="
   http://www.springframework.org/schema/beans
   http://www.springframework.org/schema/beans/spring-beans-3.0.xsd
   http://www.springframework.org/schema/aop
   http://www.springframework.org/schema/aop/spring-aop-3.0.xsd
   http://www.springframework.org/schema/tx
   http://www.springframework.org/schema/tx/spring-tx-3.0.xsd
   http://www.springframework.org/schema/context
   http://www.springframework.org/schema/context/spring-context-3.0.xsd">

    <context:annotation-config/>
    <bean name="c" class="com.how2java.pojo.Category">
        <property name="name" value="category 1" />
    </bean>
    <bean name="p" class="com.how2java.pojo.Product">
        <property name="name" value="product1" />
<!--         <property name="category" ref="c" /> -->
    </bean>

</beans>
2、@Autowired
在Product.java的category属性前加上@Autowired注解
@Autowired
private Category category;
package com.how2java.pojo;

import org.springframework.beans.factory.annotation.Autowired;

public class Product {

    private int id;
    private String name;
    @Autowired
    private Category category;

    public int getId() {
        return id;
    }

    public void setId(int id) {
        this.id = id;
    }

    public String getName() {
        return name;
    }

    public void setName(String name) {
        this.name = name;
    }

    public Category getCategory() {
        return category;
    }

    public void setCategory(Category category) {
        this.category = category;
    }
}
3、运行测试

package com.how2java.test;

import org.springframework.context.ApplicationContext;
import org.springframework.context.support.ClassPathXmlApplicationContext;

import com.how2java.pojo.Product;

public class TestSpring {

    public static void main(String[] args) {
        ApplicationContext context = new ClassPathXmlApplicationContext(new String[] { "applicationContext.xml" });
        Product p = (Product) context.getBean("p");
        System.out.println(p.getName());
        System.out.println(p.getCategory().getName());
    }
}
4、@Autowired的位置
除了前面的 在属性前加上@Autowired 这种方式外,也可以在setCategory方法前加上@Autowired,这样来达到相同的效果
@Autowired
public void setCategory(Category category)

package com.how2java.pojo;

import org.springframework.beans.factory.annotation.Autowired;

public class Product {

    private int id;
    private String name;

    private Category category;

    public int getId() {
        return id;
    }

    public void setId(int id) {
        this.id = id;
    }

    public String getName() {
        return name;
    }

    public void setName(String name) {
        this.name = name;
    }

    public Category getCategory() {
        return category;
    }
    @Autowired
    public void setCategory(Category category) {
        this.category = category;
    }
}
5、@Resource
除了@Autowired之外,@Resource也是常用的手段
@Resource(name="c")
private Category category;

package com.how2java.pojo;

import javax.annotation.Resource;

public class Product {

    private int id;
    private String name;
    @Resource(name="c")
    private Category category;

    public int getId() {
        return id;
    }

    public void setId(int id) {
        this.id = id;
    }

    public String getName() {
        return name;
    }

    public void setName(String name) {
        this.name = name;
    }

    public Category getCategory() {
        return category;
    }

    public void setCategory(Category category) {
        this.category = category;
    }
}
6、对Bean的注解
上述例子是对注入对象行为的注解,那么bean对象本身,比如Category,Product可不可以移出applicationContext.xml配置文件,也通过注解进行呢?
接下来就讲解如何对Bean进行注解配置
7、applicationContext.xml
修改applicationContext.xml,什么都去掉,只新增:
<context:component-scan base-package="com.how2java.pojo"/>
其作用是告诉Spring,bean都放在com.how2java.pojo这个包下
<?xml version="1.0" encoding="UTF-8"?>
<beans xmlns="http://www.springframework.org/schema/beans"
    xmlns:xsi="http://www.w3.org/2001/XMLSchema-instance" xmlns:aop="http://www.springframework.org/schema/aop"
    xmlns:tx="http://www.springframework.org/schema/tx" xmlns:context="http://www.springframework.org/schema/context"
    xsi:schemaLocation="
   http://www.springframework.org/schema/beans
   http://www.springframework.org/schema/beans/spring-beans-3.0.xsd
   http://www.springframework.org/schema/aop
   http://www.springframework.org/schema/aop/spring-aop-3.0.xsd
   http://www.springframework.org/schema/tx
   http://www.springframework.org/schema/tx/spring-tx-3.0.xsd
   http://www.springframework.org/schema/context
   http://www.springframework.org/schema/context/spring-context-3.0.xsd">

    <context:component-scan base-package="com.how2java.pojo"/>

</beans>
8、@Component
为Product类加上@Component注解,即表明此类是bean
@Component("p")
public class Product {
为Category 类加上@Component注解,即表明此类是bean
@Component("c")
public class Category {
另外,因为配置从applicationContext.xml中移出来了,所以属性初始化放在属性声明上进行了。
private String name="product 1";
private String name="category 1";
- Product.java
package com.how2java.pojo;

import javax.annotation.Resource;

import org.springframework.beans.factory.annotation.Autowired;
import org.springframework.stereotype.Component;

@Component("p")
public class Product {

    private int id;
    private String name="product 1";

    @Autowired
    private Category category;

    public int getId() {
        return id;
    }

    public void setId(int id) {
        this.id = id;
    }

    public String getName() {
        return name;
    }

    public void setName(String name) {
        this.name = name;
    }

    public Category getCategory() {
        return category;
    }

    public void setCategory(Category category) {
        this.category = category;
    }
}- Category.java
package com.how2java.pojo;

import org.springframework.stereotype.Component;

@Component("c")
public class Category {

    public int getId() {
        return id;
    }
    public void setId(int id) {
        this.id = id;
    }
    public String getName() {
        return name;
    }
    public void setName(String name) {
        this.name = name;
    }
    private int id;
    private String name="category 1";
}
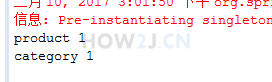
9、运行测试
运行TestSpring,可以发现运行结果是一样的
package com.how2java.test;

import org.springframework.context.ApplicationContext;
import org.springframework.context.support.ClassPathXmlApplicationContext;

import com.how2java.pojo.Product;

public class TestSpring {

    public static void main(String[] args) {
        ApplicationContext context = new ClassPathXmlApplicationContext(new String[] { "applicationContext.xml" });
        Product p = (Product) context.getBean("p");
        System.out.println(p.getName());
        System.out.println(p.getCategory().getName());
    }
}


 1019
1019


 被折叠的 条评论
为什么被折叠?
被折叠的 条评论
为什么被折叠?
 到【灌水乐园】发言


