新的一周又开始了,继续上周未完成的任务,继续集成环信。今天打开程序看了下,突然感觉导航条有点丑,所以让我们一起来给导航条来整下容。
一、改变系统导航条的风格
1、设置导航条的背景颜色和标题
进入AppDelegate.m中,添加如下代码:
- (BOOL)application:(UIApplication *)application didFinishLaunchingWithOptions:(NSDictionary *)launchOptions {
[[EaseMob sharedInstance] registerSDKWithAppKey:APPKEY apnsCertName:APNSCert];
LoginViewController *loginVC = [[LoginViewController alloc] init];
UINavigationController *navigation = [[UINavigationController alloc] initWithRootViewController:loginVC];
self.window.rootViewController = navigation;
[[UINavigationBar appearance] setBackgroundImage:[YCCommonCtrl imageWithColor:kColor_Blue] forBarMetrics:UIBarMetricsDefault];
[[UINavigationBar appearance] setShadowImage:[YCCommonCtrl imageWithColor:kColor_Blue]];
[[UINavigationBar appearance] setTitleTextAttributes:@{NSFontAttributeName:FONT(18),NSForegroundColorAttributeName:kColor_White}];
[[UINavigationBar appearance] setTintColor:kColor_White];
return YES;
}
- 1
- 2
- 3
- 4
- 5
- 6
- 7
- 8
- 9
- 10
- 11
- 12
- 13
- 14
- 15
- 16
- 17
- 18
2、设置TabBar的标题
进入YCTabBarViewController.m中,加入一个tabBar didSelectItem方法,如下:
#pragma mark - UITabBarDelegate

- (void)tabBar:(UITabBar *)tabBar didSelectItem:(UITabBarItem *)item
{
    if (item.tag == 0) {
        self.title = @"会话";
        self.navigationItem.rightBarButtonItem = nil;
    }else if (item.tag == 1){
        self.title = @"通讯录";
        self.navigationItem.rightBarButtonItem = btnAddFriend;
    }else if (item.tag == 2){
        self.title = @"设置";
        self.navigationItem.rightBarButtonItem = nil;
    }
}
然后在YCTabBarViewController.m中的viewDidLoad方法中添加设置tabBarItem Tag的语句。喔,这里还新增了一个“添加好友”的按钮。
@interface YCTabBarViewController ()
{
UIBarButtonItem *btnAddFriend
}
@end
@implementation YCTabBarViewController
- (void)viewDidLoad {
[super viewDidLoad]
self.navigationItem.hidesBackButton = YES
ChatListViewController *chatListVC = [[ChatListViewController alloc] init]
chatListVC.tabBarItem.title = @"会话"
chatListVC.tabBarItem.image = [UIImage imageNamed:@"tabbar_chatsHL"]
chatListVC.tabBarItem.tag = 0
AddressBookViewController *addressBookVC = [[AddressBookViewController alloc] init]
addressBookVC.tabBarItem.title = @"通讯录"
addressBookVC.tabBarItem.image = [UIImage imageNamed:@"tabbar_contactsHL"]
addressBookVC.tabBarItem.tag = 1
SettingsViewController *settingVC = [[SettingsViewController alloc] init]
settingVC.tabBarItem.title = @"设置"
settingVC.tabBarItem.image = [UIImage imageNamed:@"tabbar_settingHL"]
settingVC.tabBarItem.tag = 2
self.viewControllers = @[chatListVC,addressBookVC,settingVC]
btnAddFriend = [[UIBarButtonItem alloc] initWithBarButtonSystemItem:UIBarButtonSystemItemAdd
target:self
action:@selector(btnAddFriend:)]
}
- 1
- 2
- 3
- 4
- 5
- 6
- 7
- 8
- 9
- 10
- 11
- 12
- 13
- 14
- 15
- 16
- 17
- 18
- 19
- 20
- 21
- 22
- 23
- 24
- 25
- 26
- 27
- 28
- 29
- 30
- 31
- 32
- 33
- 34
- 35
3.通讯录界面添加表头表尾
进入AddressBookViewContrller.m中添加设置表头表尾的代码:
- (CGFloat)tableView:(UITableView *)tableView heightForHeaderInSection:(NSInteger)section
{
return 30.0f;
}
- (CGFloat)tableView:(UITableView *)tableView heightForFooterInSection:(NSInteger)section {
return 10.0f;
}
-(UIView *)tableView:(UITableView *)tableView viewForHeaderInSection:(NSInteger)section
{
static NSString *headerSectionID = @"headerSectionID";
UITableViewHeaderFooterView *headerView = [tableView dequeueReusableHeaderFooterViewWithIdentifier:headerSectionID];
UILabel *label;
if (headerView == nil) {
headerView = [[UITableViewHeaderFooterView alloc] initWithReuseIdentifier:headerSectionID];
label = [[UILabel alloc] initWithFrame:CGRectMake(5, 5, 200, 20)];
label.font = FONT(13);
[headerView addSubview:label];
}
if (section == 0) {
label.text = @"我的群组";
}else {
label.text = @"我的好友";
}
return headerView;
}
- 1
- 2
- 3
- 4
- 5
- 6
- 7
- 8
- 9
- 10
- 11
- 12
- 13
- 14
- 15
- 16
- 17
- 18
- 19
- 20
- 21
- 22
- 23
- 24
- 25
- 26
- 27
- 28
- 29
- 30
- 31
- 32
- 33
- 34
- 35
效果图如下:
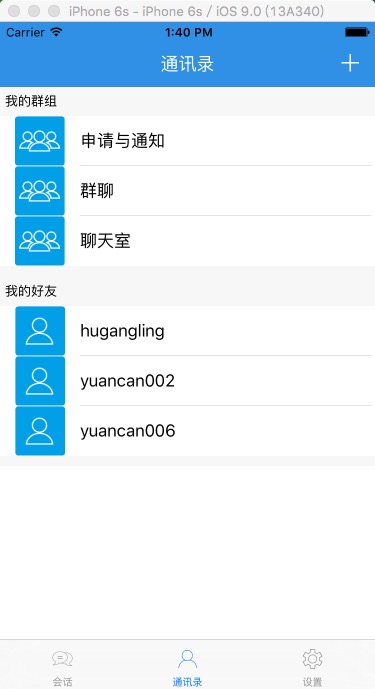
整下容之后,是不是感觉有点像模像样了吧。
二、发送添加好友申请
1. 新建AddFriendViewController类
首先,我们新建一个类,用于添加好友,我给这个类取个名字叫做AddFriendViewController。之前我们已经在YCTabBarController.m中已经创建了一个btnAddFriend按钮,下面就给这个按钮添加一个点击跳转的事件:
- (void)btnAddFriend:(id)sender
{
AddFriendViewController *addFriendVC = [[AddFriendViewController alloc] init];
[self.navigationController pushViewController:addFriendVC animated:YES];
}
记得,在YCTabBarController中添加头文件:
#import "AddFriendViewController.h"
2. 发送好友申请
环信官方文档提供的好友申请接口为:
BOOL isSuccess = [[EaseMob sharedInstance].chatManager addBuddy:@"6001" message:@"我想加您为好友" error:&error];
if (isSuccess && !error) {
    NSLog(@"添加成功");
}
在AddFriendViewController.m中添加如下代码:
#import "AddFriendViewController.h"
@interface AddFriendViewController ()
{
UITextField *textField;
}
@end
@implementation AddFriendViewController
- (void)viewDidLoad {
[super viewDidLoad];
self.title = @"添加好友";
self.view.backgroundColor = [UIColor groupTableViewBackgroundColor];
UIBarButtonItem *btnItme = [[UIBarButtonItem alloc] initWithTitle:@"查找"
style:(UIBarButtonItemStyleDone)
target:self
action:@selector(btnSearch:)];
self.navigationItem.rightBarButtonItem = btnItme;
textField = [YCCommonCtrl commonTextFieldWithFrame:CGRectMake(10, 10, SCREEN_WIDTH-20, 35)
placeholder:@"用户名"
color:kColor_Gray
font:kFont_Title
secureTextEntry:NO
delegate:self];
[YCCommonCtrl setViewBorderWithView:textField borderColor:kColor_LightGray borderWidth:1.0 cornerRadius:5.0];
[self.view addSubview:textField];
}
#pragma mark - Private Menthods
- (void)btnSearch:(id)sender
{
if (textField.text.length == 0) {
UIAlertController *alterController = [YCCommonCtrl commonAlterControllerWithTitle:nil message:@"请先输入好友的用户名"];
[self presentViewController:alterController animated:YES completion:nil];
return;
}
UIView *view = [YCCommonCtrl commonViewWithFrame:CGRectMake(0, 55, SCREEN_WIDTH, 55) backgroundColor:kColor_White];
[self.view addSubview:view];
UIImageView *imgView = [YCCommonCtrl commonImageViewWithFrame:CGRectMake(10, 5, 45, 45) image:[UIImage imageNamed:@"chatListCellHead"]];
[view addSubview:imgView];
UILabel *label = [YCCommonCtrl commonLableWithFrame:CGRectMake(60, 5, SCREEN_WIDTH-150, 45)
text:textField.text
color:kColor_Gray
font:kFont_Title
textAlignment:NSTextAlignmentLeft];
label.numberOfLines = 0;
[view addSubview:label];
UIButton *btn = [YCCommonCtrl commonButtonWithFrame:CGRectMake(SCREEN_WIDTH-70, 10, 60, 35)
title:@"添加"
color:kColor_White
font:kFont_Button
backgroundImage:[YCCommonCtrl imageWithColor:kColor_Blue]
target:self
action:@selector(btnAdd:)];
[YCCommonCtrl setViewBorderWithView:btn borderColor:kColor_Blue borderWidth:1.0 cornerRadius:5.0];
[view addSubview:btn];
}
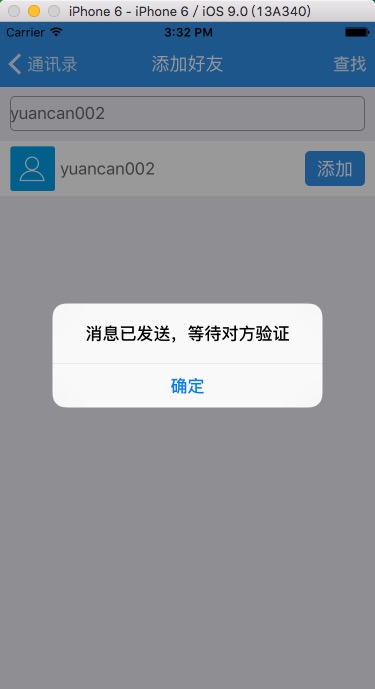
- (void)btnAdd:(id)sender
{
EMError *error;
BOOL isSuccess = [[EaseMob sharedInstance].chatManager addBuddy:textField.text message:@"我想加您为好友" error:&error];
if (isSuccess && !error) {
UIAlertController *alterController = [YCCommonCtrl commonAlterControllerWithTitle:nil message:@"消息已发送,等待对方验证"];
[self presentViewController:alterController animated:YES completion:nil];
}
}
- 1
- 2
- 3
- 4
- 5
- 6
- 7
- 8
- 9
- 10
- 11
- 12
- 13
- 14
- 15
- 16
- 17
- 18
- 19
- 20
- 21
- 22
- 23
- 24
- 25
- 26
- 27
- 28
- 29
- 30
- 31
- 32
- 33
- 34
- 35
- 36
- 37
- 38
- 39
- 40
- 41
- 42
- 43
- 44
- 45
- 46
- 47
- 48
- 49
- 50
- 51
- 52
- 53
- 54
- 55
- 56
- 57
- 58
- 59
- 60
- 61
- 62
- 63
- 64
- 65
- 66
- 67
- 68
- 69
- 70
- 71
- 72
- 73
- 74
- 75
- 76
- 77
- 78
- 79
- 80
- 81
- 82
- 83
- 84
- 85
好吧,我们不着急往下做,先来编译一下,看看效果如何。
三、接受好友申请
已经成功的发送了好友申请了,那么下一步就是等待你的好友接受你的申请,然后你们就可以成为好友思密达啦。
1. 添加监听方法
首先,在AppDelegate.m中遵循IChatManagerDelegate协议:
@interface AppDelegate ()<IChatManagerDelegate>

@end
然后,在AppDelegate.m文件didFinishLaunchingWithOptions方法中,添加注册一个监听方法:
[[EaseMob sharedInstance].chatManager addDelegate:self delegateQueue:nil];
2. 监听好友申请消息
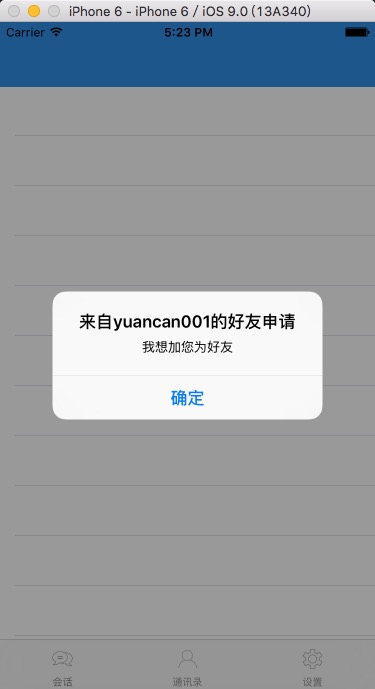
- (void)didReceiveBuddyRequest:(NSString *)username
message:(NSString *)message
{
NSDictionary *dic = [[NSDictionary alloc] initWithObjectsAndKeys:username,@"username",message,@"message", nil];
NSUserDefaults *userDefaults = [NSUserDefaults standardUserDefaults];
[userDefaults setObject:dic forKey:@"dic"];
[userDefaults synchronize];
NSString *title = [NSString stringWithFormat:@"来自%@的好友申请",username];
UIAlertController *alterController = [YCCommonCtrl commonAlterControllerWithTitle:title message:message];
[self.window.rootViewController presentViewController:alterController animated:YES completion:nil];
}
- 1
- 2
- 3
- 4
- 5
- 6
- 7
- 8
- 9
- 10
- 11
- 12
- 13
- 14
- 15
- 16
- 17
我这里,将接受到的好友申请消息的用户名和消息存储在在UserDefaults中了。这里只会告诉用户,收到了一个好友申请,但是这里仅仅只是提醒而已,至于是否接受或者拒绝不在这里进行处理。
编译一下,看看效果如何。
3. 处理好友申请消息
1、新建一个好友消息处理的界面,继承于YCBaseTableViewController,命名为SystemNotificationViewController。YCBaseTableViewController是我自己写的一个列表的基类。
在SystemNotificationViewController添加如下代码:
#import "SystemNotificationViewController.h"
@interface SystemNotificationViewController ()
{
NSMutableArray *arrList;
NSString *username;
NSUserDefaults *userDefaultes;
}
@end
@implementation SystemNotificationViewController
- (void)viewDidLoad {
[super viewDidLoad];
arrList = [[NSMutableArray alloc] init];
userDefaultes = [NSUserDefaults standardUserDefaults];
NSDictionary *dic = [userDefaultes objectForKey:@"dic"];
if (dic.count >0) {
username = [dic objectForKey:@"username"];
[arrList addObject:dic];
}
self.tableView.rowHeight = 55.0f;
}
#pragma mark - UITableView Delegate & DataSource
- (NSInteger)tableView:(UITableView *)tableView numberOfRowsInSection:(NSInteger)section {
return arrList.count;
}
- (UITableViewCell *)tableView:(UITableView *)tableView cellForRowAtIndexPath:(NSIndexPath *)indexPath {
static NSString *cellIdentifier = @"CELL";
UITableViewCell *cell = [tableView dequeueReusableCellWithIdentifier:cellIdentifier];
if (cell == nil) {
cell = [[UITableViewCell alloc] initWithStyle:UITableViewCellStyleSubtitle reuseIdentifier:cellIdentifier];
UIButton *btnAccept = [[UIButton alloc] initWithFrame:CGRectMake(SCREEN_WIDTH-140, 10.0, 60, 35.0)];
[btnAccept setTag:100];
[cell.contentView addSubview:btnAccept];
UIButton *btnCancel = [[UIButton alloc] initWithFrame:CGRectMake(SCREEN_WIDTH-70, 10.0, 60, 35.0)];
[btnCancel setTag:101];
[cell.contentView addSubview:btnCancel];
}
NSDictionary *dic = [arrList objectAtIndex:indexPath.row];
cell.textLabel.text = [dic objectForKey:@"username"];
cell.textLabel.font = kFont_Title;
cell.detailTextLabel.text = [dic objectForKey:@"message"];
cell.detailTextLabel.font = kFont_Large;
UIButton *btnAccept = (UIButton *)[cell viewWithTag:100];
[btnAccept setTitle:@"同意" forState:UIControlStateNormal];
[btnAccept setBackgroundImage:[YCCommonCtrl imageWithColor:kColor_Blue] forState:UIControlStateNormal];
[btnAccept addTarget:self action:@selector(btnAccept:) forControlEvents:UIControlEventTouchUpInside];
[YCCommonCtrl setViewBorderWithView:btnAccept borderColor:kColor_Blue borderWidth:1.0f cornerRadius:5.0f];
UIButton *btnCancel = (UIButton *)[cell viewWithTag:101];
[btnCancel setTitle:@"拒绝" forState:UIControlStateNormal];
[btnCancel setBackgroundImage:[YCCommonCtrl imageWithColor:kColor_Blue] forState:UIControlStateNormal];
[btnCancel addTarget:self action:@selector(btnCancel:) forControlEvents:UIControlEventTouchUpInside];
[YCCommonCtrl setViewBorderWithView:btnCancel borderColor:kColor_Blue borderWidth:1.0f cornerRadius:5.0f];
return cell;
}
- (void)btnAccept:(id)sender
{
[[EaseMob sharedInstance].chatManager acceptBuddyRequest:username error:nil];
[userDefaultes removeObjectForKey:@"dic"];
[arrList removeAllObjects];
[self.tableView reloadData];
}
- (void)btnCancel:(id)sender
{
[[EaseMob sharedInstance].chatManager rejectBuddyRequest:username reason:@"不认识你" error:nil];
[userDefaultes removeObjectForKey:@"dic"];
[arrList removeAllObjects];
[self.tableView reloadData];
}
- 1
- 2
- 3
- 4
- 5
- 6
- 7
- 8
- 9
- 10
- 11
- 12
- 13
- 14
- 15
- 16
- 17
- 18
- 19
- 20
- 21
- 22
- 23
- 24
- 25
- 26
- 27
- 28
- 29
- 30
- 31
- 32
- 33
- 34
- 35
- 36
- 37
- 38
- 39
- 40
- 41
- 42
- 43
- 44
- 45
- 46
- 47
- 48
- 49
- 50
- 51
- 52
- 53
- 54
- 55
- 56
- 57
- 58
- 59
- 60
- 61
- 62
- 63
- 64
- 65
- 66
- 67
- 68
- 69
- 70
- 71
- 72
- 73
- 74
- 75
- 76
- 77
- 78
- 79
- 80
- 81
- 82
- 83
- 84
- 85
- 86
- 87
- 88
- 89
- 90
- 91
- 92
- 93
- 94
- 95
- 96
- 97
- 98
- 99
4. 更改页面跳转
在AddressBookController.m文件中的列表点击方法中,增加SystemNotificationViewController的调整方法:
- (void)tableView:(UITableView *)tableView didSelectRowAtIndexPath:(NSIndexPath *)indexPath {
if (indexPath.section == 0) {
switch (indexPath.row) {
case 0:
{
SystemNotificationViewController *sysVC = [[SystemNotificationViewController alloc] init];
[self.navigationController pushViewController:sysVC animated:YES];
break;
}
default:
break;
}
}else {
EMBuddy *buddy = [arrFriends objectAtIndex:indexPath.row];
ChatViewController *chatVC = [[ChatViewController alloc] initWithChatter:buddy.username isGroup:NO];
chatVC.title = buddy.username;
[self.navigationController pushViewController:chatVC animated:YES];
}
}
- 1
- 2
- 3
- 4
- 5
- 6
- 7
- 8
- 9
- 10
- 11
- 12
- 13
- 14
- 15
- 16
- 17
- 18
- 19
- 20
- 21
- 22
- 23
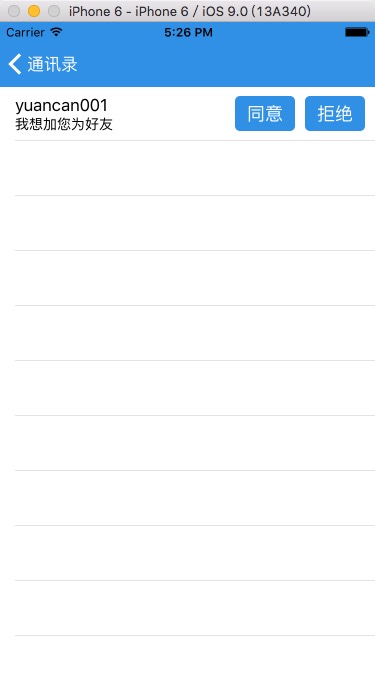
OK,大功告成,编译来看看效果。
Demo下载地址
原文(原作者有几篇关于环信的博文) :http://blog.csdn.net/u010545480/article/details/52981208


 5207
5207


 被折叠的 条评论
为什么被折叠?
被折叠的 条评论
为什么被折叠?
 到【灌水乐园】发言


