


一、准备工作
1、根据Maven工程特点,建立文档结果
myFirstProject
+-src
+-main
+-java
+-resources
+-test
+-java
+-resources
2、再在src/main/java下依次建立文件夹com,example,myFirstProject,可以构成Maven工程包(package)–>com.example.myFirstProject,最后文档结构如图1
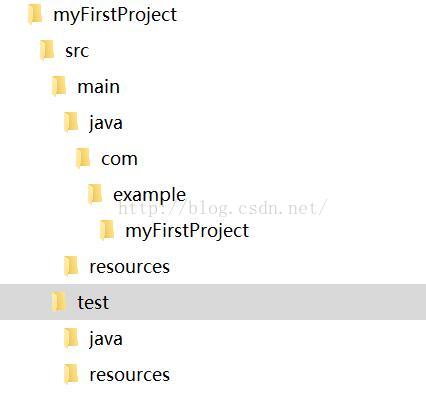
图1
3、编制pom.xml,存于myFirstProject文件夹下,与src同级
- <?xml version=“1.0” encoding=“UTF-8”?>
- <project xmlns=“http://maven.apache.org/POM/4.0.0” xmlns:xsi=“http://www.w3.org/2001/XMLSchema-instance”
- xsi:schemaLocation=“http://maven.apache.org/POM/4.0.0 http://maven.apache.org/xsd/maven-4.0.0.xsd”>
- <modelVersion>4.0.0</modelVersion>
- <groupId>com.example</groupId>
- <artifactId>myFirstproject</artifactId>
- <version>0.0.1-SNAPSHOT</version>
- <!– Inherit defaults from Spring Boot –>
- <parent>
- <groupId>org.springframework.boot</groupId>
- <artifactId>spring-boot-starter-parent</artifactId>
- <version>1.4.0.BUILD-SNAPSHOT</version>
- </parent>
- <!– Add typical dependencies for a web application –>
- <dependencies>
- <dependency>
- <groupId>org.springframework.boot</groupId>
- <artifactId>spring-boot-starter-web</artifactId>
- </dependency>
- </dependencies>
- <!– Package as an executable jar –>
- <build>
- <plugins>
- <plugin>
- <groupId>org.springframework.boot</groupId>
- <artifactId>spring-boot-maven-plugin</artifactId>
- </plugin>
- </plugins>
- </build>
- <!– Add Spring repositories –>
- <!– (you don’t need this if you are using a .RELEASE version) –>
- <repositories>
- <repository>
- <id>spring-snapshots</id>
- <url>http://repo.spring.io/snapshot</url>
- <snapshots><enabled>true</enabled></snapshots>
- </repository>
- <repository>
- <id>spring-milestones</id>
- <url>http://repo.spring.io/milestone</url>
- </repository>
- </repositories>
- <pluginRepositories>
- <pluginRepository>
- <id>spring-snapshots</id>
- <url>http://repo.spring.io/snapshot</url>
- </pluginRepository>
- <pluginRepository>
- <id>spring-milestones</id>
- <url>http://repo.spring.io/milestone</url>
- </pluginRepository>
- </pluginRepositories>
- </project>
<?xml version="1.0" encoding="UTF-8"?>
<project xmlns="http://maven.apache.org/POM/4.0.0" xmlns:xsi="http://www.w3.org/2001/XMLSchema-instance"
    xsi:schemaLocation="http://maven.apache.org/POM/4.0.0 http://maven.apache.org/xsd/maven-4.0.0.xsd">
    <modelVersion>4.0.0</modelVersion>

    <groupId>com.example</groupId>
    <artifactId>myFirstproject</artifactId>
    <version>0.0.1-SNAPSHOT</version>

    <!-- Inherit defaults from Spring Boot -->
    <parent>
        <groupId>org.springframework.boot</groupId>
        <artifactId>spring-boot-starter-parent</artifactId>
        <version>1.4.0.BUILD-SNAPSHOT</version>
    </parent>

    <!-- Add typical dependencies for a web application -->
    <dependencies>
        <dependency>
            <groupId>org.springframework.boot</groupId>
            <artifactId>spring-boot-starter-web</artifactId>
        </dependency>
    </dependencies>

    <!-- Package as an executable jar -->
    <build>
        <plugins>
            <plugin>
                <groupId>org.springframework.boot</groupId>
                <artifactId>spring-boot-maven-plugin</artifactId>
            </plugin>
        </plugins>
    </build>

    <!-- Add Spring repositories -->
    <!-- (you don't need this if you are using a .RELEASE version) -->
    <repositories>
        <repository>
            <id>spring-snapshots</id>
            <url>http://repo.spring.io/snapshot</url>
            <snapshots><enabled>true</enabled></snapshots>
        </repository>
        <repository>
            <id>spring-milestones</id>
            <url>http://repo.spring.io/milestone</url>
        </repository>
    </repositories>
    <pluginRepositories>
        <pluginRepository>
            <id>spring-snapshots</id>
            <url>http://repo.spring.io/snapshot</url>
        </pluginRepository>
        <pluginRepository>
            <id>spring-milestones</id>
            <url>http://repo.spring.io/milestone</url>
        </pluginRepository>
    </pluginRepositories>
</project>4、编制Application.java存于myFirstProject\src\main\java\com\example\myFirstProject下
- package com.example.myFirstProject;
- import org.springframework.boot.SpringApplication;
- import org.springframework.boot.autoconfigure.SpringBootApplication;
- @SpringBootApplication
- public class Application {
- public static void main(String[] args) {
- SpringApplication.run(Application.class, args);
- }
- }
package com.example.myFirstProject;

import org.springframework.boot.SpringApplication;
import org.springframework.boot.autoconfigure.SpringBootApplication;


@SpringBootApplication
public class Application {

    public static void main(String[] args) {
        SpringApplication.run(Application.class, args);
    }
}- package com.example.myFirstProject;
- import org.springframework.boot.autoconfigure.EnableAutoConfiguration;
- import org.springframework.web.bind.annotation.PathVariable;
- import org.springframework.web.bind.annotation.RequestMapping;
- import org.springframework.web.bind.annotation.RestController;
- @RestController
- @EnableAutoConfiguration
- public class Example {
- @RequestMapping(“/”)
- String home() {
- return “Hello World!”;
- }
- @RequestMapping(“/hello/{myName}”)
- String index(@PathVariable String myName) {
- return “Hello ”+myName+“!!!”;
- }
- }
package com.example.myFirstProject;

import org.springframework.boot.autoconfigure.EnableAutoConfiguration;
import org.springframework.web.bind.annotation.PathVariable;
import org.springframework.web.bind.annotation.RequestMapping;
import org.springframework.web.bind.annotation.RestController;

@RestController
@EnableAutoConfiguration
public class Example {

    @RequestMapping("/")
    String home() {
        return "Hello World!";
    }

    @RequestMapping("/hello/{myName}")
    String index(@PathVariable String myName) {
        return "Hello "+myName+"!!!";
    }
}1、启动eclipse
1.1、java–>jdk1.7.0_80x64
1.2、maven–>Apache Maven 3.3.3
1.3、Eclipse Java EE IDE for Web Developers. Version: Mars Release (4.5.0)
1.4、为本练习,新建一个workgroup
2、在eclipse中,依次点击file–>import–>Maven–>Existing Maven Projects–>Next–>Browse–>定位到myFirstProject文件夹–>确定–Finish
3、导入结果如图2
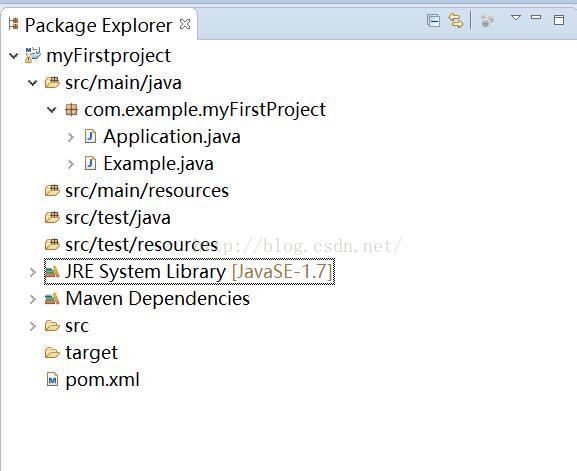
图2
三、运行
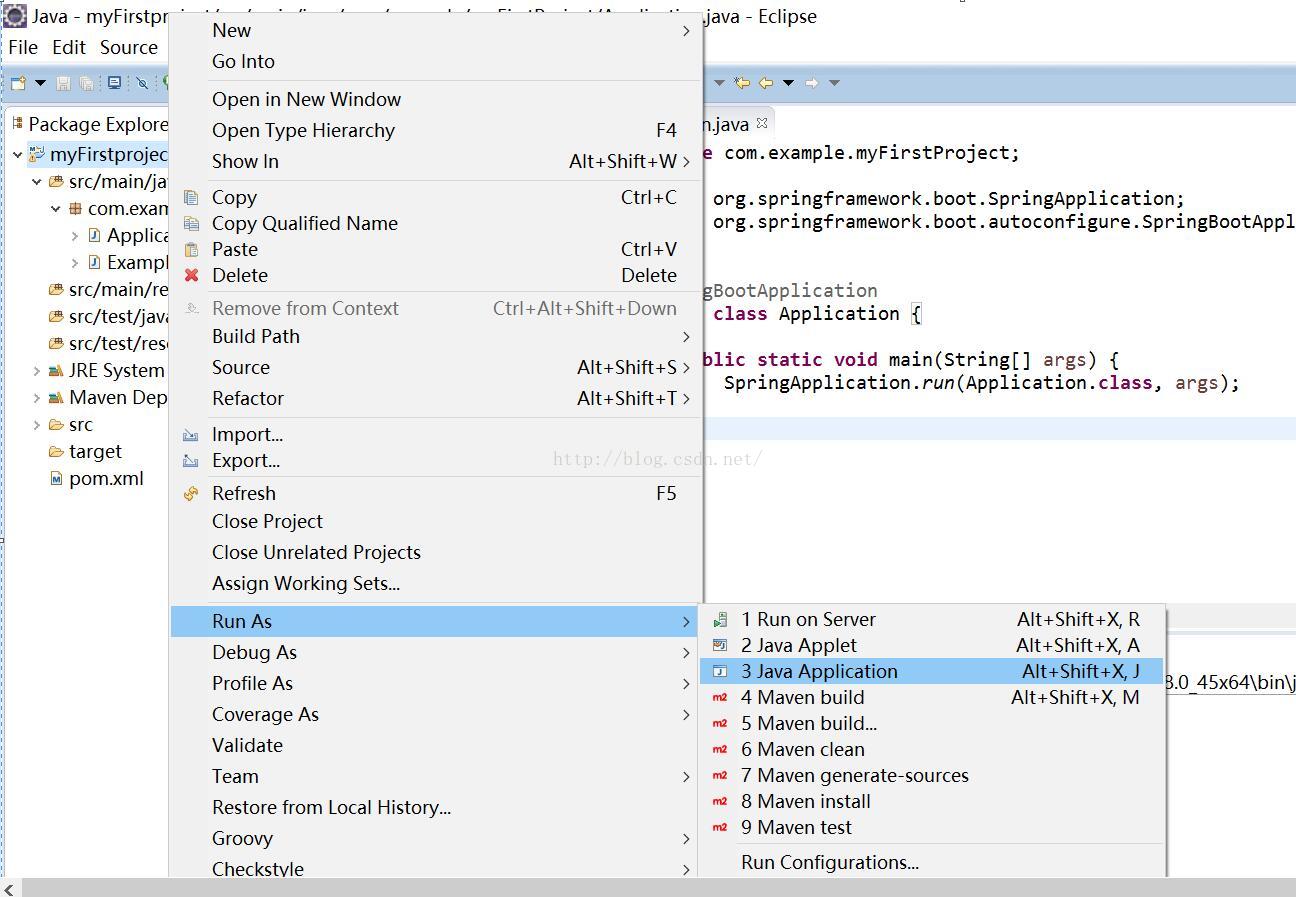
1、在eclipse的工程myFirstProject上右击鼠标,选择Run as–>Java Application,如图3
2、在select Java Aplication中选择“Application -com.example.myFirstProject”,如图4
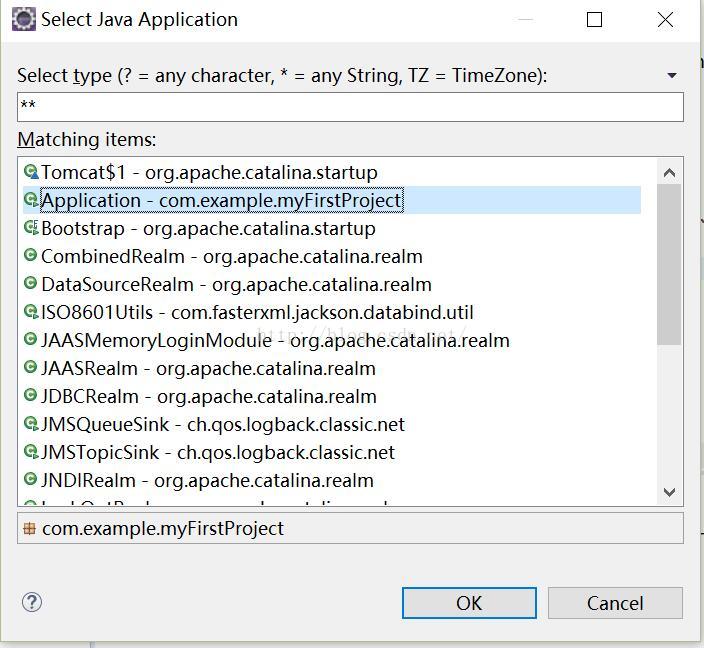
图4
3、再次点击“OK”按钮,在Eclipse的Console中开始打印如图5
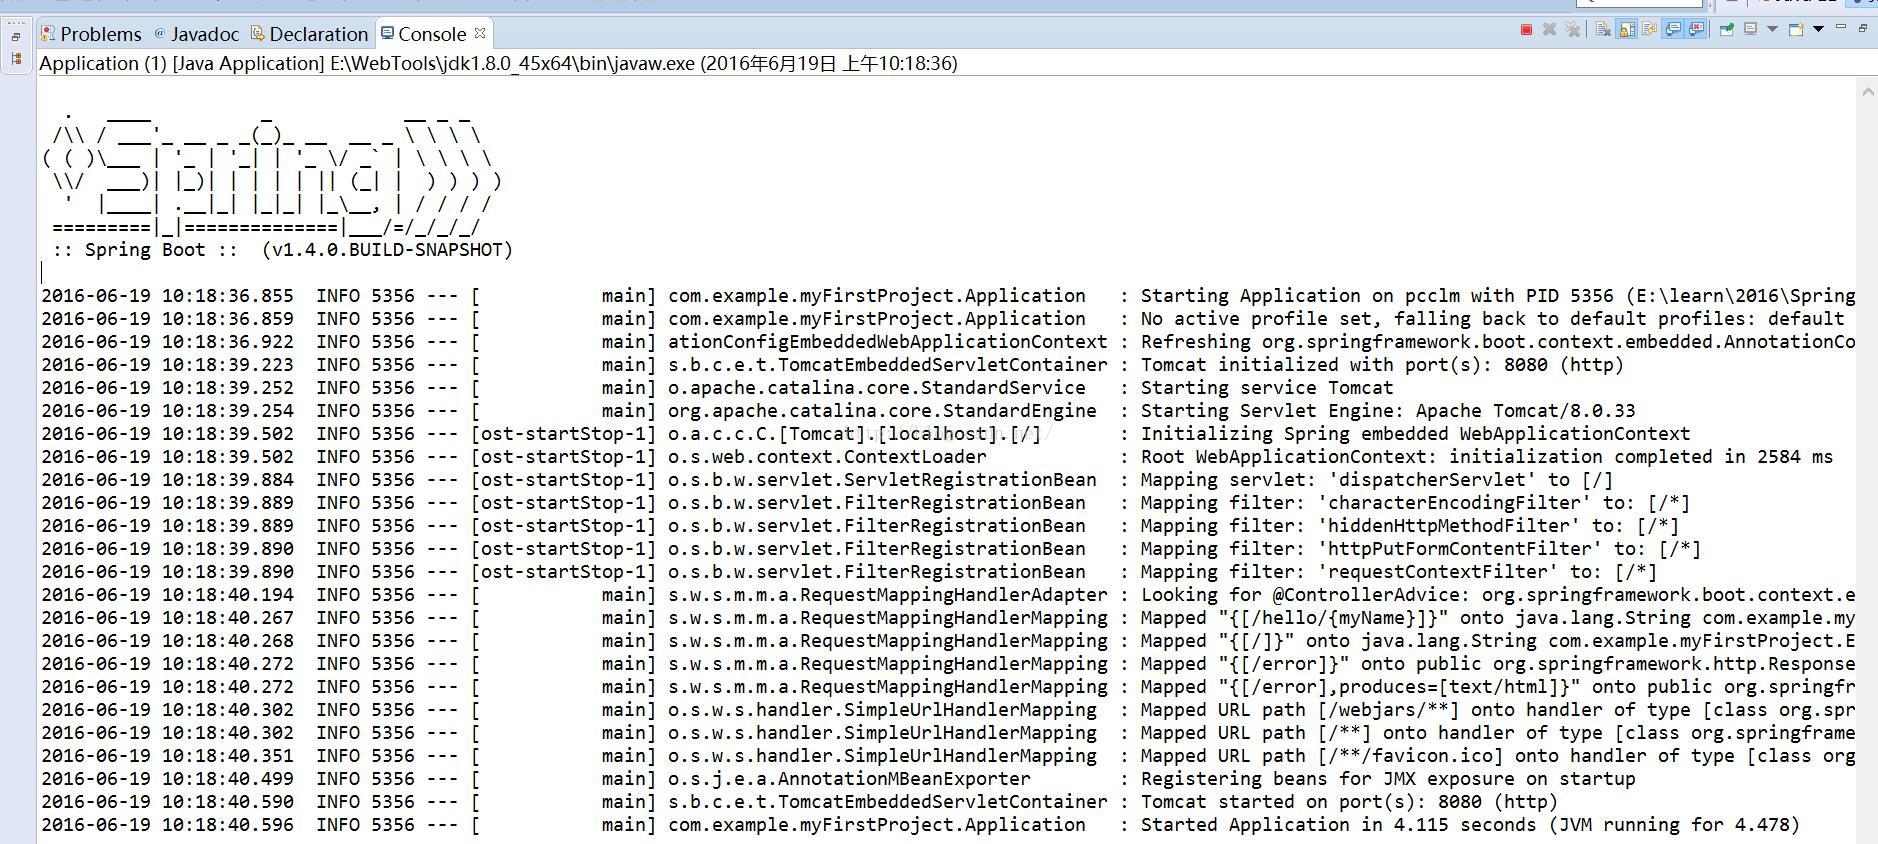
图5
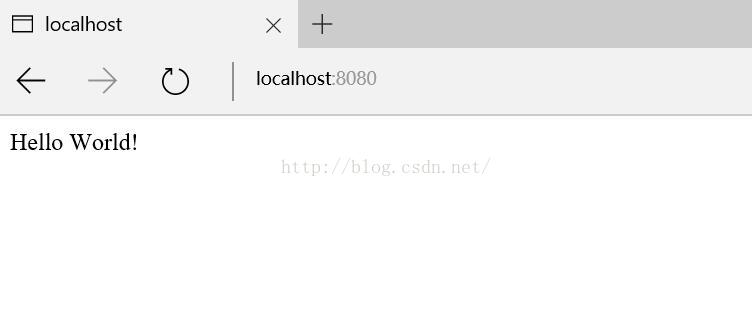
4、打开浏览器,输入http://localhost:8080,显示如图6
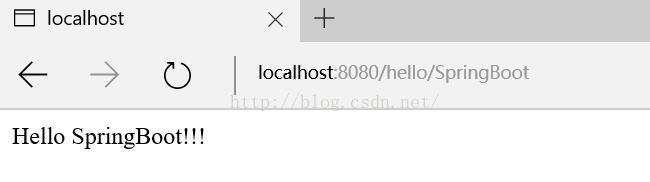
5、在浏览器中,输入http://localhost:8080/hello/SpringBoot
四、后记
痛则不通,通则不痛。这个例子非常之简单,为了这个简单,费事不少。为了这个例子能够成功,最好做以下准备
1、构建本地的Maven伺服,否则速度痛苦
2、Sonatype Nexus尽量和jdk相对应的版本,不要最求最新,否则可能启动不起来。
3、Sonatype Nexus搭建,参考
Maven入门指南⑤:使用Nexus搭建Maven私服
使用nexus搭建maven私服、手动更新索引
</div>


 被折叠的 条评论
为什么被折叠?
被折叠的 条评论
为什么被折叠?
 到【灌水乐园】发言


