在iOS项目中使用第三方类库可以说是非常常见的事,但是要正确配置这些第三方库会非常的繁琐,还好我们有CocoaPods来做这件事情,就如同在Java的世界里有Maven和Gradle,当然Maven的作用不仅仅是第三依赖库管理。通过CocoaPods工具我们可以为项目添加被称为"Pods"的依赖库(这些类库必须是CocoaPods本身所支持的),并且可以轻松管理其版本。
CocoaPods意义体现在两个方面。第一,在引入第三方库时它可以自动为我们完成各种各样的配置,包括配置编译阶段、链接器选项、甚至是ARC环境下对某些使用MRC的类设置-fno-objc-arc等;第二,使用CocoaPods可以很方便地查找新的第三方库,这些第三方库是更规范的或是知名的第三方库,这样可以让我们找到真正好用的第三方库。
安装Ruby环境
查看Mac是否安装Ruby和Gem
在终端中输入命令:ruby --version 和gem --version
输出如下类似提示符,则表示Ruby环境已安装
<code class="language-Shell hljs brainfuck has-numbering" style="display: block; padding: 0px; color: inherit; box-sizing: border-box; font-family: 'Source Code Pro', monospace;font-size:undefined; white-space: pre; border-radius: 0px; word-wrap: normal; background: transparent;"><span class="hljs-comment" style="color: rgb(136, 0, 0); box-sizing: border-box;">$</span> <span class="hljs-comment" style="color: rgb(136, 0, 0); box-sizing: border-box;">ruby</span> <span class="hljs-literal" style="color: rgb(0, 102, 102); box-sizing: border-box;">-</span><span class="hljs-literal" style="color: rgb(0, 102, 102); box-sizing: border-box;">-</span><span class="hljs-comment" style="color: rgb(136, 0, 0); box-sizing: border-box;">version</span>
<span class="hljs-comment" style="color: rgb(136, 0, 0); box-sizing: border-box;">ruby</span> <span class="hljs-comment" style="color: rgb(136, 0, 0); box-sizing: border-box;">2</span><span class="hljs-string" style="color: rgb(0, 136, 0); box-sizing: border-box;">.</span><span class="hljs-comment" style="color: rgb(136, 0, 0); box-sizing: border-box;">2</span><span class="hljs-string" style="color: rgb(0, 136, 0); box-sizing: border-box;">.</span><span class="hljs-comment" style="color: rgb(136, 0, 0); box-sizing: border-box;">1p85</span> <span class="hljs-comment" style="color: rgb(136, 0, 0); box-sizing: border-box;">(2015</span><span class="hljs-literal" style="color: rgb(0, 102, 102); box-sizing: border-box;">-</span><span class="hljs-comment" style="color: rgb(136, 0, 0); box-sizing: border-box;">02</span><span class="hljs-literal" style="color: rgb(0, 102, 102); box-sizing: border-box;">-</span><span class="hljs-comment" style="color: rgb(136, 0, 0); box-sizing: border-box;">26</span> <span class="hljs-comment" style="color: rgb(136, 0, 0); box-sizing: border-box;">revision</span> <span class="hljs-comment" style="color: rgb(136, 0, 0); box-sizing: border-box;">49769)</span> <span class="hljs-title" style="box-sizing: border-box;">[</span><span class="hljs-comment" style="color: rgb(136, 0, 0); box-sizing: border-box;">x86_64</span><span class="hljs-literal" style="color: rgb(0, 102, 102); box-sizing: border-box;">-</span><span class="hljs-comment" style="color: rgb(136, 0, 0); box-sizing: border-box;">darwin14</span><span class="hljs-title" style="box-sizing: border-box;">]</span>
<span class="hljs-comment" style="color: rgb(136, 0, 0); box-sizing: border-box;">$</span> <span class="hljs-comment" style="color: rgb(136, 0, 0); box-sizing: border-box;">gem</span> <span class="hljs-literal" style="color: rgb(0, 102, 102); box-sizing: border-box;">-</span><span class="hljs-literal" style="color: rgb(0, 102, 102); box-sizing: border-box;">-</span><span class="hljs-comment" style="color: rgb(136, 0, 0); box-sizing: border-box;">version</span>
<span class="hljs-comment" style="color: rgb(136, 0, 0); box-sizing: border-box;">2</span><span class="hljs-string" style="color: rgb(0, 136, 0); box-sizing: border-box;">.</span><span class="hljs-comment" style="color: rgb(136, 0, 0); box-sizing: border-box;">5</span><span class="hljs-string" style="color: rgb(0, 136, 0); box-sizing: border-box;">.</span><span class="hljs-comment" style="color: rgb(136, 0, 0); box-sizing: border-box;">1</span></code><ul class="pre-numbering" style="box-sizing: border-box; position: absolute; width: 50px; top: 0px; left: 0px; margin: 0px; padding: 6px 0px 40px; border-right-width: 1px; border-right-style: solid; border-right-color: rgb(221, 221, 221); list-style: none; text-align: right; background-color: rgb(238, 238, 238);"><li style="box-sizing: border-box; padding: 0px 5px;">1</li><li style="box-sizing: border-box; padding: 0px 5px;">2</li><li style="box-sizing: border-box; padding: 0px 5px;">3</li><li style="box-sizing: border-box; padding: 0px 5px;">4</li></ul>
说明:Ruby是日本人松本行弘发明的编程语言,它对面向对象和函数式编程都提供了很好的支持,而且有很高的开发效率。Gem是一个用于对Ruby组件进行打包的打包系统,它提供了分发Ruby程序和库的标准格式,还提供一个管理程序包安装的工具,CocoaPods就是用Ruby编写的第三方依赖库管理工具,可以通过gem来安装。如果系统中没有Ruby环境,那么可以先安装,具体的做法可以自己搜索一下。
安装CocoaPods
我们先将默认的gem源修改成淘宝的镜像,原因你懂的!
<code class="language-Shell hljs ruby has-numbering" style="display: block; padding: 0px; color: inherit; box-sizing: border-box; font-family: 'Source Code Pro', monospace;font-size:undefined; white-space: pre; border-radius: 0px; word-wrap: normal; background: transparent;"><span class="hljs-variable" style="color: rgb(102, 0, 102); box-sizing: border-box;">$ </span>gem sources --remove <span class="hljs-symbol" style="color: rgb(0, 102, 102); box-sizing: border-box;">https:</span>/<span class="hljs-regexp" style="color: rgb(0, 136, 0); box-sizing: border-box;">/rubygems.org/</span>
<span class="hljs-variable" style="color: rgb(102, 0, 102); box-sizing: border-box;">$ </span>gem sources -a <span class="hljs-symbol" style="color: rgb(0, 102, 102); box-sizing: border-box;">https:</span>/<span class="hljs-regexp" style="color: rgb(0, 136, 0); box-sizing: border-box;">/ruby.taobao.org/</span></code><ul class="pre-numbering" style="box-sizing: border-box; position: absolute; width: 50px; top: 0px; left: 0px; margin: 0px; padding: 6px 0px 40px; border-right-width: 1px; border-right-style: solid; border-right-color: rgb(221, 221, 221); list-style: none; text-align: right; background-color: rgb(238, 238, 238);"><li style="box-sizing: border-box; padding: 0px 5px;">1</li><li style="box-sizing: border-box; padding: 0px 5px;">2</li></ul>
为了验证你的Ruby镜像已经修改为淘宝镜像(只能保留淘宝镜像),可以用以下命令查看,而且必须看到如下所示的输出。
<code class="language-Shell hljs avrasm has-numbering" style="display: block; padding: 0px; color: inherit; box-sizing: border-box; font-family: 'Source Code Pro', monospace;font-size:undefined; white-space: pre; border-radius: 0px; word-wrap: normal; background: transparent;">$ gem sources -l
* CURRENT SOURCES *
<span class="hljs-label" style="box-sizing: border-box;">https:</span>//ruby<span class="hljs-preprocessor" style="color: rgb(68, 68, 68); box-sizing: border-box;">.taobao</span><span class="hljs-preprocessor" style="color: rgb(68, 68, 68); box-sizing: border-box;">.org</span>/</code><ul class="pre-numbering" style="box-sizing: border-box; position: absolute; width: 50px; top: 0px; left: 0px; margin: 0px; padding: 6px 0px 40px; border-right-width: 1px; border-right-style: solid; border-right-color: rgb(221, 221, 221); list-style: none; text-align: right; background-color: rgb(238, 238, 238);"><li style="box-sizing: border-box; padding: 0px 5px;">1</li><li style="box-sizing: border-box; padding: 0px 5px;">2</li><li style="box-sizing: border-box; padding: 0px 5px;">3</li></ul>
提示:如果出现多个源就需要将其他的源删除。
终端中执行安装CocoaPods
<code class="language-Shell hljs bash has-numbering" style="display: block; padding: 0px; color: inherit; box-sizing: border-box; font-family: 'Source Code Pro', monospace;font-size:undefined; white-space: pre; border-radius: 0px; word-wrap: normal; background: transparent;">$ <span class="hljs-built_in" style="color: rgb(102, 0, 102); box-sizing: border-box;">sudo</span> gem install cocoapods</code><ul class="pre-numbering" style="box-sizing: border-box; position: absolute; width: 50px; top: 0px; left: 0px; margin: 0px; padding: 6px 0px 40px; border-right-width: 1px; border-right-style: solid; border-right-color: rgb(221, 221, 221); list-style: none; text-align: right; background-color: rgb(238, 238, 238);"><li style="box-sizing: border-box; padding: 0px 5px;">1</li></ul>
执行完成后,需要初始化CocoaPods的环境
<code class="language-Shell hljs ruby has-numbering" style="display: block; padding: 0px; color: inherit; box-sizing: border-box; font-family: 'Source Code Pro', monospace;font-size:undefined; white-space: pre; border-radius: 0px; word-wrap: normal; background: transparent;"><span class="hljs-variable" style="color: rgb(102, 0, 102); box-sizing: border-box;">$ </span>pod setup</code><ul class="pre-numbering" style="box-sizing: border-box; position: absolute; width: 50px; top: 0px; left: 0px; margin: 0px; padding: 6px 0px 40px; border-right-width: 1px; border-right-style: solid; border-right-color: rgb(221, 221, 221); list-style: none; text-align: right; background-color: rgb(238, 238, 238);"><li style="box-sizing: border-box; padding: 0px 5px;">1</li></ul>
提示:以上两步可能会花费较多的时间,跟你的网络状况有很大关系。
使用CocoaPods
- 创建Xcode项目并在终端中切换到该项目路径
- 使用命令
pod init在当前文件夹下生成一个Podfile文件 - 编辑该文件,在该文件中输入如下信息:
<code class="language-Shell hljs ruby has-numbering" style="display: block; padding: 0px; color: inherit; box-sizing: border-box; font-family: 'Source Code Pro', monospace;font-size:undefined; white-space: pre; border-radius: 0px; word-wrap: normal; background: transparent;"><span class="hljs-variable" style="color: rgb(102, 0, 102); box-sizing: border-box;">$ </span>vim <span class="hljs-constant" style="box-sizing: border-box;">Podfile</span></code><ul class="pre-numbering" style="box-sizing: border-box; position: absolute; width: 50px; top: 0px; left: 0px; margin: 0px; padding: 6px 0px 40px; border-right-width: 1px; border-right-style: solid; border-right-color: rgb(221, 221, 221); list-style: none; text-align: right; background-color: rgb(238, 238, 238);"><li style="box-sizing: border-box; padding: 0px 5px;">1</li></ul>
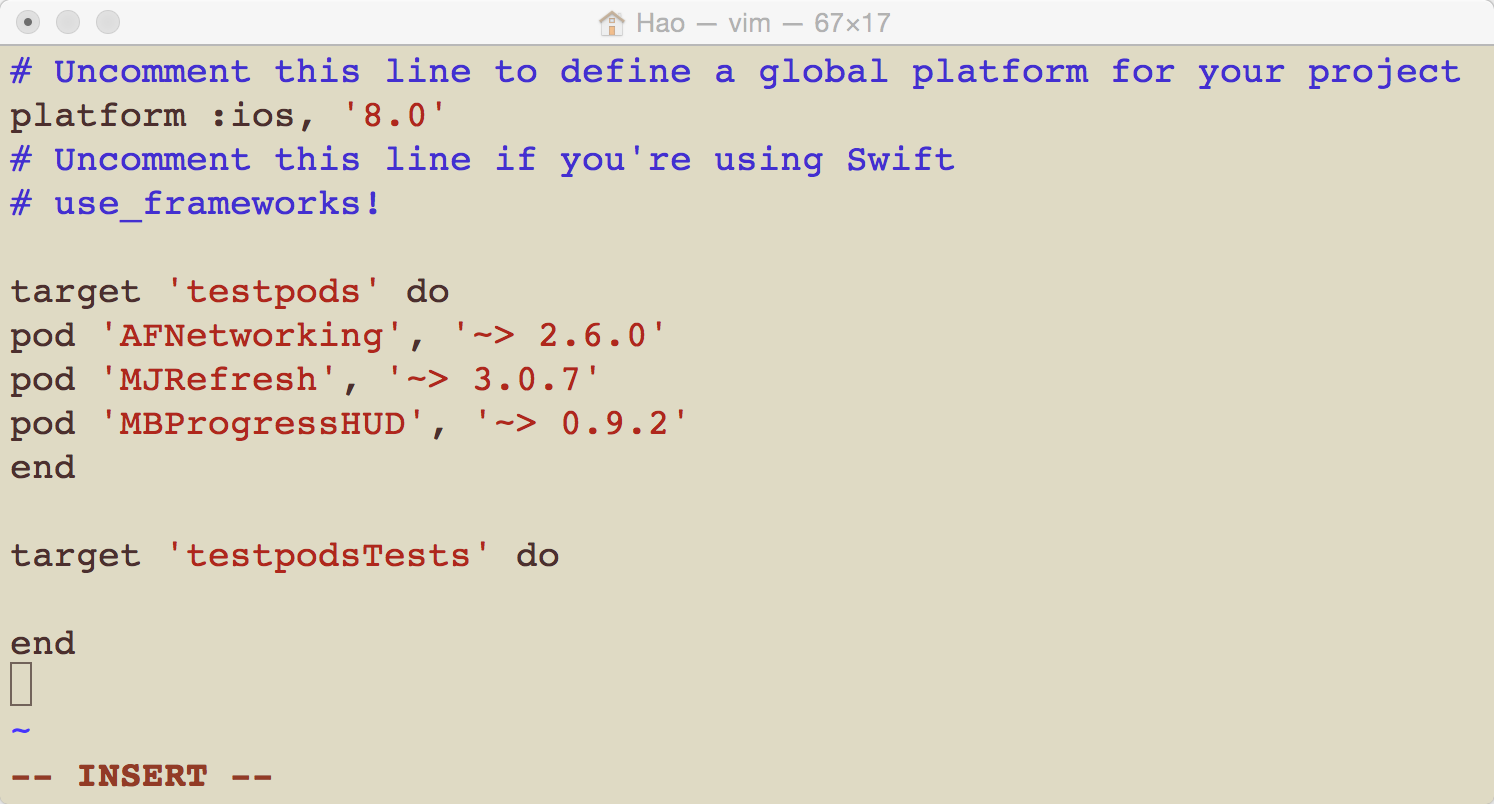
该文件中的命令格式为:pod '第三库名称', '版本号',第三库名称一定要正确,否则分分钟安装失败。版本号书写的规则如下所示:
- >= 1.0 至少版本为1.0
- ~> 1.0 兼容1.0版本的最新版
- == 1.0或1.0都表示指定版本
4. 安装工程依赖的第三方库
<code class="language-Shell hljs ruby has-numbering" style="display: block; padding: 0px; color: inherit; box-sizing: border-box; font-family: 'Source Code Pro', monospace;font-size:undefined; white-space: pre; border-radius: 0px; word-wrap: normal; background: transparent;"><span class="hljs-variable" style="color: rgb(102, 0, 102); box-sizing: border-box;">$ </span>pod install</code><ul class="pre-numbering" style="box-sizing: border-box; position: absolute; width: 50px; top: 0px; left: 0px; margin: 0px; padding: 6px 0px 40px; border-right-width: 1px; border-right-style: solid; border-right-color: rgb(221, 221, 221); list-style: none; text-align: right; background-color: rgb(238, 238, 238);"><li style="box-sizing: border-box; padding: 0px 5px;">1</li></ul>
如果命令执行后出现pods installed字样表示安装成功。
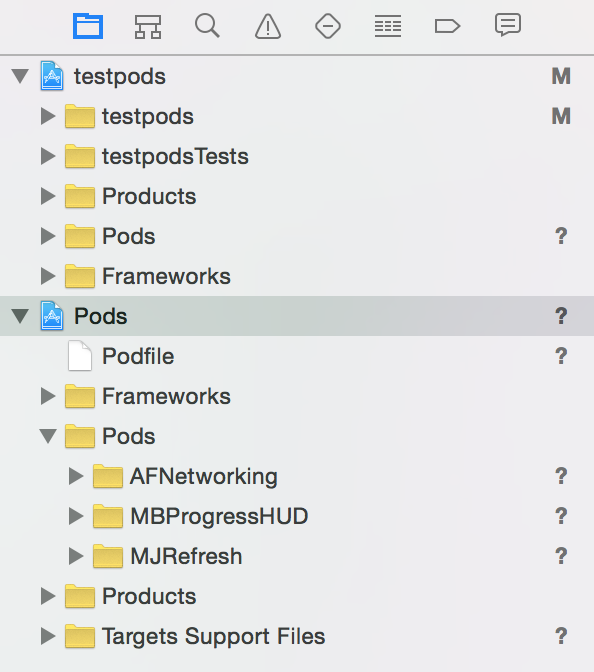
5. 关闭Xcode工程,在项目路径下打开.xcworkspace文件(工作空间文件),此时工作空间中除了你创建的项目外,还有一个名为Pods的项目,其中包含了你需要的第三方库,而且底层依赖库、编译标记、链接符号等都已经设置好了。
6. 如果要在你的项目中使用第三方库如AFNetworking,则只需要#import <AFNetworking.h>即可,如果要添加其他的第三方库,可以直接修改Podfile文件,然后再次执行$ pod install即可;如果修改了要使用的第三方库的版本,也可以执行$ pod update进行更新操作。
说明:可以在Xcode中安装CocoaPods插件,这样可以在Xcode中直接通过菜单完成各种操作而不用在终端中键入命令。
如果你愿意也可以使用Carthage来取代CocoaPods,Carthage是一个去中心化的依赖库管理工具,和CocoaPods不同它对原有的项目没有侵入性,你只需要在项目中添加由Carthage生成的Framework文件,然后在"Build Settings"中的"Framework Search Path"项加入$(SRCROOT)/Carthage/Build/iOS路径,Xcode便会自动搜索目录下的 Framework文件,完成对依赖库的安装,具体的做法可以参考互联网上的其他资料。
参考链接
- http://code4app.com/article/cocoapods-install-usage
- http://blog.csdn.net/wzzvictory/article/details/18737437
- http://blog.csdn.net/wzzvictory/article/details/19178709
- http://www.isaced.com/post-265.html


 1592
1592

 被折叠的 条评论
为什么被折叠?
被折叠的 条评论
为什么被折叠?
 到【灌水乐园】发言


