


简介: 如何使用Spark On MaxCompute连接Phonix,将Hbase的数据写入到MaxCompute的对应表中,目前没有对应的案例,为了满足用户的需求。本文主要讲解使用Spark连接Phonix访问Hbase的数据再写入到MaxCompute方案实践。该方案的验证是使用hbase1.1对应Phonix为4.12.0。本文从阿里云Hbase版本的选择、确认VPC、vswitchID、设置白名单和访问方式,Phonix4.12.0的客户端安装,在客户端实现Phonix表的创建和写入,Spark代码在本地IDEA的编写以及pom文件以及vpcList的配置,打包上传jar包并进行冒烟测试。
一、购买Hbase1.1并设置对应资源
1.1购买hbase
hbase主要版本为2.0与1.1,这边选择对应hbase对应的版本为1.1
Hbase与Hbase2.0版本的区别
HBase1.1版本
1.1版本基于HBase社区1.1.2版本开发。
HBase2.0版本
2.0版本是基于社区2018年发布的HBase2.0.0版本开发的全新版本。同样,在此基础上,做了大量的改进和优化,吸收了众多阿里内部成功经验,比社区HBase版本具有更好的稳定性和性能。
1.2确认VPC,vsWitchID
确保测试联通性的可以方便可行,该hbase的VPCId,vsWitchID尽量与购买的独享集成资源组的为一致的,独享集成资源的文档可以参考https://help.aliyun.com/document_detail/137838.html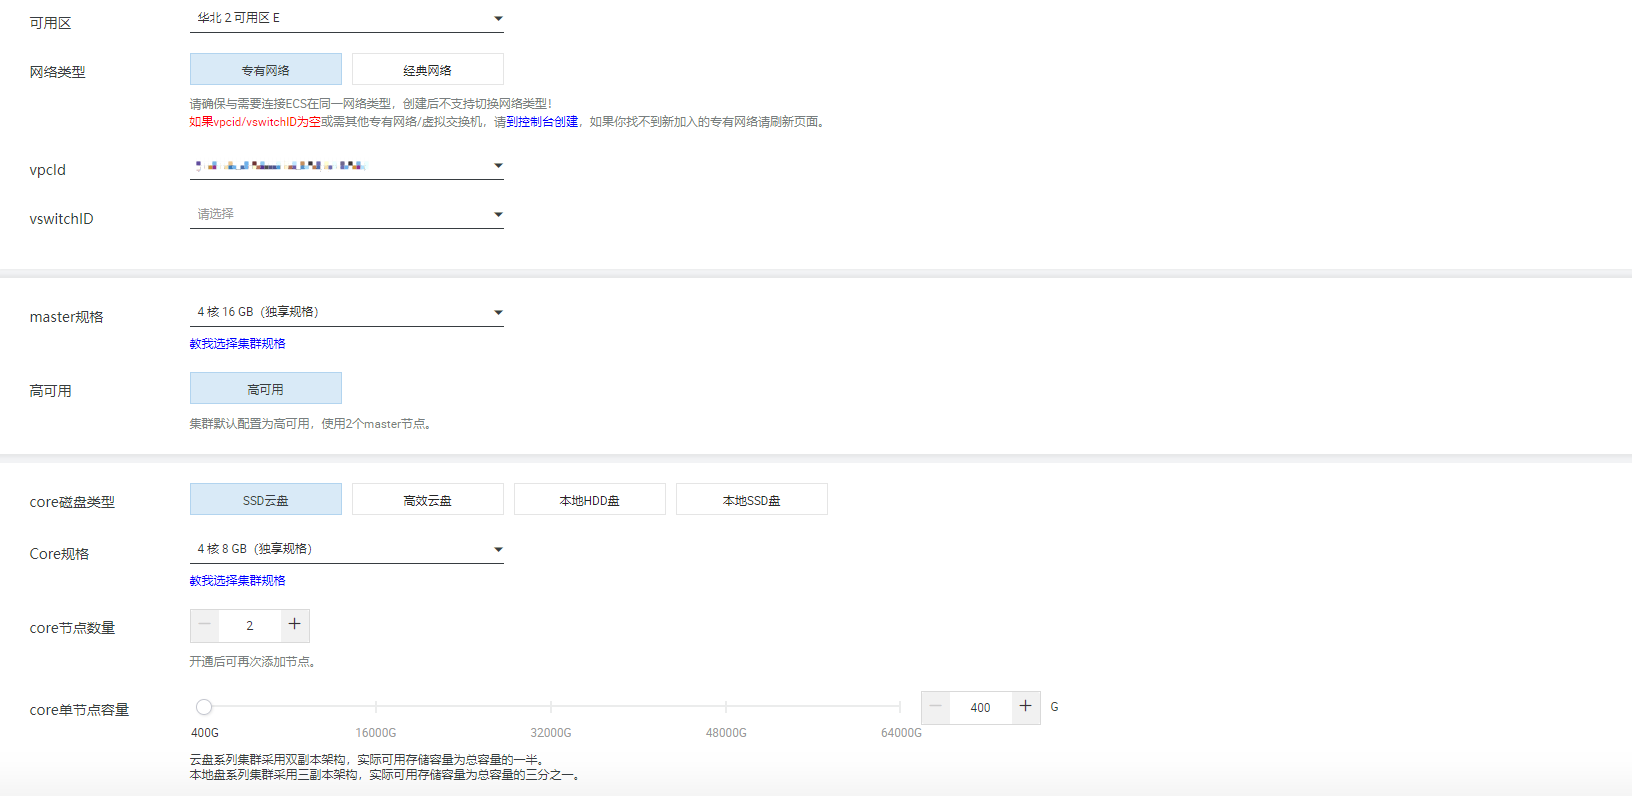
1.3设置hbase白名单,其中DataWorks白名单如下,个人ECS也可添加
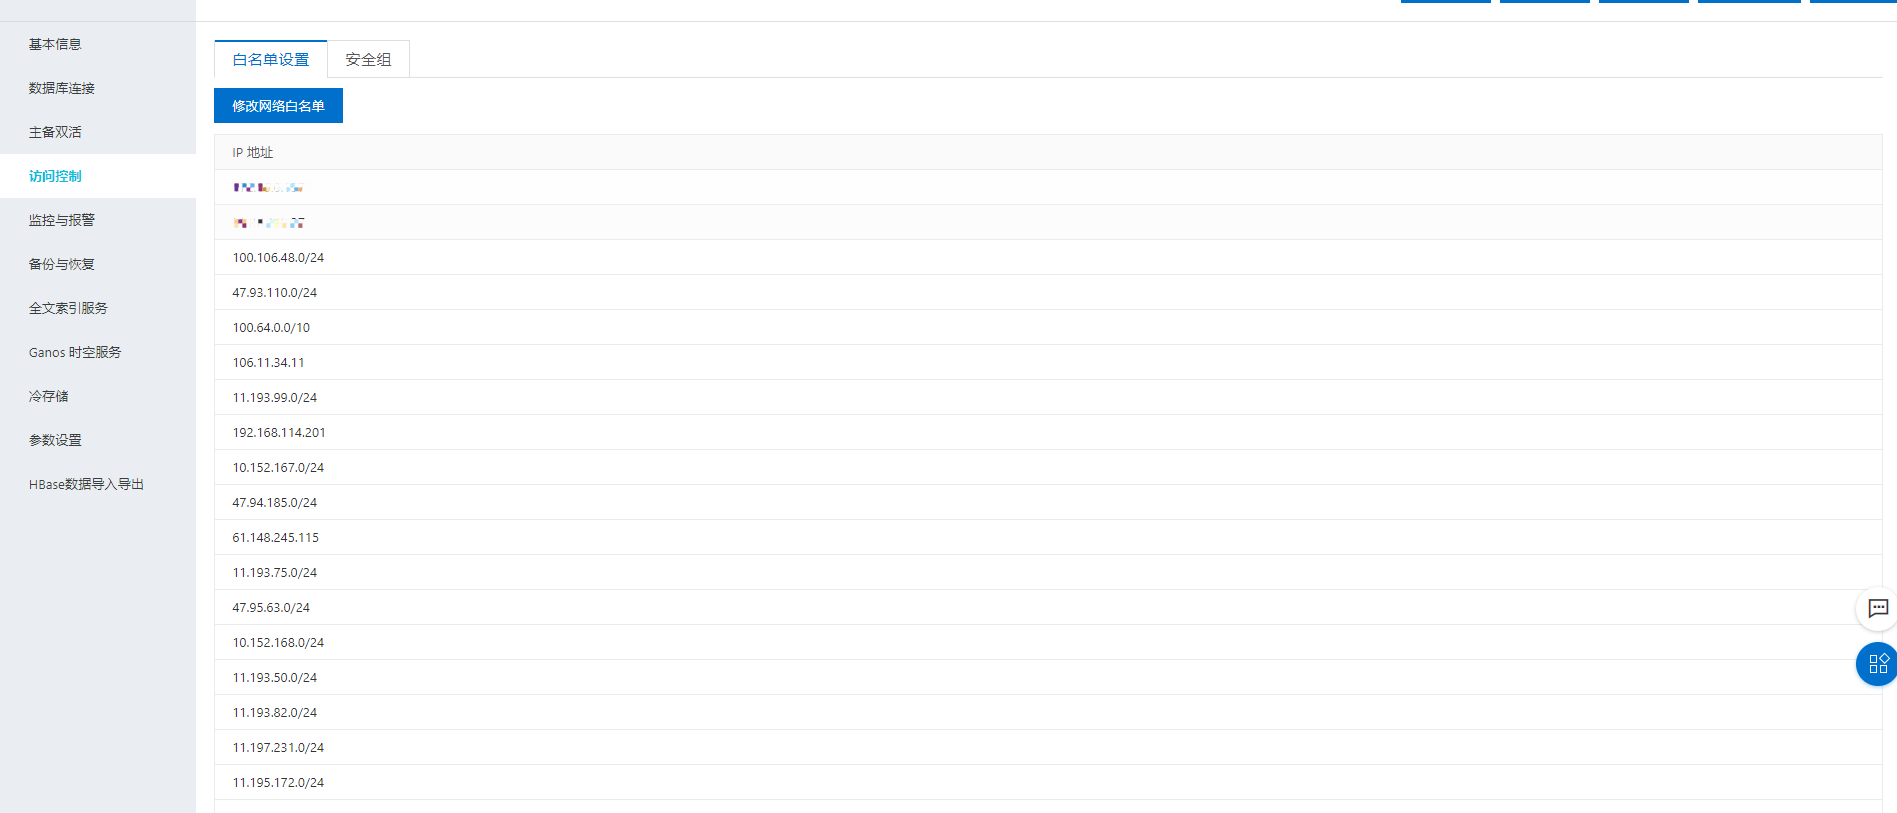
根据文档链接选择对应的DataWorks的region下的白名单进行添加https://help.aliyun.com/document_detail/137792.html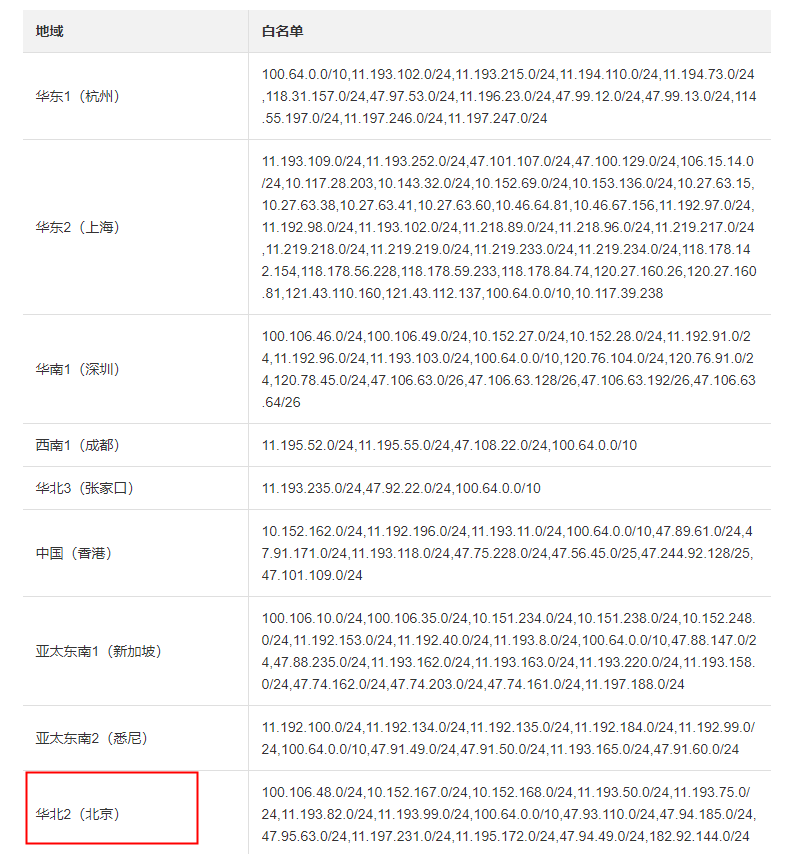
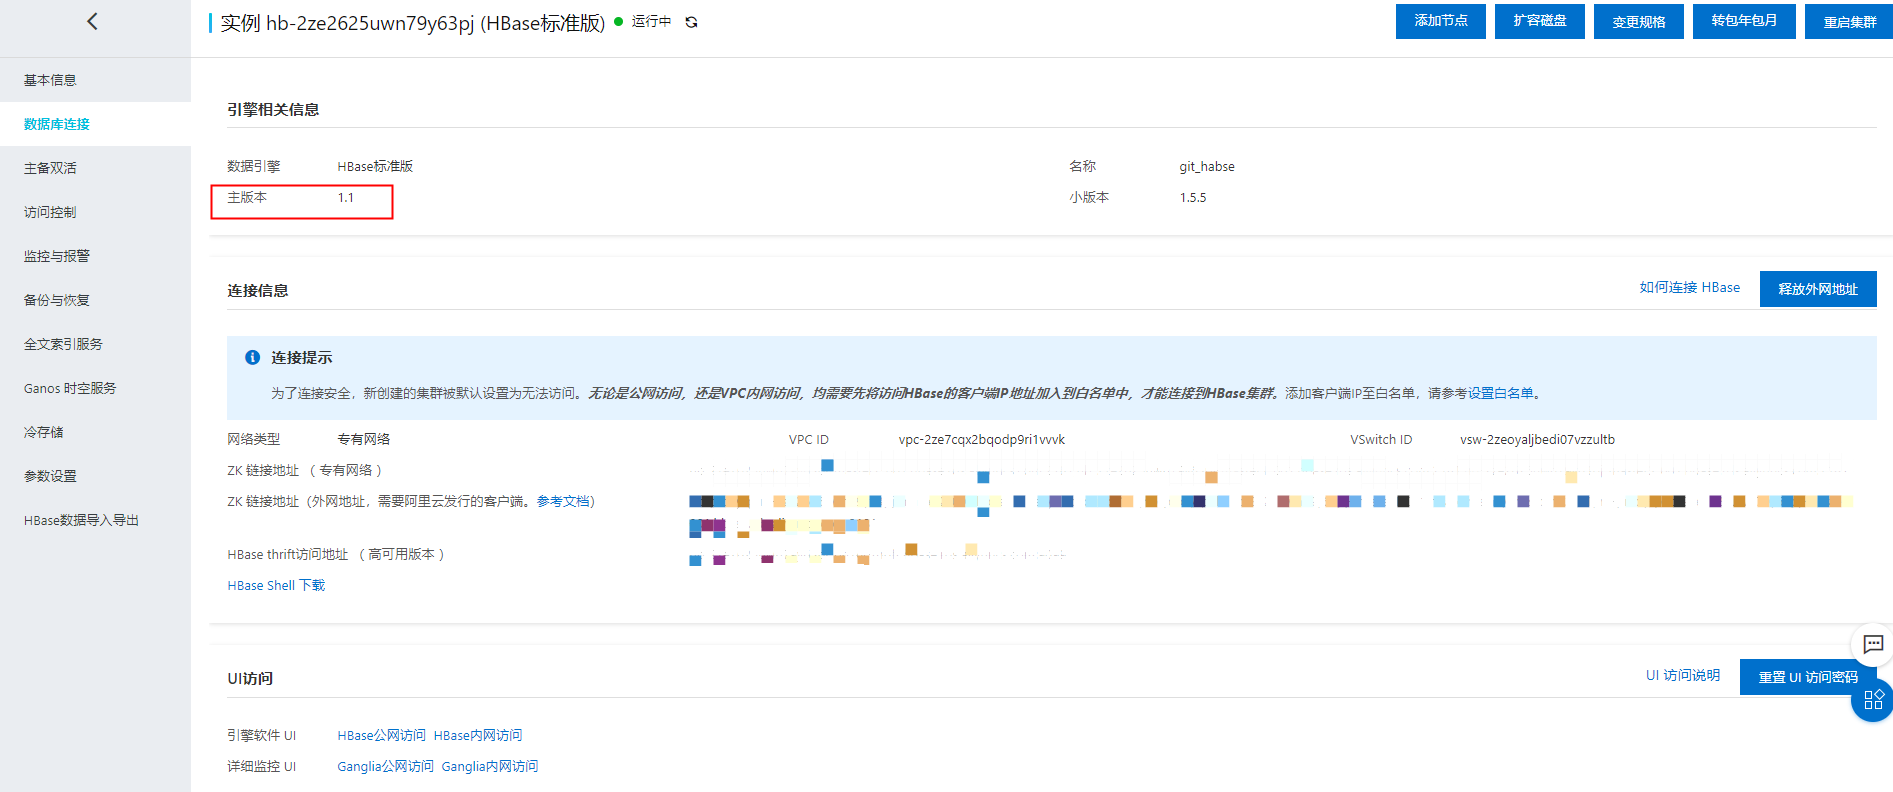
1.4查看hbase对应的版本和访问地址
打开数据库链接的按钮,可以查看到Hbase的主版本以及Hbase的专有网络访问地址,以及是否开通公网访问的方式进行连接。
二、安装Phonix客户端,并创建表和插入数据
2.1安装客户端
根据hbase的版本为1.1选择Phonix的版本为4.12.0根据文档https://help.aliyun.com/document_detail/53600.html 下载对应的客户端文件ali-phoenix-4.12.0-AliHBase-1.1-0.9.tar.gz
登陆客户端执行命令
./bin/sqlline.py 172.16.0.13,172.16.0.15,172.16.0.12:2181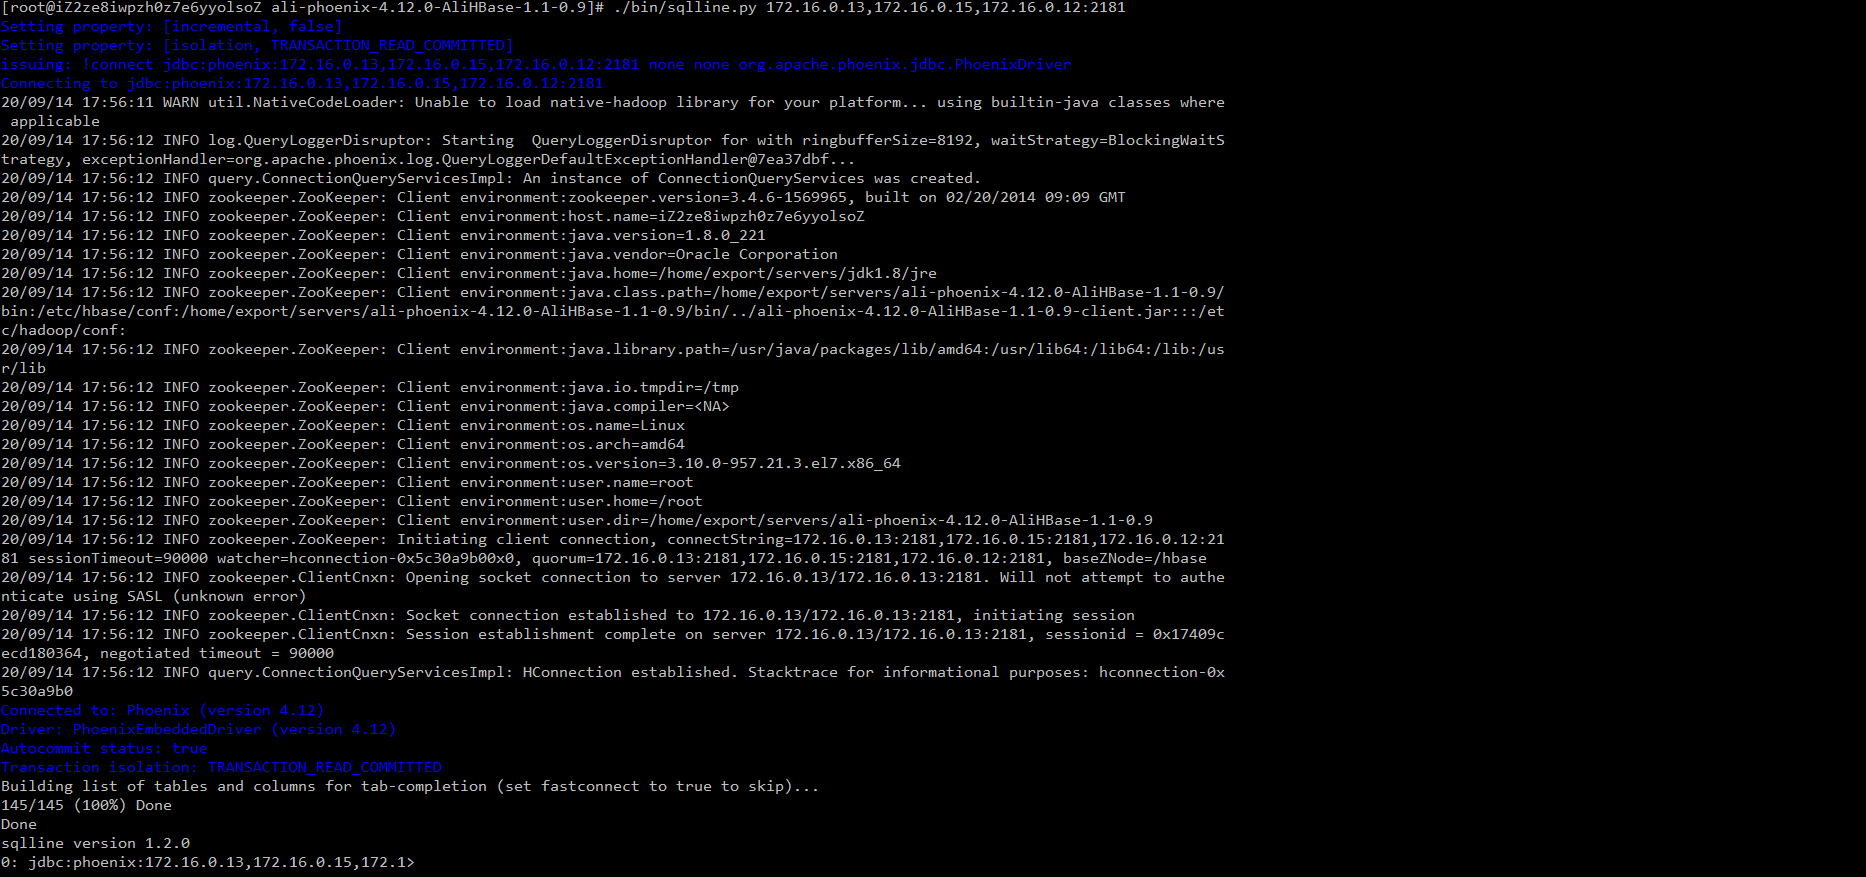
创建表:
CREATE TABLE IF NOT EXISTS users_phonix
(
    id       INT   ,
    username STRING,
    password STRING
) ;
插入数据:
UPSERT INTO users (id, username, password) VALUES (1, 'admin', 'Letmein');2.2查看是否创建和插入成功
在客户端执行命令,查看当前表与数据是否上传成功
select * from users;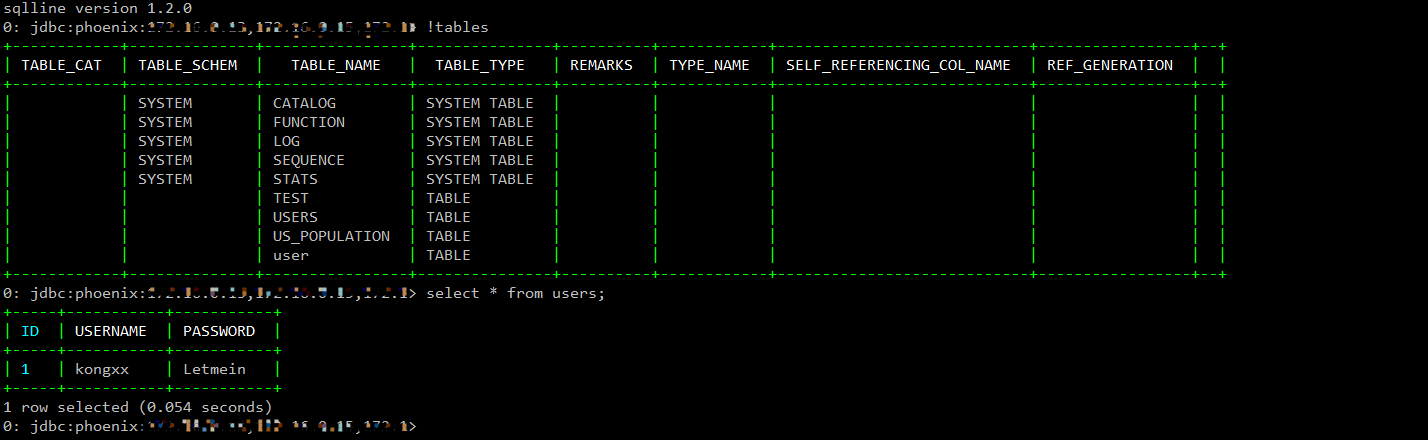
三、编写对应代码逻辑
3.1编写代码逻辑
在IDEA按照对应得Pom文件进行配置本地得开发环境,将代码涉及到得配置信息填写完整,进行编写测试,这里可以先使用Hbase得公网访问链接进行测试,代码逻辑验证成功后可调整配置参数,具体代码如下
package com.git.phonix
import org.apache.hadoop.conf.Configuration
import org.apache.spark.sql.SparkSession
import org.apache.phoenix.spark._
/**
  * 本实例适用于Phoenix 4.x版本
  */
object SparkOnPhoenix4xSparkSession {
  def main(args: Array[String]): Unit = {
    //HBase集群的ZK链接地址。
    //格式为:xxx-002.hbase.rds.aliyuncs.com,xxx-001.hbase.rds.aliyuncs.com,xxx-003.hbase.rds.aliyuncs.com:2181
    val zkAddress = args(0)
    //Phoenix侧的表名,需要在Phoenix侧提前创建。Phoenix表创建可以参考:https://help.aliyun.com/document_detail/53716.html?spm=a2c4g.11186623.4.2.4e961ff0lRqHUW
    val phoenixTableName = args(1)
    //Spark侧的表名。
    val ODPSTableName = args(2)
    val sparkSession = SparkSession
      .builder()
      .appName("SparkSQL-on-MaxCompute")
      .config("spark.sql.broadcastTimeout", 20 * 60)
      .config("spark.sql.crossJoin.enabled", true)
      .config("odps.exec.dynamic.partition.mode", "nonstrict")
      //.config("spark.master", "local[4]") // 需设置spark.master为local[N]才能直接运行,N为并发数
      .config("spark.hadoop.odps.project.name", "***")
      .config("spark.hadoop.odps.access.id", "***")
      .config("spark.hadoop.odps.access.key", "***")
      //.config("spark.hadoop.odps.end.point", "http://service.cn.maxcompute.aliyun.com/api")
      .config("spark.hadoop.odps.end.point", "http://service.cn-beijing.maxcompute.aliyun-inc.com/api")
      .config("spark.sql.catalogImplementation", "odps")
      .getOrCreate()
    //第一种插入方式
    var df = sparkSession.read.format("org.apache.phoenix.spark").option("table", phoenixTableName).option("zkUrl",zkAddress).load()
    df.show()
    df.write.mode("overwrite").insertInto(ODPSTableName)
  }
}
3.2对应Pom文件
pom文件中分为Spark依赖,与ali-phoenix-spark相关的依赖,由于涉及到ODPS的jar包,会在集群中引起jar冲突,所以要将ODPS的包排除掉
<?xml version="1.0" encoding="UTF-8"?>
<!--
  Licensed under the Apache License, Version 2.0 (the "License");
  you may not use this file except in compliance with the License.
  You may obtain a copy of the License at
    http://www.apache.org/licenses/LICENSE-2.0
  Unless required by applicable law or agreed to in writing, software
  distributed under the License is distributed on an "AS IS" BASIS,
  WITHOUT WARRANTIES OR CONDITIONS OF ANY KIND, either express or implied.
  See the License for the specific language governing permissions and
  limitations under the License. See accompanying LICENSE file.
-->
<project xmlns="http://maven.apache.org/POM/4.0.0"
         xmlns:xsi="http://www.w3.org/2001/XMLSchema-instance"
         xsi:schemaLocation="http://maven.apache.org/POM/4.0.0 http://maven.apache.org/xsd/maven-4.0.0.xsd">
    <modelVersion>4.0.0</modelVersion>
    <properties>
        <spark.version>2.3.0</spark.version>
        <cupid.sdk.version>3.3.8-public</cupid.sdk.version>
        <scala.version>2.11.8</scala.version>
        <scala.binary.version>2.11</scala.binary.version>
        <phoenix.version>4.12.0-HBase-1.1</phoenix.version>
    </properties>
    <groupId>com.aliyun.odps</groupId>
    <artifactId>Spark-Phonix</artifactId>
    <version>1.0.0-SNAPSHOT</version>
    <packaging>jar</packaging>
    <dependencies>
        <dependency>
            <groupId>org.jpmml</groupId>
            <artifactId>pmml-model</artifactId>
            <version>1.3.8</version>
        </dependency>
        <dependency>
            <groupId>org.jpmml</groupId>
            <artifactId>pmml-evaluator</artifactId>
            <version>1.3.10</version>
        </dependency>
        <dependency>
            <groupId>org.apache.spark</groupId>
            <artifactId>spark-core_${scala.binary.version}</artifactId>
            <version>${spark.version}</version>
            <scope>provided</scope>
            <exclusions>
                <exclusion>
                    <groupId>org.scala-lang</groupId>
                    <artifactId>scala-library</artifactId>
                </exclusion>
                <exclusion>
                    <groupId>org.scala-lang</groupId>
                    <artifactId>scalap</artifactId>
                </exclusion>
            </exclusions>
        </dependency>
        <dependency>
            <groupId>org.apache.spark</groupId>
            <artifactId>spark-sql_${scala.binary.version}</artifactId>
            <version>${spark.version}</version>
            <scope>provided</scope>
        </dependency>
        <dependency>
            <groupId>org.apache.spark</groupId>
            <artifactId>spark-mllib_${scala.binary.version}</artifactId>
            <version>${spark.version}</version>
            <scope>provided</scope>
        </dependency>
        <dependency>
            <groupId>org.apache.spark</groupId>
            <artifactId>spark-streaming_${scala.binary.version}</artifactId>
            <version>${spark.version}</version>
            <scope>provided</scope>
        </dependency>
        <dependency>
            <groupId>com.aliyun.odps</groupId>
            <artifactId>cupid-sdk</artifactId>
            <version>${cupid.sdk.version}</version>
            <scope>provided</scope>
        </dependency>
        <dependency>
            <groupId>com.aliyun.phoenix</groupId>
            <artifactId>ali-phoenix-core</artifactId>
            <version>4.12.0-AliHBase-1.1-0.8</version>
            <exclusions>
                <exclusion>
                    <groupId>com.aliyun.odps</groupId>
                    <artifactId>odps-sdk-mapred</artifactId>
                </exclusion>
                <exclusion>
                    <groupId>com.aliyun.odps</groupId>
                    <artifactId>odps-sdk-commons</artifactId>
                </exclusion>
            </exclusions>
        </dependency>
        <dependency>
            <groupId>com.aliyun.phoenix</groupId>
            <artifactId>ali-phoenix-spark</artifactId>
            <version>4.12.0-AliHBase-1.1-0.8</version>
            <exclusions>
                <exclusion>
                    <groupId>com.aliyun.phoenix</groupId>
                    <artifactId>ali-phoenix-core</artifactId>
                </exclusion>
            </exclusions>
        </dependency>
    </dependencies>
    <build>
        <plugins>
            <plugin>
                <groupId>org.apache.maven.plugins</groupId>
                <artifactId>maven-shade-plugin</artifactId>
                <version>2.4.3</version>
                <executions>
                    <execution>
                        <phase>package</phase>
                        <goals>
                            <goal>shade</goal>
                        </goals>
                        <configuration>
                            <minimizeJar>false</minimizeJar>
                            <shadedArtifactAttached>true</shadedArtifactAttached>
                            <artifactSet>
                                <includes>
                                    <!-- Include here the dependencies you
                                        want to be packed in your fat jar -->
                                    <include>*:*</include>
                                </includes>
                            </artifactSet>
                            <filters>
                                <filter>
                                    <artifact>*:*</artifact>
                                    <excludes>
                                        <exclude>META-INF/*.SF</exclude>
                                        <exclude>META-INF/*.DSA</exclude>
                                        <exclude>META-INF/*.RSA</exclude>
                                        <exclude>**/log4j.properties</exclude>
                                    </excludes>
                                </filter>
                            </filters>
                            <transformers>
                                <transformer
                                        implementation="org.apache.maven.plugins.shade.resource.AppendingTransformer">
                                    <resource>reference.conf</resource>
                                </transformer>
                                <transformer
                                        implementation="org.apache.maven.plugins.shade.resource.AppendingTransformer">
                                    <resource>META-INF/services/org.apache.spark.sql.sources.DataSourceRegister</resource>
                                </transformer>
                            </transformers>
                        </configuration>
                    </execution>
                </executions>
            </plugin>
            <plugin>
                <groupId>net.alchim31.maven</groupId>
                <artifactId>scala-maven-plugin</artifactId>
                <version>3.3.2</version>
                <executions>
                    <execution>
                        <id>scala-compile-first</id>
                        <phase>process-resources</phase>
                        <goals>
                            <goal>compile</goal>
                        </goals>
                    </execution>
                    <execution>
                        <id>scala-test-compile-first</id>
                        <phase>process-test-resources</phase>
                        <goals>
                            <goal>testCompile</goal>
                        </goals>
                    </execution>
                </executions>
            </plugin>
        </plugins>
    </build>
</project>
四、打包上传到DataWorks进行冒烟测试
4.1创建要传入的MaxCompute表
CREATE TABLE IF NOT EXISTS users_phonix
(
    id       INT   ,
    username STRING,
    password STRING
) ;
4.2打包上传到MaxCompute
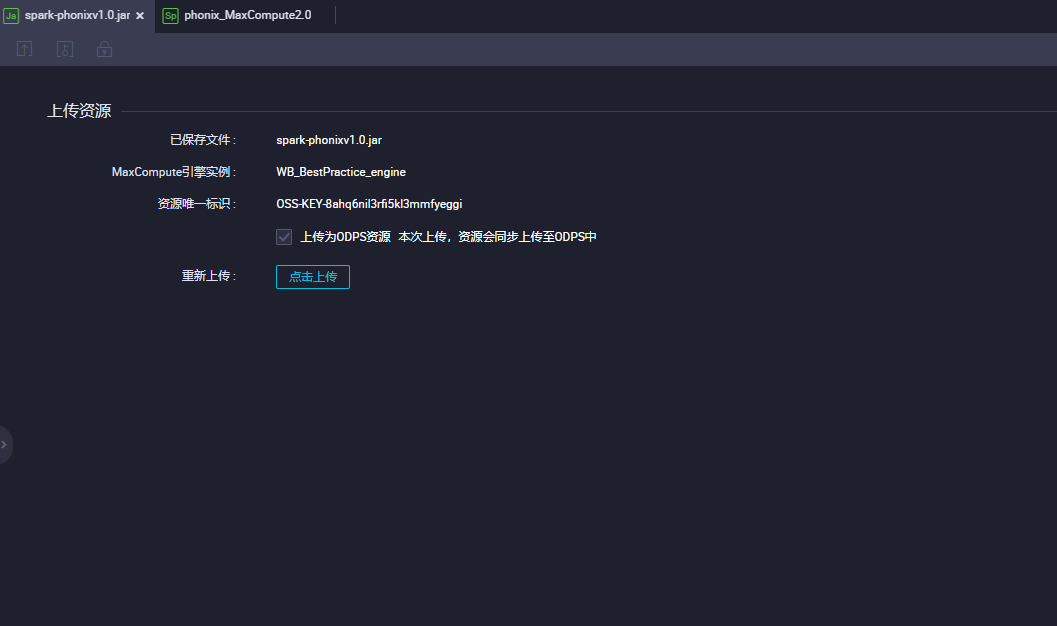
在IDEA打包要打成shaded包,将所有的依赖包,打入jar包中,由于DatadWork界面方式上传jar包有50M的限制,因此采用MaxCompute客户端进行jar包
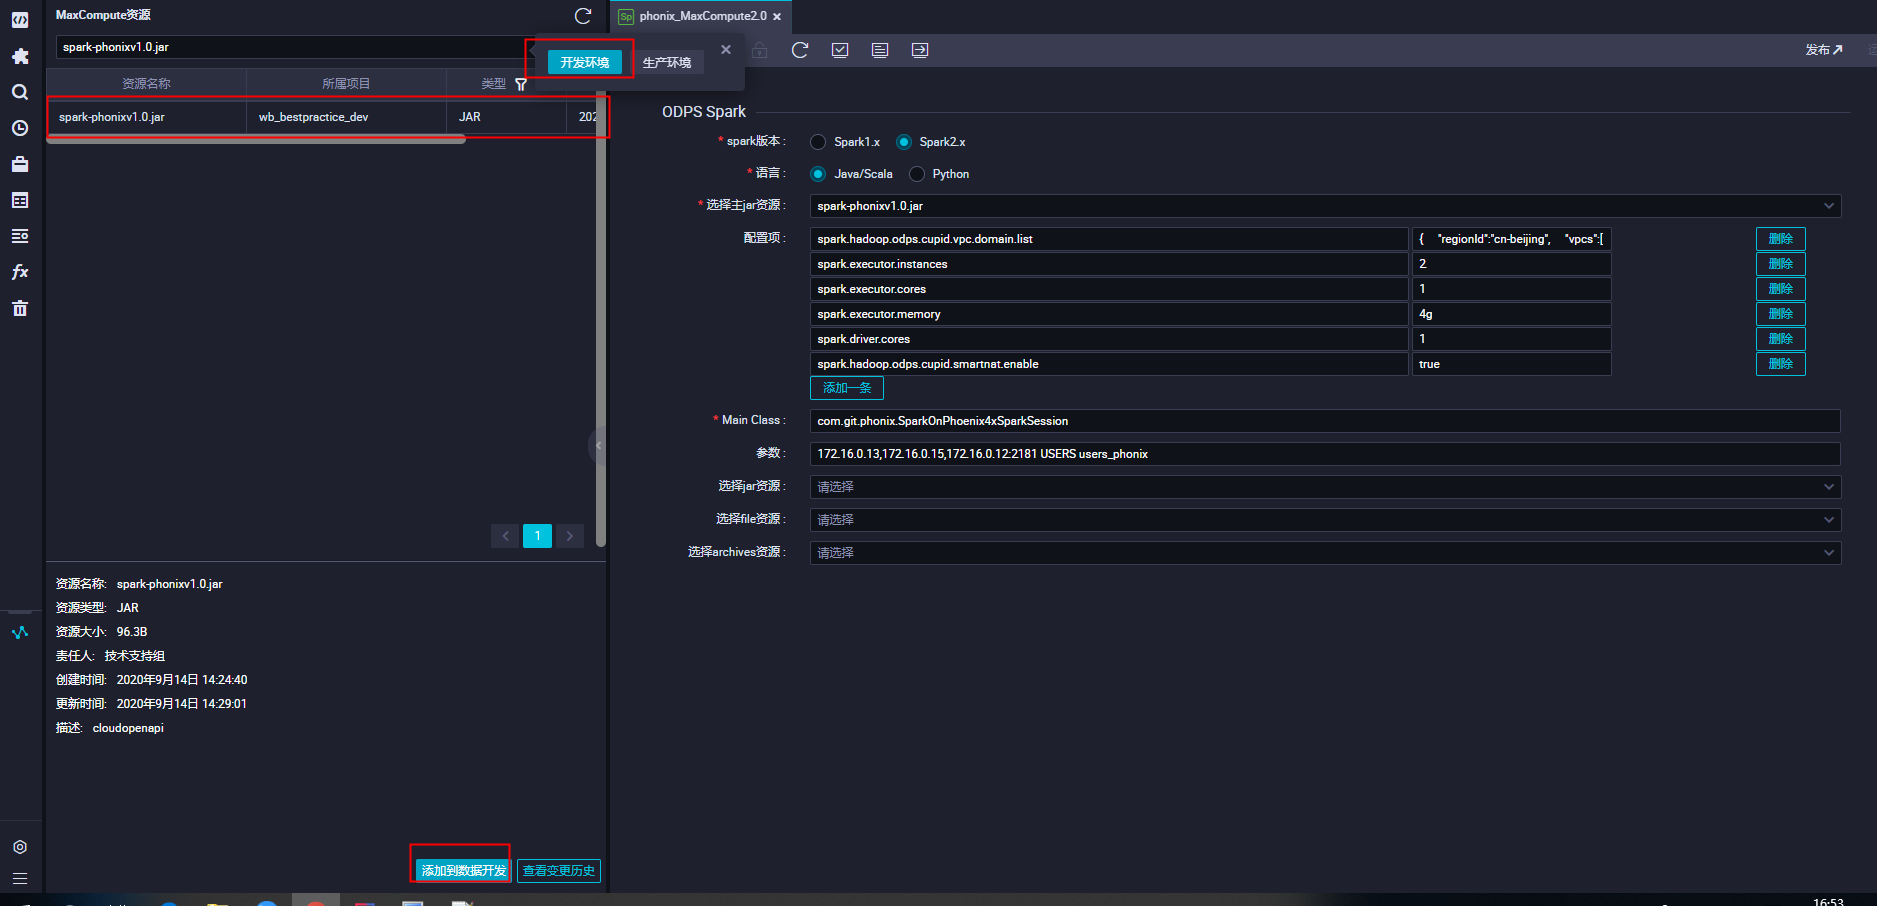
4.3选择对应的project环境,查看上传资源,并点击添加到数据开发
进入DataWorks界面选择左侧资源图标,选择对应的环境位开发换进,输入删除文件时的文件名称进行搜索,列表中展示该资源已经上传成,点击提交到数据开发
 点击提交按钮
4.4配置对应的vpcList参数并提交任务测试
其中的配置vpcList文件的配置信息如下,可具体根据个人hbase的链接,进行配置
{
    "regionId":"cn-beijing",
    "vpcs":[
        {
            "vpcId":"vpc-2ze7cqx2bqodp9ri1vvvk",
            "zones":[
                {
                    "urls":[
                        {
                            "domain":"172.16.0.12",
                            "port":2181
                        },
                        {
                            "domain":"172.16.0.13",
                            "port":2181
                        },
                        {
                            "domain":"172.16.0.15",
                            "port":2181
                        },
                        {
                            "domain":"172.16.0.14",
                            "port":2181
                        },
                        {
                            "domain":"172.16.0.12",
                            "port":16000
                        },
                        {
                            "domain":"172.16.0.13",
                            "port":16000
                        },
                        {
                            "domain":"172.16.0.15",
                            "port":16000
                        },
                        {
                            "domain":"172.16.0.14",
                            "port":16000
                        },
                        {
                            "domain":"172.16.0.12",
                            "port":16020
                        },
                        {
                            "domain":"172.16.0.13",
                            "port":16020
                        },
                        {
                            "domain":"172.16.0.15",
                            "port":16020
                        },
                        {
                            "domain":"172.16.0.14",
                            "port":16020
                        }
                    ]
                }
            ]
        }
    ]
}
Spark任务提交任务的配置参数,主类,以及对应的参数
该参数主要为3个参数第一个为Phonix的链接,第二个为Phonix的表名称,第三个为传入的MaxCompute表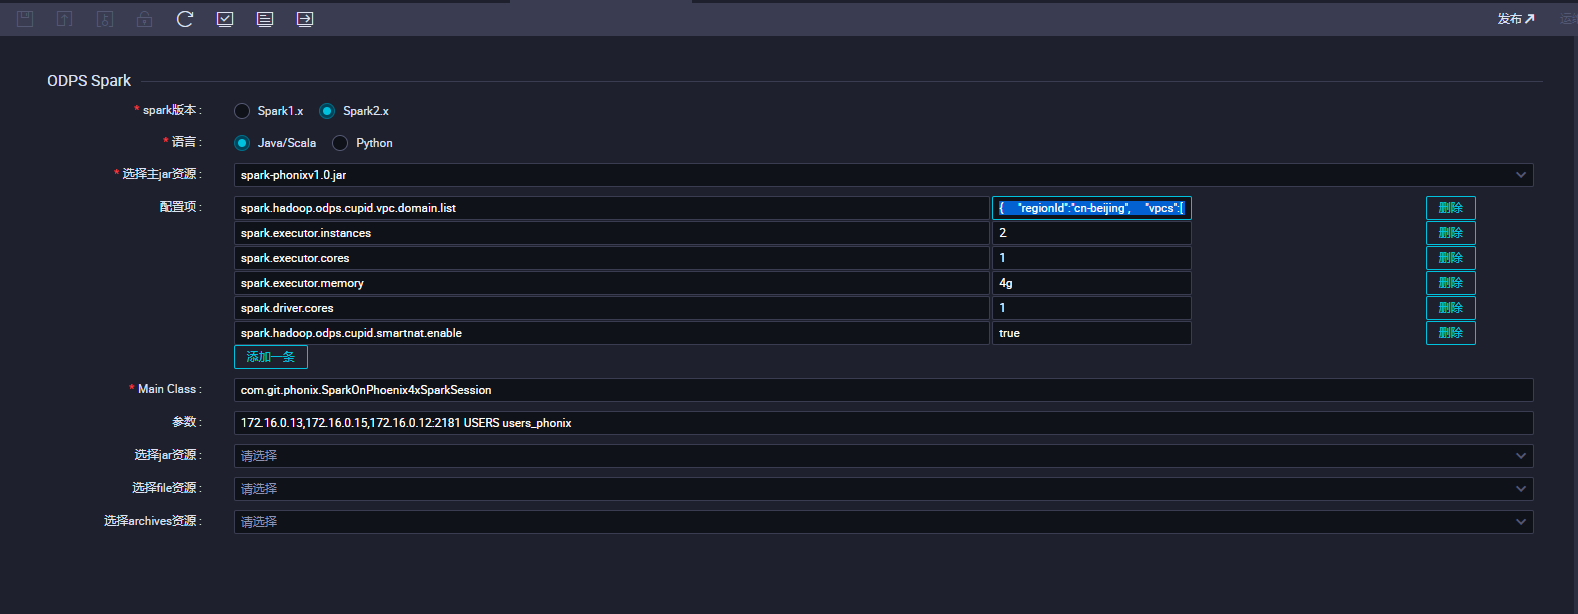
点击冒烟测试按钮,可以看到任务执行成功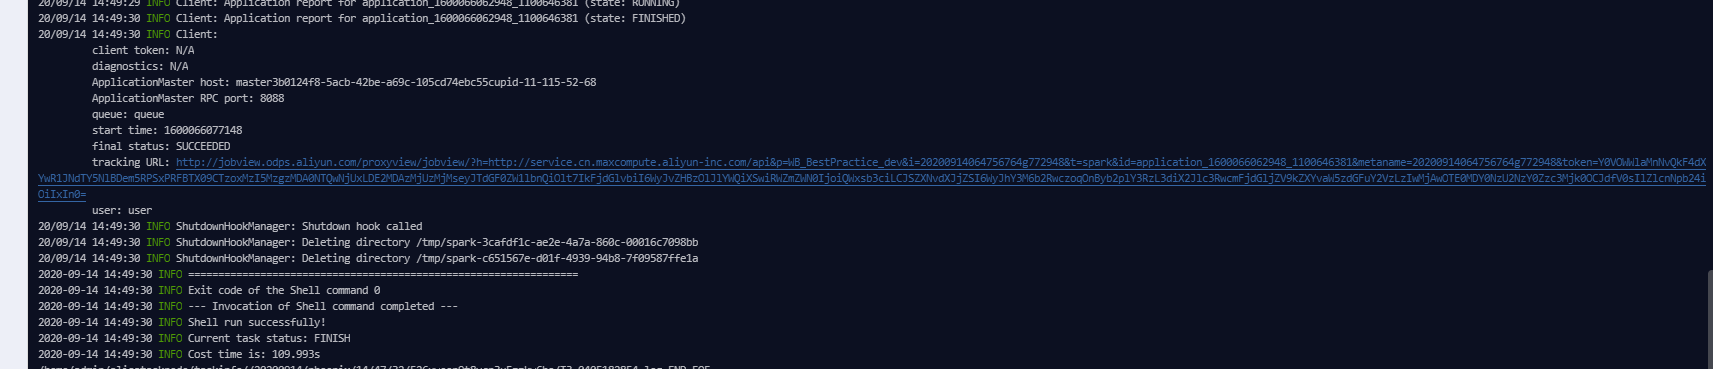
在临时查询节点中执行查询语句,可以得到数据已经写入MaxCompute的表中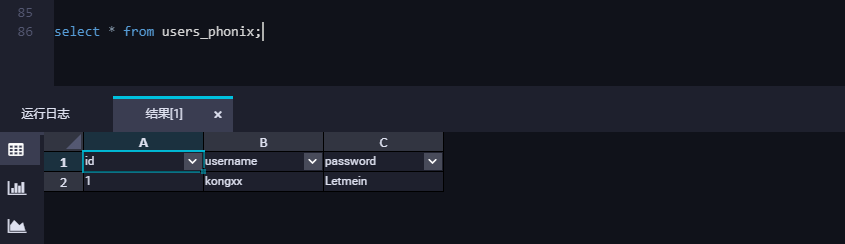
总结:
使用Spark on MaxCompute访问Phonix的数据,并将数据写入到MaxCompute的表中经过实践,该方案时可行的。但在实践的时有几点注意事项:
1.结合实际使用情况选择对应的Hbase以及Phonix版本,对应的版本一致,并且所使用的客户端,以及代码依赖都会有所改变。
2.使用公网在IEAD进行本地测试,要注意Hbase白名单,不仅要设置DataWorks的白名单,还需将自己本地的地址加入到白名单中。
3.代码打包时需要将pom中的依赖关系进行梳理,避免ODPS所存在的包在对应的依赖中,进而引起jar包冲突,并且打包时打成shaded包,避免缺失遗漏对应的依赖。
原文链接
本文为阿里云原创内容,未经允许不得转载。


 598
598


 被折叠的 条评论
为什么被折叠?
被折叠的 条评论
为什么被折叠?
 到【灌水乐园】发言


