


本文实现一个spring+zookeeper+dubbo的使用实例,本文实现创建一个简单的服务接口。然后在dubbo的服务端实现该接口并向zookeeper服务器进行注册,客户端向zookeeper服务器订阅该接口并使用。zookeeper和dubbo的环境搭建和测试可以查阅http://blog.csdn.net/smilefyx/article/details/70992427博客中的简述。
个人觉得比较好的博文推荐如下:
http://www.cnblogs.com/linjiqin/p/5859153.html
http://doc.okbase.net/congcong68/archive/112508.html
http://dubbo.io/User+Guide-zh.htm
1、添加主要依赖
添加dubbo的依赖,相关依赖如下:
		<dependency>
			<groupId>com.alibaba</groupId>
			<artifactId>dubbo</artifactId>
			<version>2.5.3</version>
		</dependency>
		<dependency>
			<groupId>org.apache.zookeeper</groupId>
			<artifactId>zookeeper</artifactId>
			<version>3.4.6</version>
		</dependency>
		<dependency>
			<groupId>com.github.sgroschupf</groupId>
			<artifactId>zkclient</artifactId>
			<version>0.1</version>
		</dependency>
2、创建测试服务器接口
创建如下接口,该接口中仅定义了一个hello的方法。源码如下:
package cn.landsem.dubbo;

public interface ITestRegistryService {
	public String hello(String name);
}
3、服务器端实现接口
在服务器端对第一步中定义的接口进行实现,源码如下:
package cn.landsem.dubbo.impl;

import org.apache.log4j.Logger;
import org.springframework.stereotype.Service;

import cn.landsem.dubbo.ITestRegistryService;

@Service("testRegistryServiceImpl")
public class TestRegistryServiceImpl implements ITestRegistryService{
	Logger logger = Logger.getLogger(TestRegistryServiceImpl.class);

	public String hello(String name) {
		logger.info("Say hello.");
		return "hello!"+name;
	}

}
4、创建dubbo用于注册或订阅的配置文件
4.1、服务器端向zookeeper注册配置的配置
在类路径下创建applicationContext-dubbo.xml配置用于配置dubbo服务,该文件的源码如下:
<?xml version="1.0" encoding="UTF-8"?>
<beans xmlns="http://www.springframework.org/schema/beans"
	xmlns:xsi="http://www.w3.org/2001/XMLSchema-instance" xmlns:p="http://www.springframework.org/schema/p"
	xmlns:aop="http://www.springframework.org/schema/aop" xmlns:context="http://www.springframework.org/schema/context"
	xmlns:jee="http://www.springframework.org/schema/jee" xmlns:tx="http://www.springframework.org/schema/tx"
	xmlns:mvc="http://www.springframework.org/schema/mvc" xmlns:dubbo="http://code.alibabatech.com/schema/dubbo"
	xsi:schemaLocation="
        http://www.springframework.org/schema/aop http://www.springframework.org/schema/aop/spring-aop-4.3.xsd
		http://www.springframework.org/schema/beans http://www.springframework.org/schema/beans/spring-beans-4.3.xsd
		http://www.springframework.org/schema/context http://www.springframework.org/schema/context/spring-context-4.3.xsd
		http://www.springframework.org/schema/jee http://www.springframework.org/schema/jee/spring-jee-4.3.xsd
		http://www.springframework.org/schema/tx http://www.springframework.org/schema/tx/spring-tx-4.3.xsd
		http://www.springframework.org/schema/mvc http://www.springframework.org/schema/mvc/spring-mvc-4.3.xsd
		http://code.alibabatech.com/schema/dubbo http://code.alibabatech.com/schema/dubbo/dubbo.xsd
		">
	<!-- 提供方应用名称信息,这个相当于起一个名字,我们dubbo管理页面比较清晰是哪个应用暴露出来的 -->
	<dubbo:application name="dubbo_provider"></dubbo:application>
	<!-- 使用zookeeper注册中心暴露服务地址 -->
	<dubbo:registry address="zookeeper://127.0.0.1:2181"  check="false" subscribe="false" register=""></dubbo:registry>
	<!-- 要暴露的服务接口 -->
	<dubbo:service interface="cn.landsem.dubbo.ITestRegistryService" ref="testRegistryServiceImpl" />
</beans>
4.2、客户端向zookeeper订阅服务的配置
在类路径下创建clienttest-applicationContext-dubbo.xml配置文件用于配置工程向zookeeper服务器订阅步骤2中注册的服务,该文件的源码如下:
<?xml version="1.0" encoding="UTF-8"?>
<beans xmlns="http://www.springframework.org/schema/beans"
	xmlns:xsi="http://www.w3.org/2001/XMLSchema-instance" xmlns:p="http://www.springframework.org/schema/p"
	xmlns:aop="http://www.springframework.org/schema/aop" xmlns:context="http://www.springframework.org/schema/context"
	xmlns:jee="http://www.springframework.org/schema/jee" xmlns:tx="http://www.springframework.org/schema/tx"
	xmlns:mvc="http://www.springframework.org/schema/mvc" xmlns:dubbo="http://code.alibabatech.com/schema/dubbo"
	xsi:schemaLocation="
        http://www.springframework.org/schema/aop http://www.springframework.org/schema/aop/spring-aop-4.3.xsd
		http://www.springframework.org/schema/beans http://www.springframework.org/schema/beans/spring-beans-4.3.xsd
		http://www.springframework.org/schema/context http://www.springframework.org/schema/context/spring-context-4.3.xsd
		http://www.springframework.org/schema/jee http://www.springframework.org/schema/jee/spring-jee-4.3.xsd
		http://www.springframework.org/schema/tx http://www.springframework.org/schema/tx/spring-tx-4.3.xsd
		http://www.springframework.org/schema/mvc http://www.springframework.org/schema/mvc/spring-mvc-4.3.xsd
		http://code.alibabatech.com/schema/dubbo http://code.alibabatech.com/schema/dubbo/dubbo.xsd
		">
	<!-- 提供方应用名称信息,这个相当于起一个名字,我们dubbo管理页面比较清晰是哪个应用暴露出来的 -->
	<dubbo:application name="dubbo_customer"></dubbo:application>
	<!-- 使用zookeeper注册中心暴露服务地址 -->
	<dubbo:registry address="zookeeper://127.0.0.1:2181"  check="false" subscribe="true" register="false"></dubbo:registry>
	<dubbo:reference id="testRegistryServiceImpl" interface="cn.landsem.dubbo.ITestRegistryService" />
</beans>
5、创建基于java的配置类
5.1、服务器端java配置类
创建一个基于java注解的配置类用于加载xml的配置文件以及实现服务的自动扫描和bean创建。如下为服务器端配置类的源代码:
package cn.landsem.configuration;

import org.springframework.context.annotation.ComponentScan;
import org.springframework.context.annotation.Configuration;
import org.springframework.context.annotation.EnableAspectJAutoProxy;
import org.springframework.context.annotation.ImportResource;

@Configuration
@EnableAspectJAutoProxy
@ComponentScan({"cn.landsem.dubbo.impl"})
@ImportResource("classpath:applicationContext-dubbo.xml")
public class RootConfiguration {

}
5.2、客户端java配置类
创建一个基于java注解的配置类用于加载客户端的xml配置文件,如下为配置类的源代码:
package cn.landsem.configuration;

import org.springframework.context.annotation.Configuration;
import org.springframework.context.annotation.EnableAspectJAutoProxy;
import org.springframework.context.annotation.ImportResource;

@Configuration
@EnableAspectJAutoProxy
@ImportResource("classpath:clienttest-applicationContext-dubbo.xml")
public class TestConfiguration {

}
6、创建测试类
6.1、服务端注册服务测试类
这里创建两个类,一个基类用于加载相关配置(服务器端使用RootConfiguration的java配置类),一个子类继承基类的配置并完成具体的测试工作,方便后续扩展。基类的源码如下:
package cn.landsem.tester;

import org.junit.runner.RunWith;
import org.springframework.test.context.ContextConfiguration;
import org.springframework.test.context.junit4.SpringJUnit4ClassRunner;
import org.springframework.test.context.web.WebAppConfiguration;

import cn.landsem.configuration.RootConfiguration;

@RunWith(SpringJUnit4ClassRunner.class)
@ContextConfiguration(classes = {RootConfiguration.class})
@WebAppConfiguration
public class BaseServerTest {
}
子类的功能比较简单,就是启动后等待用户输入任意键后退出。源代码如下:
package cn.landsem.tester.impl;

import java.io.BufferedReader;
import java.io.IOException;
import java.io.InputStreamReader;

import org.apache.log4j.Logger;
import org.junit.Test;

import cn.landsem.tester.BaseServerTest;

public class ServerTester extends BaseServerTest{
	private Logger logger = Logger.getLogger(BaseServerTest.class);

	@Test
	public void test() {
        try {
    		logger.info("Wait input to exit.");
            InputStreamReader is_reader = new InputStreamReader(System.in);
			new BufferedReader(is_reader).readLine();
		} catch (IOException e) {
			// TODO Auto-generated catch block
			e.printStackTrace();
		}
	}
}
6.2、客户端测试类
客户端也分开为测试的基类和子类,基类负责加载配置(客户端加载TestConfiguration的配置类),源码如下:
package cn.landsem.tester;

import org.junit.runner.RunWith;
import org.springframework.test.context.ContextConfiguration;
import org.springframework.test.context.junit4.SpringJUnit4ClassRunner;
import org.springframework.test.context.web.WebAppConfiguration;

import cn.landsem.configuration.TestConfiguration;

@RunWith(SpringJUnit4ClassRunner.class)
@ContextConfiguration(classes = {TestConfiguration.class})
@WebAppConfiguration
public class BaseClientTest {

}
子类的功能也比较简单,注入服务,然后做一个回声测试,然后等待用户输入任意键后退出测试。相关源码如下:
package cn.landsem.tester.impl;

import java.io.BufferedReader;
import java.io.IOException;
import java.io.InputStreamReader;

import org.apache.log4j.Logger;
import org.junit.Test;
import org.springframework.beans.factory.annotation.Autowired;

import cn.landsem.dubbo.ITestRegistryService;
import cn.landsem.tester.BaseClientTest;

import com.alibaba.dubbo.rpc.service.EchoService;

public class ClientTester extends BaseClientTest{
	private Logger logger = Logger.getLogger(ClientTester.class);

	@Autowired
	private ITestRegistryService mDubboTest;

	@Test
	public void test() {
        try {
        	logger.info("dubbo server="+mDubboTest.hello("123"));
        	EchoService echoService = (EchoService) mDubboTest;
        	Object status = echoService.$echo("OK");
        	assert(status.equals("OK"));
    		logger.info("Wait input to exit.");
            InputStreamReader is_reader = new InputStreamReader(System.in);
			new BufferedReader(is_reader).readLine();
		} catch (IOException e) {
			// TODO Auto-generated catch block
			e.printStackTrace();
		}
	}

}
7、运行测试
首先运行测试工程钱需先运行zookeeper工程,如果需要查看后台,需要运行dubbo-admin的web工程,具体见http://blog.csdn.net/smilefyx/article/details/70992427博客中的简述。
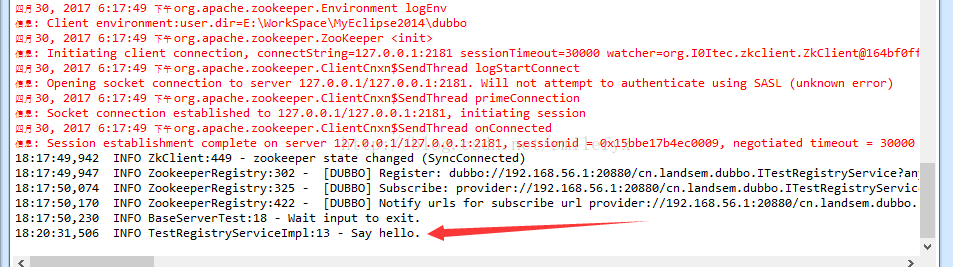
7.1、运行服务器端测试
点击ServerTester的java文件,右键Run As -- JUnit Test运行测试。运行成功后输出如下:

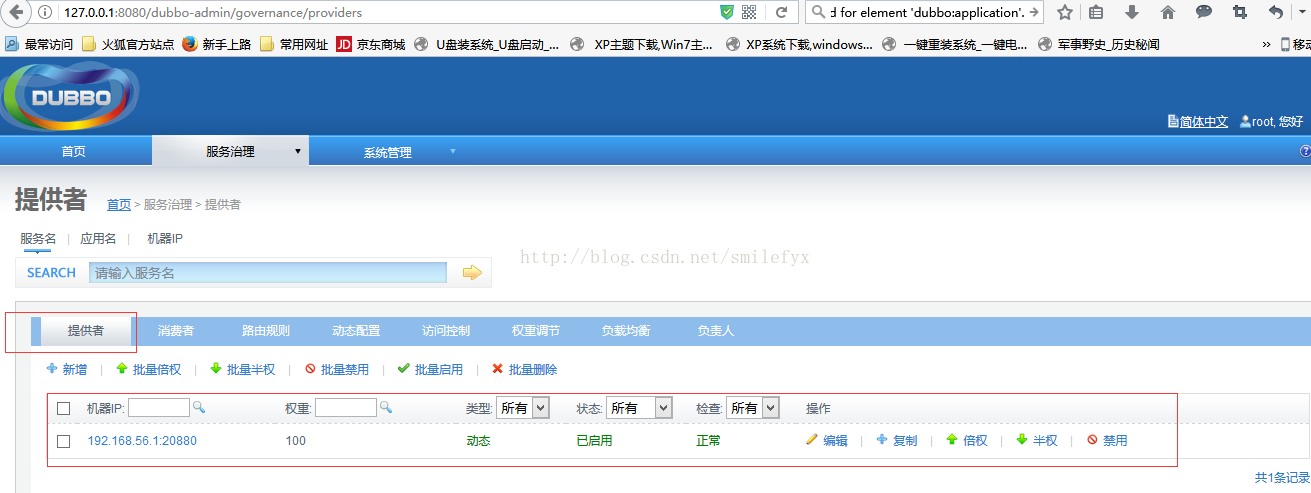
此时登录dubbo-admin管理界面,可以查看到已经成功注册了一个服务到zookeeper中。如图
7.2、运行客户端测试
点击ClientTester的java类并奕junit测试运行,运行成功后输出如下:
8、常见问题
(1)、找不到dubbo.xsd文件
从https://github.com/alibaba/dubbo下载源代码,然后在其中搜索找到dubbo.xsd的文件,将该文件拷贝到工程类目录下,打开myeclipse--window---preference,搜索xml,并找到XML Catalog选项。点击右侧的Add按钮,输入key为如下内容
http://code.alibabatech.com/schema/dubbo/dubbo.xsd(2)、org.apache.catalina.LifecycleException
在整合Spring工程后,启动工程你可能会遇到工程向你抛出org.apache.catalina.LifecycleException的异常并停止运行。最终引发异常的原因可能时找不到Spring某个jar包中的某个方法。如类似下面的错误:
严重: ContainerBase.addChild: start:
org.apache.catalina.LifecycleException: Failed to start component [StandardEngine[Catalina].StandardHost[localhost].StandardContext[/aop]]
	at org.apache.catalina.util.LifecycleBase.start(LifecycleBase.java:162)
	at org.apache.catalina.core.ContainerBase.addChildInternal(ContainerBase.java:899)
	at org.apache.catalina.core.ContainerBase.addChild(ContainerBase.java:875)
	at org.apache.catalina.core.StandardHost.addChild(StandardHost.java:652)
	at org.apache.catalina.startup.HostConfig.deployDirectory(HostConfig.java:1260)
	at org.apache.catalina.startup.HostConfig$DeployDirectory.run(HostConfig.java:2002)
	at java.util.concurrent.Executors$RunnableAdapter.call(Executors.java:471)
	at java.util.concurrent.FutureTask.run(FutureTask.java:262)
	at java.util.concurrent.ThreadPoolExecutor.runWorker(ThreadPoolExecutor.java:1145)
	at java.util.concurrent.ThreadPoolExecutor$Worker.run(ThreadPoolExecutor.java:615)
	at java.lang.Thread.run(Thread.java:744)
Caused by: java.lang.NoSuchMethodError: org.springframework.core.annotation.AnnotationAwareOrderComparator.sort(Ljava/util/List;)V
	at org.springframework.web.SpringServletContainerInitializer.onStartup(SpringServletContainerInitializer.java:167)
	at org.apache.catalina.core.StandardContext.startInternal(StandardContext.java:5623)
	at org.apache.catalina.util.LifecycleBase.start(LifecycleBase.java:145)
	... 10 more
五月 11, 2017 3:14:35 下午 org.apache.catalina.startup.HostConfig deployDirectory
严重: Error deploying web application directory D:\tomcat\apache-tomcat-7_0_75_1\webapps\aop
java.lang.IllegalStateException: ContainerBase.addChild: start: org.apache.catalina.LifecycleException: Failed to start component [StandardEngine[Catalina].StandardHost[localhost].StandardContext[/aop]]
	at org.apache.catalina.core.ContainerBase.addChildInternal(ContainerBase.java:903)
	at org.apache.catalina.core.ContainerBase.addChild(ContainerBase.java:875)
	at org.apache.catalina.core.StandardHost.addChild(StandardHost.java:652)
	at org.apache.catalina.startup.HostConfig.deployDirectory(HostConfig.java:1260)
	at org.apache.catalina.startup.HostConfig$DeployDirectory.run(HostConfig.java:2002)
	at java.util.concurrent.Executors$RunnableAdapter.call(Executors.java:471)
	at java.util.concurrent.FutureTask.run(FutureTask.java:262)
	at java.util.concurrent.ThreadPoolExecutor.runWorker(ThreadPoolExecutor.java:1145)
	at java.util.concurrent.ThreadPoolExecutor$Worker.run(ThreadPoolExecutor.java:615)
at java.lang.Thread.run(Thread.java:744) <dependency>
<groupId>com.alibaba</groupId>
<artifactId>dubbo</artifactId>
<version>2.5.3</version>
<exclusions>
<exclusion>
<artifactId>spring</artifactId>
<groupId>org.springframework</groupId>
</exclusion>
</exclusions>
</dependency>注意:由于上传的源码只是使用了简单的spring特性,而且上传时候没考虑到这个问题,所有并没有做dubbo自带spring的排除。希望下载源码的人看到这里的提醒。
9、源码下载
本实例源码可以从如下地址进行下载http://download.csdn.net/detail/yxtouch/9829802


 被折叠的 条评论
为什么被折叠?
被折叠的 条评论
为什么被折叠?
 到【灌水乐园】发言


