


- concepts and flow
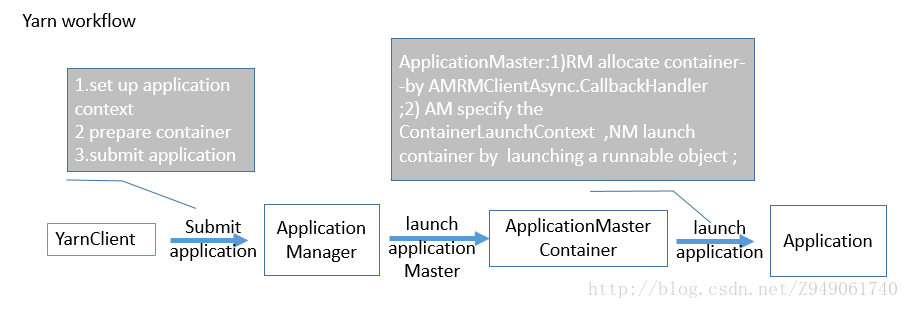
一个应用提交客户端想YARN RM提交应用。这可以通过设置YarnClient对象来完成。在YarnClient建立后,这个客户端设置应用上下文,准备这个应用的包含AM的第一个container,然后提交应用。你需要提供信息,比如应用允许需要的本地文件/jars的细节,执行的实际命令(包括必须的命令行参数),一些操作系统环境设置(可选的)等等。实际上,你需要描述下applicationMaster中执行的Unix进程。
YARN RM会在分配的container中启动applicationMaster。applicationMaster和YARN集群沟通,完成应用执行。它用异步的方式完成操作。在启动应用期间,applicationMaster的主要任务时:a)和RM沟通协商和分配未来的container资源;b)container分配后,和YARN NodeManager沟通启动container。任务a)可以通过AMRMClientAsync对象异步地执行,使用AMRMClientAsync.CallbackHandler类型的事件处理器指定的事件处理方法。这个事件处理器需要显示地设定给客户端。任务b)可以在分配container后,通过启动一个runnable对象启动container。作为启动container的一部分,AM必须指定ContainerLaunchContext,它有启动信息比如命令行说明、环境等。
在应用执行期间,AM通过NMClientAsync 对象和NM沟通。所有的container事件由和NMClientAsync相关的NMClientAsync.CallbackHandler处理。一个典型的callback处理器处理客户端start/stop/status update和error。AM通过处理AMRMClientAsync.CallbackHandler的getProgress()方法向RM报告执行进度。
除了异步客户端,特定工作流程(AMRMClient和NMClient)也有同步版本。推荐异步客户端是因为主观上更简单的用法,这篇也主要说明异步客户端。可以参考AMRMCLient和NMClient获取更多同步客户端的信息。
- interfaces write a simple YARN application
- Client<–>RM : YarnClient
- AM<–>RM : AMRMClientAsync
- AM<–>NM : NMClientAsync
Note: - YARN应用的三个主要协议(ApplicationClientProtocol, ApplicationMasterProtocol and ContainerManagementProtocol)还在维护中。这三个客户端隐藏了三个协议,为YARN应用提供更简单的编程模型。
- 很少情况下,程序员或许想要直接使用三个协议来实现应用。但是,请注意对于一般的情况这样的行为不再鼓励。
- FAQ
Writing a simple YARN application
- writing a simple client
- client第一步要做的是初始化和启动YarnClient
YarnClient yarnClient = YarnClient.createYarnClient();
 yarnClient.init(conf);
yarnClient.start(); - 一旦生成client,client需要生成一个application,然后得到application id。
YarnClientApplication app = yarnClient.createApplication();
GetNewApplicationResponse appResponse = app.getNewApplicationResponse(); - 来自新application的YarnClientApplication的response也包含集群的信息,比如集群的最小/大资源能力。这样你可以正确地设置container的参数。请参考GetNewApplicationResponse获取更多细节。
- client的关键是设置ApplicationSubmissionContext,它定义了RM启动AM所需要的所有信息。client需要把以下设置进context:
- application info :id,name
- 队列,优先级信息:应用要提交到的队列,为应用分配的优先级
- 用户:提交应用的用户
- ContainerLaunchContext:定义了启动和运行AM所在的container,定义了运行application所需的所有信息比如本地资源(binaries,jars,files等等)、环境设置(CLASSPATH等)、要执行的命令和安全Token(RECT)。
 // set the application submission context
 ApplicationSubmissionContext appContext = app.getApplicationSubmissionContext();
 ApplicationId appId = appContext.getApplicationId();
 appContext.setKeepContainersAcrossApplicationAttempts(keepContainers);
 appContext.setApplicationName(appName);
 // set local resources for the application master
 // local files or archives as needed
 // In this scenario, the jar file for the application master is part of the local resources
 Map<String, LocalResource> localResources = new HashMap<String, LocalResource>();
 LOG.info("Copy App Master jar from local filesystem and add to local environment");
 // Copy the application master jar to the filesystem
 // Create a local resource to point to the destination jar path
 FileSystem fs = FileSystem.get(conf);
 addToLocalResources(fs, appMasterJar, appMasterJarPath, appId.toString(),
 localResources, null);
 // Set the log4j properties if needed
 if (!log4jPropFile.isEmpty()) {
 addToLocalResources(fs, log4jPropFile, log4jPath, appId.toString(),
 localResources, null);
 }
 // The shell script has to be made available on the final container(s)
 // where it will be executed.
 // To do this, we need to first copy into the filesystem that is visible
 // to the yarn framework.
 // We do not need to set this as a local resource for the application
 // master as the application master does not need it.
 String hdfsShellScriptLocation = "";
 long hdfsShellScriptLen = 0;
 long hdfsShellScriptTimestamp = 0;
 if (!shellScriptPath.isEmpty()) {
 Path shellSrc = new Path(shellScriptPath);
 String shellPathSuffix =
 appName + "/" + appId.toString() + "/" + SCRIPT_PATH;
 Path shellDst =
 new Path(fs.getHomeDirectory(), shellPathSuffix);
 fs.copyFromLocalFile(false, true, shellSrc, shellDst);
 hdfsShellScriptLocation = shellDst.toUri().toString();
 FileStatus shellFileStatus = fs.getFileStatus(shellDst);
 hdfsShellScriptLen = shellFileStatus.getLen();
 hdfsShellScriptTimestamp = shellFileStatus.getModificationTime();
 }
 if (!shellCommand.isEmpty()) {
 addToLocalResources(fs, null, shellCommandPath, appId.toString(),
 localResources, shellCommand);
 }
 if (shellArgs.length > 0) {
 addToLocalResources(fs, null, shellArgsPath, appId.toString(),
 localResources, StringUtils.join(shellArgs, " "));
 }
 // Set the env variables to be setup in the env where the application master will be run
 LOG.info("Set the environment for the application master");
 Map<String, String> env = new HashMap<String, String>();
 // put location of shell script into env
 // using the env info, the application master will create the correct local resource for the
 // eventual containers that will be launched to execute the shell scripts
 env.put(DSConstants.DISTRIBUTEDSHELLSCRIPTLOCATION, hdfsShellScriptLocation);
 env.put(DSConstants.DISTRIBUTEDSHELLSCRIPTTIMESTAMP, Long.toString(hdfsShellScriptTimestamp));
 env.put(DSConstants.DISTRIBUTEDSHELLSCRIPTLEN, Long.toString(hdfsShellScriptLen));
 // Add AppMaster.jar location to classpath
 // At some point we should not be required to add
 // the hadoop specific classpaths to the env.
 // It should be provided out of the box.
 // For now setting all required classpaths including
 // the classpath to "." for the application jar
 StringBuilder classPathEnv = new StringBuilder(Environment.CLASSPATH.$$()).append(ApplicationConstants.CLASS_PATH_SEPARATOR).append("./*"); for (String c : conf.getStrings(YarnConfiguration.YARN_APPLICATION_CLASSPATH,YarnConfiguration.DEFAULT_YARN_CROSS_PLATFORM_APPLICATION_CLASSPATH)) {classPathEnv.append(ApplicationConstants.CLASS_PATH_SEPARATOR); classPathEnv.append(c.trim()); }classPathEnv.append(ApplicationConstants.CLASS_PATH_SEPARATOR).append( "./log4j.properties"); // Set the necessary command to execute the application master Vector<CharSequence> vargs = new Vector<CharSequence>(30); // Set java executable command LOG.info("Setting up app master command"); vargs.add(Environment.JAVA_HOME.$$() + "/bin/java");
 // Set Xmx based on am memory size
 vargs.add("-Xmx" + amMemory + "m");
 // Set class name
 vargs.add(appMasterMainClass);
 // Set params for Application Master
 vargs.add("--container_memory " + String.valueOf(containerMemory));
 vargs.add("--container_vcores " + String.valueOf(containerVirtualCores));
 vargs.add("--num_containers " + String.valueOf(numContainers));
 vargs.add("--priority " + String.valueOf(shellCmdPriority));
 for (Map.Entry<String, String> entry : shellEnv.entrySet()) {
 vargs.add("--shell_env " + entry.getKey() + "=" + entry.getValue());
 }
 if (debugFlag) {
 vargs.add("--debug");
 }
 vargs.add("1>" + ApplicationConstants.LOG_DIR_EXPANSION_VAR + "/AppMaster.stdout");
 vargs.add("2>" + ApplicationConstants.LOG_DIR_EXPANSION_VAR + "/AppMaster.stderr");
 // Get final command
 StringBuilder command = new StringBuilder();
 for (CharSequence str : vargs) {
 command.append(str).append(" ");
 }
 LOG.info("Completed setting up app master command " + command.toString());
 List<String> commands = new ArrayList<String>();
 commands.add(command.toString());
 // Set up the container launch context for the application master
 ContainerLaunchContext amContainer = ContainerLaunchContext.newInstance(
 localResources, env, commands, null, null, null);// Set up resource type requirements
 // For now, both memory and vcores are supported, so we set memory and
 // vcores requirements
 Resource capability = Resource.newInstance(amMemory, amVCores);
 appContext.setResource(capability);
 // Service data is a binary blob that can be passed to the application
 // Not needed in this scenario
 // amContainer.setServiceData(serviceData);
 // Setup security tokens
 if (UserGroupInformation.isSecurityEnabled()) {
 // Note: Credentials class is marked as LimitedPrivate for HDFS and MapReduce
 Credentials credentials = new Credentials();
 String tokenRenewer = conf.get(YarnConfiguration.RM_PRINCIPAL);
 if (tokenRenewer == null | | tokenRenewer.length() == 0) {
 throw new IOException(
 "Can't get Master Kerberos principal for the RM to use as renewer");
 }
 // For now, only getting tokens for the default file-system.
 final Token<?> tokens[] =
 fs.addDelegationTokens(tokenRenewer, credentials);
 if (tokens != null) {
 for (Token<?> token : tokens) {
 LOG.info("Got dt for " + fs.getUri() + "; " + token);
 }
 }
 DataOutputBuffer dob = new DataOutputBuffer();
 credentials.writeTokenStorageToStream(dob);
 ByteBuffer fsTokens = ByteBuffer.wrap(dob.getData(), 0, dob.getLength());
 amContainer.setTokens(fsTokens);
 }
 appContext.setAMContainerSpec(amContainer);
- 设置流程完成后,client就准备用指定的优先级和队列提交application。
// Set the priority for the application master
 Priority pri = Priority.newInstance(amPriority);
 appContext.setPriority(pri);
 // Set the queue to which this application is to be submitted in the RM
 appContext.setQueue(amQueue);
 // Submit the application to the applications manager
 // SubmitApplicationResponse submitResp = applicationsManager.submitApplication(appRequest);
 yarnClient.submitApplication(appContext);
- 这时RM已经接受了application,在后台RM会分配container,然后在container中设置和启动AM。
- client有很多方式跟踪实际任务的进度。
- client可以和RM沟通,通过YARNClient.getApplicationReport()方法要求应用的报告。
// Get application report for the appId we are interested in
ApplicationReport report = yarnClient.getApplicationReport(appId); - 从RM收到的ApplicationReport由以下组成:
- 一般应用信息:application id,提交至的队列,提交应用的用户和应用开始时间。
- AM细节:AM所在的主机,监听client请求的rpc端口,client和AM沟通所需要的token。
- 应用跟踪信息:如果应用支持进度跟踪,可以设置通过ApplicationReport’s getTrackingUrl()方法获取的跟踪url,client可以据此查看进度。
- 应用状态:RM看到的应用状态可以通过ApplicationReport#getYarnApplicationState获得。如果YarnApplicationState 被设为结束,client应该参考ApplicationReport#getFinalApplicationStatus来确认应用任务自身实际的成功/失败。在失败的情况下,ApplicationReport#getDiagnostics 可以提供一些失败信息。
- 如果AM支持,client可以直接查询AM自己来获得进度更新,通过从application report获得的host:rpcport信息。如果可用,也可使用从报告中获取的跟踪url。
- client可以和RM沟通,通过YARNClient.getApplicationReport()方法要求应用的报告。
- 在特定情况下,如果应用花费了太长时间或者其他原因,client想要杀死应用。YARNClient支持killApplication调用来通过RM发送kill信号给AM。
yarnClient.killApplication(appId);
- client第一步要做的是初始化和启动YarnClient
Writing an ApplicationMaster
- AM是任务的真正所有者。RM启动AM,并通过client提供所有关于监督和完成任务所必需的信息和资源。
- 当AM在一个container中启动,这个container或许和其他container共享一个物理主机,考虑到多租户特性,在其他事项中,不能假设其在监听之前配置的端口。
- 当AM启动,很多参数可以通过环境获得。包括containerID,应用提交时间和关于NM主机运行AM的细节。参考ApplicationConstants获取参数名称。
- 所有和RM的交互都需要ApplicationAttemptID(为防止失败每个应用可以有多个attempt)。ApplicationAttemptID可以通过AM的containerid获得。helper APIs可以把从环境获得的值转化成对象。
Map<String, String> envs = System.getenv();
 String containerIdString =
 envs.get(ApplicationConstants.AM_CONTAINER_ID_ENV);
 if (containerIdString == null) {
 // container id should always be set in the env by the framework
 throw new IllegalArgumentException(
 "ContainerId not set in the environment");
 }
 ContainerId containerId = ConverterUtils.toContainerId(containerIdString);
ApplicationAttemptId appAttemptID = containerId.getApplicationAttemptId(); - AM完全初始化后,可以启动两个客户端:one to RM,one to NM。可设置客户端自定义事件处理器。
 AMRMClientAsync.CallbackHandler allocListener = new RMCallbackHandler();
 amRMClient = AMRMClientAsync.createAMRMClientAsync(1000, allocListener);
 amRMClient.init(conf);
 amRMClient.start();
 containerListener = createNMCallbackHandler();
 nmClientAsync = new NMClientAsyncImpl(containerListener);
 nmClientAsync.init(conf);
 nmClientAsync.start();
- AM必须向RM发送心跳以使RM知道AM是活的。RM的失效超时间隔由配置YarnConfiguration.RM_AM_EXPIRY_INTERVAL_MS来定义,默认是 YarnConfiguration.DEFAULT_RM_AM_EXPIRY_INTERVAL_MS。AM需要向RM注册来开始心跳。
// Register self with ResourceManager
 // This will start heartbeating to the RM
 appMasterHostname = NetUtils.getHostname();
 RegisterApplicationMasterResponse response = amRMClient
 .registerApplicationMaster(appMasterHostname, appMasterRpcPort,
 appMasterTrackingUrl);
在注册的回复中有最大的资源能力,如果存在。你或许想用这个来检查应用的请求。
// Dump out information about cluster capability as seen by the
// resource manager
int maxMem = response.getMaximumResourceCapability().getMemory();
LOG.info("Max mem capability of resources in this cluster " + maxMem);
int maxVCores = response.getMaximumResourceCapability().getVirtualCores();
LOG.info("Max vcores capability of resources in this cluster " + maxVCores);
// A resource ask cannot exceed the max.
if (containerMemory > maxMem) {
LOG.info("Container memory specified above max threshold of cluster."
+ " Using max value." + ", specified=" + containerMemory + ", max="
+ maxMem);
containerMemory = maxMem;
}
if (containerVirtualCores > maxVCores) {
LOG.info("Container virtual cores specified above max threshold of  cluster."
+ " Using max value." + ", specified=" + containerVirtualCores + ", max="
+ maxVCores);
containerVirtualCores = maxVCores;
}
List<Container> previousAMRunningContainers =
response.getContainersFromPreviousAttempts();
LOG.info("Received " + previousAMRunningContainers.size()
+ " previous AM's running containers on AM registration.");
基于任务需求,AM可以申请container集来运行它的任务。我们现在可以计算我们需要多少container,然后申请container。
List<Container> previousAMRunningContainers =
 response.getContainersFromPreviousAttempts();
 LOG.info("Received " + previousAMRunningContainers.size() + "previous AM's running containers on AM registration.");
 int numTotalContainersToRequest =
 numTotalContainers - previousAMRunningContainers.size();
 // Setup ask for containers from RM
 // Send request for containers to RM
 // Until we get our fully allocated quota, we keep on polling RM for
 // containers
 // Keep looping until all the containers are launched and shell script
 // executed on them ( regardless of success/failure).
 for (int i = 0; i < numTotalContainersToRequest; ++i) {
 ContainerRequest containerAsk = setupContainerAskForRM();
 amRMClient.addContainerRequest(containerAsk);
}- 在setupContainerAskForRM()中,以下两个需要设置:
- 资源能力:当前YARN基于资源需求支持内存,所以请求应该定义需要多少内存。值以MB为单位,必须少于集群的最大能力,必须是最小能力的整数倍。内存资源和施加到任务的container的物理内存限制有关。
- 优先级:当申请container集时,AM会给container定义不同的优先级。比如,Map-Reduce AM会指定较高优先级给Map任务需要的container,给较低的优先级给reduce任务的container。
 private ContainerRequest setupContainerAskForRM() {
 // setup requirements for hosts
 // using * as any host will do for the distributed shell app
 // set the priority for the request
 Priority pri = Priority.newInstance(requestPriority);
 // Set up resource type requirements
 // For now, memory and CPU are supported so we set memory and cpu requirements
 Resource capability = Resource.newInstance(containerMemory,
 containerVirtualCores);
 ContainerRequest request = new ContainerRequest(capability, null, null,
 pri);
 LOG.info("Requested container ask: " + request.toString());
 return request;
 }
在application manager发出container分配需求后,container会由AMRMClientAsync客户端的事件处理器异步地启动。这个处理器应该器应该实现AMRMClientAsync.CallbackHandler接口。
当有container被分配后,处理器设置线程,运行代码来启动container。这里我们使用LaunchContainerRunnable来说明。我们UI在文章的下面部分讨论LaunchContainerRunnable类。
public void onContainersAllocated(List<Container> allocatedContainers) {
LOG.info("Got response from RM for container ask, allocatedCnt="
+ allocatedContainers.size());
numAllocatedContainers.addAndGet(allocatedContainers.size());
for (Container allocatedContainer : allocatedContainers) {
LaunchContainerRunnable runnableLaunchContainer =
new LaunchContainerRunnable(allocatedContainer, containerListener);
Thread launchThread = new Thread(runnableLaunchContainer);
// launch and start the container on a separate thread to keep
// the main thread unblocked
// as all containers may not be allocated at one go.
launchThreads.add(launchThread);
launchThread.start();
}
}
一心跳,事件处理器就报告应用的进度。
public float getProgress() {
// set progress to deliver to RM on next heartbeat
float progress = (float) numCompletedContainers.get()
/ numTotalContainers;
return progress;
}
- 启动container的线程实际上在NM上启动container。在container分配给AM后,container需要执行client为在其上运行最终任务而设置ContainerLaunchContext时执行的流程。一旦ContainerLaunchContext定义后,AM可以通过NMClientAsync开始它。
// Set the necessary command to execute on the allocated container
 Vector<CharSequence> vargs = new Vector<CharSequence>(5);
 // Set executable command
 vargs.add(shellCommand);
 // Set shell script path
 if (!scriptPath.isEmpty()) {
 vargs.add(Shell.WINDOWS ? ExecBatScripStringtPath : ExecShellStringPath);
 }
 // Set args for the shell command if any
 vargs.add(shellArgs);
 // Add log redirect params
 vargs.add("1>" + ApplicationConstants.LOG_DIR_EXPANSION_VAR + "/stdout");
 vargs.add("2>" + ApplicationConstants.LOG_DIR_EXPANSION_VAR + "/stderr");
 // Get final command
 StringBuilder command = new StringBuilder();
 for (CharSequence str : vargs) {
 command.append(str).append(" ");
 }
 List<String> commands = new ArrayList<String>();
 commands.add(command.toString());
 // Set up ContainerLaunchContext, setting local resource, environment,
 // command and token for constructor.
 // Note for tokens: Set up tokens for the container too. Today, for normal
 // shell commands, the container in distribute-shell doesn't need any
 // tokens. We are populating them mainly for NodeManagers to be able to
 // download anyfiles in the distributed file-system. The tokens are
 // otherwise also useful in cases, for e.g., when one is running a
 // "hadoop dfs" command inside the distributed shell.
 ContainerLaunchContext ctx = ContainerLaunchContext.newInstance(
 localResources, shellEnv, commands, null, allTokens.duplicate(), null);
 containerListener.addContainer(container.getId(), container);
 nmClientAsync.startContainerAsync(container, ctx);
- NMClientAsync对象和它的事件处理器,处理container事件。包括container start,stop,status update和报错。
- 在AM确定工作结束后,它需要通过AM-RM client移除注册,关闭client。
try {
 amRMClient.unregisterApplicationMaster(appStatus, appMessage, null);
 } catch (YarnException ex) {
 LOG.error("Failed to unregister application", ex);
 } catch (IOException e) {
 LOG.error("Failed to unregister application", e);
 }
 amRMClient.stop();
- writing a simple client
sample code


10-08
 1192
1192
1192
11-19
3110
3110
12-28
1191
1191

 被折叠的 条评论
为什么被折叠?
被折叠的 条评论
为什么被折叠?
 到【灌水乐园】发言


