


续上篇,在Flux后,为了更好的实现MVC,Redux模式出现。
不同于 Flux ,Redux 不再有 dispatcher 的概念(Store已经集成了dispatch方法)。其次它依赖纯函数来替代事件处理器(即原来Flux中Dispatcher.register((action) 注册逻辑处理这块),这个纯函数叫做Reducer。另外使用到了一个新概念 context ,在React 组件间,数据是通过 props 属性由上向下(由父及子)进行传递的,当遇到多个层级多个组件间共享一个props,这种树形的由上而下的传参方式就显得过于繁琐,context 便很巧妙的解决了这个问题,参数只需从树顶点设置一次,便可在其所有枝节点都能共享到。
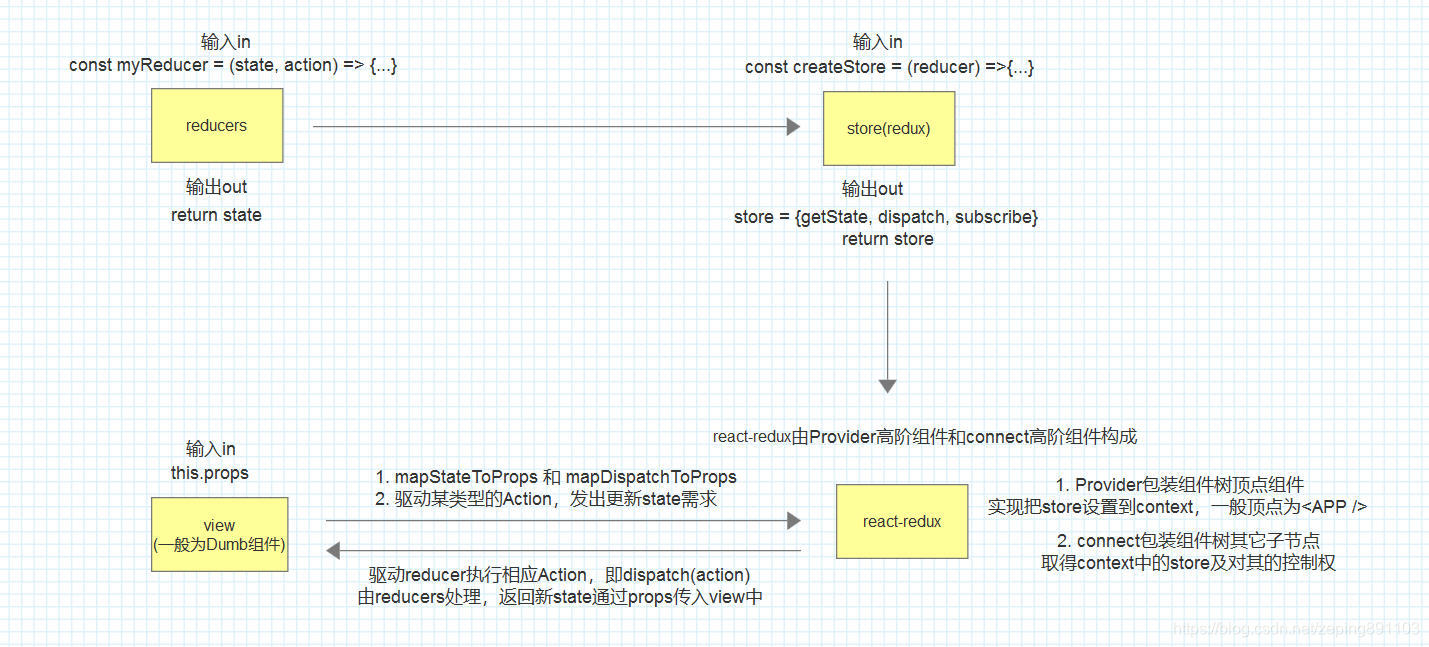
看了react-redux官方源码,总结出其redux思想主要由四个部分组成:reducers、store(redux)、react-redux和view。大致画了个图,其逻辑关系如下:
为了让大家更好理解Redux思想,以设定/更改全局主题颜色为例,本demo暂不会引用官方已封装好的 'redux'和'react-redux' 模块,而是抽离出核心代码综合编写了一个demo,下一篇将会介绍并使用官方的 'reudx'和'react-redux' 库。
源码地址:https://github.com/smallH/redux-demo.git
reducers
reducers,入参为:组件当前所在状态state,将要处理的动作 action。action通常是一个对象,由类型和值{type, value}组成,通过switch(action.type)来筛选类型。简单来说,reducers就是组件状态发生变化时主要逻辑处理的地方。其代码如下:
// reducers.js
const themeReducer = (state, action) => {
    if (!state) return {
      themeColor: 'red'
    }
    // 处理各类action,并返回最新的状态
    switch (action.type) {
      case 'CHANGE_COLOR':
        return { ...state, themeColor: action.themeColor }
      default:
        return state
    }
}
export default themeReducer
上面代码表示,当 action 类型为'CHANGE_COLOR'时(我告诉你我要改变颜色啦),则改变颜色状态值 state.themeColor 为action.themeColor。其中{ ...state, themeColor: action.themeColor }是一种语法糖写法,表示返回一个新对象 newState ,它不仅继承了原有入参 state的数据结构和值,还顺道修改了themeColor属性值。注意哦,这种写法的好处就是实现了返回的新状态值newState 和 state 在内存中没有指向同一引用,是两个各自不想关的对象,也可以理解为深度拷贝吧。
store(redux)
核心其实就是就是官方模块中的引用的redux:
import { createStore } from 'redux'但在本demo中我们并不直接引用,我们先来看看代码:
// redux.js
export const createStore = (reducer) => {
	let state = null
	const listeners = []; // 事件监听列表
	const subscribe = (listener) => listeners.push(listener); // 定义添加事件对外接口
	const getState = () => state; // 定义获取状态总值对外接口
	// 定义驱动 Aciton 的对外接口,每次驱动会遍历执行listeners列表里的所有事件
	const dispatch = (action) => {
		state = reducer(state, action)
		listeners.forEach((listener) => listener())
	}
	dispatch({}); // 首次初始化state
	return {
		getState,
		dispatch,
		subscribe
	}
}
该模块以reducer为入参,返回了三个带有核心功能的对象{getState, dispatch, subscribe},目的是对外提供了状态获取和更新的渠道。
getState:获取所有通过store管理的组件的状态值。
dispatch:驱动reducer执行状态更新,并遍历事件监听列表,使在状态更新后自动刷新(渲染)dom节点。
subscribe:添加需要自动刷新的dom节点的_updateProps()函数到监听列表。
react-redux
该模块比较复杂,它提供了两个高阶组件Provider和 connect 函数。在看本模块前如果不了解高阶函数的意义和context功能,可以先看一下:react系列(21)高阶组件 和 react系列(17)跨组件树传递数据 context
高阶组件Provider:很简单,主要功能是提供 context 的全局状态入参 store 设置。
// 高阶组件 Provider
export class Provider extends React.Component {
	static propTypes = {
		store: PropTypes.object,
		children: PropTypes.any
	}

	static childContextTypes = {
		store: PropTypes.object
	}

	// 通过对context调用设置store
	getChildContext() {
		return {
			store: this.props.store
		}
	}

	render() {
		return(
			<div>{this.props.children}</div>
		)
	}
}
高阶组件connect:主要功能是为了连接起视图层view和store。
import React from 'react'
import PropTypes from 'prop-types'

// 高阶组件 contect
export const connect = (mapStateToProps, mapDispatchToProps) => (WrappedComponent) => {
	class Connect extends React.Component {
		// 通过对context调用获取store
		static contextTypes = {
			store: PropTypes.object
		}

		constructor() {
			super()
			this.state = {
				allProps: {}
			}
		}

		// 第一遍需初始化所有组件初始状态
		componentWillMount() {
			const store = this.context.store
			this._updateProps()
			store.subscribe(() => this._updateProps()); // 加入_updateProps()至store里的监听事件列表
		}

		// 执行action后更新props,使组件可以更新至最新状态(类似于setState)
		_updateProps() {
			const store = this.context.store;
			let stateProps = mapStateToProps ?
				mapStateToProps(store.getState(), this.props) : {} // 防止 mapStateToProps 没有传入
			let dispatchProps = mapDispatchToProps ?
				mapDispatchToProps(store.dispatch, this.props) : {
                                    dispatch: store.dispatch
                                } // 防止 mapDispatchToProps 没有传入
			this.setState({
				allProps: {
					...stateProps,
					...dispatchProps,
					...this.props
				}
			})
		}

		render() {
			return <WrappedComponent {...this.state.allProps} />
		}
	}
	return Connect
}
高阶组件connect有三个入参:mapStateToProps, mapDispatchToProps 和 WrappedComponent。
首先需要明白,react-redux模块的一个主要目的就是可以把view和store连接起来,store存储了所有组件的状态值state和事件处理方法action,但并不代表所有的组件都需要用到全部的state和action,于组件而言,最好的办法是我告诉store我需要那些 state和action 你给我就好,mapStateToProps和mapDispatchToProps就是干这个事情的。
mapStateToProps:告诉store ,本组件渲染时所需的props值。
mapDispatchToProps :告诉store,本组件触发事件时所需的action。
WrappedComponent:将要被包装升级的原组件,最好为Dumb组件。Dumb组件是指只可以也仅可以通过props来控制组件渲染内容,它也是最符合react设计思想的组件设计,复用性高耦合性低。
现在,回过头来看看最开始的逻辑图,是不是清楚了很多。
view
即将要被渲染的组件。
import React from 'react'
import PropTypes from 'prop-types'
import { connect } from '../react-redux'

class ThemeSwitch extends React.Component {
	// 设置所需参数
	static propTypes = {
		themeColor: PropTypes.string,
		onSwitchColor: PropTypes.func
	}

	handleSwitchColor(color) {
		if(this.props.onSwitchColor) {
			this.props.onSwitchColor(color)
		}
	}

	render() {
		return(
			<div>
		                <button
		                  style={{ color: this.props.themeColor }}
		                  onClick={this.handleSwitchColor.bind(this, 'red')}>Style-Red</button>
		                <button
		                  style={{ color: this.props.themeColor }}
		                  onClick={this.handleSwitchColor.bind(this, 'blue')}>Style-Blue</button>
      		        </div>
		)
	}
}

const mapStateToProps = (state, ownProps) => {
	return {
		themeColor: state.themeColor
	}
}
const mapDispatchToProps = (dispatch, ownProps) => {
	return {
		onSwitchColor: (color) => {
			dispatch({
				type: 'CHANGE_COLOR',
				themeColor: color
			})
		}
	}
}
ThemeSwitch = connect(mapStateToProps, mapDispatchToProps)(ThemeSwitch)

export default ThemeSwitch
结合上面的react-redux模块高阶组件的意图,看起来就很明白了,没什么好讲述的了,有问题可以留言。
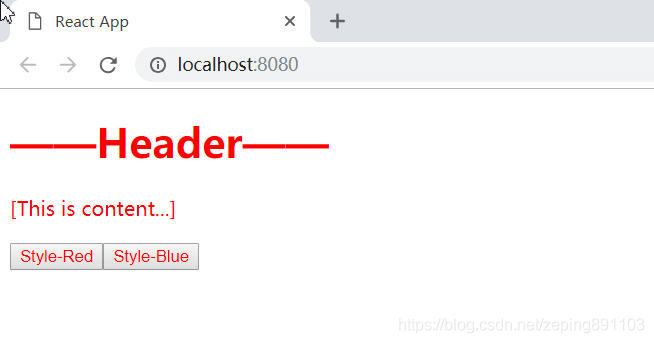
最终demo运行效果:点击按钮Style-Red主题颜色变为红色,点击按钮Style-Red主题颜色变为蓝色。
最后,我们试着把上面例子中的 redux.js 和 react-redux.js 文件删除,改为直接引用官方的 'redux' 和 'react-redux':
// 安装
$ npm install redux -S
$ npm install react-redux -S

// 引用
import { createStore } from 'redux'
import { Provider } from 'react-redux'
会发现程序依然运行起来了,而且结果是一样的!这就是Redux模式了,而官方提供的 'redux' 和 'react-redux' 模块,只过不是对上面代码的封装和增加了一些插件,下一篇将介绍这些插件的用法。


 263
263


 被折叠的 条评论
为什么被折叠?
被折叠的 条评论
为什么被折叠?
 到【灌水乐园】发言


