


经常会需要一个对话框窗口,以便从用户那里得到确认,这时可以重写在activity中的onCreateDialog方法来显示一个对话框窗口。onCreateDialog是一个由activity管理的对话框的回调方法,里面用switch来区分不同的特定对话框。

(1)创建对话框窗口
	CharSequence[] items = { "Google", "Apple", "Microsoft" };
	boolean[] itemsChecked = new boolean [items.length];

		public void onClick(View v) {
  		showDialog(0);	//调用onCreateDialog的switch 0
	}
onCreateDialog的内容如下:
case 0:
			return new AlertDialog.Builder(this)
			.setIcon(R.drawable.ic_launcher)
			.setTitle("This is a dialog with some simple text...")
			.setPositiveButton("OK", 		//OK键
				new DialogInterface.OnClickListener() {
					public void onClick(DialogInterface dialog,	int whichButton)
					{
						Toast.makeText(getBaseContext(),
								"OK clicked!", Toast.LENGTH_SHORT).show();
					}
			    }
			)
			.setNegativeButton("Cancel", 		//cancel键
				new DialogInterface.OnClickListener() {
					public void onClick(DialogInterface dialog, int whichButton)
					{
						Toast.makeText(getBaseContext(),
								"Cancel clicked!", Toast.LENGTH_SHORT).show();
					}
				}
			)
			.setMultiChoiceItems(items, itemsChecked,
			    new DialogInterface.OnMultiChoiceClickListener() {		//多checkbox选择键
					public void onClick(DialogInterface dialog,int which, boolean isChecked) {
						Toast.makeText(getBaseContext(),items[which] + (isChecked ? " checked!":" unchecked!"),
							Toast.LENGTH_SHORT).show();
						}
			    }
			).create();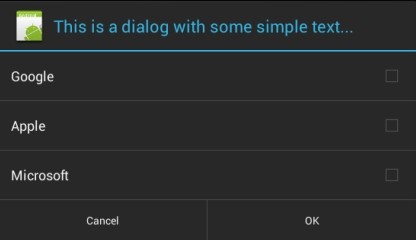
(2)进度等待窗口。比如很多时候等待后台的某个操作返回结果,需要这个

	public void onClick2(View v) {
		//---show the dialog---
		final ProgressDialog dialog = ProgressDialog.show(this, "Doing something", "Please wait...", true);
	        new Thread(new Runnable(){
		    public void run(){
			 try {
			    	//---simulate doing something lengthy---
			        Thread.sleep(5000);
			        //---dismiss the dialog---
					dialog.dismiss();
		              } catch (InterruptedException e) {
				    e.printStackTrace();
			      }
			}
		}).start();
} ProgressDialog progressDialog;

	public void onClick3(View v) {
		showDialog(1); 	//调用onCreateDialog中编号1的对话框
             progressDialog.setProgress(0);

             new Thread(new Runnable(){
		    public void run(){
		    	for (int i=1; i<=15; i++) {		//进度刷新15次
				    try {
				    	//---simulate doing something lengthy---
				        Thread.sleep(1000);
				        //---update the dialog---
				        progressDialog.incrementProgressBy((int)(100/15));	//跟循环次数相关,相当于单步的步长
					} catch (InterruptedException e) {
					    e.printStackTrace();
					}
		    	}
		        progressDialog.dismiss();
			}
		}).start();
} case 1:
progressDialog = new ProgressDialog(this);
progressDialog.setIcon(R.drawable.ic_launcher);
progressDialog.setTitle("Downloading files...");
progressDialog.setProgressStyle(ProgressDialog.STYLE_HORIZONTAL);
progressDialog.setButton(DialogInterface.BUTTON_POSITIVE, "OK", //OK
new DialogInterface.OnClickListener() {
public void onClick(DialogInterface dialog,
int whichButton)
{
Toast.makeText(getBaseContext(),
"OK clicked!", Toast.LENGTH_SHORT).show();
}
});
progressDialog.setButton(DialogInterface.BUTTON_NEGATIVE, "Cancel", //cacel
new DialogInterface.OnClickListener() {
public void onClick(DialogInterface dialog,
int whichButton)
{
Toast.makeText(getBaseContext(),
"Cancel clicked!", Toast.LENGTH_SHORT).show();
}
});
return progressDialog;======================================MenuInflater ============================================================
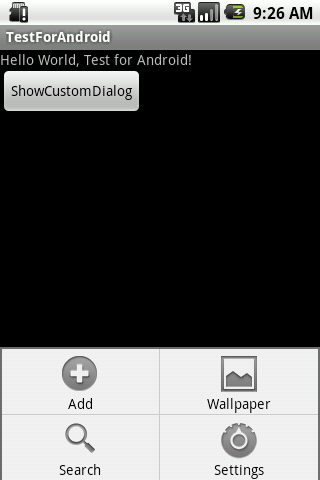
LayoutInflater是用来实例化整个布局文件,MenuInflater是用来实例化Menu目录下的Menu布局文件的。传统意义上的菜单定义需要Override Activity的onCreateOptionsMenu,然后在里面调用Menu.add把Menu的一个个item加进来,比较复杂。而通过使用MenuInflater可以把Menu的构造直接放在Menu布局文件中,真正实现模型(Model)与视图(View)的分离,程序也看着清爽多了。
下面一个实例是定义四个菜单项,并且实现了一个菜单事件, 当我们点击设置(Settind) 菜单,进入默认的设置界面。
其中options_menu.xml:
<?xml version="1.0" encoding="utf-8"?>
<menu xmlns:android="http://schemas.android.com/apk/res/android">
	<item
		android:id="@+id/menu_add"
		android:title="Add"
		android:icon="@android:drawable/ic_menu_add"/>
	 <item
	 	android:id="@+id/menu_wallaper"
	    android:title="Wallpaper"
	    android:icon="@android:drawable/ic_menu_gallery"/>
	<item
		android:id="@+id/menu_search"
	    android:title="Search"
	    android:icon="@android:drawable/ic_search_category_default"/>
	<item
		android:id="@+id/menu_setting"
	    android:title="Settings"
	    android:icon="@android:drawable/ic_menu_preferences"/>
</menu>
public class TestMenuInflater extends Activity {
    @Override
    public void onCreate(Bundle savedInstanceState) {
        super.onCreate(savedInstanceState);
        setContentView(R.layout.main);
    }

    @Override
    public boolean onCreateOptionsMenu(Menu menu) {
    	MenuInflater inflater = getMenuInflater();
    	inflater.inflate(R.menu.options_menu, menu);
    	return true;
    }

    @Override
    public boolean onOptionsItemSelected(MenuItem item) {
    	switch (item.getItemId()) {
		case R.id.menu_add:
			break;
		case R.id.menu_wallaper:
			break;
		case R.id.menu_search:
			break;
		case R.id.menu_setting:
			showSettings();
			break;
		}
    	return super.onOptionsItemSelected(item);
    }

    private void showSettings(){
   	 	final Intent settings = new Intent(android.provider.Settings.ACTION_SETTINGS);
	 		settings.setFlags(Intent.FLAG_ACTIVITY_NEW_TASK | Intent.FLAG_ACTIVITY_RESET_TASK_IF_NEEDED);
	 		startActivity(settings);
   }
}
=============================LayoutInflater ====================================
LayoutInflater inflater = getLayoutInflater();
View layout = inflater.inflate(R.layout.custom_dialog,null);
...............
Button button = (Button) findViewById(R.id.button);
不同之处是:LayoutInflater是用来实例化整个布局文件,而findViewById()是实例化布局文中中的View。
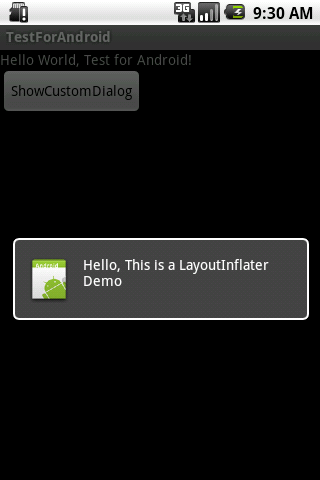
实例:主布局main.xml里有一个TextView和一个Button,当点击Button,出现Dialog,而这个Dialog的布局方式是我们在layout目录下定义的custom_dialog.xml文件(里面左右分布,左边 ImageView,右边TextView)。
主activity的main.xml的就不说了,主要关注对话框这个layout的xml。custom_dialog.xml:
<?xml version="1.0" encoding="utf-8"?>
<LinearLayout xmlns:android="http://schemas.android.com/apk/res/android"
	android:orientation="horizontal"
	android:layout_width="fill_parent"
	android:layout_height="fill_parent"
	android:padding="10dp">
	   <ImageView
	   		android:id="@+id/image"
          android:layout_width="wrap_content"
          android:layout_height="fill_parent"
          android:layout_marginRight="10dp"/>
	   <TextView
	   		android:id="@+id/text"
	       android:layout_width="wrap_content"
	       android:layout_height="fill_parent"
	       android:textColor="#FFF"/>
</LinearLayout>
public class TestLayoutInflater extends Activity implements OnClickListener {
    	private Button button;
    	public void onCreate(Bundle savedInstanceState)
    	{
        super.onCreate(savedInstanceState);
        setContentView(R.layout.main);

        button = (Button)findViewById(R.id.button);
        button.setOnClickListener(this);
    	}

	public void onClick(View v) {
		showCustomDialog();
	}

	public void showCustomDialog()
	{
		AlertDialog.Builder builder;
		AlertDialog alertDialog;
		Context mContext = TestSlidingDrawer.this;

		LayoutInflater inflater = getLayoutInflater();	//Activity.getLayoutInflater() or Window.getLayoutInflater().
		View layout = inflater.inflate(R.layout.custom_dialog,null);

		TextView text = (TextView) layout.findViewById(R.id.text);
		text.setText("Hello, This is a LayoutInflater Demo");
		ImageView image = (ImageView) layout.findViewById(R.id.image);
		image.setImageResource(R.drawable.icon);

		builder = new AlertDialog.Builder(mContext);
		builder.setView(layout);
		alertDialog = builder.create();
		alertDialog.show();
	}
}
===================================AppWidget=====================================
有关AppWidget,参见http://www.cnblogs.com/playing/archive/2011/04/12/2013386.html,讲的很到位很清晰。
参考原文:http://blog.csdn.net/zhangqijie001/article/details/5835838
参考原文:http://blog.csdn.net/zhangqijie001/article/details/5836492


 2863
2863


 被折叠的 条评论
为什么被折叠?
被折叠的 条评论
为什么被折叠?
 到【灌水乐园】发言


