iOS经典讲解之百度地图的使用及案例(iOS地图SDK)

准备工作:

一、去百度开发平台注册,并且获得密钥,具体步骤百度开发平台详细说明,并且下载相应的BaiduMapAPI.framework。

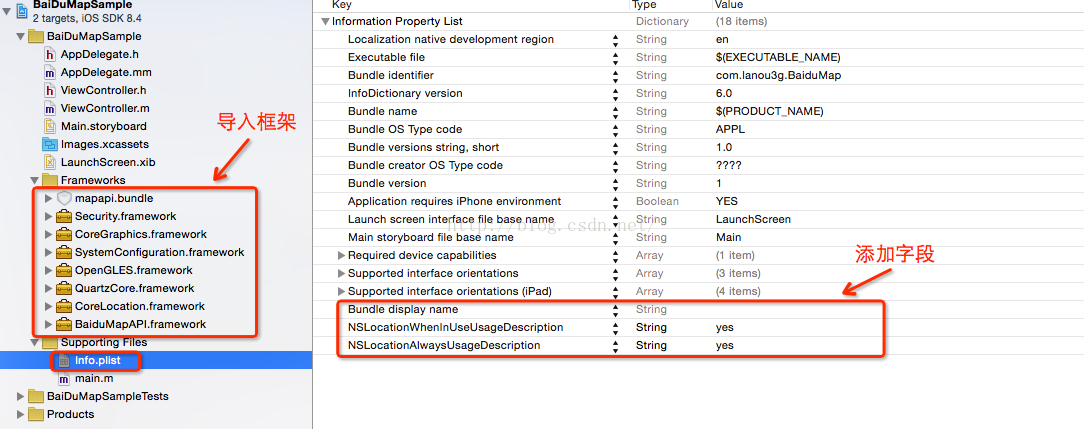
二、引入BaiduMapAPI.framework

将所需的BaiduMapAPI.framework拷贝到工程所在文件夹下。在 TARGETS->Build Phases-> Link Binary With Libaries中点击“+”按钮,在弹出的窗口中点击“Add Other”按钮,选择BaiduMapAPI.framework文件添加到工程中。

三、引入所需的系统库

百度地图SDK中提供了定位功能和动画效果,v2.0.0版本开始使用OpenGL渲染,因此您需要在您的Xcode工程中引入CoreLocation.framework和QuartzCore.framework、OpenGLES.framework、SystemConfiguration.framework、CoreGraphics.framework、Security.framework。添加方式:在Xcode的Project -> Active Target ->Build Phases ->Link Binary With Libraries,添加这几个framework即可。

四、环境配置

在TARGETS->Build Settings->Other Linker Flags 中添加-ObjC。

五、引入mapapi.bundle资源文件

如果使用了基础地图功能,需要添加该资源,否则地图不能正常显示

方法:选中工程名,在右键菜单中选择Add Files to “工程名”…,从BaiduMapAPI.framework||Resources文件中选择mapapi.bundle文件,并勾选“Copy items if needed”复选框,单击“Add”按钮,将资源文件添加到工程中。

六、引入头文件

在使用SDK的类引入头文件:

#import <BaiduMapAPI/BMapKit.h>//引入所有的头文件


#import <BaiduMapAPI /BMKMapView. h > //只引入所需的单个头文件

七、在info.plist文件中添加

NSLocationWhenInUseUsageDescription

NSLocationAlwaysUsageDescription

Bundle display name等字段。因为百度提供的类中使用了

- (void)requestWhenInUseAuthorization

- (void)requestAlwaysAuthorization,方法。具体原因详见 iOS经典讲解之地图定位请求位置信息时出现的问题

如图所示:


准备工作完成后,下面是具体示例代码:

  1. //  
  2. //  ViewController.m  
  3. //  BaiDuMapSample  
  4. #import “ViewController.h”  
  5. #import <BaiduMapAPI/BMapKit.h>  
  6. @interface ViewController () <BMKGeneralDelegate, BMKMapViewDelegate, BMKLocationServiceDelegate, BMKGeoCodeSearchDelegate, BMKRouteSearchDelegate>  
  7. // 开始城市  
  8. @property (nonatomicstrongUITextField *startCityTF;  
  9. // 开始地址  
  10. @property (nonatomicstrongUITextField *startAddressTF;  
  11. // 终点城市  
  12. @property (nonatomic,strongUITextField *endCityTF;  
  13. // 终点地址  
  14. @property (nonatomicstrongUITextField *endAddressTF;  
  15. // 添加地图  
  16. @property (nonatomicstrongBMKMapView *mapView;  
  17. // 定位服务对象(专门用于定位)  
  18. @property (nonatomicstrongBMKLocationService *locationService;  
  19. //声明地理位置搜索对象(负责地理编码)  
  20. @property (nonatomicstrongBMKGeoCodeSearch *geocoder;  
  21. // 声明路线搜索服务对象  
  22. @property (nonatomicstrongBMKRouteSearch *routeSearch;  
  23. // 开始路线检索节点  
  24. @property (nonatomicstrongBMKPlanNode *statNode;  
  25. // 目标路线检索节点  
  26. @property (nonatomicstrongBMKPlanNode *endNode;  
  27.   
  28. @end  
  29.   
  30. @implementation ViewController  
  31. -(void)dealloc  
  32. {  
  33.     self.geocoder.delegate = nil;  
  34.     self.locationService.delegate = nil;  
  35.     self.mapView.delegate = nil;  
  36.     self.routeSearch.delegate = nil;  
  37.   
  38. }  
  39.   
  40. - (void)viewDidLoad {  
  41.     [super viewDidLoad];  
  42.       
  43.     // 因为百度SDK的引擎是使用C++代码写成,所以我们必须保证我们的工程中至少有一个文件是.mm后缀  
  44.     // 创建百度地图主引擎类(使用百度地图功能之前必须启动引擎)  
  45.     BMKMapManager *manager = [[BMKMapManager alloc] init];  
  46.     // 启动引擎  
  47.     // foIpeFfSSd5SGy2fKxLmD0M8百度开发者平台注册的密钥  
  48.     // 注意要把NSLocationWhenInUseUsageDescription NSLocationAlwaysUsageDescription 字段添加到plist文件中  
  49.     [manager start:@”foIpeFfSSd5SGy2fKxLmD0M8” generalDelegate:self];  
  50.       
  51.       
  52.     // 设置内边距  
  53.     if ([[UIDevice currentDevice].systemVersion floatValue] >= 7.0) {  
  54.         self.edgesForExtendedLayout = UIRectEdgeNone;  
  55.     }  
  56.       
  57.     // 搭建UI  
  58.     [self addSubViews];  
  59.       
  60.     // 创建定位服务对象  
  61.     self.locationService = [[BMKLocationService alloc] init];  
  62.     // 设置定位服务对象的代理  
  63.     self.locationService.delegate = self;  
  64.     // 设置再次定位的最小距离  
  65.     [BMKLocationService setLocationDistanceFilter:10];  
  66.       
  67.       
  68.     // 创建地理位置搜索对象  
  69.     self.geocoder = [[BMKGeoCodeSearch alloc] init];  
  70.     // 设置代理  
  71.     self.geocoder.delegate = self;  
  72.       
  73.       
  74.     // 创建routeSearch服务对象  
  75.     self.routeSearch = [[BMKRouteSearch alloc] init];  
  76.     // 设置代理  
  77.     self.routeSearch.delegate = self;  
  78.       
  79. }  
  80.   
  81. /** 
  82.  *  搭建UI方法 
  83.  */  
  84.   
  85. - (void)addSubViews  
  86. {  
  87.     // 设置barButtonItem  
  88.     UIBarButtonItem *leftButton = [[UIBarButtonItem alloc] initWithTitle:@”开始定位” style:(UIBarButtonItemStylePlain) target:self action:@selector(leftAction:)];  
  89.     self.navigationItem.leftBarButtonItem = leftButton;  
  90.       
  91.     UIBarButtonItem *rightButton = [[UIBarButtonItem alloc] initWithTitle:@”关闭定位” style:(UIBarButtonItemStylePlain) target:self action:@selector(rightAction:)];  
  92.     self.navigationItem.rightBarButtonItem = rightButton;  
  93.       
  94.     // 设置textField  
  95.     // 开始城市  
  96.     self.startCityTF = [[UITextField alloc] initWithFrame:CGRectMake(203010030)];  
  97.     self.startCityTF.text = @”开始城市”;  
  98.     [self.view addSubview:self.startCityTF];  
  99.     // 开始地址  
  100.     self.startAddressTF = [[UITextField alloc] initWithFrame:CGRectMake(CGRectGetMaxX(self.startCityTF.frame) + 30, CGRectGetMinY(self.startCityTF.frame), CGRectGetWidth(self.startCityTF.frame), CGRectGetHeight(self.startCityTF.frame))];  
  101.     self.startAddressTF.text = @”开始地址”;  
  102.     [self.view addSubview:self.startAddressTF];  
  103.     // 目的城市  
  104.     self.endCityTF = [[UITextField alloc] initWithFrame:CGRectMake(CGRectGetMinX(self.startCityTF.frame), CGRectGetMaxY(self.startCityTF.frame) + 10, CGRectGetWidth(self.startCityTF.frame), CGRectGetHeight(self.startCityTF.frame))];  
  105.     self.endCityTF.text = @”目的城市”;  
  106.     [self.view addSubview:self.endCityTF];  
  107.     // 目的地址  
  108.     self.endAddressTF = [[UITextField alloc] initWithFrame:CGRectMake(CGRectGetMaxX(self.endCityTF.frame) + 30, CGRectGetMinY(self.endCityTF.frame), CGRectGetWidth(self.endCityTF.frame), CGRectGetHeight(self.endCityTF.frame))];  
  109.     self.endAddressTF.text = @”目的地址”;  
  110.     [self.view addSubview:self.endAddressTF];;  
  111.       
  112.     // 添加线路规划按钮  
  113.     UIButton *roadButton = [UIButton buttonWithType:UIButtonTypeCustom];  
  114.     roadButton.frame = CGRectMake(CGRectGetMaxX(self.startAddressTF.frame) + 10, CGRectGetMaxY(self.startAddressTF.frame), 10030);  
  115.     [roadButton setTitle:@”线路规划” forState:UIControlStateNormal];  
  116.     [roadButton setTitleColor:[UIColor blackColor] forState:UIControlStateNormal];  
  117.     // 设置点击方法  
  118.     [roadButton addTarget:self action:@selector(roadAction:) forControlEvents:UIControlEventTouchUpInside];  
  119.     [self.view addSubview:roadButton];  
  120.   
  121.     // 添加地图  
  122.     self.mapView = [[BMKMapView alloc] initWithFrame:CGRectMake(0, CGRectGetMaxY(self.endAddressTF.frame) + 5, [UIScreen mainScreen].bounds.size.width, [UIScreen mainScreen].bounds.size.height - CGRectGetMaxY(self.endAddressTF.frame) - 5)];  
  123.     // 设置代理  
  124.     self.mapView.delegate = self;  
  125.     [self.view addSubview:self.mapView];  
  126.    
  127.      
  128. }  
  129.   
  130. // 开始定位方法  
  131. - (void)leftAction:(UIBarButtonItem *)leftButton  
  132. {  
  133.     // 开启定位服务  
  134.     [self.locationService startUserLocationService];  
  135.     // 在地图上显示用户位置  
  136.     self.mapView.showsUserLocation = YES;  
  137.       
  138. }  
  139. // 关闭定位方法  
  140. - (void)rightAction:(UIBarButtonItem *)rightButton  
  141. {  
  142.     // 关闭定位服务  
  143.     [self.locationService stopUserLocationService];  
  144.     // 设置地图不显示用户位置  
  145.     self.mapView.showsUserLocation = NO;  
  146.     // 删除我们添加的标注对象  
  147.     [self.mapView removeAnnotation:self.mapView.annotations.lastObject];  
  148. }  
  149. // 线路规划点击方法  
  150. - (void)roadAction:(UIButton *)button  
  151. {  
  152.     // 完成正向地理编码  
  153.     // 1、创建正向地理编码选项对象  
  154.     BMKGeoCodeSearchOption *geocoderOption = [[BMKGeoCodeSearchOption alloc] init];  
  155.     // 2、给进行正向地理位置编码的位置赋值  
  156.     geocoderOption.city = self.startCityTF.text;  
  157.     geocoderOption.address = self.startAddressTF.text;  
  158.     // 执行地理位置编码  
  159.     [self.geocoder geoCode:geocoderOption];  
  160.       
  161.       
  162. }  
  163. #pragma mark - BMKLocationService代理方法  
  164. -(void)willStartLocatingUser  
  165. {  
  166.     NSLog(@”开始定位”);  
  167. }  
  168. -(void)didFailToLocateUserWithError:(NSError *)error  
  169. {  
  170.     NSLog(@”定位失败%@”, error);  
  171. }  
  172.   
  173. /** 
  174.  *  定位成功,再次定位的方法(定位成功触发) 
  175.  */  
  176. -(void)didUpdateBMKUserLocation:(BMKUserLocation *)userLocation  
  177. {  
  178.     // 完成地理反编码  
  179.     // 1、创建反向地理编码选项对象  
  180.     BMKReverseGeoCodeOption *reverseOption = [[BMKReverseGeoCodeOption alloc] init];  
  181.     // 2、给反向地理编码选项对象坐标点赋值  
  182.     reverseOption.reverseGeoPoint = userLocation.location.coordinate;  
  183.     // 3、执行反向地理编码操作  
  184.     [self.geocoder reverseGeoCode:reverseOption];  
  185.       
  186. }  
  187.   
  188. #pragma mark - BMKGeoCodeSearch代理方法  
  189.   
  190. //反编码代理方法执行  
  191. -(void)onGetReverseGeoCodeResult:(BMKGeoCodeSearch *)searcher result:(BMKReverseGeoCodeResult *)result errorCode:(BMKSearchErrorCode)error  
  192. {  
  193.     // 定义大头针标注  
  194.     BMKPointAnnotation *annotation = [[BMKPointAnnotation alloc] init];  
  195.     // 设置标注位置坐标  
  196.     annotation.coordinate = result.location;  
  197.     annotation.title = result.address;  
  198.     annotation.subtitle = [NSString stringWithFormat:@”%f-%f”, result.location.latitude, result.location.longitude];  
  199.     // 添加到地图里  
  200.     [self.mapView addAnnotation:annotation];  
  201.     // 使地图显示该位置  
  202.     [self.mapView setCenterCoordinate:result.location animated:YES];  
  203. }  
  204. // 正向编码代理方法  
  205. -(void)onGetGeoCodeResult:(BMKGeoCodeSearch *)searcher result:(BMKGeoCodeResult *)result errorCode:(BMKSearchErrorCode)error  
  206. {  
  207.     //  
  208.     if ([result.address isEqualToString:self.startAddressTF.text]) {  
  209.         // 当前编码的对象是开始节点  
  210.         self.statNode = [[BMKPlanNode alloc] init];  
  211.         //给节点的坐标位置赋值  
  212.         _statNode.pt = result.location;  
  213.         // 发起对目标节点的地理编码  
  214.         // 1、创建正向地理编码选项对象  
  215.         BMKGeoCodeSearchOption *geoOption = [[BMKGeoCodeSearchOption alloc] init];  
  216.         geoOption.city = self.endCityTF.text;  
  217.         geoOption.address = self.endAddressTF.text;  
  218.         // 执行编码  
  219.         [self.geocoder geoCode:geoOption];  
  220.           
  221.          self.endNode = nil;  
  222.     } else {  
  223.           
  224.         self.endNode = [[BMKPlanNode alloc] init];  
  225.         _endNode.pt = result.location;  
  226.     }  
  227.     if (_statNode != nil && _endNode != nil) {  
  228.           
  229.         // 开始执行路线规划  
  230.           
  231.         //1、创建驾车路线规划 这里以自驾模式为例 还可以是公交路线或者步行路线规划  
  232.         BMKDrivingRoutePlanOption *drivingRouteOption = [[BMKDrivingRoutePlanOption alloc] init];  
  233.         // 2、指定开始节点和目标节点  
  234.         drivingRouteOption.from = _statNode;  
  235.         drivingRouteOption.to = _endNode;  
  236.         // 3、让路线搜索服务对象搜索路线 开始执行代理方法  
  237.         [self.routeSearch drivingSearch:drivingRouteOption];  
  238.           
  239.     }  
  240.       
  241. }  
  242. // 获取到自驾路线回调  
  243. - (void)onGetDrivingRouteResult:(BMKRouteSearch *)searcher result:(BMKDrivingRouteResult *)result errorCode:(BMKSearchErrorCode)error  
  244. {  
  245.     // 删除原来的覆盖物  
  246.     NSArray *array = [NSArray arrayWithArray:self.mapView.annotations];  
  247.     [self.mapView removeAnnotations:array];  
  248.     // 删除overlays(原来的痕迹)  
  249.     array = [NSArray arrayWithArray:self.mapView.overlays];  
  250.     [self.mapView removeOverlays:array];  
  251.     //  
  252.     if (error == BMK_SEARCH_NO_ERROR) {  
  253.         // 选取获取到所有路线中的一条路线  
  254.         BMKDrivingRouteLine *plan = [result.routes objectAtIndex:0];  
  255.         // 计算路线方案中路段的数目  
  256.         NSUInteger size = [plan.steps count];  
  257.         // 声明一个整型变量用来计算所有轨迹点的总数  
  258.         int planPointCounts = 0;  
  259.         for (int i = 0; i < size; i++) {  
  260.             // 获取路线中的路段  
  261.             BMKDrivingStep *step = plan.steps[i];  
  262.             if (i == 0) {  
  263.                 // 地图显示经纬区域  
  264.                 [self.mapView setRegion:BMKCoordinateRegionMake(step.entrace.location, BMKCoordinateSpanMake(0.0010.001))];  
  265.             }  
  266.               
  267.             // 累计轨迹点  
  268.             planPointCounts += step.pointsCount;  
  269.         }  
  270.           
  271.         // 声明一个结构体数组来保存所有的轨迹点(每一个轨迹点都是一个结构体)  
  272.         // 轨迹点结构体的名字为BMKMapPoint C++写法,必须写在.mm文件中  
  273.         BMKMapPoint *tempPoints = new BMKMapPoint[planPointCounts]; // 声明一个有planPointCounts个元素的数组,数组名为tempPoints  
  274.         int i = 0;  
  275.         for (int j = 0; j < size; j++) {  
  276.             BMKDrivingStep *transitStep = [plan.steps objectAtIndex:j];  
  277.             int k = 0;  
  278.             for (k = 0; k < transitStep.pointsCount; k++) {  
  279.                 // 获取每个轨迹点的x y放入数组中  
  280.                 tempPoints[i].x = transitStep.points[k].x;  
  281.                 tempPoints[i].y = transitStep.points[k].y;  
  282.                 i++;  
  283.                   
  284.             }  
  285.         }  
  286.           
  287.         // 通过轨迹点构造BMKPolyline(折线)  
  288.         BMKPolyline *polyline = [BMKPolyline polylineWithPoints:tempPoints count:planPointCounts];  
  289.         // 添加到mapView上  
  290.         // 想要在地图上显示轨迹 只能先添加overlay对象(类似大头针标注)添加好之后,地图就会根据设置的overlay显示出轨迹  
  291.         [self.mapView addOverlay:polyline];  
  292.     }  
  293. }  
  294.   
  295. #pragma mark - mapView代理方法  
  296. -(BMKOverlayView *)mapView:(BMKMapView *)mapView viewForOverlay:(id<BMKOverlay>)overlay  
  297. {  
  298.     if ([overlay isKindOfClass:[BMKPolyline class]]) {  
  299.           
  300.         // 创建要显示的折线  
  301.         BMKPolylineView *view = [[BMKPolylineView alloc] initWithOverlay:overlay];  
  302.         // 设置该线条的填充颜色  
  303.         view.fillColor = [UIColor redColor];  
  304.         // 设置线条颜色  
  305.         view.strokeColor = [UIColor redColor];  
  306.         // 设置线条宽度  
  307.         view.lineWidth = 3;  
  308.         return view;  
  309.     }  
  310.       
  311.     return nil;  
  312. }  
  313.   
  314. @end  
//
//  ViewController.m
//  BaiDuMapSample


#import "ViewController.h" #import <BaiduMapAPI/BMapKit.h> @interface ViewController () <BMKGeneralDelegate, BMKMapViewDelegate, BMKLocationServiceDelegate, BMKGeoCodeSearchDelegate, BMKRouteSearchDelegate> // 开始城市 @property (nonatomic, strong) UITextField *startCityTF; // 开始地址 @property (nonatomic, strong) UITextField *startAddressTF; // 终点城市 @property (nonatomic,strong) UITextField *endCityTF; // 终点地址 @property (nonatomic, strong) UITextField *endAddressTF; // 添加地图 @property (nonatomic, strong) BMKMapView *mapView; // 定位服务对象(专门用于定位) @property (nonatomic, strong) BMKLocationService *locationService; //声明地理位置搜索对象(负责地理编码) @property (nonatomic, strong) BMKGeoCodeSearch *geocoder; // 声明路线搜索服务对象 @property (nonatomic, strong) BMKRouteSearch *routeSearch; // 开始路线检索节点 @property (nonatomic, strong) BMKPlanNode *statNode; // 目标路线检索节点 @property (nonatomic, strong) BMKPlanNode *endNode; @end @implementation ViewController -(void)dealloc { self.geocoder.delegate = nil; self.locationService.delegate = nil; self.mapView.delegate = nil; self.routeSearch.delegate = nil; } - (void)viewDidLoad { [super viewDidLoad]; // 因为百度SDK的引擎是使用C++代码写成,所以我们必须保证我们的工程中至少有一个文件是.mm后缀 // 创建百度地图主引擎类(使用百度地图功能之前必须启动引擎) BMKMapManager *manager = [[BMKMapManager alloc] init]; // 启动引擎 // foIpeFfSSd5SGy2fKxLmD0M8百度开发者平台注册的密钥 // 注意要把NSLocationWhenInUseUsageDescription NSLocationAlwaysUsageDescription 字段添加到plist文件中 [manager start:@"foIpeFfSSd5SGy2fKxLmD0M8" generalDelegate:self]; // 设置内边距 if ([[UIDevice currentDevice].systemVersion floatValue] >= 7.0) { self.edgesForExtendedLayout = UIRectEdgeNone; } // 搭建UI [self addSubViews]; // 创建定位服务对象 self.locationService = [[BMKLocationService alloc] init]; // 设置定位服务对象的代理 self.locationService.delegate = self; // 设置再次定位的最小距离 [BMKLocationService setLocationDistanceFilter:10]; // 创建地理位置搜索对象 self.geocoder = [[BMKGeoCodeSearch alloc] init]; // 设置代理 self.geocoder.delegate = self; // 创建routeSearch服务对象 self.routeSearch = [[BMKRouteSearch alloc] init]; // 设置代理 self.routeSearch.delegate = self; } /** * 搭建UI方法 */ - (void)addSubViews { // 设置barButtonItem UIBarButtonItem *leftButton = [[UIBarButtonItem alloc] initWithTitle:@"开始定位" style:(UIBarButtonItemStylePlain) target:self action:@selector(leftAction:)]; self.navigationItem.leftBarButtonItem = leftButton; UIBarButtonItem *rightButton = [[UIBarButtonItem alloc] initWithTitle:@"关闭定位" style:(UIBarButtonItemStylePlain) target:self action:@selector(rightAction:)]; self.navigationItem.rightBarButtonItem = rightButton; // 设置textField // 开始城市 self.startCityTF = [[UITextField alloc] initWithFrame:CGRectMake(20, 30, 100, 30)]; self.startCityTF.text = @"开始城市"; [self.view addSubview:self.startCityTF]; // 开始地址 self.startAddressTF = [[UITextField alloc] initWithFrame:CGRectMake(CGRectGetMaxX(self.startCityTF.frame) + 30, CGRectGetMinY(self.startCityTF.frame), CGRectGetWidth(self.startCityTF.frame), CGRectGetHeight(self.startCityTF.frame))]; self.startAddressTF.text = @"开始地址"; [self.view addSubview:self.startAddressTF]; // 目的城市 self.endCityTF = [[UITextField alloc] initWithFrame:CGRectMake(CGRectGetMinX(self.startCityTF.frame), CGRectGetMaxY(self.startCityTF.frame) + 10, CGRectGetWidth(self.startCityTF.frame), CGRectGetHeight(self.startCityTF.frame))]; self.endCityTF.text = @"目的城市"; [self.view addSubview:self.endCityTF]; // 目的地址 self.endAddressTF = [[UITextField alloc] initWithFrame:CGRectMake(CGRectGetMaxX(self.endCityTF.frame) + 30, CGRectGetMinY(self.endCityTF.frame), CGRectGetWidth(self.endCityTF.frame), CGRectGetHeight(self.endCityTF.frame))]; self.endAddressTF.text = @"目的地址"; [self.view addSubview:self.endAddressTF];; // 添加线路规划按钮 UIButton *roadButton = [UIButton buttonWithType:UIButtonTypeCustom]; roadButton.frame = CGRectMake(CGRectGetMaxX(self.startAddressTF.frame) + 10, CGRectGetMaxY(self.startAddressTF.frame), 100, 30); [roadButton setTitle:@"线路规划" forState:UIControlStateNormal]; [roadButton setTitleColor:[UIColor blackColor] forState:UIControlStateNormal]; // 设置点击方法 [roadButton addTarget:self action:@selector(roadAction:) forControlEvents:UIControlEventTouchUpInside]; [self.view addSubview:roadButton]; // 添加地图 self.mapView = [[BMKMapView alloc] initWithFrame:CGRectMake(0, CGRectGetMaxY(self.endAddressTF.frame) + 5, [UIScreen mainScreen].bounds.size.width, [UIScreen mainScreen].bounds.size.height - CGRectGetMaxY(self.endAddressTF.frame) - 5)]; // 设置代理 self.mapView.delegate = self; [self.view addSubview:self.mapView]; } // 开始定位方法 - (void)leftAction:(UIBarButtonItem *)leftButton { // 开启定位服务 [self.locationService startUserLocationService]; // 在地图上显示用户位置 self.mapView.showsUserLocation = YES; } // 关闭定位方法 - (void)rightAction:(UIBarButtonItem *)rightButton { // 关闭定位服务 [self.locationService stopUserLocationService]; // 设置地图不显示用户位置 self.mapView.showsUserLocation = NO; // 删除我们添加的标注对象 [self.mapView removeAnnotation:self.mapView.annotations.lastObject]; } // 线路规划点击方法 - (void)roadAction:(UIButton *)button { // 完成正向地理编码 // 1、创建正向地理编码选项对象 BMKGeoCodeSearchOption *geocoderOption = [[BMKGeoCodeSearchOption alloc] init]; // 2、给进行正向地理位置编码的位置赋值 geocoderOption.city = self.startCityTF.text; geocoderOption.address = self.startAddressTF.text; // 执行地理位置编码 [self.geocoder geoCode:geocoderOption]; } #pragma mark - BMKLocationService代理方法 -(void)willStartLocatingUser { NSLog(@"开始定位"); } -(void)didFailToLocateUserWithError:(NSError *)error { NSLog(@"定位失败%@", error); } /** * 定位成功,再次定位的方法(定位成功触发) */ -(void)didUpdateBMKUserLocation:(BMKUserLocation *)userLocation { // 完成地理反编码 // 1、创建反向地理编码选项对象 BMKReverseGeoCodeOption *reverseOption = [[BMKReverseGeoCodeOption alloc] init]; // 2、给反向地理编码选项对象坐标点赋值 reverseOption.reverseGeoPoint = userLocation.location.coordinate; // 3、执行反向地理编码操作 [self.geocoder reverseGeoCode:reverseOption]; } #pragma mark - BMKGeoCodeSearch代理方法 //反编码代理方法执行 -(void)onGetReverseGeoCodeResult:(BMKGeoCodeSearch *)searcher result:(BMKReverseGeoCodeResult *)result errorCode:(BMKSearchErrorCode)error { // 定义大头针标注 BMKPointAnnotation *annotation = [[BMKPointAnnotation alloc] init]; // 设置标注位置坐标 annotation.coordinate = result.location; annotation.title = result.address; annotation.subtitle = [NSString stringWithFormat:@"%f-%f", result.location.latitude, result.location.longitude]; // 添加到地图里 [self.mapView addAnnotation:annotation]; // 使地图显示该位置 [self.mapView setCenterCoordinate:result.location animated:YES]; } // 正向编码代理方法 -(void)onGetGeoCodeResult:(BMKGeoCodeSearch *)searcher result:(BMKGeoCodeResult *)result errorCode:(BMKSearchErrorCode)error { // if ([result.address isEqualToString:self.startAddressTF.text]) { // 当前编码的对象是开始节点 self.statNode = [[BMKPlanNode alloc] init]; //给节点的坐标位置赋值 _statNode.pt = result.location; // 发起对目标节点的地理编码 // 1、创建正向地理编码选项对象 BMKGeoCodeSearchOption *geoOption = [[BMKGeoCodeSearchOption alloc] init]; geoOption.city = self.endCityTF.text; geoOption.address = self.endAddressTF.text; // 执行编码 [self.geocoder geoCode:geoOption]; self.endNode = nil; } else { self.endNode = [[BMKPlanNode alloc] init]; _endNode.pt = result.location; } if (_statNode != nil && _endNode != nil) { // 开始执行路线规划 //1、创建驾车路线规划 这里以自驾模式为例 还可以是公交路线或者步行路线规划 BMKDrivingRoutePlanOption *drivingRouteOption = [[BMKDrivingRoutePlanOption alloc] init]; // 2、指定开始节点和目标节点 drivingRouteOption.from = _statNode; drivingRouteOption.to = _endNode; // 3、让路线搜索服务对象搜索路线 开始执行代理方法 [self.routeSearch drivingSearch:drivingRouteOption]; } } // 获取到自驾路线回调 - (void)onGetDrivingRouteResult:(BMKRouteSearch *)searcher result:(BMKDrivingRouteResult *)result errorCode:(BMKSearchErrorCode)error { // 删除原来的覆盖物 NSArray *array = [NSArray arrayWithArray:self.mapView.annotations]; [self.mapView removeAnnotations:array]; // 删除overlays(原来的痕迹) array = [NSArray arrayWithArray:self.mapView.overlays]; [self.mapView removeOverlays:array]; // if (error == BMK_SEARCH_NO_ERROR) { // 选取获取到所有路线中的一条路线 BMKDrivingRouteLine *plan = [result.routes objectAtIndex:0]; // 计算路线方案中路段的数目 NSUInteger size = [plan.steps count]; // 声明一个整型变量用来计算所有轨迹点的总数 int planPointCounts = 0; for (int i = 0; i < size; i++) { // 获取路线中的路段 BMKDrivingStep *step = plan.steps[i]; if (i == 0) { // 地图显示经纬区域 [self.mapView setRegion:BMKCoordinateRegionMake(step.entrace.location, BMKCoordinateSpanMake(0.001, 0.001))]; } // 累计轨迹点 planPointCounts += step.pointsCount; } // 声明一个结构体数组来保存所有的轨迹点(每一个轨迹点都是一个结构体) // 轨迹点结构体的名字为BMKMapPoint C++写法,必须写在.mm文件中 BMKMapPoint *tempPoints = new BMKMapPoint[planPointCounts]; // 声明一个有planPointCounts个元素的数组,数组名为tempPoints int i = 0; for (int j = 0; j < size; j++) { BMKDrivingStep *transitStep = [plan.steps objectAtIndex:j]; int k = 0; for (k = 0; k < transitStep.pointsCount; k++) { // 获取每个轨迹点的x y放入数组中 tempPoints[i].x = transitStep.points[k].x; tempPoints[i].y = transitStep.points[k].y; i++; } } // 通过轨迹点构造BMKPolyline(折线) BMKPolyline *polyline = [BMKPolyline polylineWithPoints:tempPoints count:planPointCounts]; // 添加到mapView上 // 想要在地图上显示轨迹 只能先添加overlay对象(类似大头针标注)添加好之后,地图就会根据设置的overlay显示出轨迹 [self.mapView addOverlay:polyline]; } } #pragma mark - mapView代理方法 -(BMKOverlayView *)mapView:(BMKMapView *)mapView viewForOverlay:(id<BMKOverlay>)overlay { if ([overlay isKindOfClass:[BMKPolyline class]]) { // 创建要显示的折线 BMKPolylineView *view = [[BMKPolylineView alloc] initWithOverlay:overlay]; // 设置该线条的填充颜色 view.fillColor = [UIColor redColor]; // 设置线条颜色 view.strokeColor = [UIColor redColor]; // 设置线条宽度 view.lineWidth = 3; return view; } return nil; } @end

注:静态库中采用ObjectC++实现,因此需要您保证您工程中至少有一个.mm后缀的源文件(您可以将任意一个.m后缀的文件改名为.mm)。

代码中包含C++语法因此必须写在.mm文件中。例如BMKMapPoint *tempPoints = new BMKMapPoint[planPointCounts];,因此上面代码一定要写在.mm文件中。

  • 0
    点赞
  • 0
    收藏
    觉得还不错? 一键收藏
  • 0
    评论
评论
添加红包

请填写红包祝福语或标题

红包个数最小为10个

红包金额最低5元

当前余额3.43前往充值 >
需支付:10.00
成就一亿技术人!
领取后你会自动成为博主和红包主的粉丝 规则
hope_wisdom
发出的红包
实付
使用余额支付
点击重新获取
扫码支付
钱包余额 0

抵扣说明:

1.余额是钱包充值的虚拟货币,按照1:1的比例进行支付金额的抵扣。
2.余额无法直接购买下载,可以购买VIP、付费专栏及课程。

余额充值