


excel导出在C#代码中应用己经很广泛了,我这里就做些总结,供自己和读者学习用。
Excel知识点。
一、添加引用和命名空间
添加Microsoft.Office.Interop.Excel引用,它的默认路径是C:\Program Files\Microsoft Visual Studio 9.0\Visual Studio Tools for Office\PIA\Office12\Microsoft.Office.Interop.Excel.dll
代码中添加引用using Microsoft.Office.Interop.Excel;
二、Excel类的简单介绍
此命名空间下关于Excel类的结构分别为:
ApplicationClass - 就是我们的excel应用程序。
Workbook - 就是我们平常见的一个个excel文件,经常是使用Workbooks类对其进行操作。
Worksheet - 就是excel文件中的一个个sheet页。
Worksheet.Cells[row, column] - 就是某行某列的单元格,注意这里的下标row和column都是从1开始的,跟我平常用的数组或集合的下标有所不同。
知道了上述基本知识后,利用此类来操作excel就清晰了很多。
三、Excel的操作
任何操作Excel的动作首先肯定是用excel应用程序,首先要new一个ApplicationClass 实例,并在最后将此实例释放。
1. 打开现有的Excel文件<!-- Code highlighting produced by Actipro CodeHighlighter (freeware) http://www.CodeHighlighter.com/ --> ApplicationClass xlsApp = new ApplicationClass(); // 1. 创建Excel应用程序对象的一个实例,相当于我们从开始菜单打开Excel应用程序。 if (xlsApp == null ) { // 对此实例进行验证,如果为null则表示运行此代码的机器可能未安装Excel }
2.复制sheet页<!-- Code highlighting produced by Actipro CodeHighlighter (freeware) http://www.CodeHighlighter.com/ --> Workbook workbook = xlsApp.Workbooks.Open(excelFilePath, Type.Missing, Type.Missing, Type.Missing, Type.Missing, Type.Missing, Type.Missing, Type.Missing, Type.Missing, Type.Missing, Type.Missing, Type.Missing, Type.Missing, Type.Missing, Type.Missing); Worksheet mySheet = workbook.Sheets[ 1 ] as Worksheet; // 第一个sheet页 mySheet.Name = " testsheet " ; // 这里修改sheet名称
注意 这里Copy方法的两个参数,指是的复制出来新的sheet页是在指定sheet页的前面还是后面,上面的例子就是指复制的sheet页在第一个sheet页的后面。<!-- Code highlighting produced by Actipro CodeHighlighter (freeware) http://www.CodeHighlighter.com/ --> mySheet.Copy(Type.Missing, workbook.Sheets[ 1 ]); // 复制mySheet成一个新的sheet页,复制完后的名称是mySheet页名称后加一个(2),这里就是testsheet(2),复制完后,Worksheet的数量增加一个
3.删除sheet页
4.选中sheet页<!-- Code highlighting produced by Actipro CodeHighlighter (freeware) http://www.CodeHighlighter.com/ --> xlsApp.DisplayAlerts = false ; // 如果想删除某个sheet页,首先要将此项设为fasle。 (xlsApp.ActiveWorkbook.Sheets[ 1 ] as Worksheet).Delete();
5.另存excel文件<!-- Code highlighting produced by Actipro CodeHighlighter (freeware) http://www.CodeHighlighter.com/ --> (xlsApp.ActiveWorkbook.Sheets[ 1 ] as Worksheet).Select(Type.Missing); // 选中某个sheet页
6.释放excel资源<!-- Code highlighting produced by Actipro CodeHighlighter (freeware) http://www.CodeHighlighter.com/ --> workbook.Saved = true ; workbook.SaveCopyAs(filepath);
一般的我们传入一个DataTable生成Excel代码<!-- Code highlighting produced by Actipro CodeHighlighter (freeware) http://www.CodeHighlighter.com/ --> workbook.Close( true , Type.Missing, Type.Missing); workbook = null ; xlsApp.Quit(); xlsApp = null ;
如果要在excel中插入图片,我们需要把代码加入一行即可,如下所示<!-- Code highlighting produced by Actipro CodeHighlighter (freeware) http://www.CodeHighlighter.com/ --> /// <summary> /// /// </summary> /// <param name="dt"></param> protected void ExportExcel(DataTable dt) { if (dt == null || dt.Rows.Count == 0 ) return ; Microsoft.Office.Interop.Excel.Application xlApp = new Microsoft.Office.Interop.Excel.Application(); if (xlApp == null ) { return ; } System.Globalization.CultureInfo CurrentCI = System.Threading.Thread.CurrentThread.CurrentCulture; System.Threading.Thread.CurrentThread.CurrentCulture = new System.Globalization.CultureInfo( " en-US " ); Microsoft.Office.Interop.Excel.Workbooks workbooks = xlApp.Workbooks; Microsoft.Office.Interop.Excel.Workbook workbook = workbooks.Add(Microsoft.Office.Interop.Excel.XlWBATemplate.xlWBATWorksheet); Microsoft.Office.Interop.Excel.Worksheet worksheet = (Microsoft.Office.Interop.Excel.Worksheet)workbook.Worksheets[ 1 ]; Microsoft.Office.Interop.Excel.Range range; long totalCount = dt.Rows.Count; long rowRead = 0 ; float percent = 0 ; for ( int i = 0 ; i < dt.Columns.Count; i ++ ) { worksheet.Cells[ 1 , i + 1 ] = dt.Columns[i].ColumnName; range = (Microsoft.Office.Interop.Excel.Range)worksheet.Cells[ 1 , i + 1 ]; range.Interior.ColorIndex = 15 ; range.Font.Bold = true ; } for ( int r = 0 ; r < dt.Rows.Count; r ++ ) { for ( int i = 0 ; i < dt.Columns.Count; i ++ ) { worksheet.Cells[r + 2 , i + 1 ] = dt.Rows[r][i].ToString(); } rowRead ++ ; percent = (( float )( 100 * rowRead)) / totalCount; } xlApp.Visible = true ; }
我们调用如下:<!-- Code highlighting produced by Actipro CodeHighlighter (freeware) http://www.CodeHighlighter.com/ --> protected void ExportExcel(DataTable dt) { if (dt == null || dt.Rows.Count == 0 ) return ; Microsoft.Office.Interop.Excel.Application xlApp = new Microsoft.Office.Interop.Excel.Application(); if (xlApp == null ) { return ; } System.Globalization.CultureInfo CurrentCI = System.Threading.Thread.CurrentThread.CurrentCulture; System.Threading.Thread.CurrentThread.CurrentCulture = new System.Globalization.CultureInfo( " en-US " ); Microsoft.Office.Interop.Excel.Workbooks workbooks = xlApp.Workbooks; Microsoft.Office.Interop.Excel.Workbook workbook = workbooks.Add(Microsoft.Office.Interop.Excel.XlWBATemplate.xlWBATWorksheet); Microsoft.Office.Interop.Excel.Worksheet worksheet = (Microsoft.Office.Interop.Excel.Worksheet)workbook.Worksheets[ 1 ]; Microsoft.Office.Interop.Excel.Range range; long totalCount = dt.Rows.Count; long rowRead = 0 ; float percent = 0 ; for ( int i = 0 ; i < dt.Columns.Count; i ++ ) { worksheet.Cells[ 1 , i + 1 ] = dt.Columns[i].ColumnName; range = (Microsoft.Office.Interop.Excel.Range)worksheet.Cells[ 1 , i + 1 ]; range.Interior.ColorIndex = 15 ; } for ( int r = 0 ; r < dt.Rows.Count; r ++ ) { for ( int i = 0 ; i < dt.Columns.Count; i ++ ) { try { worksheet.Cells[r + 2 , i + 1 ] = dt.Rows[r][i].ToString(); } catch { worksheet.Cells[r + 2 , i + 1 ] = dt.Rows[r][i].ToString().Replace( " = " , "" ); } } rowRead ++ ; percent = (( float )( 100 * rowRead)) / totalCount; } worksheet.Shapes.AddPicture( " C:\\Users\\spring\\Desktop\\1.gif " , Microsoft.Office.Core.MsoTriState.msoFalse, Microsoft.Office.Core.MsoTriState.msoCTrue, 100 , 200 , 200 , 300 ); worksheet.Shapes.AddTextEffect(Microsoft.Office.Core.MsoPresetTextEffect.msoTextEffect1, " 123456 " , " Red " , 15 , Microsoft.Office.Core.MsoTriState.msoFalse, Microsoft.Office.Core.MsoTriState.msoTrue, 150 , 200 ); xlApp.Visible = true ; }
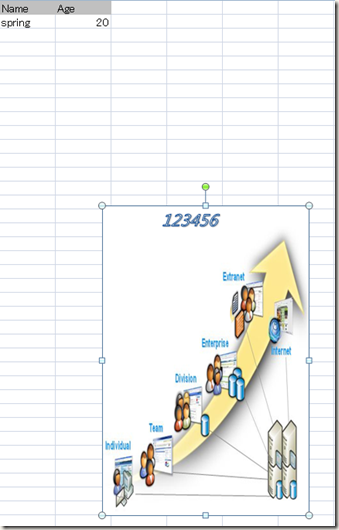
  <!--


Code highlighting produced by Actipro CodeHighlighter (freeware)

http://www.CodeHighlighter.com/


-->

  public


  void

   GenerateExcel()

{

    DataTable dt

  =


  new

   DataTable();

    dt.Columns.Add(

  "

  Name

  "

  ,

  typeof

  (

  string

  ));

    dt.Columns.Add(

  "

  Age

  "

  ,

  typeof

  (

  string

  ));

    DataRow dr

  =

   dt.NewRow();

    dr[

  "

  Name

  "

  ]

  =


  "

  spring

  "

  ;

    dr[

  "

  Age

  "

  ]

  =


  "

  20

  "

  ;

    dt.Rows.Add(dr);

    dt.AcceptChanges();

    ExportExcel(dt);

}
运行结果如下所示:
其中如下代码的作用是
在Excel的指定位置加入图片<!-- Code highlighting produced by Actipro CodeHighlighter (freeware) http://www.CodeHighlighter.com/ --> worksheet.Shapes.AddPicture( " C:\\Users\\spring\\Desktop\\1.gif " , Microsoft.Office.Core.MsoTriState.msoFalse, Microsoft.Office.Core.MsoTriState.msoCTrue, 100 , 200 , 200 , 300 );
  <!--


Code highlighting produced by Actipro CodeHighlighter (freeware)

http://www.CodeHighlighter.com/


-->

  worksheet.Shapes.AddTextEffect(Microsoft.Office.Core.MsoPresetTextEffect.msoTextEffect1,

  "

  123456

  "

  ,

  "

  Red

  "

  ,

  15

  , Microsoft.Office.Core.MsoTriState.msoFalse, Microsoft.Office.Core.MsoTriState.msoTrue,

  150

  ,

  200

  );
在Excel的指定位置加入文本框,和里面的内容.
我们可以这样来设计一个ExcelBase的基类:
先创建一个ExcelBE.cs:
接下来创建ExcelBase.cs:<!-- Code highlighting produced by Actipro CodeHighlighter (freeware) http://www.CodeHighlighter.com/ --> public class ExcelBE { private int _row = 0 ; private int _col = 0 ; private string _text = string .Empty; private string _startCell = string .Empty; private string _endCell = string .Empty; private string _interiorColor = string .Empty; private bool _isMerge = false ; private int _size = 0 ; private string _fontColor = string .Empty; private string _format = string .Empty; public ExcelBE( int row, int col, string text, string startCell, string endCell, string interiorColor, bool isMerge, int size, string fontColor, string format) { _row = row; _col = col; _text = text; _startCell = startCell; _endCell = endCell; _interiorColor = interiorColor; _isMerge = isMerge; _size = size; _fontColor = fontColor; _format = format; } public ExcelBE() { } public int Row { get { return _row; } set { _row = value; } } public int Col { get { return _col; } set { _col = value; } } public string Text { get { return _text; } set { _text = value; } } public string StartCell { get { return _startCell; } set { _startCell = value; } } public string EndCell { get { return _endCell; } set { _endCell = value; } } public string InteriorColor { get { return _interiorColor; } set { _interiorColor = value; } } public bool IsMerge { get { return _isMerge; } set { _isMerge = value; } } public int Size { get { return _size; } set { _size = value; } } public string FontColor { get { return _fontColor; } set { _fontColor = value; } } public string Formart { get { return _format; } set { _format = value; } } }
调用的代码如下:<!-- Code highlighting produced by Actipro CodeHighlighter (freeware) http://www.CodeHighlighter.com/ --> public class ExcelBase { private Microsoft.Office.Interop.Excel.Application app = null ; private Microsoft.Office.Interop.Excel.Workbook workbook = null ; private Microsoft.Office.Interop.Excel.Worksheet worksheet = null ; private Microsoft.Office.Interop.Excel.Range workSheet_range = null ; public ExcelBase() { createDoc(); } public void createDoc() { try { app = new Microsoft.Office.Interop.Excel.Application(); app.Visible = true ; workbook = app.Workbooks.Add( 1 ); worksheet = (Microsoft.Office.Interop.Excel.Worksheet)workbook.Sheets[ 1 ]; } catch (Exception e) { Console.Write( " Error " ); } finally { } } public void InsertData(ExcelBE be) { worksheet.Cells[be.Row, be.Col] = be.Text; workSheet_range = worksheet.get_Range(be.StartCell, be.EndCell); workSheet_range.MergeCells = be.IsMerge; workSheet_range.Interior.Color = GetColorValue(be.InteriorColor); workSheet_range.Borders.Color = System.Drawing.Color.Black.ToArgb(); workSheet_range.ColumnWidth = be.Size; workSheet_range.Font.Color = string .IsNullOrEmpty(be.FontColor) ? System.Drawing.Color.White.ToArgb() : System.Drawing.Color.Black.ToArgb(); workSheet_range.NumberFormat = be.Formart; } private int GetColorValue( string interiorColor) { switch (interiorColor) { case " YELLOW " : return System.Drawing.Color.Yellow.ToArgb(); case " GRAY " : return System.Drawing.Color.Gray.ToArgb(); case " GAINSBORO " : return System.Drawing.Color.Gainsboro.ToArgb(); case " Turquoise " : return System.Drawing.Color.Turquoise.ToArgb(); case " PeachPuff " : return System.Drawing.Color.PeachPuff.ToArgb(); default : return System.Drawing.Color.White.ToArgb(); } } }
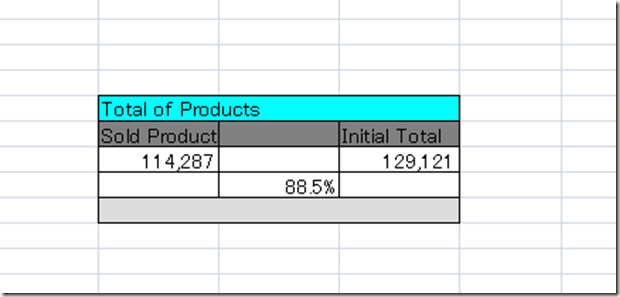
  <!--


Code highlighting produced by Actipro CodeHighlighter (freeware)

http://www.CodeHighlighter.com/


-->

  private


  void

   btnRun_Click(

  object

   sender, EventArgs e)

{

    ExcelBase excel

  =


  new

   ExcelBase();


  //

  creates the main header


      ExcelBE be

  =


  null

  ;

    be

  =


  new

   ExcelBE (

  5

  ,

  2

  ,

  "

  Total of Products

  "

  ,

  "

  B5

  "

  ,

  "

  D5

  "

  ,

  "

  YELLOW

  "

  ,

  true

  ,

  10

  ,

  "

  n

  "

  ,

  null

  );

    excel.InsertData(be);


  //

  creates subheaders


      be

  =


  new

   ExcelBE (

  6

  ,

  2

  ,

  "

  Sold Product

  "

  ,

  "

  B6

  "

  ,

  "

  B6

  "

  ,

  "

  GRAY

  "

  ,

  true

  ,

  10

  ,

  ""

  ,

  null

  );

    excel.InsertData(be);

    be

  =

  new

   ExcelBE(

  6

  ,

  3

  ,

  ""

  ,

  "

  C6

  "

  ,

  "

  C6

  "

  ,

  "

  GRAY

  "

  ,

  true

  ,

  10

  ,

  ""

  ,

  null

  );

    excel.InsertData(be);

    be

  =

  new

   ExcelBE (

  6

  ,

  4

  ,

  "

  Initial Total

  "

  ,

  "

  D6

  "

  ,

  "

  D6

  "

  ,

  "

  GRAY

  "

  ,

  true

  ,

  10

  ,

  ""

  ,

  null

  );

    excel.InsertData(be);


  //

  add Data to cells


      be

  =

  new

   ExcelBE (

  7

  ,

  2

  ,

  "

  114287

  "

  ,

  "

  B7

  "

  ,

  "

  B7

  "

  ,

  null

  ,

  false

  ,

  10

  ,

  ""

  ,

  "

  #,##0

  "

  );

    excel.InsertData(be);

    be

  =

  new

   ExcelBE (

  7

  ,

  3

  ,

  ""

  ,

  "

  C7

  "

  ,

  "

  C7

  "

  ,

  null

  ,

  false

  ,

  10

  ,

  ""

  ,

  null

  );

    excel.InsertData(be);

    be

  =


  new

   ExcelBE(

  7

  ,

  4

  ,

  "

  129121

  "

  ,

  "

  D7

  "

  ,

  "

  D7

  "

  ,

  null

  ,

  false

  ,

  10

  ,

  ""

  ,

  "

  #,##0

  "

  );

    excel.InsertData(be);


  //

  add percentage row


      be

  =


  new

   ExcelBE(

  8

  ,

  2

  ,

  ""

  ,

  "

  B8

  "

  ,

  "

  B8

  "

  ,

  null

  ,

  false

  ,

  10

  ,

  ""

  ,

  ""

  );

    excel.InsertData(be);

    be

  =


  new

   ExcelBE(

  8

  ,

  3

  ,

  "

  =B7/D7

  "

  ,

  "

  C8

  "

  ,

  "

  C8

  "

  ,

  null

  ,

  false

  ,

  10

  ,

  ""

  ,

  "

  0.0%

  "

  );

    excel.InsertData(be);

    be

  =


  new

   ExcelBE(

  8

  ,

  4

  ,

  ""

  ,

  "

  D8

  "

  ,

  "

  D8

  "

  ,

  null

  ,

  false

  ,

  10

  ,

  ""

  ,

  ""

  );

    excel.InsertData(be);


  //

  add empty divider


      be

  =


  new

   ExcelBE(

  9

  ,

  2

  ,

  ""

  ,

  "

  B9

  "

  ,

  "

  D9

  "

  ,

  "

  GAINSBORO

  "

  ,

  true

  ,

  10

  ,

  ""

  ,

  null

  );

    excel.InsertData(be);


}
结果如下图所示:


 被折叠的 条评论
为什么被折叠?
被折叠的 条评论
为什么被折叠?
 到【灌水乐园】发言


