


转载请注明出处:http://blog.csdn.net/zhuwentao2150/article/details/51407661
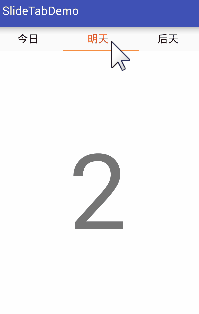
效果图如下,点击对应的Tab标签或者滑动屏幕则可跳转到对应的页面,并且底部的横线也会滑动到对应的Tab标签下面

顶部的导航栏使用三个TextView实现,下划线就是一个ImageView加载了一张横线图片,内容区是用ViewPager实现。
需要注意的是,使用ViewPager控件需要导入android.support.v4.jar兼容包,不过如果你是使用AndroidStudio,则会自动导入
页面布局代码
activity_main.xml
<?xml version="1.0" encoding="utf-8"?> <LinearLayout xmlns:android="http://schemas.android.com/apk/res/android" android:layout_width="match_parent" android:layout_height="match_parent" android:orientation="vertical"><!-- 顶部导航栏 --> <LinearLayout android:layout_width="match_parent" android:layout_height="40dp" android:orientation="horizontal"> <TextView android:id="@+id/tv01" android:layout_width="0dp" android:layout_height="match_parent" android:layout_weight="1" android:gravity="center" android:text="今日" android:textColor="#ff0000" android:textSize="18sp" /> <TextView android:id="@+id/tv02" android:layout_width="0dp" android:layout_height="match_parent" android:layout_weight="1" android:gravity="center" android:text="明天" android:textSize="18sp" /> <TextView android:id="@+id/tv03" android:layout_width="0dp" android:layout_height="match_parent" android:layout_weight="1" android:gravity="center" android:text="后天" android:textSize="18sp" /> </LinearLayout> <!-- Tab底部下划线 --> <ImageView android:id="@+id/iv_tab_bottom_img" android:layout_width="wrap_content" android:layout_height="2dp" android:scaleType="matrix" android:src="@drawable/ic_orange_line" /> <!-- 内容页 --> <android.support.v4.view.ViewPager android:id="@+id/vPager" android:layout_width="wrap_content" android:layout_height="match_parent" android:layout_gravity="center" android:background="#ffffff" />
</LinearLayout>
还需要三个Tab页面作为VIewPager的内容展示页,分别取名 tab_01.xml、tab_02.xml,tab_03.xml 把里面的数字改一改就好了
<?xml version="1.0" encoding="utf-8"?> <LinearLayout xmlns:android="http://schemas.android.com/apk/res/android" android:layout_width="match_parent" android:layout_height="match_parent" android:orientation="vertical"><TextView android:layout_width="match_parent" android:layout_height="match_parent" android:gravity="center" android:textSize="180sp" android:text="1"/>
</LinearLayout>
接下来就是主要代码了,详细的解释在代码里
public class MainActivity extends AppCompatActivity implements View.OnClickListener {private List<View> listViews; private ImageView cursorIv; private TextView tab01, tab02, tab03; private TextView[] titles; private ViewPager viewPager; /** * 偏移量(手机屏幕宽度 / 选项卡总数 - 选项卡长度) / 2 */ private int offset = 0; /** * 下划线图片宽度 */ private int lineWidth; /** * 当前选项卡的位置 */ private int current_index = 0; /** * 选项卡总数 */ private static final int TAB_COUNT = 3; private static final int TAB_0 = 0; private static final int TAB_1 = 1; private static final int TAB_2 = 2; @Override protected void onCreate(Bundle savedInstanceState) { super.onCreate(savedInstanceState); setContentView(R.layout.activity_main); initUI(); initImageView(); initVPager(); } /** * 初始化布局和监听 */ private void initUI() { viewPager = (ViewPager) findViewById(R.id.vPager); cursorIv = (ImageView) findViewById(R.id.iv_tab_bottom_img); tab01 = (TextView) findViewById(R.id.tv01); tab02 = (TextView) findViewById(R.id.tv02); tab03 = (TextView) findViewById(R.id.tv03); tab01.setOnClickListener(this); tab02.setOnClickListener(this); tab03.setOnClickListener(this); } /** * 初始化底部下划线 */ private void initImageView() { // 获取图片宽度 lineWidth = BitmapFactory.decodeResource(getResources(), R.drawable.ic_orange_line).getWidth(); // Android提供的DisplayMetrics可以很方便的获取屏幕分辨率 DisplayMetrics dm = new DisplayMetrics(); getWindowManager().getDefaultDisplay().getMetrics(dm); int screenW = dm.widthPixels; // 获取分辨率宽度 offset = (screenW / TAB_COUNT - lineWidth) / 2; // 计算偏移值 Matrix matrix = new Matrix(); matrix.postTranslate(offset, 0); // 设置下划线初始位置 cursorIv.setImageMatrix(matrix); } /** * 初始化ViewPager并添加监听事件 */ private void initVPager() { listViews = new ArrayList<>(); LayoutInflater mInflater = getLayoutInflater(); listViews.add(mInflater.inflate(R.layout.tab_01, null)); listViews.add(mInflater.inflate(R.layout.tab_02, null)); listViews.add(mInflater.inflate(R.layout.tab_03, null)); viewPager.setAdapter(new MyPagerAdapter(listViews)); viewPager.setCurrentItem(0); titles = new TextView[]{tab01, tab02, tab03}; viewPager.setOffscreenPageLimit(titles.length); viewPager.addOnPageChangeListener(new ViewPager.OnPageChangeListener() { int one = offset * 2 + lineWidth; @Override public void onPageScrolled(int position, float positionOffset, int positionOffsetPixels) { } @Override public void onPageSelected(int position) { // 下划线开始移动前的位置 float fromX = one * current_index; // 下划线移动完毕后的位置 float toX = one * position; Animation animation = new TranslateAnimation(fromX, toX, 0, 0); animation.setFillAfter(true); animation.setDuration(500); // 给图片添加动画 cursorIv.startAnimation(animation); // 当前Tab的字体变成红色 titles[position].setTextColor(Color.RED); titles[current_index].setTextColor(Color.BLACK); current_index = position; } @Override public void onPageScrollStateChanged(int state) { } }); } /** * ViewPager适配器 */ public class MyPagerAdapter extends PagerAdapter { public List<View> mListViews; public MyPagerAdapter(List<View> mListViews) { this.mListViews = mListViews; } @Override public void destroyItem(ViewGroup container, int position, Object object) { container.removeView(mListViews.get(position)); } @Override public Object instantiateItem(ViewGroup container, int position) { container.addView(mListViews.get(position), 0); return mListViews.get(position); } @Override public int getCount() { return mListViews.size(); } @Override public boolean isViewFromObject(View view, Object object) { return view == object; } } @Override public void onClick(View v) { switch (v.getId()) { case R.id.tv01: // 避免重复加载 if (viewPager.getCurrentItem() != TAB_0) { viewPager.setCurrentItem(TAB_0); } break; case R.id.tv02: if (viewPager.getCurrentItem() != TAB_1) { viewPager.setCurrentItem(TAB_1); } break; case R.id.tv03: if (viewPager.getCurrentItem() != TAB_2) { viewPager.setCurrentItem(TAB_2); } break; } }
}
如果嫌下划线走的太慢的话,可以设置animation.setDuration(100),传入的毫秒数字越小动画执行的越快,越大则越慢
要注意animation.setFillAfter()一定要设置为true,防止下划线图片返回,Animation动画终止时让ImageView停留在最后一帧,不然下划线又会回到没有执行Animation之前的状态,如下图
其实这个效果也可使用Google提供的TabLayout来实现:《使用TabLayout制作下划线能滑动的Tab标签页》
Demo源码:传送门


 5087
5087

 被折叠的 条评论
为什么被折叠?
被折叠的 条评论
为什么被折叠?
 到【灌水乐园】发言


