


 本文介绍了CUnit作为C语言的单元测试框架,详细阐述了其作用、结构和使用方法,包括测试注册簿、测试包、测试用例的管理。通过一个简单的CUnit测试案例,展示了如何编写、注册和运行测试用例。此外,还提供了CUnit在Windows下的安装步骤和配置指南,以及如何生成和解析测试报告。
入门须知
为什么要用cunit做测试?在项目编译之前,如果想测试某个业务逻辑或者基础库的功能,可以使用CUNIT工具进行处理。
什么是cunit
CUnit是一种C语言单元测试框架 ,CUnit以静态库的形式提供给用户使用,用户编写程序的时候直接链接此静态库就可以了。它提供了一个简单的单元测试框架,并且为常用的数据类型提供了丰富的断言语句支持。
CUnit是一个的独立于平台的测试框架,核心框架是提供基本的测试注册薄,测试包和测试用例的管理服务。CUnit完成测试的自动化工具,编写一定的代码就可以完成对工程的单元测试,包含N个suit,每个suit下面又有很多test。
cunit的测试框架结构
CUnit核心框架为测试注册簿、测试包和测试用例的管理提供了基本支持,它提供的接口可以使用户和测试框架交互,方便测试的运行和测试结果的查看。CUnit被组织成一个常见的单元测试框架,其结构如下:
                  Test Registry
                        |
         ------------------------------
         |                            |
      Suite '1'      . . . .       Suite 'N'
         |                            |
   ---------------             ---------------
   |             |             |             |
Test '11' ... Test '1M'     Test 'N1' ... Test 'NM'
测试用例被打包成测试包,并被注册到当前活动的测试注册簿中。测试包的装载和卸载函数在测试执行前后被自动调用。所有的测试包和测试用例可以一键运行,也可以选择相应的测试包或测试用例来执行测试。
4种测试模式
- Automated Output to xml file Non-interactive
- Basic Flexible programming interface Non-interactive
- Console Console interface (ansi C) Interactive
- Curses Graphical interface (Unix) Interact
注意1,2是没有交互功能的,第3个console可以人机交互,4是Unix下的。
测试的基本方法
使用CUnit框架的常用流程如下:
编写测试用例,如果有必要须对测试包进行初始化或者清理
初始化测试注册簿 CU_initialize_registry()
向注册簿中注册测试包 CU_add_suite()
向测试包中添加测试用例 CU_add_test()
使用合适的测试模式执行测试CU_automated(basic/console/curses)_run_tests()
清理测试注册簿 CU_cleanup_registry()
cunit在Windows下的安装
安装mingw
msys2可以让你在Windows下编译Linux的代码。下载链接 直接download即可。
安装后需要配置,具体配置可以看这个学习,链接
安装msys
完整安装包下载链接 完整版的文件名为msys+7za+wget+svn+git+mercurial+cvs-rev13.7z文件。
解压完毕请把文件夹msys全部拷贝到mingw的目录下,我这里为C:\mingw-w64\x86_64-8.1.0-posix-seh-rt_v6-rev0\mingw64。
进入C:\mingw-w64\x86_64-8.1.0-posix-seh-rt_v6-rev0\mingw64\msys,打开msys.bat。执行以下命令:
cd C:\CUnit-2.1-3 #解压的CUnit的根目录
libtoolize
automake --add-missing
autoreconf
./configure --prefix=/mingw
make
make install
安装完毕把 C:\mingw-w64\x86_64-8.1.0-posix-seh-rt_v6-rev0\mingw64\msys\mingw\lib\libcunit.a 拷贝到 C:\mingw-w64\x86_64-8.1.0-posix-seh-rt_v6-rev0\mingw64\lib。(不拷贝在下面gcc或者clang运行中,加入-lcunit参数会提示…lib: can’t find -lcunit的错误)
接下来把 C:\mingw-w64\x86_64-8.1.0-posix-seh-rt_v6-rev0\mingw64\msys\mingw\include\CUnit\ 目录中的所有.h文件拷贝到 C:\mingw-w64\x86_64-8.1.0-posix-seh-rt_v6-rev0\mingw64\include 中去。
cunit的使用
cunit测试案列
/*
* Simple example of a CUnit unit test.
*
* This program (crudely) demonstrates a very simple "black box"
* test of the standard library functions fprintf() and fread().
* It uses suite initialization and cleanup functions to open
* and close a common temporary file used by the test functions.
* The test functions then write to and read from the temporary
* file in the course of testing the library functions.
*
* The 2 test functions are added to a single CUnit suite, and
* then run using the CUnit Basic interface. The output of the
* program (on CUnit version 2.0-2) is:
*
* CUnit : A Unit testing framework for C.
* http://cunit.sourceforge.net/
*
* Suite: Suite_1
* Test: test of fprintf() ... passed
* Test: test of fread() ... passed
*
* --Run Summary: Type Total Ran Passed Failed
* suites 1 1 n/a 0
* tests 2 2 2 0
* asserts 5 5 5 0
*/
/* 根据书上程序流图编写 */
#include <stdio.h>
#include <string.h>
#include "CUnit/Headers/Basic.h"
#include "CUnit/Headers/Automated.h"
/* Pointer to the file used by the tests. */
//定义一个空文件用来测试
static FILE* temp_file = NULL;
/* The suite initialization function.
* Opens the temporary file used by the tests.
* Returns zero on success, non-zero otherwise.
*/
//初始化suite,编写init套件
int init_suite1(void)
{
if (NULL == (temp_file = fopen("temp.txt", "w+"))) {
return -1;
}
else {
return 0;
}
}
/* The suite cleanup function.
* Closes the temporary file used by the tests.
* Returns zero on success, non-zero otherwise.
*/
//初始化套件。编写clean套件
int clean_suite1(void)
{
if (0 != fclose(temp_file)) {
return -1;
}
else {
temp_file = NULL;
return 0;
}
}
/* Simple test of fprintf().
* Writes test data to the temporary file and checks
* whether the expected number of bytes were written.
*/
//用以测试的fprintf和fread的用例
void testFPRINTF(void)
{
int i1 = 10;
if (NULL != temp_file) {
CU_ASSERT(0 == fprintf(temp_file, ""));
CU_ASSERT(2 == fprintf(temp_file, "Q\n"));
CU_ASSERT(7 == fprintf(temp_file, "i1 = %d", i1));
}
}
/* Simple test of fread().
* Reads the data previously written by testFPRINTF()
* and checks whether the expected characters are present.
* Must be run after testFPRINTF().
*/
void testFREAD(void)
{
unsigned char buffer[20];
if (NULL != temp_file) {
rewind(temp_file);
CU_ASSERT(9 == fread(buffer, sizeof(unsigned char), 20, temp_file));
CU_ASSERT(0 == strncmp((char *)buffer, "Q\ni1 = 10", 9));
}
}
/* The main() function for setting up and running the tests.
* Returns a CUE_SUCCESS on successful running, another
* CUnit error code on failure.
*/
int main()
{
//第一步,初始化结构体
CU_pSuite pSuite = NULL;
/* initialize the CUnit test registry */
//第二步,初始化注册表
if (CUE_SUCCESS != CU_initialize_registry())
return CU_get_error();
/* add a suite to the registry */
//第三步,添加套件到测试注册表
pSuite = CU_add_suite("Suite_1", init_suite1, clean_suite1);
if (NULL == pSuite) { //如果失败,清理注册表并报错
CU_cleanup_registry();
return CU_get_error();
}
/* add the tests to the suite */
/* NOTE - ORDER IS IMPORTANT - MUST TEST fread() AFTER fprintf() */
//第四步,添加测试套件
if ((NULL == CU_add_test(pSuite, "test of fprintf()", testFPRINTF)) ||
(NULL == CU_add_test(pSuite, "test of fread()", testFREAD)))
{
CU_cleanup_registry();
return CU_get_error();
}
/* Run all tests using the CUnit Basic interface */
//第五步,使用适当的接口运行测试
CU_basic_set_mode(CU_BRM_VERBOSE);///设置基本的接口运行模式
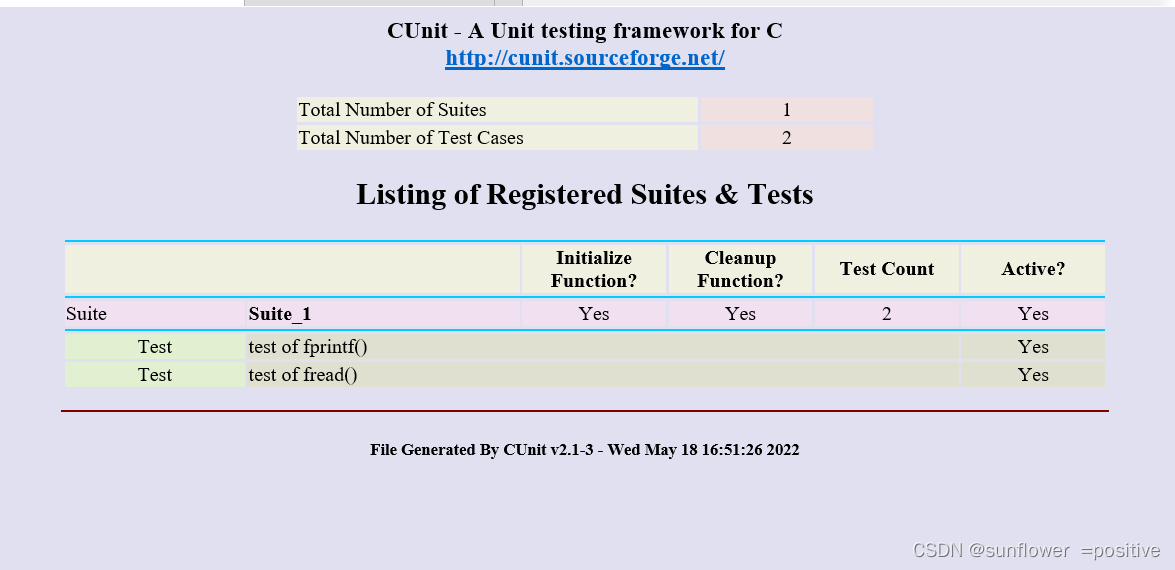
CU_list_tests_to_file();
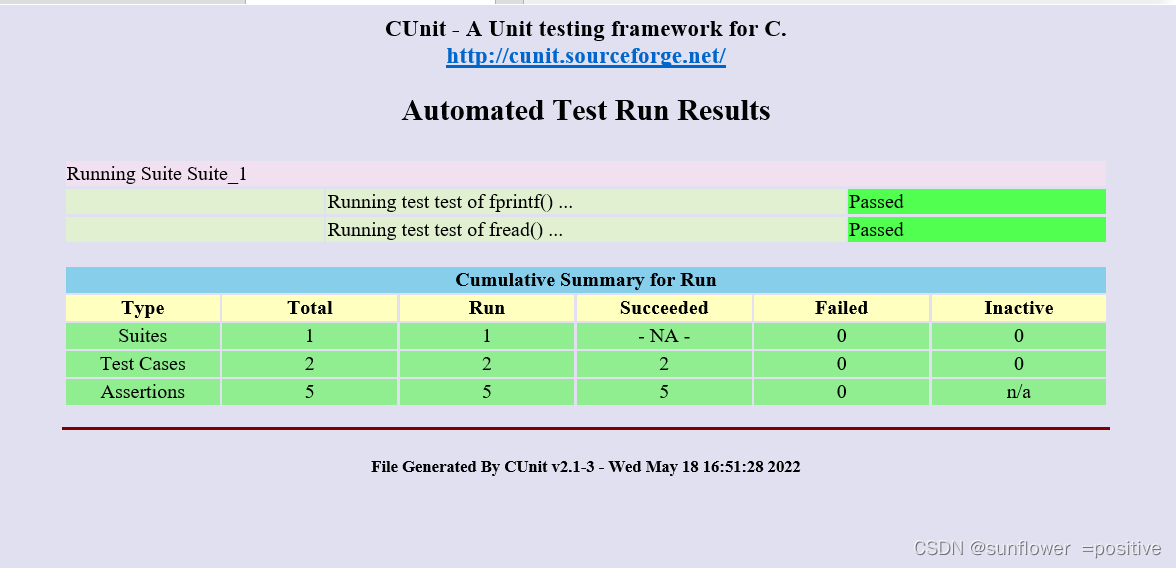
CU_automated_run_tests();//使用automated的方式运行所有注册的cunit测试
//第六步,清理测试注册表
CU_cleanup_registry();
return CU_get_error();
}
建立一个go.c文件,然后在VS code的编译环境的终端输入,在文件下会自动生成一个a.exe文件,运行exe文件会产生两个xml文件。
gcc go.c  lcunit
./a.exe
把项目生成的 Listing.xml和Results.xml,与CUnit D:\program\mingw64\msys\mingw\share\CUnit 安装目录下的
CUnit-List.dtd
CUnit-List.xsl
CUnit-Run.dtd
CUnit-Run.xsl
共六个文件,放到一个文件夹下,拷贝到window系统下,使用IE浏览器打开。注意,要用IE浏览器进行打开,谷歌浏览器和狐火浏览器都无法正确打开。
打开后的结果如图:
-
关于gcc的内容,可以参考一下这个内容 :参考链接
-
主要步骤的说明
CU_pSuite pSuite = NULL//结构体初始化,用户使用CUnit前,必须运行CU_initialize_registry接口进行测试框架初始化。
CU_initialize_registry()//初始化注册表
CU_cleanup_registry();//清理注册表,用户使用CUnit后,必须运行CU_cleanup_registry接口用于释放测试框架
CU_pSuite =CU_add_suite(const char* strName, CU_InitializeFunc pInit, CU_CleanupFunc pClean);//创建一个新的测试集,具有指定的名称、初始化函数、清除函数。函数用于用户向测试框架注册一个单元测试;strName【入参】:单元测试的名称,必须在框架内唯一;pInit【入参】:单元测试初始化程序,类似于构造函数;pClean【入参】:单元测试结束程序,类似于析构函数。
CU_pTest =CU_add_test(CU_pSuite , const char* strName, CU_TestFunc pTestFunc)//创建一个新的具有指定名称和测试功能的test,并在指定的suite中注册。该suite必须是已经使用CU_add_suite()创建的。函数用于用户向单元测试中增加一个测试用例,pSuite【入参】:单元测试指针。strName【入参】:测试用例名称;pTestFunc【入参】:测试用例函数。
void CU_basic_set_mode(CU_BasicRunMode mode);//设置基本运行模式,该模式在测试运行期间控制输出,mode【入参】:可选择下列参数值
mode | 模式具体含义
CU_BRM_NORMAL   |打印失败和运行摘要。
CU_BRM_SILENT	|除错误消息外,不输出任何输出。
CU_BRM_VERBOSE	|运行详细信息的最大输出。
//运行Tests
1)     Automated Mode 自动输出到XML文件
非交互式
void CU_automated_run_tests(void);//运行在所有suites中注册的所有tests
CU_ErrorCode CU_list_tests_to_file(void);//列出已注册的suites和与其相关联的tests
void CU_set_output_filename(const char* szFilenameRoot);//设置-Results.xml和-Listing.xml的名字
2)     Basic Mode   基本扩展编程方式
非交互式
CU_ErrorCode CU_basic_run_tests(void);//运行在所有suites中注册的所有tests
CU_ErrorCode CU_basic_run_suite(CU_pSuite pSuite);//在一个指定的suite中运行其下所有的tests
CU_ErrorCode CU_basic_run_test(CU_pSuite pSuite, CU_pTest pTest);//在一个指定的suite中运行指定的test
void CU_basic_set_mode(CU_BasicRunMode mode);//设置运行的基本模式,控制着tests的输出
CU_BasicRunMode CU_basic_get_mode(void);//检测当前的运行模式
void CU_basic_show_failures(CU_pFailureRecord pFailure);//将所有的失败信息打印到stdout,不依赖于运行模式
3)     Interactive Console Mode  控制台方式
交互式
void CU_console_run_tests(void);//启动控制台方式
4)         Interactive Curses Mode    Curses图形接口
交互式,只适用于Unix/Linux
void CU_curses_run_tests(void);//启动Curses方式,需要应用程序中支持ncurses库支持
CU_ErrorCode   CU_get_error(void);//由于CUnit部分函数错误时,返回NULL。
cunit构成结构
我要测试的是整数求最大值的函数maxi,我使用如下文件组织结构:
⒈test.c:被测函数(定义函数)
⒉testcase.c:测试函数(定义测试用例和测试包)
⒊Main.c:运行测试函数(调用CUnit的Automated接口运行测试)
CUNIT的自动化测试case
我是在vscode环境下进行编译的,在写函数之前需要先进一个新的文件夹,然后把cunit的Headers放在新建文件下,后面的代码需要用到的头文件都在Headers里面。位置在 D:\program\CUnit-2.1-3\CUnit\Headers
convert.c:表示需要被测试的函数。
// convert.c
// 版本1
int
str_to_int(char* s)
{
    int sum = 0;
    char *p = s;
    while (*p != 0) {
        sum = sum * 10 + *p -'0';
        p++;
    }
    return sum;
}
TEST.c
#include<stdio.h>
#include<assert.h>
#include<stdlib.h>
#include"Headers/Automated.h"
#include"Headers/CUnit.h"
#include"Headers/TestDB.h"

//测试函数
void
TEST_str_to_int()
{
    int ans;
    char *p;
    char *ps[] = { "123", "-123", "0", "siahideib",  "2147483648", "2147483647", "-1-2", "            -2147483647", "  -2147483648aaaa"};
    int real[] = {123,    -123,   0,   0,            0,            2147483647,   -1,     -2147483647,               -2147483648};

    int i = 0;
    for (i = 0; i < sizeof(real)/sizeof(real[0]); i++) {
        ans = str_to_int(ps[i]);
        CU_ASSERT_EQUAL(ans,real[i]);
    }
}

//定义一个registry 和一个suite,在suite中添加被测函数,并在registry中注册。

int  suite_success_init(void)
{
    return  0;
}

int  suite_success_clean(void)
{
    return  0;
}

CU_SuiteInfo suites[] = //一个测试suite init-->testcase-->clean
{

    {"Testing the functionmaxi:", suite_success_init, suite_success_clean, TEST_str_to_int},
    CU_SUITE_INFO_NULL
};

void  AddTests(void)
{

    assert(NULL != CU_get_registry());
    assert(!CU_is_test_running());
    if(CUE_SUCCESS  != CU_register_suites(suites))  //注册测试suite
    {

        fprintf(stderr, "Register suites failed - %s ", CU_get_error_msg());
        exit(EXIT_FAILURE);
    }
}
main.c
#include<stdio.h>
#include "TEST.c"

void run_test()
{
    if (CU_initialize_registry()) {
        printf("error");
        return ;
    }
    assert(NULL != CU_get_registry());
    assert(!CU_is_test_running());
    if (0 != addTestModule()) {
		CU_cleanup_registry();
		return ;
	}

    // 报表模式
    // 设置输出文件名称
    CU_set_output_filename("str_to_int_test_report");
    CU_list_tests_to_file();
    CU_automated_run_tests();

    // 基本模式
    // CU_basic_set_mode(CU_BRM_VERBOSE);
    // CU_basic_run_tests();
    // 控制台模式
    // CU_console_run_tests();
    // CU_console_run_tests();
    CU_cleanup_registry();
}

//主函数调用测试函数
int main()
{
    run_test();
    return 0;
}
gcc convert.c main.c TEST.c  -lcunit
./a.exe
把项目生成的Test Listing.xml和Test-Results.xml,与CUnit D:\program\mingw64\msys\mingw\share\CUnit 安装目录下的
CUnit-List.dtd
CUnit-List.xsl
CUnit-Run.dtd
CUnit-Run.xsl
共六个文件,放到一个文件夹下,拷贝到window系统下,使用IE浏览器打开。注意,要用IE浏览器进行打开,谷歌浏览器和狐火浏览器都无法正确打开。
新手小白,发出来是为了和大家学习一起相互学习,相互进步,请多指教。


 2029
2029

 被折叠的 条评论
为什么被折叠?
被折叠的 条评论
为什么被折叠?
 到【灌水乐园】发言


