


"Hello Cloud" - An illustrative walk-through of the Sun Cloud API
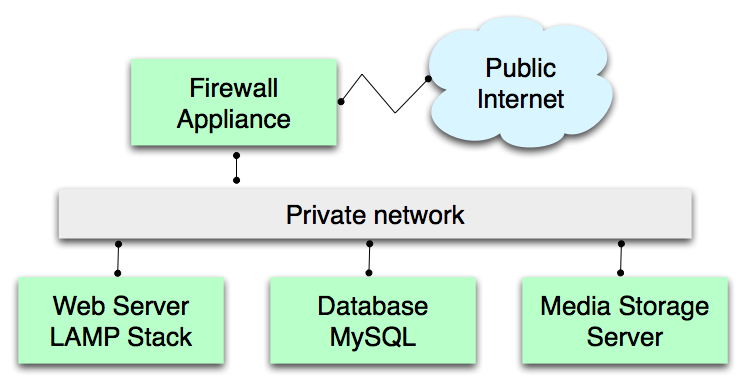
This document illustrates by example the process of building a Virtual Data Center to support a simple web application. Let's assume that this application does storage and retrieval of large media files; the required infrastructure is:
- A firewall appliance for connecting to the Internet
- A private network connecting the firewall to other systems
- A Linux web server running a LAMP stack
- A Solaris database machine running MySQL for application persistence
- A WebDAV server for the media files
Here's a schematic of the effect we want to achieve.
This walk-through uses the pure REST version of the API exclusively. Quite likely, many users would prefer to script this in a higher-level language or even to use a Web or compiled GUI.
All the resources in the Virtual Data Center (machines, clusters, networks, storage volumes) are "Resources" in the Web sense: that is to say, they are identified by URIs, and operated on by HTTP requests, chiefly GET and POST. Whenever you GET one of these resources, you receive a representation encoded using JSON.
This walk-through should make it obvious that the cloud interface doesn't constrain the design of the URI space. URIs used for retrieving, creating, and controlling the resources are provided by the system; clients can make no assumptions as to their internal syntax.
Of course, it is necessary to bootstrap this process. A single URI must be provided, that of the Virtual Data Center (VDC) itself. In this example, let's assume that a customer named "XRGY" is building the VDC; initially, all that is known is the VDC's URI: xrgy.cloud.sun.com.
Examining the Virtual Data Center
As a first step, we fetch a representation of the VDC, to ascertain what resources are available and can be created.
To server:
From server:
A close look reveals that the VDC is mostly empty. It comes with a few preconfigured resources:
- A "cluster", an administrative container for grouping virtual machines.
- A firewall-appliance virtual machine.
- A private network, to which the appliance is connected.
- A single public IP address, also connected to the firewall.
Note that these objects are richly equipped with URIs which may be used to add more resources to the VDC, or control the operation of resources that are there. While the URIs in the example follow an obvious pattern, that is an artifact of this implementation; another Cloud service provider might us an entirely different URI-space design. Clients should treat the URIs as opaque strings.
However, note that almost all the embedded URIs are relative references, beginning with "/". The usual practices for absolutizing them apply; standard HTTP libraries will take care of this.
Virtual Machine templates
Our first step is to examine the templates available use for creating virtual machines. The JSON representation of the VDC above includes a field named "vm_templates"; its value is a URI by which a catalog of templates may be retreived.
To server:
From server:
A virtual-machine template has many fields, similar to those observed in the representation of the firewall appliance above; we've omitted them to make this walk-through more readable.
Adding Servers
In this setup, we will use the firewall appliance that's already there, a Debian LAMP-stack VM, and a larger OpenSolaris VM for MySQL. We could group these into multiple clusters for administrative convenience, access control, and programmability, but for this walk-through we will bypass that and put everything in the pre-provided "cluster1" cluster.
Since we're adding the machine to "cluster1", we need to post enough of the VM rpresentation to that cluster's URI to get the job done; in this case, a name and description for the new VM, and a reference to the template we want to base it on.
To server:
From server; for readability, we omit many of the VM's fields where their values are not particularly relevant to this deployment - the Firewall example in the VDC representation above is an example of a complete VM representation:
Note that the newly-added server is not connected to any networks, since its interfaces field is unpopulated.
The request that would be used to create the Solaris web server would be straightforwardly similar. After these two requests had been issued, the vms field of "cluster1" would have representations of three VMs.
Virtual Networks
We want to connect our servers to the Firewall server, but not directly to the outside world. For this purpose, we use a Virtual Network (VNet). Our VDC came pre-configured with one named "vnet1", so we will use this. In a more complex configuration we might want further isolation of the Web tier from the Database tier, and use two VNets. VNets may be created by POSTing a VNet representation to the the URI of the containing VDC.
Connecting the machines to the network
Given that the Firewall is already connected to our VNet and a Public Address, we need only connect the Database and Web-Server servers to the VNet. Examining the representation of the Database machine reveals a field named attach whose value is "/clusters/cluster1/vms/001/ops/attach". The only piece of information the system needs to make the connection is the URI, the unique identifier of the VNet.
To server:
From server:
The the 204 code signals that the operation was successful. After the operation has completed, the interfaces field in the representation of the Database would be something like this:
This signals that the Database machine is connected to the VNet on interface "eth0" at IP address 10.31.145.254.
Similarly, it would be straightforward to connect the Web-server machine to the same VNet.
Creating and Attaching a Storage Volume
For the purposes of this application, we will use a WebDAV server to store the media objects, with metadata and links stored in the MySQL database. A POST of a Volume representation to a VDC's URI is a request to create a new storage volume within that VDC. Since most of the fields are set by the server, we only supply the name. The server knows that this is a request to create a Volume by examining the Content-Type header.
To server:
From server:
After the operation has completed, the volumes field in the representation of the VDC would be something like this:
Modeling, Deploying, Starting, and Stopping
At this point, we have created two servers, a WebDAV-accessible storage volume, and made the necessary network connections. However, the VDC is not yet actually in operation. It would be undesirable for the kinds of changes exhibited so far in the walk-through to take immediate effect.
The "deploy" operation, offered at various levels of VDC infrastructure, is a request to create a physical instantiation of the current state of the model. Upon successful completion, physical resources exist which match the representation of the various objects in the VDC.
Once the software has been deployed, it can be started. The "deploy" and "start" operations are available both at the VM and Cluster levels. In this fairly minimal setup, it is only necessary to deploy and start "cluster1" to have the infrastructure on the air.
For this type of operation, the only operation in the request body is a human-readable note to be used for logging and auditing purposes.
To server:
From server:
This will cause the deploy_state of "cluster1" and the run_state of the VMs to change to DEPLOYING, and then after some period of time to DEPLOYED for the clusters and HALTED for the VMs. Now we are ready to boot the servers.
To server:
From server:
This will cause the run_state of all the machines in the cluster to change to STARTING, and then after some period of time to STARTED.
Conclusion
This completes the initial walk-through, illustrating the basics of creating a fairly minimal virtual data center. Many capabilities of the API have been omitted for brevity. For further reference, consult "Hello, Big Cloud", a similar walk-through for a larger and more ambitious VDC deployment; also the specification pages on this wiki which detail the resource models and all the operations available on them.
Some capabilities omitted in this walk-through include:
- Cloning and copying: These features are operations at both the Cluster and VM levels. They represent the most straightforward and efficient way of configuring homogeneous machines for operation in one tier of of a Web application.
- Clustering: Clusters of VMs are useful in cloning/copying operations, for enforcing access control, for modeling geographically distributed groups of machines, and for simplifying automated operational scripting. A typical real-world VDC would probably have multiple clusters; for example, one for the firewall(s), one for the App Server tier, and one for the Database tier.
- Backups: Backup and restore operations are available at the VM level and may be automated through this interface.
- Startup parameters. A machine, when started, needs to be instructed as to its role and workflow. This information is made available on a virtual filesystem which is mounted at boot time at /cloud; the VMs' startup scripts, after booting has completed, execute /cloud/startup. The contents of /cloud may be controlled programmatically through the params field of the VM resource.
Copyright © Sun Microsystems, 2009. This work is licensed under Creative Commons Attribution 3.0 Unported License


 被折叠的 条评论
为什么被折叠?
被折叠的 条评论
为什么被折叠?
 到【灌水乐园】发言


