


部署物理机跟部署虚拟机的概念在nova来看是一样,都是nova通过创建虚拟机的方式来触发,只是底层nova-scheduler和nova-compute的驱动不一样。虚拟机的底层驱动采用的libvirt的虚拟化技术,而物理机是采用Ironic技术,ironic可以看成一组Hypervisor API的集合,其功能与libvirt类似。
操作系统安装过程
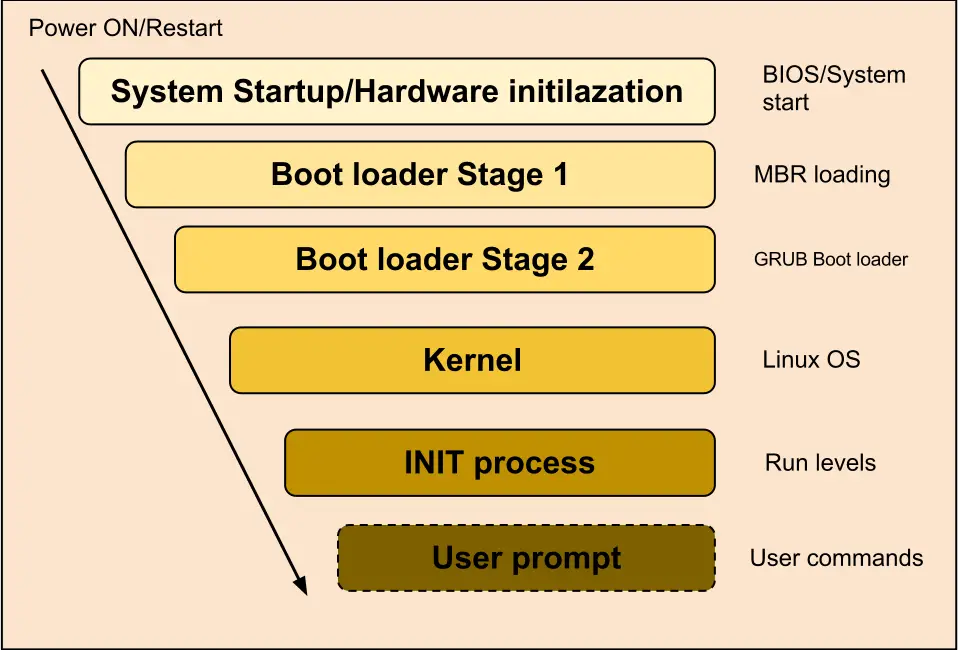
Linux系统启动过程
- bootloader(引导程序,常见的有GRUB、LILO)
- kernel(内核)
- ramdisk(虚拟内存盘)
- initrd/initramfs (初始化内存磁盘镜像)
下面我们分别介绍每个概念:
- 引导加载程序是系统加电后运行的第一段软件代码。PC机中的引导加载程序由BIOS(其本质就是一段固件程序)和位于硬盘MBR(主引导记录,通常位于第一块硬盘的第一个扇区)中的OS BootLoader(比如,LILO和GRUB等)一起组成。BIOS在完成硬件检测和资源分配后,硬盘MBR中的BootLoader读到系统的RAM中,然后控制权交给OS BootLoader。
- bootloader负责将kernel和ramdisk从硬盘读到内存中,然后跳转到内核的入口去运行。
- kernel是Linux的内核,包含最基本的程序。
- ramdisk是一种基于内存的虚拟文件系统,就好像你又有一个硬盘,你可以对它上面的文件添加修改删除等等操作。但是一掉电,就什么也没有了,无法保存。一般驱动程序放在这里面。
- initrd是boot loader initialized RAM disk, 顾名思义,是在系统初始化引导时候用的ramdisk。也就是由启动加载器所初始化的RamDisk设备,它的作用是完善内核的模块机制,让内核的初始化流程更具弹性;内核以及initrd,都由 bootloader在机子启动后被加载至内存的指定位置,主要功能为按需加载模块以及按需改变根文件系统。initramfs与initrd功能类似,是initrd的改进版本,改进了initrd大小不可变等等缺点。

为什么需要initrd?
在早期的Linux系统中,一般就只有软盘或者硬盘被用来作为Linux的根文件系统,因此很容易把这些设备的驱动程序集成到内核中。但是现在根文件系统 可能保存在各种存储设备上,包括SCSI, SATA, U盘等等。因此把这些设备驱动程序全部编译到内核中显得不太方便,违背了“内核”的精神。在Linux内核模块自动加载机制中可以利用udevd可以实现内核模块的自动加载,因此我们希望根文件系统的设备驱动程序也能够实现自动加载。但是这里有一个矛盾,udevd是一个可执行文件,在根文件系统被挂载前,是不可能执行udevd的,但是如果udevd没有启动,那就无法自动加载根根据系统设备的驱动程序,同时也无法在/dev目录下建立相应的设备节点。
为了解决这个矛盾,于是出现了initrd(boot loader initialized RAM disk)。initrd是一个被压缩过的小型根目录,这个目录中包含了启动阶段中必须的驱动模块,可执行文件和启动脚本。包括上面提到的udevd,当系统启动的时候,bootload会把内核和initrd文件读到内存中,然后把initrd的起始地址告诉内核。内核在运行过程中会解压initrd,然后把initrd挂载为根目录,然后执行根目录中的/initrc脚本,可以在这个脚本中运行initrd中的udevd,让它来自动加载设备驱动程序以及 在/dev目录下建立必要的设备节点。在udevd自动加载磁盘驱动程序之后,就可以mount真正的根目录,并切换到这个根目录中。
Linux启动一定要用initrd么?
如果把需要的功能全都编译到内核中(非模块方式),只需要一个内核文件即可。initrd 能够减小启动内核的体积并增加灵活性,如果你的内核以模块方式支持某种文件系统(例如ext3, UFS),而启动阶段的驱动模块放在这些文件系统上,内核是无法读取文件系统的,从而只能通过initrd的虚拟文件系统来装载这些模块。这里有些人会问: 既然内核此时不能读取文件系统,那内核的文件是怎么装入内存中的呢?答案很简单,Grub是file-system sensitive的,能够识别常见的文件系统。通用安装流程如下:
- 开机启动,BIOS完成硬件检测和资源分配,选择操作系统的启动(安装)模式(此时,内存是空白的)
- 然后根据相关的安装模式,寻找操作系统的引导程序(bootloader)(不同的模式,对应不同的引导程序当然也对应着不同的引导程序存在的位置)
- 引导程序加载文件系统初始化(initrd)程序和内核初始镜像(vmlinuz),完成操作系统安装前的初始化
- 操作系统开始安装相关的系统和应用程序。
PXE部署过程
PXE协议分为client和server两端,PXE client在网卡的ROM中,当计算机启动时,BIOS把PXE client调入内存执行,并显示出命令菜单,经用户选择后,PXE client将放置在远端的操作系统通过网络下载到本地运行。
安装流程如下:
- 客户机从自己的PXE网卡启动,向本网络中的DHCP服务器索取IP,并搜寻引导文件的位置
- DHCP服务器返回分给客户机IP以及NBP(Network Bootstrap Program )文件的放置位置(该文件一般是放在一台TFTP服务器上)
- 客户机向本网络中的TFTP服务器索取NBP
- 客户机取得NBP后之执行该文件
- 根据NBP的执行结果,通过TFTP服务器加载内核和文件系统
- 安装操作系统

流程小结:
客户端广播dhcp请求——服务器相应请求,建立链接——由dhcp和tftp配置得到ip还有引导程序所在地点——客户端下载引导程序并开始运行——引导程序读取系统镜像-安装操作系统
相关文件位置与内容:
- dhcp配置文件/etc/dhcpd/dhcp.conf——ip管理与引导程序名称
- tftp配置文件/etc/xinetd.d/tftp——tftp根目录,和上面的引导程序名称组成完整路径
- 引导程序读取的配置文件/tftpboot/pxelinux.cfg/default——启动内核其他
参考资料: PXE网络安装操作系统过程
Ironic部署过程
部署流程
 此图是Liberty版的官方裸机部署过程图,部署过程描述如下:
- 部署物理机的请求通过 Nova API 进入Nova;
- Nova Scheduler 根据请求参数中的信息(指定的镜像和硬件模板等)选择合适的物理节点;
- Nova 创建一个 spawn 任务,并调用 Ironic API 部署物理节点,Ironic 将此次任务中所需要的硬件资源保留,并更新数据库;
- Ironic 与 OpenStack 的其他服务交互,从 Glance 服务获取部署物理节点所需的镜像资源,并调用 Neutron 服务为物理机创建网路端口;
- Ironic 开始部署物理节点,PXE driver 准备 tftp bootloader,IPMI driver 设置物理机启动模式并将机器上电;
- 物理机启动后,通过 DHCP 获得 Ironic Conductor 的地址并尝试通过 tftp 协议从 Conductor 获取镜像,Conductor 将部署镜像部署到物理节点上后,通过 iSCSI 协议将物理节点的硬盘暴露出来,随后写入用户镜像,成功部署用户镜像后,物理节点的部署就完成了。
下面我们通过代码来分析Ironic的部署流程。
Ironic给物理机部署系统详解
配置
在/etc/nova/nova.conf中修改manager和driver,比如修改成如下:
[DEFAULT]
scheduler_host_manager = nova.scheduler.ironic_host_manager.IronicHostManager
compute_driver = nova.virt.ironic.driver.IronicDriver
compute_manager = ironic.nova.compute.manager.ClusteredComputeManager
[ironic]
admin_username = ironic
admin_password = unset
admin_url = http://127.0.0.1:35357/v2.0
admin_tenant_name = service
compute_manager的代码实现是在ironic项目里面。
部署流程
第一步, nova-api接收到nova boot的请求,通过消息队列到达nova-scheduler
第二步, nova-scheduler收到请求后,在scheduler_host_manager里面处理。nova-scheduler会使用flavor里面的额外属性extra_specs,像cpu_arch,baremetal:deploy_kernel_id,baremetal:deploy_ramdisk_id等过滤条件找到相匹配的物理节点,然后发送RPC消息到nova-computer。
第三步,nova-computer拿到消息调用指定的driver的spawn方法进行部署,即调用nova.virt.ironic.driver.IronicDriver.spawn(), 该方法做了什么操作呢?我们来对代码进行分析(下面的代码只保留了主要的调用)。
 def spawn(self, context, instance, image_meta, injected_files,
             admin_password, network_info=None, block_device_info=None):

        #获取镜像信息 image_meta = objects.ImageMeta.from_dict(image_meta) ...... #调用ironic的node.get方法查询node的详细信息,锁定物理机,获取该物理机的套餐信息 node = self.ironicclient.call("node.get", node_uuid) flavor = instance.flavor #将套餐里面的baremetal:deploy_kernel_id和baremetal:deploy_ramdisk_id信息 #更新到driver_info,将image_source、root_gb、swap_mb、ephemeral_gb、 #ephemeral_format、preserve_ephemeral信息更新到instance_info中, #然后将driver_info和instance_info更新到ironic的node节点对应的属性上。 self._add_driver_fields(node, instance, image_meta, flavor) ....... # 验证是否可以部署,只有当deply和power都准备好了才能部署 validate_chk = self.ironicclient.call("node.validate", node_uuid) ..... # 准备部署 try: #将节点的虚拟网络接口和物理网络接口连接起来并调用ironic API #进行更新,以便neutron可以连接 self._plug_vifs(node, instance, network_info) self._start_firewall(instance, network_info) except Exception: .... # 配置驱动 onfigdrive_value = self._generate_configdrive( instance, node, network_info, extra_md=extra_md, files=injected_files) # 触发部署请求 try: #调用ironic API,设置provision_state的状态ACTIVE self.ironicclient.call("node.set_provision_state", node_uuid, ironic_states.ACTIVE, configdrive=configdrive_value) except Exception as e: .... #等待node provision_state为ATCTIVE timer = loopingcall.FixedIntervalLoopingCall(self._wait_for_active, self.ironicclient, instance) try: timer.start(interval=CONF.ironic.api_retry_interval).wait() except Exception: ...
nova-compute的spawn的步骤包括:
- 获取节点
- 配置网络信息
- 配置驱动信息
- 触发部署,设置ironic的provision_state为ACTIVE
- 然后等待ironic的node provision_state为ACTIVE就结束了。
第四步
ironic-api接收到了provision_state的设置请求,然后返回202的异步请求,那我们下来看下ironic在做什么?
首先,设置ironic node的provision_stat为ACTIVE相当于发了一个POST请求:PUT /v1/nodes/(node_uuid)/states/provision。那根据openstack的wsgi的框架,注册了app为ironic.api.app.VersionSelectorApplication的类为ironic的消息处理接口,那PUT /v1/nodes/(node_uuid)/states/provision的消息处理就在ironic.api.controllers.v1.node.NodeStatesController的provision方法。
@expose.expose(None, types.uuid_or_name, wtypes.text,
                   wtypes.text, status_code=http_client.ACCEPTED)
    def provision(self, node_ident, target, configdrive=None): .... if target == ir_states.ACTIVE: #RPC调用do_node_deploy方法 pecan.request.rpcapi.do_node_deploy(pecan.request.context, rpc_node.uuid, False, configdrive, topic) ...
然后RPC调用的ironic.condutor.manager.ConductorManager.do_node_deploy方法,在方法中会先检查电源和部署信息,其中部署信息检查指定的节点的属性是否包含驱动的要求,包括检查boot、镜像大小是否大于内存大小、解析根设备。检查完之后调用ironic.condutor.manager.do_node_deploy方法
def do_node_deploy(task, conductor_id, configdrive=None):
    """Prepare the environment and deploy a node.""" node = task.node ... try: try: if configdrive: _store_configdrive(node, configdrive) except exception.SwiftOperationError as e: with excutils.save_and_reraise_exception(): handle_failure( e, task, _LE('Error while uploading the configdrive for ' '%(node)s to Swift'), _('Failed to upload the configdrive to Swift. ' 'Error: %s')) try: #调用驱动的部署模块的prepare方法,不同驱动的动作不一样 #1. pxe_* 驱动使用的是iscsi_deploy.ISCSIDeploy.prepare, #然后调用pxe.PXEBoot.prepare_ramdisk()准备部署进行和环境,包括cache images、 update DHCP、 #switch pxe_config、set_boot_device等操作 #cache images 是从glance上取镜像缓存到condutor本地, #update DHCP指定bootfile文件地址为condutor #switch pxe_config将deploy mode设置成service mode #set_boot_device设置节点pxe启动 #2. agent_* 生成镜像swift_tmp_url加入节点的instance_info中 #然后调用pxe.PXEBoot.prepare_ramdisk()准备部署镜像和环境 task.driver.deploy.prepare(task) except Exception as e: ... try: #调用驱动的deploy方法,不同驱动动作不一样 #1. pxe_* 驱动调用iscsi_deploy.ISCSIDeploy.deploy() #进行拉取用户镜像,然后重启物理机 #2. agent_*驱动,直接重启 new_state = task.driver.deploy.deploy(task) except Exception as e: ... # NOTE(deva): Some drivers may return states.DEPLOYWAIT # eg. if they are waiting for a callback if new_state == states.DEPLOYDONE: task.process_event('done') elif new_state == states.DEPLOYWAIT: task.process_event('wait') finally: node.save()
至此,ironic-conductor的动作完成,等待物理机进行上电。
值得说明的是,task是task_manager.TaskManager的一个对象,这个对象在初始化的时候将self.driver初始化了 self.driver = driver_factory.get_driver(driver_name or self.node.driver) driver_name是传入的参数,默认为空;这个self.node.driver指物理机使用的驱动,不同物理机使用的驱动可能不同,这是在注册物理机时指定的。
第五步
在上一步中已经设置好了启动方式和相关网络信和给机器上电了,那么下一步就是机器启动,进行部署了。下面以PXE和agent两种部署方式分别来说明。
情况一、使用PXE驱动部署
我们知道安装操作系统的通用流程是:首先,bios启动,选择操作系统的启动(安装)模式(此时,内存是空白的),然后根据相关的安装模式,寻找操作系统的引导程序(不同的模式,对应不同的引导程序当然也对应着不同的引导程序存在的位置),引导程序加载文件系统初始化程序(initrd)和内核初始镜像(vmlinuz),完成操作系统安装前的初始化;接着,操作系统开始安装相关的系统和应用程序。
PXE启动方式的过程为:
- 物理机上电后,BIOS把PXE client调入内存执行,客户端广播DHCP请求
- DHCP服务器(neutron)给客户机分配IP并给定bootstrap文件的放置位置
- 客户机向本网络中的TFTP服务器索取bootstrap文件
- 客户机取得bootstrap文件后之执行该文件
- 根据bootstrap的执行结果,通过TFTP服务器(conductor)加载内核和文件系统
- 在内存中启动安装
启动后运行init启动脚本,那么init启动脚本是什么样子的。
首先,我们需要知道当前创建deploy-ironic的镜像,使用的diskimage-build命令,参考diskimage-builder/elements/deploy-ironic这个元素,最重要的是init.d/80-deploy-ironic这个脚本,这个脚本主要其实就是做以下几个步骤:
- 找到磁盘,以该磁盘启动iSCSI设备
- Tftp获取到ironic准备的token文件
- 调用ironic的api接(POST v1/nodes/{node-id}/vendor_passthru/pass_deploy_info)
- 启动iSCSI设备, 开启socket端口 10000等待通知PXE结束
- 结束口停止iSCSI设备。
# 安装bootloader
function install_bootloader {
   #此处省略很多
   ...
}


#向Ironic Condutor发送消息,开启socket端口10000等待通知PXE结束
function do_vendor_passthru_and_wait { local data=$1 local vendor_passthru_name=$2 eval curl -i -X POST \ "$TOKEN_HEADER" \ "-H 'Accept: application/json'" \ "-H 'Content-Type: application/json'" \ -d "$data" \ "$IRONIC_API_URL/v1/nodes/$DEPLOYMENT_ID/vendor_passthru/$vendor_passthru_name" echo "Waiting for notice of complete" nc -l -p 10000 } readonly IRONIC_API_URL=$(get_kernel_parameter ironic_api_url) readonly IRONIC_BOOT_OPTION=$(get_kernel_parameter boot_option) readonly IRONIC_BOOT_MODE=$(get_kernel_parameter boot_mode) readonly ROOT_DEVICE=$(get_kernel_parameter root_device) if [ -z "$ISCSI_TARGET_IQN" ]; then err_msg "iscsi_target_iqn is not defined" troubleshoot fi #获取当前linux的本地硬盘 target_disk= if [[ $ROOT_DEVICE ]]; then target_disk="$(get_root_device)" else t=0 while ! target_disk=$(find_disk "$DISK"); do if [ $t -eq 60 ]; then break fi t=$(($t + 1)) sleep 1 done fi if [ -z "$target_disk" ]; then err_msg "Could not find disk to use." troubleshoot fi #将找到的本地磁盘作为iSCSI磁盘启动,暴露给Ironic Condutor echo "start iSCSI target on $target_disk" start_iscsi_target "$ISCSI_TARGET_IQN" "$target_disk" ALL if [ $? -ne 0 ]; then err_msg "Failed to start iscsi target." troubleshoot fi #获取到相关的token文件,从tftp服务器上获取,token文件在ironic在prepare阶段就生成好的。 if [ "$BOOT_METHOD" = "$VMEDIA_BOOT_TAG" ]; then TOKEN_FILE="$VMEDIA_DIR/token" if [ -f "$TOKEN_FILE" ]; then TOKEN_HEADER="-H 'X-Auth-Token: $(cat $TOKEN_FILE)'" else TOKEN_HEADER="" fi else TOKEN_FILE=token-$DEPLOYMENT_ID # Allow multiple versions of the tftp client if tftp -r $TOKEN_FILE -g $BOOT_SERVER || tftp $BOOT_SERVER -c get $TOKEN_FILE; then TOKEN_HEADER="-H 'X-Auth-Token: $(cat $TOKEN_FILE)'" else TOKEN_HEADER="" fi fi #向Ironic请求部署镜像,POST node的/vendor_passthru/pass_deploy_info请求 echo "Requesting Ironic API to deploy image" deploy_data="'{\"address\":\"$BOOT_IP_ADDRESS\",\"key\":\"$DEPLOYMENT_KEY\",\"iqn\":\"$ISCSI_TARGET_IQN\",\"error\":\"$FIRST_ERR_MSG\"}'" do_vendor_passthru_and_wait "$deploy_data" "pass_deploy_info" #部署镜像下载结束,停止iSCSI设备 echo "Stopping iSCSI target on $target_disk" stop_iscsi_target #如果是本地启动,安装bootloarder # If localboot is set, install a bootloader if [ "$IRONIC_BOOT_OPTION" = "local" ]; then echo "Installing bootloader" error_msg=$(install_bootloader) if [ $? -eq 0 ]; then status=SUCCEEDED else status=FAILED fi echo "Requesting Ironic API to complete the deploy" bootloader_install_data="'{\"address\":\"$BOOT_IP_ADDRESS\",\"status\":\"$status\",\"key\":\"$DEPLOYMENT_KEY\",\"error\":\"$error_msg\"}'" do_vendor_passthru_and_wait "$bootloader_install_data" "pass_bootloader_install_info" fi
下面我们来看一下node的/vendor_passthru/pass_deploy_info都干了什么?Ironic-api在接受到请求后,是在ironic.api.controllers.v1.node.NodeVendorPassthruController._default()方法处理的,这个方法将调用的方法转发到ironic.condutor.manager.CondutorManager.vendor_passthro()去处理,进而调用相应task.driver.vendor.pass_deploy_info()去处理,这里不同驱动不一样,可以根据源码查看到,比如使用pxe_ipmptoos驱动, 则是转发给ironic.drivers.modules.iscsi_deploy.VendorPassthru.pass_deploy_info()处理,其代码是
@base.passthru(['POST'])
    @task_manager.require_exclusive_lock
    def pass_deploy_info(self, task, **kwargs): """Continues the deployment of baremetal node over iSCSI. This method continues the deployment of the baremetal node over iSCSI from where the deployment ramdisk has left off. :param task: a TaskManager instance containing the node to act on. :param kwargs: kwargs for performing iscsi deployment. :raises: InvalidState """ node = task.node LOG.warning(_LW("The node %s is using the bash deploy ramdisk for " "its deployment. This deploy ramdisk has been " "deprecated. Please use the ironic-python-agent " "(IPA) ramdisk instead."), node.uuid) task.process_event('resume') #设置任务状态 LOG.debug('Continuing the deployment on node %s', node.uuid) is_whole_disk_image = node.driver_internal_info['is_whole_disk_image'] #继续部署的函数,连接到iSCSI设备,将用户镜像写到iSCSI设备上,退出删除iSCSI设备, #然后在Condutor上删除镜像文件 uuid_dict_returned = continue_deploy(task, **kwargs) root_uuid_or_disk_id = uuid_dict_returned.get( 'root uuid', uuid_dict_returned.get('disk identifier')) # save the node's root disk UUID so that another conductor could # rebuild the PXE config file. Due to a shortcoming in Nova objects, # we have to assign to node.driver_internal_info so the node knows it # has changed. driver_internal_info = node.driver_internal_info driver_internal_info['root_uuid_or_disk_id'] = root_uuid_or_disk_id node.driver_internal_info = driver_internal_info node.save() try: #再一次设置PXE引导,为准备进入用户系统做准备 task.driver.boot.prepare_instance(task) if deploy_utils.get_boot_option(node) == "local": if not is_whole_disk_image: LOG.debug('Installing the bootloader on node %s', node.uuid) deploy_utils.notify_ramdisk_to_proceed(kwargs['address']) task.process_event('wait') return except Exception as e: LOG.error(_LE('Deploy failed for instance %(instance)s. ' 'Error: %(error)s'), {'instance': node.instance_uuid, 'error': e}) msg = _('Failed to continue iSCSI deployment.') deploy_utils.set_failed_state(task, msg) else: #结束部署,通知ramdisk重启,将物理机设置为ative finish_deploy(task, kwargs.get('address'))
在continue_deploy函数中,先解析iscsi部署的信息,然后在进行分区、格式化、写入镜像到磁盘。 然后调用prepare_instance在设置一遍PXE环境,为进入系统做准备,我们知道在instance_info上设置了ramdisk、kernel、image_source 3个镜像,其实就是内核、根文件系统、磁盘镜像。这里就是设置了ramdisk和kernel,磁盘镜像上面已经写到磁盘中去了,调用switch_pxe_config方法将当前的操作系统的启动项设置为ramdisk和kernel作为引导程序。 最后向节点的10000发送一个‘done’通知节点关闭iSCSI设备,最后节点重启安装用户操作系统,至此部署结束。
在部署过程中,节点和驱动的信息都会被存入ironic数据库,以便后续管理。
情况二、使用agent驱动部署
在部署阶段的prepare阶段与PXE一样,但是由于创建的ramdisk不一样所以部署方式则不一样,在PXE中,开机执行的是一段init脚本,而在Agent开机执行的是IPA。
机器上电后,ramdisk在内存中执行,然后启动IPA,入口为cmd.agent.run(),然后调用ironic-python-agent.agent.run(),其代码如下
def run(self):
        """Run the Ironic Python Agent.""" # Get the UUID so we can heartbeat to Ironic. Raises LookupNodeError # if there is an issue (uncaught, restart agent) self.started_at = _time() #加载hardware manager # Cached hw managers at runtime, not load time. See bug 1490008. hardware.load_managers() if not self.standalone: # Inspection should be started before call to lookup, otherwise # lookup will fail due to unknown MAC. uuid = inspector.inspect() #利用Ironic API给Condutor发送lookup()请求,用户获取UUID,相当于自发现 content = self.api_client.lookup_node( hardware_info=hardware.dispatch_to_managers( 'list_hardware_info'), timeout=self.lookup_timeout, starting_interval=self.lookup_interval, node_uuid=uuid) self.node = content['node'] self.heartbeat_timeout = content['heartbeat_timeout'] wsgi = simple_server.make_server( self.listen_address[0], self.listen_address[1], self.api, server_class=simple_server.WSGIServer) #发送心跳包 if not self.standalone: # Don't start heartbeating until the server is listening self.heartbeater.start() try: wsgi.serve_forever() except BaseException: self.log.exception('shutting down') #部署完成后停止心跳包 if not self.standalone: self.heartbeater.stop()
其中self.api_client.lookup_node调用到ironic-python-api._do_lookup(),然后发送一个GET /{api_version}/drivers/{driver}/vendor_passthru/lookup请求。 Condutor API在接受到lookup请求后调用指定驱动的lookup函数处理,返回节点UUID。
IPA收到UUID后调用Ironic-API发送Heartbeat请求(/{api_version}/nodes/{uuid}/vendor_passthru/heartbeat),Ironic-API把消息路由给节点的驱动heartbeat函数处理。Ironic-Condutor周期执行该函数,每隔一段时间执行该函数检查IPA部署是否完成,如果完成则进入之后的动作.目前agent*驱动使用的是ironic.drivers.modouls.agent.AgentVendorInterface类实现的接口,代码如下。
@base.passthru(['POST'])
    def heartbeat(self, task, **kwargs): """Method for agent to periodically check in. The agent should be sending its agent_url (so Ironic can talk back) as a kwarg. kwargs should have the following format:: { 'agent_url': 'http://AGENT_HOST:AGENT_PORT' } AGENT_PORT defaults to 9999. """ node = task.node driver_internal_info = node.driver_internal_info LOG.debug( 'Heartbeat from %(node)s, last heartbeat at %(heartbeat)s.', {'node': node.uuid, 'heartbeat': driver_internal_info.get('agent_last_heartbeat')}) driver_internal_info['agent_last_heartbeat'] = int(_time()) try: driver_internal_info['agent_url'] = kwargs['agent_url'] except KeyError: raise exception.MissingParameterValue(_('For heartbeat operation, ' '"agent_url" must be ' 'specified.')) node.driver_internal_info = driver_internal_info node.save() # Async call backs don't set error state on their own # TODO(jimrollenhagen) improve error messages here msg = _('Failed checking if deploy is done.') try: if node.maintenance: # this shouldn't happen often, but skip the rest if it does. LOG.debug('Heartbeat from node %(node)s in maintenance mode; ' 'not taking any action.', {'node': node.uuid}) return elif (node.provision_state == states.DEPLOYWAIT and not self.deploy_has_started(task)): msg = _('Node failed to get image for deploy.') self.continue_deploy(task, **kwargs) #调用continue_deploy函数,下载镜像 elif (node.provision_state == states.DEPLOYWAIT and self.deploy_is_done(task)): #查看IPA执行下载镜像是否结束 msg = _('Node failed to move to active state.') self.reboot_to_instance(task, **kwargs) #如果镜像已经下载完成,即部署完成,设置从disk启动,重启进入用户系统, elif (node.provision_state == states.DEPLOYWAIT and self.deploy_has_started(task)): node.touch_provisioning() #更新数据库,将节点的设置为alive # TODO(lucasagomes): CLEANING here for backwards compat # with previous code, otherwise nodes in CLEANING when this # is deployed would fail. Should be removed once the Mitaka # release starts. elif node.provision_state in (states.CLEANWAIT, states.CLEANING): node.touch_provisioning() if not node.clean_step: LOG.debug('Node %s just booted to start cleaning.', node.uuid) msg = _('Node failed to start the next cleaning step.') manager.set_node_cleaning_steps(task) self._notify_conductor_resume_clean(task) else: msg = _('Node failed to check cleaning progress.') self.continue_cleaning(task, **kwargs) except Exception as e: err_info = {'node': node.uuid, 'msg': msg, 'e': e} last_error = _('Asynchronous exception for node %(node)s: ' '%(msg)s exception: %(e)s') % err_info LOG.exception(last_error) if node.provision_state in (states.CLEANING, states.CLEANWAIT): manager.cleaning_error_handler(task, last_error) elif node.provision_state in (states.DEPLOYING, states.DEPLOYWAIT): deploy_utils.set_failed_state(task, last_error)
根据上面bearthead函数,首先根据当前节点的状态node.provision_state==DEPLOYWAIT,调用continue_deploy()函数进行部署.
@task_manager.require_exclusive_lock
    def continue_deploy(self, task, **kwargs): task.process_event('resume') node = task.node image_source = node.instance_info.get('image_source') LOG.debug('Continuing deploy for node %(node)s with image %(img)s', {'node': node.uuid, 'img': image_source}) image_info = { 'id': image_source.split('/')[-1], 'urls': [node.instance_info['image_url']], 'checksum': node.instance_info['image_checksum'], # NOTE(comstud): Older versions of ironic do not set # 'disk_format' nor 'container_format', so we use .get() # to maintain backwards compatibility in case code was # upgraded in the middle of a build request. 'disk_format': node.instance_info.get('image_disk_format'), 'container_format': node.instance_info.get( 'image_container_format') } #通知IPA下载swift上的镜像,并写入本地磁盘 # Tell the client to download and write the image with the given args self._client.prepare_image(node, image_info) task.process_event('wait')
Condutor然后依次调用:
- deploy_is_done()检查IPA执行下载镜像是否结束,
- 如果镜像已经下载完成,即部署完成,设置从disk启动,重启进入用户系统reboot_to_instance()
- 然后调用node.touch_provisioning() 更新数据库,将节点的设置为alive
至此,使用agent方式进行部署操作系统的过程到处结束。


 1001
1001


 被折叠的 条评论
为什么被折叠?
被折叠的 条评论
为什么被折叠?
 到【灌水乐园】发言


