


本文是
JNDI Tutorial
系列文章的第二部分:
The Basics
,介绍了
JNDI
的一些基础知识,诸如
Naming
操作和
Directory
操作。介绍了如何通过编程的方式访问命名和目录服务,如何使用
JNDI
和目录进行交互。从准备环境到查找对象以及在目录中进行搜索等操作。
本部分主要讲述了
JNDI
对目录的操作。
可以通过
JNDi
来实现以下目录操作:
- Reading an object's attributes 读取对象属性
- Modifying an object's attributes 修改对象属性
- Searching the directory 检索
- Performing hybrid naming and directory operations 命名和目录的联合操作
接下来将介绍这些操作的具体内容,在使用它们一下,首先应该了解一下有关属性名称的知识。
配置
本部分教程的内容使用
LDAP
服务
provider
。本部分的例子都是假设已经根据前面的预备知识创建了样例名称空间。如果使用其他的服务
provider
或者使用其他的
LDAP
名称空间,那么这部分的例子的执行结果可能会和实际有所不同或者不能执行。
通过以下环境属性来初始化这部分例子中的
initial context
:
//Set up the environment for creating the initial context
env.put(Context.INITIAL_CONTEXT_FACTORY,
"com.sun.jndi.ldap.LdapCtxFactory");
env.put(Context.PROVIDER_URL, "ldap://localhost:389/o=JNDITutorial");
env.put(Context.SECURITY_AUTHENTICATION, "simple");
env.put(Context.SECURITY_PRINCIPAL, "uid=admin,ou=system");
env.put(Context.SECURITY_CREDENTIALS, "secret");
DirContext ctx = new InitialDirContext(env);
(
此处教程中使用匿名用户进行的绑定,而
ApacheDS
默认情况下不允许匿名绑定,所以笔者使用管理员进行绑定,实际上,根据不同的服务器,本教程中所有的例子的返回结果可能和原
JNDI
教程有些不一致
)
属性名
(Attribute Names)
一个属性包含属性标识符合一系列属性值,属性标识符也叫做属性名,是一个字符串用来标识一个属性。属性值是属性的内容,并且属性的值得类型不局限于字符串。当在执行检索、获取或者修改的时候需要指定特定的属性,这个时候需要使用属性名。返回属性的操作也会返回名称,例如读操作或者检索操作。
当使用属性名时,需要注意特定目录服务器的特性,所以有时可能会返回不同的结果。这些特性在后面将会介绍。
属性类型
在诸如
LDAP
的目录中,属性名标识了属性的类型,并且叫做属性类型名。例如,属性名
cn
叫做属性类型名。属性的类型定义指定了属性的值
(
是否可以有多个值
)
,等价性,以及排序规则
(
当根据属性值进行执行比较和排序操作时
)
。
属性子类
一些目录实现支持属性子类,这些服务器允许属性类型根据其他的属性类型进行定义。例如,
name
属性可能是所有名称相关属性的超类,例如
commonName
可能是
name
的一个子类。对于支持属性子类的目录实现,当请求
name
属性的时候,可能返回
commonName
属性。
当访问支持属性子类的目录时,要注意服务器可能返回与要求的属性名不同的属性,为了最小程度的减少这种情况,使用最底层的子类。
同义的属性名
一些目录实现支持属性名同义的概念,例如
cn
属性是
commonName
的一个同义属性。因此请求
cn
属性时,可能返回
commonName
属性。
当访问支持这个特性的目录时,必须注意服务器可能返回和请求属性名不同的属性。为了防止这种情况的发生,使用规范的属性名来代替和它同义的属性名。规范属性名用于属性定义,而同义的属性名是参考了规范属性名的定义。
语言参数选择
LDAP v3
的一个扩展允许在属性名中指定语言代码。这和属性子类相似,一个属性名可以代表多个不同的属性。一个例子就是
description
属性可以有以下两种语言的形式:
description:software
description;lang-en:software products
description;lang-de:Softwareprodukte
当请求
description
属性时,可能返回所有这三种结果。
当访问支持这种特性的目录时,必须注意服务器可能返回和期望属性名不同的属性。
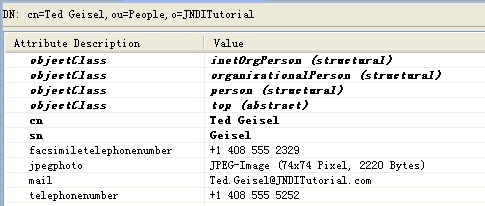
读取属性
当读取目录中一个对象的属性时,需要将对象名传给
DirContext.getAttributes()
方法作参数。假设有一个名为
”cn=Ted Geisel,ou=people”
的对象,为了获取它的属性,需要使用如下的代码:
Attributes answer = ctx.getAttributes("cn=Ted Geisel, ou=People");
通过下面的代码迭代打出所有的属性名和属性值:
for (NamingEnumeration ae = attrs.getAll(); ae.hasMore();) {
Attribute attr = (Attribute) ae.next();
System.out.println("attribute: " + attr.getID());
/* print each value */
for (NamingEnumeration e = attr.getAll(); e.hasMore(); System.out
.println("value: " + e.next()));
}
执行的结果如下:
attribute: telephonenumber
value: +1 408 555 5252
attribute: mail
value: Ted.Geisel@JNDITutorial.com
attribute: facsimiletelephonenumber
value: +1 408 555 2329
在
Eclipse
中查看的视图如下:
(从图中可以看出,该对象的属性不仅仅上面列出的这些,但是
ApacheDS
在返回结果的时候只返回了一部分。笔者认为
ApacheDS
的理由是:既然你提供了用户的
DN
来进行读取属性,那么诸如
cn
,
sn
,
c
,
ou
,
o
等属性就应该是已知的了,没有必要再返回一次。)
返回指定的属性:
为了运行所有属性的一个子集,可以指定一个属性名数组来指定需要获取的属性:
// Specify the ids of the attributes to return
String[] attrIDs = { "sn", "telephonenumber", "golfhandicap",
"mail" };
// Get the attributes requested
Attributes answer = ctx.getAttributes("cn=Ted Geisel, ou=People",
attrIDs);
返回结果如下:
attribute: telephonenumber
value: +1 408 555 5252
attribute: mail
value: Ted.Geisel@JNDITutorial.com
attribute: sn
value: Geisel
由于这个对象没有
golfhanicap
属性,所以只返回三个属性。
修改属性
DirContext
接口包含了修改对象的属性及属性值得方法。
使用修改列表
修改一个对象的属性的方法之一就是提供一个修改请求列表
(ModificationItem)
。每个
ModificationItem
由一定数量的指定修改类型的常量以及修改的属性
Attribute
组成。下面是三种类型的修改:
¨
ADD_ATTRIBUTE
¨
REPLACE_ATTRIBUTE
¨
REMOVE_ATTRIBUTE
修改的顺序和它们出现在列表中的顺序一致,要么所有的修改都完成,要么一个都不完成,即一个修改操作是一个事务。
// Create the initial context
DirContext ctx = new InitialDirContext(env);
String name = "cn=Ted Geisel, ou=People";
// Save original attributes
Attributes orig = ctx.getAttributes(name, new String[] { "mail","telephonenumber", "jpegphoto" });
// Specify the changes to make
ModificationItem[] mods = new ModificationItem[3];
// Replace the "mail" attribute with a new value
mods[0] = new ModificationItem(DirContext.REPLACE_ATTRIBUTE,
new BasicAttribute("mail", "geisel@wizards.com"));
// Add additional value to "telephonenumber"
mods[1] = new ModificationItem(DirContext.ADD_ATTRIBUTE,
new BasicAttribute("telephonenumber", "+1 555 555 5555"));
// Remove the "jpegphoto" attribute
mods[2] = new ModificationItem(DirContext.REMOVE_ATTRIBUTE,
new BasicAttribute("jpegphoto"));
// Perform the requested modifications on the named object
当创建完修改列表后,执行
modifyAttributes()
方法,该方法接受两个参数,一个为
String
类型的对象名,另一个为
ModificationItem[]
类型的
修改列表
。执行完该方法后,修改被应用。
ctx.modifyAttributes(name, mods);
修改完成后打印新旧属性的比较:
**** new attributes *****
attribute: telephonenumber
value: +1 408 555 5252
value: +1 555 555 5555
attribute: mail
value: geisel@wizards.com
**** reverted to original attributes *****
attribute: telephonenumber
value: +1 408 555 5252
attribute: mail
value: Ted.Geisel@JNDITutorial.com
attribute: jpegphoto
value: [B@119cca4
在
windows active directory
中,
telephonenumber
属性是一个单值属性,但是
RFC 2256
中的定义是多值的。所以当
LDAP
服务器为
win ad
时,需要将添加操作修改为替换操作。
使用属性
也可以通过制定修改的类型以及要修改的属性来执行修改操作。
例如,下面的方法将名称为
name
的对象的属性
(
和
orig
中定义的同名的属性
)
替换为
orig
中的属性,该对象的
orig
以外的属性不变。
ctx.modifyAttributes(name,DirContext.REPLACE_ATTRIBUTE,orig);
检索操作
最常见的目录服务就是黄页,或者说检索服务。
[yellow page:
黄页
(
电话
)
查号簿
(
美国按行业、职业分类的部分常用黄色纸
)]
可以组合一个检索语句,语句中包含实体的属性需要符合的条件,然后提交给目录服务器,目录服务器返回符合条件的检索列表。例如,可以查找所有
surname
以
”Sch”
开头的人的实体,或者保龄球平均成绩高于
200
的实体。
DirContext
接口提供了很多检索的方法,功能和复杂性各不相同。目录检索的相关内容包括以下部分:
¨
基本检索
¨
检索过滤器
¨
检索控制
基本检索
这是目录检索的最简单的形式,只需要指定检索结果必须包含的属性以及检索的目的上下文。下面的代码创建了一个属性集
matchAttrs
,其中包含两个属性,
telephonenumber
和
mail
,检索指定了实体必须具有的
surname(sn)
属性和
mail
属性,并且
surname
属性的值为
”Geisel”
,而
mail
的属性值任意。然后调用
DirContext.search()
方法在
ou=people
的上下文中检索符合
matchAttrs
的实体。
Attributes matchAttrs = new BasicAttributes(true); // ignore case
matchAttrs.put(new BasicAttribute("sn", "Geisel"));
matchAttrs.put(new BasicAttribute("mail"));
// Search for objects that have those matching attributes
NamingEnumeration answer = ctx.search("ou=People", matchAttrs);
可以使用下面的语句打印结果:
while (answer.hasMore()) {
SearchResult sr = (SearchResult) answer.next();
System.out.println(">>>" + sr.getName());
GetattrsAll.printAttrs(sr.getAttributes());
}
返回结果为:
>>>cn=Ted Geisel
attribute: telephonenumber
value: +1 408 555 5252
attribute: mail
value: Ted.Geisel@JNDITutorial.com
attribute: facsimiletelephonenumber
value: +1 408 555 2329
attribute: objectClass
value: person
value: inetOrgPerson
value: organizationalPerson
value: top
attribute: jpegphoto
value: [B@179c285
attribute: sn
value: Geisel
attribute: cn
value: Ted Geisel
可以选择返回指定的属性,代码如下:
// Specify the ids of the attributes to return
String[] attrIDs = { "sn", "telephonenumber", "golfhandicap","mail" };
answer = ctx.search("ou=People", matchAttrs, attrIDs);
此时返回的结果为:
>>>cn=Ted Geisel
attribute: telephonenumber
value: +1 408 555 5252
attribute: mail
value: Ted.Geisel@JNDITutorial.com
attribute: sn
value: Geisel
检索过滤器
和基本检索不同的是,可以使用一个检索过滤器进行检索操作。检索过滤器的检索语句是通过逻辑表达式的形式表示的。检索过滤器的语法在
RFC 2254
中进行了定义,
DirContext.search()
方法接受符合这个语法的过滤器。
下面的检索过滤器指定了合法的实体必须具有
sn
属性,并且其值为
Geisel
以及一个值为任意的
mail
属性:
(&(sn=Geisel)(mail=*))
下面的代码创建了一个过滤器和一个默认的检索控制,
SearchControls
,并使用它们来进行检索操作。这个检索和基本检索中的功能是一样的。
// Create default search controls
SearchControls ctls = new SearchControls();
// Specify the search filter to match
// Ask for objects with attribute sn == Geisel and which have
// the "mail" attribute.
String filter = "(&(sn=Geisel)(mail=*))";
// Search for objects using filter
NamingEnumeration answer = ctx.search("ou=People", filter, ctls);
// Print the answer
while (answer.hasMore()) {
SearchResult sr = (SearchResult) answer.next();
System.out.println(">>>" + sr.getName());
GetattrsAll.printAttrs(sr.getAttributes());
}
检索返回的结果和基本检索的结果是一样的。
检索过滤器语法一览
检索过滤器语法基本上就是逻辑运算符作为前缀的逻辑表达式,下图是一些逻辑运算符号及其说明:
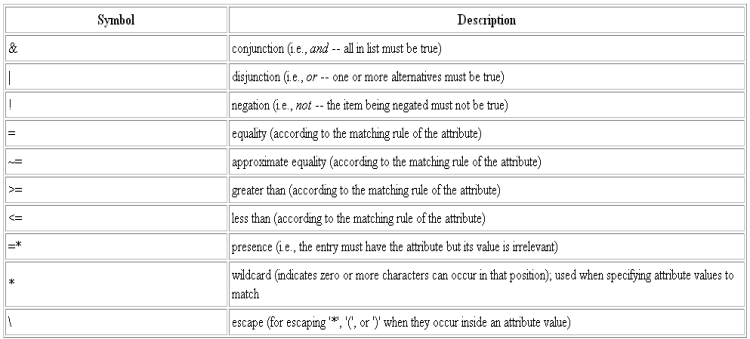
过滤器中的每一项都由属性标识符和属性值或者上述的运算符号组成。例如,
”sn=Geisel”
表示必须具有
sn
属性,并且
sn
属性的值必须为
Geisel
,
”mail=*”
则表示
mail
属性只要存在就可以了。
每一项都必须使用括号括起来使用。逻辑运算符可以组合使用,通过使用括号进行分割。例如
(| (& (sn=Geisel) (mail=*)) (sn=L*))
关于更完整的语法描述,参见
RFC 2254
。
返回指定属性
可以通过设置
SearchControls
的
setReturningAttributes()
方法来设置需要返回的特定属性:
// Specify the ids of the attributes to return
String[] attrIDs = { "sn", "telephonenumber", "golfhandicap","mail" };
ctls.setReturningAttributes(attrIDs);
其返回的结果和基本认证返回的一致。
检索控制
在上面的检索过滤器中如何使用
SearchControls
参数来选择需要返回的属性。还可以是
SearchControls
参数来控制检索的其他方面,下面是一些可用的控制:
¨
返回的属性
¨
检索的范围
¨
返回的最大结果数
¨
等待最大时间
(
毫秒
)
,即超时时间
¨
是否返回和实体相关联的
Java
对象
¨
在检索时是否废除
JNDI
链接
其中后两部分在之后的教程中介绍,本部分教程介绍前四种控制:
检索范围
通过使用
SearchControls.setSearchScope(int scope)
方法来设置检索范围,检索范围由三种,分别如下:
下图摘自
ApacheDS
网站对于检索范围的说明,比较易懂:
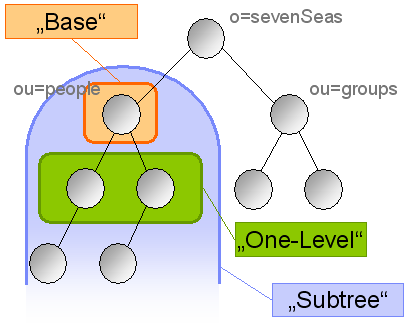
Note:Base scope is useful for reading attribute values of a particular entry. One example for using One_Level scope is expanding the tree in graphical LDAP clients. For extensive investigations within your data, Subtree is the most powerful option.
这里的示例就省略了,通过上面的图片应该很容易理解检索范围的概念。
数量限制
有的时候,需要限制查询返回结果的数量,这个时候需要使用检索控制的数量限制。默认情况下,检索操作返回所有符合条件的检索结果,可以使用
SearchControls.setCountLimit()
方法设置检索结果的数量。下面的代码将检索结果数量设置为
1
:
// Set search controls to limit count to 'expected'
SearchControls ctls = new SearchControls();
ctls.setCountLimit(expected);
如果程序要获取大于最大数量的结果,那么将抛出一个
SizeLimitExceededException
。所以当设置数量限制的时候,应该将这个异常和
NamingExceptions
异常相区分,或者根据数量限制请求结果
(
不要超过最大数量
)
。
指定检索结果的数量是一种控制程序消耗资源的方法,比如内存或者网络带宽。其他控制资源消耗的办法有实用查询过滤器、在适当的上下文中查询以及使用适当的检索范围。
(
笔者运行这部分
Sun
的教程,和实际不一样,原因有待调查,情况如下:即使我设置了数量限制,但是还是可以返回两个结果。
)
但是当笔者将检索过滤器修改为
objectClass=*
的时候就可以使用了。
程序运行结果为:
>>>cn=Ted Geisel
number of answers: 1
源代码如下:
package com.sun.jndi.examples.basics;
import java.util.Hashtable;
import javax.naming.Context;
import javax.naming.NamingEnumeration;
import javax.naming.NamingException;
import javax.naming.SizeLimitExceededException;
import javax.naming.directory.DirContext;
import javax.naming.directory.InitialDirContext;
import javax.naming.directory.SearchControls;
import javax.naming.directory.SearchResult;
/**
* Demonstrates how to perform a search and limit the number of results
* returned.
*
* usage: java SearchCountLimit
*/
class SearchCountLimit {
static int expected = 1;
public static void printSearchEnumeration(NamingEnumeration enu) {
int count = 0;
try {
while (enu.hasMore()) {
SearchResult sr = (SearchResult) enu.next();
System.out.println(">>>" + sr.getName());
++count;
}
System.out.println("number of answers: " + count);
} catch (SizeLimitExceededException e) {
if (count == expected)
System.out.println("number of answers: " + count);
else
e.printStackTrace();
} catch (NamingException e) {
e.printStackTrace();
}
}
public static void main(String[] args) {
// Set up the environment for creating the initial context
Hashtable env = new Hashtable();
env.put(Context.INITIAL_CONTEXT_FACTORY,
"com.sun.jndi.ldap.LdapCtxFactory");
env.put(Context.PROVIDER_URL, "ldap://localhost:389/o=JNDITutorial");
env.put(Context.SECURITY_AUTHENTICATION, "simple");
env.put(Context.SECURITY_PRINCIPAL, "uid=admin,ou=system");
env.put(Context.SECURITY_CREDENTIALS, "sunjavaduke");
try {
// Create initial context
DirContext ctx = new InitialDirContext(env);
// Set search controls to limit count to 'expected'
SearchControls ctls = new SearchControls();
ctls.setCountLimit(expected);
// Search for objects with those matching attributes
NamingEnumeration answer = ctx.search("ou=People", "(sn=M*)", ctls);
// Print the answer
printSearchEnumeration(answer);
// Close the context when we're done
ctx.close();
} catch (Exception e) {
System.err.println(e);
}
}
}
(
运行上面的程序时,打印结果为:
>>>cn=Spuds Mackenzie
>>>cn=Londo Mollari
number of answers: 2
并没有抛出异常
)
设置超时
设置超时是为了不至于等待太长的时间,如果超过时间限制,操作还没有执行完的话,将抛出
TimeLimitExceededException
,下面的代码设置了时间限制:
ctls.setTimeLimit(1000); //set time limit to 1 second
为了使这个程序运行,需要做一些特殊的设置,例如使用较慢的服务器或者检索范围使用
SUB_TREE
检索,并且服务器最好包含大量的实体。
当设置时间限制为
0
的时候,则表示没有时间限制。
集成命名和目录操作
命名操作部分介绍了如何使用
Context
接口的
bind(),rebind(),createSubcontext()
方法来创建绑定和子上下文。
DirContext
接口包含了这些方法的重载方法,接受属性参数。可以使用这些
DirContext
方法关联属性和对象。例如,可以创建一个
Person
对象,并将其绑定到一个名称空间,同时添加一些
Person
对象的属性。
创建一个包含属性的上下文
通过使用
DirContext.createSubcontext()
方法创建一个包含属性的上下文,提供要创建的上下文的名字和属性作为参数:
// Create the initial context
DirContext ctx = new InitialDirContext(env);
// Create attributes to be associated with the new context
Attributes attrs = new BasicAttributes(true); // case-ignore
Attribute objclass = new BasicAttribute("objectclass");
objclass.add("top");
objclass.add("organizationalUnit");
attrs.put(objclass);
// Create the context
Context result = ctx.createSubcontext("ou=Fruits", attrs);
上面的代码创建了一个叫做
ou=Fruits
的上下文,并包含具有两个值得属性
objectClass
,值分别为
top
何
organizationalUnit
,这个新的上下文被追加到
ctx
上下文中,然后列出
ctx
下面的内容,结果如下:
ou=Groups: javax.naming.directory.DirContext
ou=People: javax.naming.directory.DirContext
ou=Fruits: javax.naming.directory.DirContext
可以看到新建的
Context
已经添加成功。
添加包含属性的绑定
DirContext.bind()
方法用来在上下文中添加一个包含属性的绑定。该方法的参数是对象的名字,被绑定的对象以及一个属性集合。
// Create the initial context
DirContext ctx = new InitialDirContext(env);
// Create object to be bound
Fruit fruit
= new Fruit("orange");
// Create attributes to be associated with object
Attributes attrs
= new BasicAttributes(true); // case-ignore
Attribute objclass = new BasicAttribute("objectclass");
objclass.add("top");
objclass.add("organizationalUnit");
attrs.put(objclass);
// Perform bind
ctx.bind("ou=favorite, ou=Fruits", fruit, attrs);
上面的代码创建了一个
Fruit
类的对象
fruit
,并使用
ou=favorite
名字将其绑定到
ou=Fruits
的上下文。这个上下文相对于
ctx
,及
o=JNDITutorial
。这个绑定具有
objectclass
属性。绑定完成后查找
ou=favorite,ou=Fruits
,将会获取
fruit
对象。如果获取
ou=favorite,ou=Fruits
的属性,那么将会获取新建的对象的属性:
orange
attribute: ou
value: favorite
attribute: objectClass
value: javaNamingReference
value: javaObject
value: organizationalUnit
value: top
attribute: javafactory
value: com.sun.jndi.examples.basics.FruitFactory
attribute: javareferenceaddress
value: #0#fruit#orange
attribute: javaclassname
value: com.sun.jndi.examples.basics.Fruit
(
当运行这个程序两次的话,会提示错误信息
NameAlreadyBoundException
,这是由于
ou=favorite
已经被绑定到
ou=Fruits
上下文。
)
可以使用
rebind
进行重新绑定。
有关
JNDI
的另外一篇不错的文章,请参考:
http://www.javaworld.com/javaworld/jw-03-2000/jw-0324-ldap.html?page=1


 4159
4159


 被折叠的 条评论
为什么被折叠?
被折叠的 条评论
为什么被折叠?
 到【灌水乐园】发言


