


MonkeyRunnerStarter是MonkeyRunner启动时的入口类,因为它里面包含了main方法.它的整个启动过程主要做了以下几件事情:
- 解析用户启动MonkeyRunner时从命令行传输进来的参数: 因为MonkeyRunner需要根据指定的参数才能做事情,比如输入的一个需要执行的脚本。如果确实不知道任何参数的话它就会进入MonkeyRunner的交互模式,其实就是Jythong的交互模式,让用户可以边写代码边执行
- 启动AndroidDebugBridge: 其实就是启动ADB服务器,因为MonkeyRunner跟设备通信的一个很重要的方法之一就是通过向ADB服务器发送命令来请求目标设备的服务
- 启动设备监控线程: 其实这个是在启动AndroidDebugBridge的时候一并启动的。设备监控线程主要做的事情就是取监控设备是否有接入进来或者移除出去,如果有新的设备连接进来,或者说设备变成ONLINE状态(一个设备有多个状态:ONLINE|OFFLINE|RECOVERY|UNAUTHORIZED),那么就需要取监控设备里面的每个可调试进程,这主要是用来给DDMS等调试工具使用的。它维护了一个最新的设备列表
- 启动AndroidDebugBridge:
- 启动Monkey:
- 运行测试脚本:
本小节我们会先去看下MonkeyRunner在启动的时候是如何获得命令行参数并对其进行解析处理的。整个过程其实跟monkey在启动的时候的命令行参数分析类似。往下我们先看下牵涉到的关键类之间的关系:
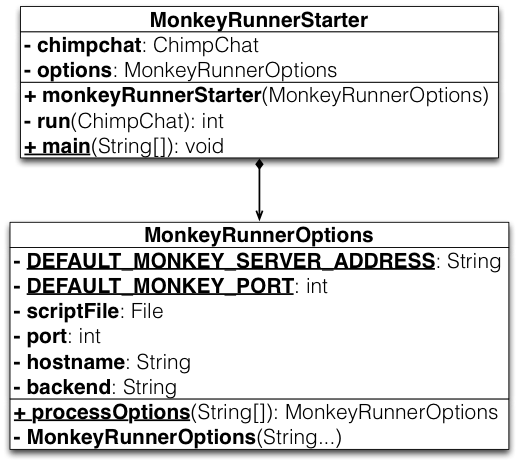
图8-2-1 MonkeyRunnerStarter类图
从类图中我们看到MonkeyRunnerStarter持有了一个MonkeyRunnerOptions类型的成员变量options,这个实例保存的就是解析出来的命令行参数,同时该类会提供一个processOptions方法来专门解析命令行参数。
我们先进入到MonkeyRunnerStart这个类的main方法:
178   public static void main(String[] args) {
179     MonkeyRunnerOptions options =
MonkeyRunnerOptions.processOptions(args);
180
181     if (options == null) {
182       return;
183     }
184
185
186     replaceAllLogFormatters(MonkeyFormatter.DEFAULT_INSTANCE,
options.getLogLevel());
187
188     MonkeyRunnerStarter runner =
new MonkeyRunnerStarter(options);
189     int error = runner.run();
190
191
192     System.exit(error);
193   }
194 }这里主要做了三件事情:
- 179行去处理用户启动monkeyrunner的时候输入的命令行参数
- 188行去初始化MonkeyRunnerStarter,里面主要是初始化了ChimpChat,ChimpChat又去开启AndroidDebugBridge进程和开启DeviceMonitor设备监控线程,我们往后小节会进行详细分析
- 189行去把monkeyrunner运行起来,包括带脚本参数的情况和不待脚本参数直接提供jython命令行的情况
我们这一节会先去分析下monkeyrunner是如何对参数进行处理的,我们跳转到MonkeyRunnerOptions这个类里面的processOptions这个方法:
 93   public static MonkeyRunnerOptions processOptions(String[] args)
 94   {
 95     int index = 0;
 96
 97     String hostname = DEFAULT_MONKEY_SERVER_ADDRESS;
 98     File scriptFile = null;
 99     int port = DEFAULT_MONKEY_PORT;
100     String backend = "adb";
101     Level logLevel = Level.SEVERE;
102
103     ImmutableList.Builder<File> pluginListBuilder = ImmutableList.builder();
104     ImmutableList.Builder<String> argumentBuilder = ImmutableList.builder();
105     while (index < args.length) {
106       String argument = args[(index++)];
107
108       if ("-s".equals(argument)) {
109         if (index == args.length) {
110           printUsage("Missing Server after -s");
111           return null;
112         }
113         hostname = args[(index++)];
114       }
115       else if ("-p".equals(argument))
116       {
117         if (index == args.length) {
118           printUsage("Missing Server port after -p");
119           return null;
120         }
121         port = Integer.parseInt(args[(index++)]);
122       }
123       else if ("-v".equals(argument))
124       {
125         if (index == args.length) {
126           printUsage("Missing Log Level after -v");
127           return null;
128         }
129
130         logLevel = Level.parse(args[(index++)]);
131       } else if ("-be".equals(argument))
132       {
133         if (index == args.length) {
134           printUsage("Missing backend name after -be");
135           return null;
136         }
137         backend = args[(index++)];
138       } else if ("-plugin".equals(argument))
139       {
140         if (index == args.length) {
141           printUsage("Missing plugin path after -plugin");
142           return null;
143         }
144         File plugin = new File(args[(index++)]);
145         if (!plugin.exists()) {
146           printUsage("Plugin file doesn't exist");
147           return null;
148         }
149
150         if (!plugin.canRead()) {
151           printUsage("Can't read plugin file");
152           return null;
153         }
154
155         pluginListBuilder.add(plugin);
156       } else if (!"-u".equals(argument))
157       {
158         if ((argument.startsWith("-")) && (scriptFile == null))
159         {
160
161
162           printUsage("Unrecognized argument: " + argument + ".");
163           return null;
164         }
165         if (scriptFile == null)
166         {
167
168           scriptFile = new File(argument);
169           if (!scriptFile.exists()) {
170             printUsage("Can't open specified script file");
171             return null;
172           }
173           if (!scriptFile.canRead()) {
174             printUsage("Can't open specified script file");
175             return null;
176           }
177         } else {
178           argumentBuilder.add(argument);
179         }
180       }
181     }
182
183     return new MonkeyRunnerOptions(hostname,
port,
scriptFile,
backend,
logLevel,
pluginListBuilder.build(),
argumentBuilder.build());
184   }
185 }这里首先请看99-101行的几个变量初始化,如果用户在命令行中没有指定对应的参数,那么这些默认参数就会被使用,我们且看下这些默认值分别是什么:
- hostname:对应‘-s'参数,默认值是'127.0.0.1',也就是本机,将会forward给目标设备运行的monkey,所以加上下面的转发port等同于目标机器在listen的monkey服务
- port :对应‘-p'参数,默认值是'12345',也就是monkey默认监听端口
- backend :对应'-be'参数,默认值是‘adb‘,其实往后看代码我们会发现它也只是支持’adb‘而已。这里需要注意的是这是一个隐藏参数,命令行的help没有显示该参数
- logLevel :对应‘-v'参数,默认值'SEVERE',也就是说只打印严重的log
代码往下就是对用户输入的参数的解析并保存了,这里要注意几个隐藏的参数:
- -u :乍一看以为这是一个什么特别的参数,从156-178行可以看到这个参数处理的意义是:当用户输入'-u'的时候不会作任何处理,但当用户输入的是由‘-’开始的但又不是monkeyrunner声称支持的那几个参数的时候,就会根据不同的情况给用户报错。所以这段代码的意思其实就是在用户输入了不支持的参数的时候根据不同的情况给用户提示而已
- -be :backend,如前所述,只支持‘adb'
- -plugin :这里需要一个背景知识,在google官网有说明,用户可以通过遵循一定的规范去编写插件来扩展monkeyrunner的功能,比如在monkeydevice里面按下这个动作是需要通过MonkeyDevice.DOWN这个参数来传给press这个方法的,如果你觉得这样子不好,你希望增加个pressDown这样的方法,里面默认就是用MonkeyDevice.DOWN来驱动MonkeyDevice的press方法,而用户只需要给出坐标点就可以了,那么你就可以遵循google描述的规范去编写一个这方面的插件,到时使用的时候就可以通过python方式直接import进来使用了。本书并不会把MonkeyRunner插件进行重点介绍。
在解析出所有的参数之后,processOptions方法最后根据这些参数来初始化MonkeyRunnerOptions类。我们进入到该构造函数看下它究竟做了什么事情:
 38   private MonkeyRunnerOptions(String hostname, int port, File scriptFile, String backend, Level logLevel, Collection<File> plugins, Collection<String> arguments)
 39   {
 40     this.hostname = hostname;
 41     this.port = port;
 42     this.scriptFile = scriptFile;
 43     this.backend = backend;
 44     this.logLevel = logLevel;
 45     this.plugins = plugins;
 46     this.arguments = arguments;
47 }所做的事情非常简单,就是把解析出来的所有参数保存到MonkeyRunnerOptions类的实例里面,今后需要的时候就进去拿就好了。
注:更多文章请关注公众号:techgogogo或个人博客http://techgogogo.com。当然,也非常欢迎您直接微信(zhubaitian1)勾搭。本文由天地会珠海分舵原创。转载请自觉,是否投诉维权看心情。


 2944
2944


 被折叠的 条评论
为什么被折叠?
被折叠的 条评论
为什么被折叠?
 到【灌水乐园】发言


