


在OpenCV中看到一个很有意思的函数:floodfill()
使用给定颜色填充一个联通的区域
- C++: int floodFill(InputOutputArray image, Point seedPoint,
- Scalar newVal, Rect* rect=0, Scalar loDiff=Scalar(),
- Scalar upDiff=Scalar(), int flags=4 )
一个简单的例子:
- #include "opencv2/imgproc/imgproc.hpp"
- #include "opencv2/highgui/highgui.hpp"
- #include <iostream>
- using namespace cv;
- using namespace std;
- //floodfill()
- //Fills a connected component with the given color.
- static void help()
- {
- cout << "\nThis program demonstrated the floodFill() function\n"
- "Call:\n"
- "./ffilldemo [image_name -- Default: fruits.jpg]\n" << endl;
- cout << "Hot keys: \n"
- "\tESC - quit the program\n"
- "\tc - switch color/grayscale mode\n"
- "\tm - switch mask mode\n"
- "\tr - restore the original image\n"
- "\ts - use null-range floodfill\n"
- "\tf - use gradient floodfill with fixed(absolute) range\n"
- "\tg - use gradient floodfill with floating(relative) range\n"
- "\t4 - use 4-connectivity mode\n"
- "\t8 - use 8-connectivity mode\n" << endl;
- }
- Mat image0, image, gray, mask;
- int ffillMode = 1;
- int loDiff = 20, upDiff = 20;
- int connectivity = 4;
- int isColor = true;
- bool useMask = false;
- int newMaskVal = 255;
- static void onMouse( int event, int x, int y, int, void* )
- {
- if( event != CV_EVENT_LBUTTONDOWN )
- return;
- Point seed = Point(x,y);
- int lo = ffillMode == 0 ? 0 : loDiff;
- int up = ffillMode == 0 ? 0 : upDiff;
- int flags = connectivity + (newMaskVal << 8) +
- (ffillMode == 1 ? CV_FLOODFILL_FIXED_RANGE : 0);
- int b = (unsigned)theRNG() & 255;
- int g = (unsigned)theRNG() & 255;
- int r = (unsigned)theRNG() & 255;
- Rect ccomp;
- Scalar newVal = isColor ? Scalar(b, g, r) : Scalar(r*0.299 + g*0.587 + b*0.114);
- Mat dst = isColor ? image : gray;
- int area;
- if( useMask )
- {
- threshold(mask, mask, 1, 128, CV_THRESH_BINARY);
- area = floodFill(dst, mask, seed, newVal, &ccomp, Scalar(lo, lo, lo),
- Scalar(up, up, up), flags);
- imshow( "mask", mask );
- }
- else
- {
- area = floodFill(dst, seed, newVal, &ccomp, Scalar(lo, lo, lo),
- Scalar(up, up, up), flags);
- }
- imshow("image", dst);
- cout << area << " pixels were repainted\n";
- }
- int main( )
- {
- char* filename="0.png";
- image0 = imread(filename, 1);
- if( image0.empty() )
- {
- cout << "Image empty. Usage: ffilldemo <image_name>\n";
- return 0;
- }
- help();
- image0.copyTo(image);
- cvtColor(image0, gray, CV_BGR2GRAY);
- mask.create(image0.rows+2, image0.cols+2, CV_8UC1);
- namedWindow( "image", 0 );
- createTrackbar( "lo_diff", "image", &loDiff, 255, 0 );
- createTrackbar( "up_diff", "image", &upDiff, 255, 0 );
- setMouseCallback( "image", onMouse, 0 );
- for(;;)
- {
- imshow("image", isColor ? image : gray);
- int c = waitKey(0);
- if( (c & 255) == 27 )
- {
- cout << "Exiting ...\n";
- break;
- }
- switch( (char)c )
- {
- case 'c':
- if( isColor )
- {
- cout << "Grayscale mode is set\n";
- cvtColor(image0, gray, CV_BGR2GRAY);
- mask = Scalar::all(0);
- isColor = false;
- }
- else
- {
- cout << "Color mode is set\n";
- image0.copyTo(image);
- mask = Scalar::all(0);
- isColor = true;
- }
- break;
- case 'm':
- if( useMask )
- {
- destroyWindow( "mask" );
- useMask = false;
- }
- else
- {
- namedWindow( "mask", 0 );
- mask = Scalar::all(0);
- imshow("mask", mask);
- useMask = true;
- }
- break;
- case 'r':
- cout << "Original image is restored\n";
- image0.copyTo(image);
- cvtColor(image, gray, CV_BGR2GRAY);
- mask = Scalar::all(0);
- break;
- case 's':
- cout << "Simple floodfill mode is set\n";
- ffillMode = 0;
- break;
- case 'f':
- cout << "Fixed Range floodfill mode is set\n";
- ffillMode = 1;
- break;
- case 'g':
- cout << "Gradient (floating range) floodfill mode is set\n";
- ffillMode = 2;
- break;
- case '4':
- cout << "4-connectivity mode is set\n";
- connectivity = 4;
- break;
- case '8':
- cout << "8-connectivity mode is set\n";
- connectivity = 8;
- break;
- }
- }
- return 0;
- }
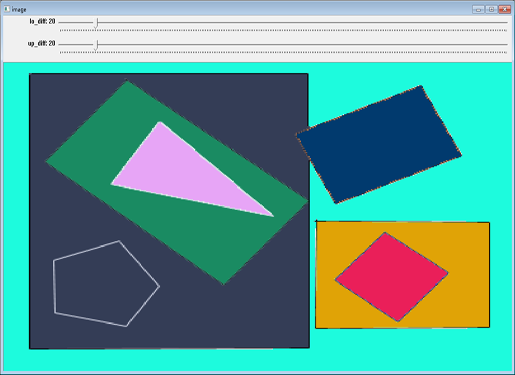
点击图标改变图像中的连图区域的颜色:
转载 :http://blog.csdn.net/xiaowei_cqu/article/details/8987387


 422
422

 被折叠的 条评论
为什么被折叠?
被折叠的 条评论
为什么被折叠?
 到【灌水乐园】发言


