WebSocket 规范的目标是在浏览器中实现和服务器端双向通信。双向通信可以拓展浏览器上的应用类型,例如实时的数据推送、游戏、聊天等。有了WebSocket,我们就可以通过持久的浏览器和服务器的连接实现实时的数据通信,再也不用傻傻地使用连绵不绝的请求和常轮询的机制了,费时费力,当然WebSocket也不是完美的,当然,WebSocket还需要浏览器的支持,目前IE的版本必须在10以上才支持WebSocket,Chrome Safari的最新版本当然也都支持。本节简单介绍一个在服务器端和浏览器端实现WebSocket通信的简单示例。
1.服务器端
我们需要在MVC4的项目中添加一个WSChatController并继承自ApiController,这也是ASP.NET MVC4种提供的WEB API新特性。
在Get方法中,我们使用HttpContext.AcceptWebSocketRequest方法来创建WebSocket连接:
- namespace WebSocketSample.Controllers
- {
- public class WSChatController : ApiController
- {
- public HttpResponseMessage Get()
- {
- if (HttpContext.Current.IsWebSocketRequest)
- {
- HttpContext.Current.AcceptWebSocketRequest(ProcessWSChat);
- }
- return new HttpResponseMessage(HttpStatusCode.SwitchingProtocols);
- }
-
- private async Task ProcessWSChat(AspNetWebSocketContext arg)
- {
- WebSocket socket = arg.WebSocket;
- while (true)
- {
- ArraySegment<byte> buffer = new ArraySegment<byte>(new byte[1024]);
- WebSocketReceiveResult result = await socket.ReceiveAsync(buffer, CancellationToken.None);
- if (socket.State == WebSocketState.Open)
- {
- string message = Encoding.UTF8.GetString(buffer.Array, 0, result.Count);
- string returnMessage = "You send :" + message + ". at" + DateTime.Now.ToLongTimeString();
- buffer = new ArraySegment<byte>(Encoding.UTF8.GetBytes(returnMessage));
- await socket.SendAsync(buffer, WebSocketMessageType.Text, true, CancellationToken.None);
- }
- else
- {
- break;
- }
- }
- }
- }
- }
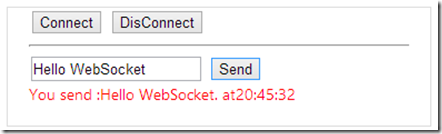
在这段代码中,只是简单的检查当前连接的状态,如果是打开的,那么拼接了接收到的信息和时间返回给浏览器端。
2.浏览器端
在另外一个视图中,我们使用了原生的WebSocket创建连接,并进行发送数据和关闭连接的操作
- @{
- ViewBag.Title = "Index";
- }
- @Scripts.Render("~/Scripts/jquery-1.8.2.js")
-
- <script type="text/javascript">
- var ws;
- $(
- function () {
- $("#btnConnect").click(function () {
- $("#messageSpan").text("Connection...");
- ws = new WebSocket("ws://" + window.location.hostname +":"+window.location.port+ "/api/WSChat");
- ws.onopen = function () {
- $("#messageSpan").text("Connected!");
- };
- ws.onmessage = function (result) {
- $("#messageSpan").text(result.data);
- };
- ws.onerror = function (error) {
- $("#messageSpan").text(error.data);
- };
- ws.onclose = function () {
- $("#messageSpan").text("Disconnected!");
- };
- });
- $("#btnSend").click(function () {
- if (ws.readyState == WebSocket.OPEN) {
- ws.send($("#txtInput").val());
- }
- else {
- $("messageSpan").text("Connection is Closed!");
- }
- });
- $("#btnDisconnect").click(function () {
- ws.close();
- });
- }
- );
- </script>
-
- <fieldset>
- <input type="button" value="Connect" id="btnConnect"/>
- <input type="button" value="DisConnect" id="btnDisConnect"/>
- <hr/>
- <input type="text" id="txtInput"/>
- <input type="button" value="Send" id="btnSend"/>
- <br/>
- <span id="messageSpan" style="color:red;"></span>
- </fieldset>

3.测试结果


 5916
5916

 被折叠的 条评论
为什么被折叠?
被折叠的 条评论
为什么被折叠?
 到【灌水乐园】发言


