


原文:http://wiki.lwjgl.org/wiki/The_Quad_textured
Introduction 介绍
本教程将讲怎样对模型贴纹理,其他方形的部分就和之前教程中讲的差不多。后面可以看到完整的源代码。(废话特多,全略)
Resources 资源
本教程将用第三方类库读取图片,图片读取器使用TWL的PNG解码器工具,你可以在这里获取:[1]。它就是一个JAR文件,把它加入工程库里。
材质我们将使用一套UV网格,什么是UV稍后会讨论,我们将使用两个纹理,都是PNG图片,图片来源是:[2],你可以从这里获取图片并用你的图片编辑器把它们转成PNG格式。
Texture Units 纹理单元
首先要知道OpenGL使用的是一个纹理单元列表,就跟VBO的属性列表一样,也有一套纹理单元供使用。纹理单元的总数可能是不一定是多少,但是最小值是2。我们可以调用GL_TEXTUREX获取这些纹理单元,X就是纹理的单元序号。系统一定会支持的纹理单元是GL_TEXTURE0和GL_TEXTURE1。
由于一个模型可能会用到许多不同的纹理(漫射、高光、法线、烤阴影……),我们必须告诉OpenGL哪个纹理放在哪里。本教程将只使用GL_TEXTURE0,因为我们的shader只处理漫反射纹理,漫反射纹理就是物体的基本颜色。目前为止,我们已经分配颜色到顶点还利用交叉数据在不同顶点间创建有色方形,通过使用纹理,我们可以映射一个图片到方形上,还能很轻松地操控每一个象素的颜色。
(Texture) Coordinates (纹理)坐标
通常我们渲染的东西是3D的,所以顶点坐标有三个组件(X,Y,Z),尽管方形没有深度,顶点Z值也得设一个0。纹理坐标只需要2个组件(S,T),3D建模者应该知道这些坐标的名字“UV”,以下是图例:
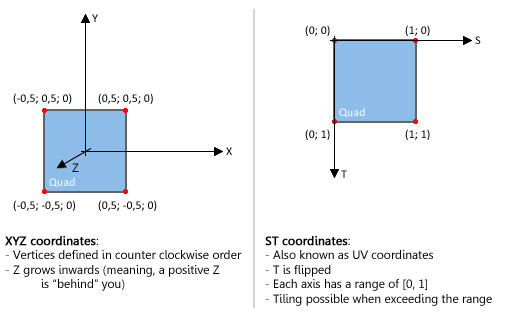
XYZ组件跟ST组件没什么关系,因为这个转换过程一般叫做展开,美工可以针对每个顶点定义其ST位置,完全不需要考虑XYZ。图例里的数字就是我们在范例里用的数据,我们已经更新了自定义顶点类Vertex,这样就可以分配ST值给它了。像下面这样定义顶点:
// We'll define our quad using 4 vertices of the custom 'TexturedVertex' class
TexturedVertex v0 = new TexturedVertex();
v0.setXYZ(-0.5f, 0.5f, 0); v0.setRGB(1, 0, 0); v0.setST(0, 0);
TexturedVertex v1 = new TexturedVertex();
v1.setXYZ(-0.5f, -0.5f, 0); v1.setRGB(0, 1, 0); v1.setST(0, 1);
TexturedVertex v2 = new TexturedVertex();
v2.setXYZ(0.5f, -0.5f, 0); v2.setRGB(0, 0, 1); v2.setST(1, 1);
TexturedVertex v3 = new TexturedVertex();
v3.setXYZ(0.5f, 0.5f, 0); v3.setRGB(1, 1, 1); v3.setST(1, 0);
Using the attribute lists 使用属性列表
仍然使用交叉数据保存,带上额外的ST数据。
// Create a new Vertex Buffer Object in memory and select it (bind)
vboId = GL15.glGenBuffers();
GL15.glBindBuffer(GL15.GL_ARRAY_BUFFER, vboId);
GL15.glBufferData(GL15.GL_ARRAY_BUFFER, verticesBuffer, GL15.GL_STATIC_DRAW);

// Put the position coordinates in attribute list 0
GL20.glVertexAttribPointer(0, TexturedVertex.positionElementCount, GL11.GL_FLOAT,
        false, TexturedVertex.stride, TexturedVertex.positionByteOffset);
// Put the color components in attribute list 1
GL20.glVertexAttribPointer(1, TexturedVertex.colorElementCount, GL11.GL_FLOAT,
        false, TexturedVertex.stride, TexturedVertex.colorByteOffset);
// Put the texture coordinates in attribute list 2
GL20.glVertexAttribPointer(2, TexturedVertex.textureElementCount, GL11.GL_FLOAT,
        false, TexturedVertex.stride, TexturedVertex.textureByteOffset);

GL15.glBindBuffer(GL15.GL_ARRAY_BUFFER, 0);
Texture Shaders 纹理shader
在OpenGL 3.x以上版本里,必须依赖shader去完成所有的工作。因此必须更新shader以使它能读到ST数据,映射纹理到模型的工作将在片段shader里完成。因为到时需要每个象素去定义,所以是片段shader的工作。
Vertex Shader 顶点shader
但是一切都从顶点shader开始,所以还是要增加一个in变量,然后将它传递到片段shader里。
#version 150 core

in vec4 in_Position;
in vec4 in_Color;
in vec2 in_TextureCoord;

out vec4 pass_Color;
out vec2 pass_TextureCoord;

void main(void) {
    gl_Position = in_Position;

    pass_Color = in_Color;
    pass_TextureCoord = in_TextureCoord;
}
Fragment Shader 片段shader
现在片段shader用纹理坐标从纹理取样,并把颜色弄到其象素上。
#version 150 core

uniform sampler2D texture_diffuse;

in vec4 pass_Color;
in vec2 pass_TextureCoord;

out vec4 out_Color;

void main(void) {
    out_Color = pass_Color;
    // Override out_Color with our texture pixel
    out_Color = texture(texture_diffuse, pass_TextureCoord);
}
注意片段shader从纹理取样,纹理也可以被uniform变量texture_diffuse访问(注意到它是sampler2D类型,稍后会再讲),它从材质取样因为我们的屏幕象素通常和材质象素并非是一象素一象素对应的。如果有缩放,我们可能会需要更多或更少的象素。假如我们想取3个象素,但是实际上只有2个,采样器将会根据周围的象素创建一个中间象素出来。
Binding the shader variables 绑定shader变量
我们现在都有三种数据在每个顶点上,XYZ坐标、颜色、T坐标。我们必须绑定顶点shader的纹理坐标变量到VBO属性列表上。
// Position information will be attribute 0
GL20.glBindAttribLocation(pId, 0, "in_Position");
// Color information will be attribute 1
GL20.glBindAttribLocation(pId, 1, "in_Color");
// Textute information will be attribute 2
GL20.glBindAttribLocation(pId, 2, "in_TextureCoord");
记着要用同样的变量名。
Loading textures 读取纹理
所有东西就绪,只需读取纹理了。导入图片,用第三方库TWL PNG解码器,具体怎样做不重要,重要的是OpenGL需要的是你象素色组件一样的字节缓冲区,用PNG解码器就可以获取到:
ByteBuffer buf = null;
int tWidth = 0;
int tHeight = 0;

try {
    // Open the PNG file as an InputStream
    InputStream in = new FileInputStream(filename);
    // Link the PNG decoder to this stream
    PNGDecoder decoder = new PNGDecoder(in);

    // Get the width and height of the texture
    tWidth = decoder.getWidth();
    tHeight = decoder.getHeight();


    // Decode the PNG file in a ByteBuffer
    buf = ByteBuffer.allocateDirect(
            4 * decoder.getWidth() * decoder.getHeight());
    decoder.decode(buf, decoder.getWidth() * 4, Format.RGBA);
    buf.flip();

    in.close();
} catch (IOException e) {
    e.printStackTrace();
    System.exit(-1);
}
代码运行后,我们得到一个缓冲区,里面填满RGBA格式的象素数据,我们需要告诉OpenGL缓冲区里填的是哪种类型的数据,感谢PNG解码器帮我们做了大部分的工作。RGBA是非常通用的格式,另一个通用格式是BRG(A),此格式是DirectX用的。
下一步我们将在内存里创建我们的纹理对象,textureUnit变量就是教程一开始说的纹理单元,我们当然还必须绑定纹理对象使变化生效,第一个变化就是把字节缓冲区推送至内存。
// Create a new texture object in memory and bind it
int texId = GL11.glGenTextures();
GL13.glActiveTexture(textureUnit);
GL11.glBindTexture(GL11.GL_TEXTURE_2D, texId);
 最低0.47元/天 解锁文章


 被折叠的 条评论
为什么被折叠?
被折叠的 条评论
为什么被折叠?
 到【灌水乐园】发言


