


转载 :http://blog.csdn.net/congcong68/article/details/41113239
互联网的发展,网站应用的规模不断扩大,常规的垂直应用架构已无法应对,分布式服务架构以及流动计算架构势在必行,Dubbo是一个分布式服务框架,在这种情况下诞生的。现在核心业务抽取出来,作为独立的服务,使前端应用能更快速和稳定的响应。
第一:介绍Dubbo背景
大规模服务化之前,应用可能只是通过RMI或Hessian等工具,简单的暴露和引用远程服务,通过配置服务的URL地址进行调用,通过F5等硬件进行负载均衡。
(1) 当服务越来越多时,服务URL配置管理变得非常困难,F5硬件负载均衡器的单点压力也越来越大。
此时需要一个服务注册中心,动态的注册和发现服务,使服务的位置透明。
并通过在消费方获取服务提供方地址列表,实现软负载均衡和Failover,降低对F5硬件负载均衡器的依赖,也能减少部分成本。
(2) 当进一步发展,服务间依赖关系变得错踪复杂,甚至分不清哪个应用要在哪个应用之前启动,架构师都不能完整的描述应用的架构关系。
这时,需要自动画出应用间的依赖关系图,以帮助架构师理清理关系。
(3) 接着,服务的调用量越来越大,服务的容量问题就暴露出来,这个服务需要多少机器支撑?什么时候该加机器?
为了解决这些问题,第一步,要将服务现在每天的调用量,响应时间,都统计出来,作为容量规划的参考指标。
其次,要可以动态调整权重,在线上,将某台机器的权重一直加大,并在加大的过程中记录响应时间的变化,直到响应时间到达阀值,记录此时的访问量,再以此访问量乘以机器数反推总容量。
第二:Dubbo的简介
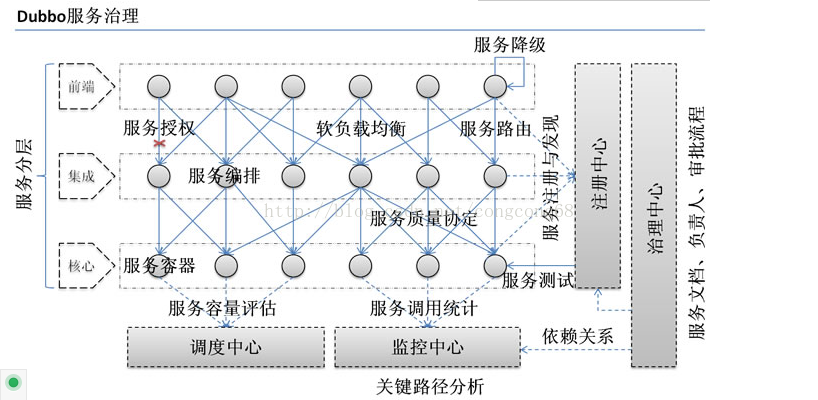
Dubbo是一个分布式服务框架,解决了上面的所面对的问题,Dubbo的架构如图所示:

节点角色说明:
Provider: 暴露服务的服务提供方。
Consumer: 调用远程服务的服务消费方。
Registry: 服务注册与发现的注册中心。
Monitor: 统计服务的调用次调和调用时间的监控中心。
Container: 服务运行容器。
调用关系说明:
0. 服务容器负责启动,加载,运行服务提供者。
1. 服务提供者在启动时,向注册中心注册自己提供的服务。
2. 服务消费者在启动时,向注册中心订阅自己所需的服务。
3. 注册中心返回服务提供者地址列表给消费者,如果有变更,注册中心将基于长连接推送变更数据给消费者。
4. 服务消费者,从提供者地址列表中,基于软负载均衡算法,选一台提供者进行调用,如果调用失败,再选另一台调用。
5. 服务消费者和提供者,在内存中累计调用次数和调用时间,定时每分钟发送一次统计数据到监控中心。
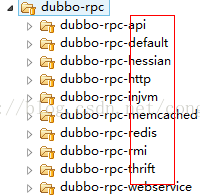
Dubbo提供了很多协议,Dubbo协议、RMI协议、Hessian协议,我们查看Dubbo源代码,有各种协议的实现,如图所示:
我们之前没用Dubbo之前时,大部分都使用Hessian来使用我们服务的暴露和调用,利用HessianProxyFactory调用远程接口。
上面是参考了Dubbo官方网介绍,接下来我们来介绍SpringMVC、Dubbo、Zookeeper整合使用。
第一步:在Linux上安装Zookeeper
Zookeeper作为Dubbo服务的注册中心,Dubbo原先基于数据库的注册中心,没采用Zookeeper,Zookeeper一个分布式的服务框架,是树型的目录服务的数据存储,能做到集群管理数据 ,这里能很好的作为Dubbo服务的注册中心,Dubbo能与Zookeeper做到集群部署,当提供者出现断电等异常停机时,Zookeeper注册中心能自动删除提供者信息,当提供者重启时,能自动恢复注册数据,以及订阅请求。我们先在linux上安装Zookeeper,我们安装最简单的单点,集群比较麻烦。
(1)下载Zookeeper-3.4.6.tar.gz 地址http://www.apache.org/dist/zookeeper/
(2) 我们放到Linux下的一个文件夹,然后解压:
#tar zxvf zookeeper-3.4.6.tar.gz
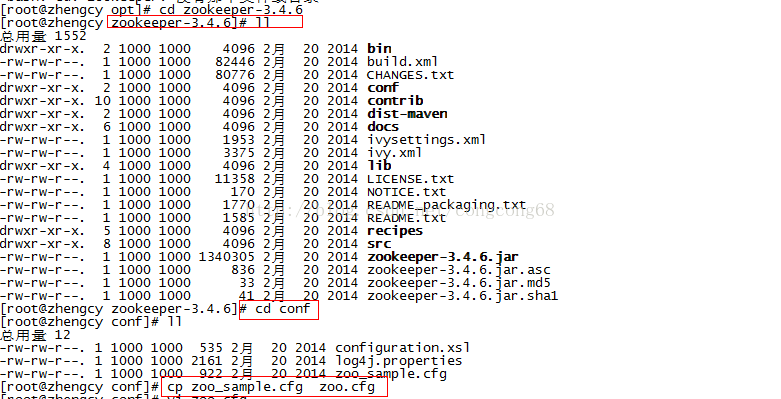
(3)然后在对应的zookeeper-3.4.6/conf 下有一个文件zoo_sample.cfg的这个文件里面配置了监听客户端连接的端口等一些信息,Zookeeper 在启动时会找zoo.cfg这个文件作为默认配置文件,所以我们复制一个名称为zoo.cfg的文件,如图所示:
我们查看一下这个文件的里面的一些配置信息,如图所示:
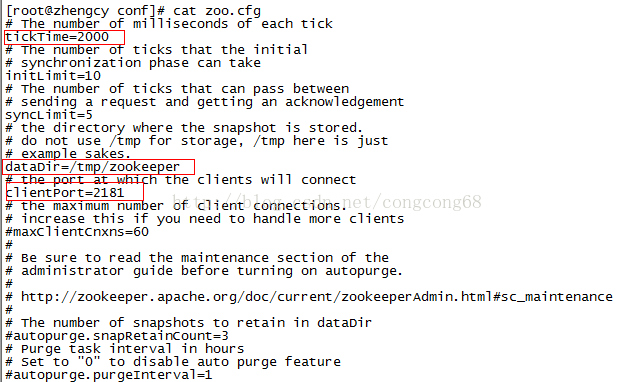
说明:
clientPort:监听客户端连接的端口。
tickTime:基本事件单元,以毫秒为单位。它用来控制心跳和超时,默认情况下最小的会话超时时间为两倍的 tickTime。
我们可以对配置文件的端口等或者进行高级配置和集群配置例如:maxClientCnxns:限制连接到 ZooKeeper 的客户端的数量等
(4)启动Zookeeper 的服务,如图所示:
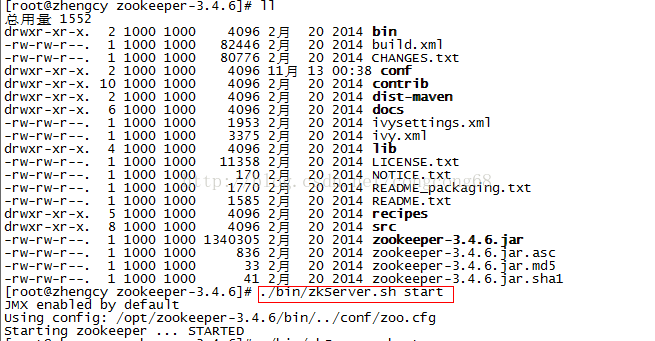
到这边Zookeeper的安装和配置完成
第二步:配置dubbo-admin的管理页面,方便我们管理页面
(1)下载dubbo-admin-2.4.1.war包,在Linux的tomcat部署,先把dubbo-admin-2.4.1放在tomcat的webapps/ROOT下,然后进行解压:
#jar -xvf dubbo-admin-2.4.1.war
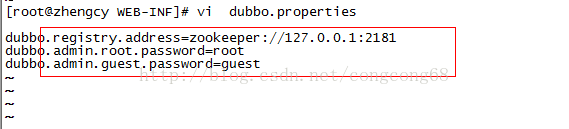
(2)然后到webapps/ROOT/WEB-INF下,有一个dubbo.properties文件,里面指向Zookeeper ,使用的是Zookeeper 的注册中心,如图所示:
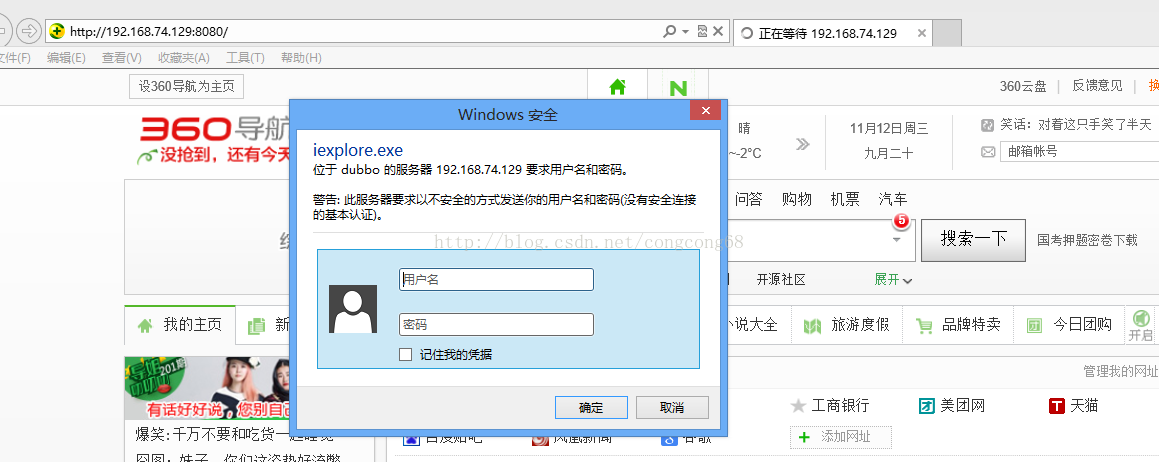
(3)然后启动tomcat服务,用户名和密码:root,并访问服务,显示登陆页面,说明dubbo-admin部署成功,如图所示:
第三步:SpringMVC与Dubbo的整合,这边使用的Maven的管理项目
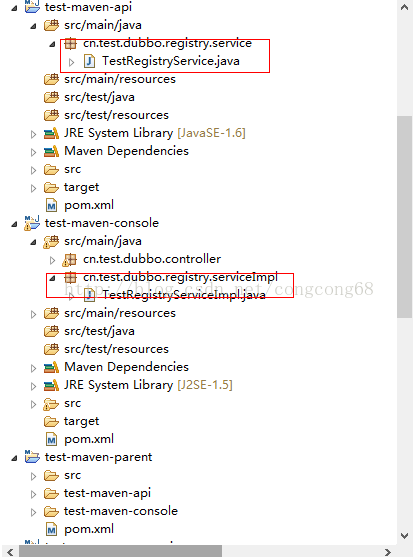
第一:我们先开发服务注册的,就是提供服务,项目结构如图所示:
(1)test-maven-api项目加入了一个服务接口,代码如下:
- public interface TestRegistryService {
- public String hello(String name);
- }
- <dependency>
- <groupId>cn.test</groupId>
- <artifactId>test-maven-api</artifactId>
- <version>0.0.1-SNAPSHOT</version>
- </dependency>
- <dependency>
- <groupId>com.alibaba</groupId>
- <artifactId>dubbo</artifactId>
- <version>2.5.3</version>
- </dependency>
- <dependency>
- <groupId>org.apache.zookeeper</groupId>
- <artifactId>zookeeper</artifactId>
- <version>3.4.6</version>
- </dependency>
- <dependency>
- <groupId>com.github.sgroschupf</groupId>
- <artifactId>zkclient</artifactId>
- <version>0.1</version>
- </dependency>
- @Service("testRegistryService")
- ublic class TestRegistryServiceImpl implements TestRegistryService {
- public String hello(String name) {
- return "hello"+name;
- }
(4)我们服务以及实现好了,这时要暴露服务,代码如下:
- <?xml version="1.0" encoding="UTF-8"?>
- <beans xmlns="http://www.springframework.org/schema/beans"
- xmlns:xsi="http://www.w3.org/2001/XMLSchema-instance"
- xmlns:jee="http://www.springframework.org/schema/jee"
- xmlns:tx="http://www.springframework.org/schema/tx"
- <span style="color:#cc0000;">xmlns:dubbo="http://code.alibabatech.com/schema/dubbo"</span>
- xmlns:context="http://www.springframework.org/schema/context"
- xsi:schemaLocation="http://www.springframework.org/schema/beans http://www.springframework.org/schema/beans/spring-beans-3.1.xsd
- http://www.springframework.org/schema/tx http://www.springframework.org/schema/tx/spring-tx-3.1.xsd
- http://www.springframework.org/schema/jee http://www.springframework.org/schema/jee/spring-jee-3.1.xsd
- <span style="color:#990000;">http://code.alibabatech.com/schema/dubbo http://code.alibabatech.com/schema/dubbo/dubbo.xsd</span>
- http://www.springframework.org/schema/context http://www.springframework.org/schema/context/spring-context-3.1.xsd"
- default-lazy-init="false" >
- <!-- 提供方应用名称信息,这个相当于起一个名字,我们dubbo管理页面比较清晰是哪个应用暴露出来的 -->
- <dubbo:application name="dubbo_provider"></dubbo:application>
- <!-- 使用zookeeper注册中心暴露服务地址 -->
- <dubbo:registry address="zookeeper://127.0.0.1:2181" check="false" subscribe="false" register=""></dubbo:registry>
- <!-- 要暴露的服务接口 -->
- <dubbo:service interface="cn.test.dubbo.registry.service.TestRegistryService" ref="testRegistryService" />
- </beans>
说明:
dubbo:registry 标签一些属性的说明:
1)register是否向此注册中心注册服务,如果设为false,将只订阅,不注册。
2)check注册中心不存在时,是否报错。
3)subscribe是否向此注册中心订阅服务,如果设为false,将只注册,不订阅。
4)timeout注册中心请求超时时间(毫秒)。
5)address可以Zookeeper集群配置,地址可以多个以逗号隔开等。
dubbo:service标签的一些属性说明:
1)interface服务接口的路径
2)ref引用对应的实现类的Bean的ID
3)registry向指定注册中心注册,在多个注册中心时使用,值为<dubbo:registry>的id属性,多个注册中心ID用逗号分隔,如果不想将该服务注册到任何registry,可将值设为N/A
4)register 默认true ,该协议的服务是否注册到注册中心。
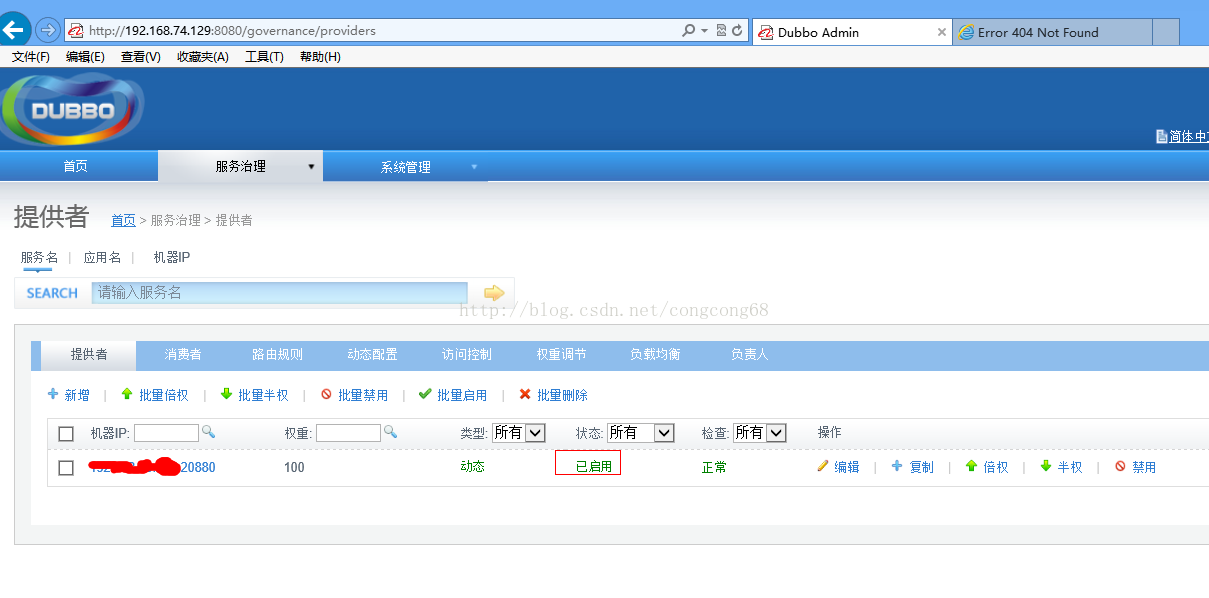
(5)启动项目,然后我们在Dubbo管理页面上显示,已经暴露的服务,但显示还没有消费者,因为我们还没实现消费者服务,如图所示:
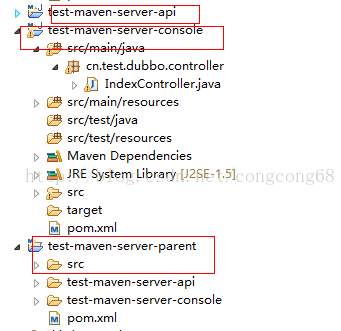
第二:我们在开发服务消费者,就是调用服务,我们在新建一个新的消费者项目结构如图所示:
(1)test-maven-server-console的pom.xml引入Dubbo和Zookeeper的jar包、test-maven-api的jar包,因为引入test-maven-api的jar包,我们在项目中调用像在本地调用一样。代码如下:
- <dependency>
- <groupId>cn.test</groupId>
- <artifactId>test-maven-api</artifactId>
- <version>0.0.1-SNAPSHOT</version>
- </dependency>
- <dependency>
- <groupId>com.alibaba</groupId>
- <artifactId>dubbo</artifactId>
- <version>2.5.3</version>
- </dependency>
- <dependency>
- <groupId>org.apache.zookeeper</groupId>
- <artifactId>zookeeper</artifactId>
- <version>3.4.6</version>
- </dependency>
- <dependency>
- <groupId>com.github.sgroschupf</groupId>
- <artifactId>zkclient</artifactId>
- <version>0.1</version>
- </dependency>
- @Controller
- public class IndexController {
- @Autowired
- private TestRegistryService testRegistryService;
- @RequestMapping("/hello")
- public String index(Model model){
- String name=testRegistryService.hello("zz");
- System.out.println("xx=="+name);
- return "";
- }
- }
(3)我们要引用的地址,代码如下:
- <?xml version="1.0" encoding="UTF-8"?>
- <beans xmlns="http://www.springframework.org/schema/beans"
- xmlns:xsi="http://www.w3.org/2001/XMLSchema-instance"
- xmlns:jee="http://www.springframework.org/schema/jee"
- xmlns:tx="http://www.springframework.org/schema/tx"
- <span style="background-color: rgb(255, 255, 255);"><span style="color:#990000;">xmlns:dubbo="http://code.alibabatech.com/schema/dubbo"</span></span>
- xmlns:context="http://www.springframework.org/schema/context"
- xsi:schemaLocation="http://www.springframework.org/schema/beans http://www.springframework.org/schema/beans/spring-beans-3.1.xsd
- http://www.springframework.org/schema/tx http://www.springframework.org/schema/tx/spring-tx-3.1.xsd
- http://www.springframework.org/schema/jee http://www.springframework.org/schema/jee/spring-jee-3.1.xsd
- <span style="color:#990000;">http://code.alibabatech.com/schema/dubbo http://code.alibabatech.com/schema/dubbo/dubbo.xsd</span>
- http://www.springframework.org/schema/context http://www.springframework.org/schema/context/spring-context-3.1.xsd"
- default-lazy-init="false" >
- <dubbo:application name="dubbo_consumer"></dubbo:application>
- <!-- 使用zookeeper注册中心暴露服务地址 -->
- <dubbo:registry address="zookeeper://192.168.74.129:2181" check="false"></dubbo:registry>
- <!-- 要引用的服务 -->
- <dubbo:reference interface="cn.test.dubbo.registry.service.TestRegistryService" id="testRegistryService"></dubbo:reference>
- </beans>
说明:
dubbo:reference 的一些属性的说明:
1)interface调用的服务接口
2)check 启动时检查提供者是否存在,true报错,false忽略
3)registry 从指定注册中心注册获取服务列表,在多个注册中心时使用,值为<dubbo:registry>的id属性,多个注册中心ID用逗号分隔
4)loadbalance 负载均衡策略,可选值:random,roundrobin,leastactive,分别表示:随机,轮循,最少活跃调用
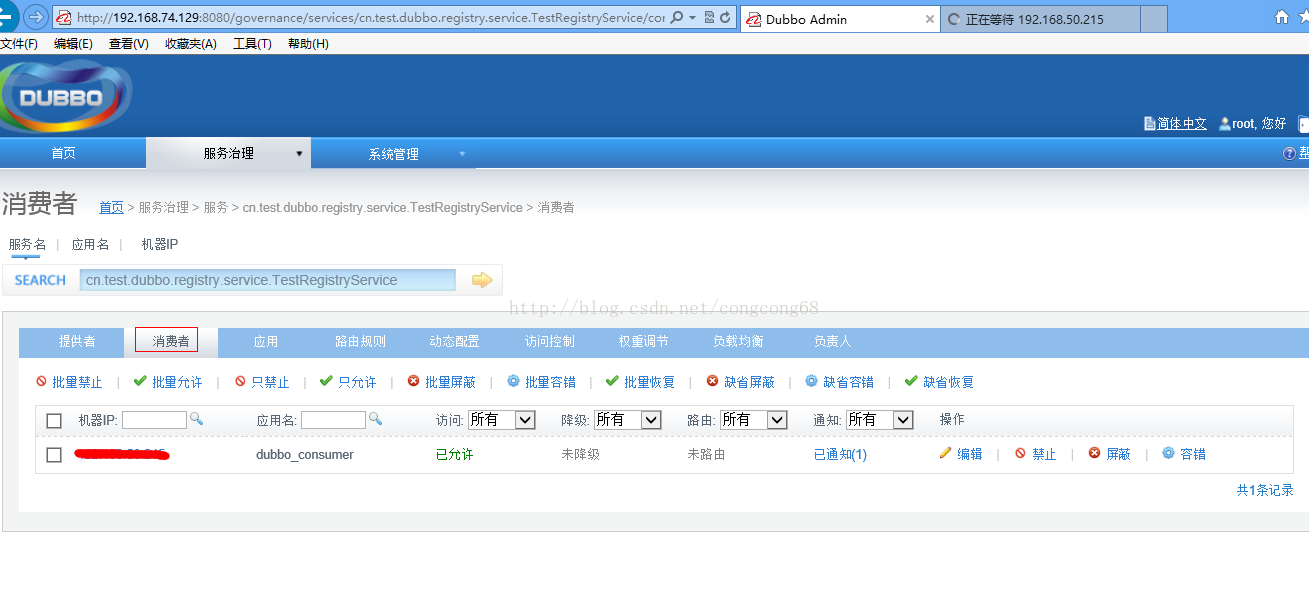
(4)项目启动,Dubbo管理页面,能看到消费者,如图所示:

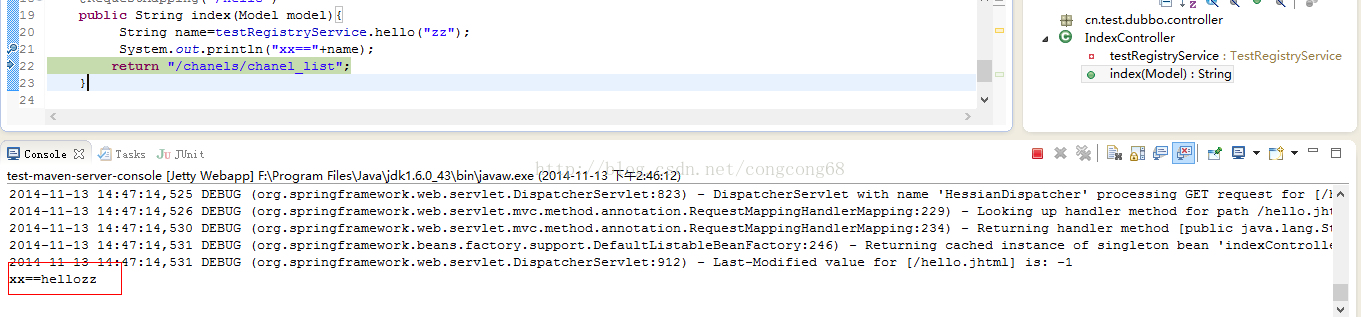
(5)然后访问消费者项目,Controller层能像调用本地一样调用服务的具体实现,如图所示:
Dubbo提供了多种容错方案,包括负载均衡这些,如图所示:
2)集群模式
为了获得可靠的 ZooKeeper 服务,用户应该在一个集群上部署 ZooKeeper 。只要集群上大多数的ZooKeeper 服务启动了,那么总的 ZooKeeper 服务将是可用的。另外,最好使用奇数台机器。 如果 zookeeper拥有 5 台机器,那么它就能处理 2 台机器的故障了。
之后的操作和单机模式的安装类似,我们同样需要对 JAVA 环境进行设置,下载最新的 ZooKeeper 稳定版本并配置相应的环境变量。不同之处在于每台机器上 conf/zoo.cfg 配置文件的参数设置,参考下面的配置:
tickTime=2000
dataDir=/var/zookeeper/
clientPort=2181
initLimit=5
syncLimit=2
server.1=zoo1:2888:3888
server.2=zoo2:2888:3888
server.3=zoo3:2888:3888
“ server.id=host:port:port. ”指示了不同的 ZooKeeper 服务器的自身标识,作为集群的一部分的机器应该知道 ensemble 中的其它机器。用户可以从“ server.id=host:port:port. ”中读取相关的信息。 在服务器的 data( dataDir 参数所指定的目录)目录下创建一个文件名为 myid 的文件,这个文件中仅含有一行的内容,指定的是自身的 id 值。比如,服务器“ 1 ”应该在 myid 文件中写入“ 1 ”。这个 id 值必须是 ensemble 中唯一的,且大小在 1 到 255 之间。这一行配置中,第一个端口( port )是从( follower )机器连接到主( leader )机器的端口,第二个端口是用来进行 leader 选举的端口。在这个例子中,每台机器使用三个端口,分别是: clientPort ,2181 ; port , 2888 ; port , 3888 。
我们在拥有三台机器的 Hadoop 集群上测试使用 ZooKeeper 服务,下面代码清单 B 是我们根据自身情况所设置的 ZooKeeper 配置文档:
代码清单 B : zoo.cfg
# The number of milliseconds of each tick
tickTime=2000
# The number of ticks that the initial
# synchronization phase can take
initLimit=10
# The number of ticks that can pass between
# sending a request and getting an acknowledgement
syncLimit=5
# the directory where the snapshot is stored.
dataDir=/root/hadoop-0.20.2/zookeeper-3.3.1/snapshot/d1
# the port at which the clients will connect
clientPort=2181
server.1=IP1:2887:3887
server.2=IP2:2888:3888
server.3=IP3:2889:3889
清单中的 IP 分别对应的配置分布式 ZooKeeper 的 IP 地址。当然,也可以通过机器名访问 zookeeper ,但是需要在ubuntu 的 hosts 环境中进行设置。读者可以查阅 Ubuntu 以及 Linux 的相关资料进行设置。
3)集群伪分布
简单来说,集群伪分布模式就是在单机下模拟集群的ZooKeeper服务。
那么,如何对配置 ZooKeeper 的集群伪分布模式呢?其实很简单,在 zookeeper 配置文档中, clientPort参数用来设置客户端连接 zookeeper 的端口。 server.1=IP1:2887:3887 中, IP1 指示的是组成 ZooKeeper 服务的机器 IP 地址, 2887 为用来进行 leader 选举的端口, 3887 为组成 ZooKeeper 服务的机器之间通信的端口。集群伪分布模式我们使用每个配置文档模拟一台机器,也就是说,需要在单台机器上运行多个 zookeeper 实例。但是,我们必须要保证各个配置文档的 clientPort 不能冲突。
下面是我们所配置的集群伪分布模式,通过 zoo1.cfg , zoo2.cfg , zoo3.cfg 模拟了三台机器的 ZooKeeper集群。详见代码清单 C :
代码清单C : zoo1.cfg :
# The number of milliseconds of each tick
tickTime=2000
# The number of ticks that the initial
# synchronization phase can take
initLimit=10
# The number of ticks that can pass between
# sending a request and getting an acknowledgement
syncLimit=5
# the directory where the snapshot is stored.
dataDir=/root/hadoop-0.20.2/zookeeper-3.3.1/d_1
# the port at which the clients will connect
clientPort=2181
server.1=localhost:2887:3887
server.2=localhost:2888:3888
server.3=localhost:2889:3889
zoo2.cfg :
# The number of milliseconds of each tick
tickTime=2000
# The number of ticks that the initial
# synchronization phase can take
initLimit=10
# The number of ticks that can pass between
# sending a request and getting an acknowledgement
syncLimit=5
# the directory where the snapshot is stored.
dataDir=/root/hadoop-0.20.2/zookeeper-3.3.1/d_2
# the port at which the clients will connect
clientPort=2182
#the location of the log file
dataLogDir=/root/hadoop-0.20.2/zookeeper-3.3.1/logs
server.1=localhost:2887:3887
server.2=localhost:2888:3888
server.3=localhost:2889:3889
zoo3.cfg :
# The number of milliseconds of each tick
tickTime=2000
# The number of ticks that the initial
# synchronization phase can take
initLimit=10
# The number of ticks that can pass between
# sending a request and getting an acknowledgement
syncLimit=5
# the directory where the snapshot is stored.
dataDir=/root/hadoop-0.20.2/zookeeper-3.3.1/d_2
# the port at which the clients will connect
clientPort=2183
#the location of the log file
dataLogDir=/root/hadoop-0.20.2/zookeeper-3.3.1/logs
server.1=localhost:2887:3887
server.2=localhost:2888:3888
server.3=localhost:2889:3889
第六步:安装验证
可以通过ZooKeeper的脚本来查看启动状态,包括集群中各个结点的角色(或是Leader,或是Follower),如下所示,是在ZooKeeper集群中的每个结点上查询的结果:
- root@rdcdz140260 zookeeper-3.4.6: bin/zkServer.sh status
- JMX enabled by default
- Using config: /home/hadoop/installation/zookeeper-3.3.4/bin/../conf/zoo.cfg
- Mode: follower
另外,可以通过客户端脚本,连接到ZooKeeper集群上。对于客户端来说,ZooKeeper是一个整体(ensemble),连接到ZooKeeper集群实际上感觉在独享整个集群的服务,所以,你可以在任何一个结点上建立到服务集群的连接,例如:
- root@rdcdz140260 zookeeper-3.4.6:bin/zkCli.sh -server slave-01:2181
- Connecting to slave-01:2181
- 2012-01-08 07:14:21,068 - INFO [main:Environment@97] - Client environment:zookeeper.version=3.3.3-1203054, built on 11/17/2011 05:47 GMT
- 2012-01-08 07:14:21,080 - INFO [main:Environment@97] - Client environment:host.name=slave-03
- 2012-01-08 07:14:21,085 - INFO [main:Environment@97] - Client environment:java.version=1.6.0_30
- 2012-01-08 07:14:21,089 - INFO [main:Environment@97] - Client environment:java.vendor=Sun Microsystems Inc.
- 2012-01-08 07:14:21,095 - INFO [main:Environment@97] - Client environment:java.home=/home/hadoop/installation/jdk1.6.0_30/jre
- 2012-01-08 07:14:21,104 - INFO [main:Environment@97] - Client environment:java.class.path=/home/hadoop/installation/zookeeper-3.3.4/bin/../build/classes:/home/hadoop/installation/zookeeper-3.3.4/bin/../build/lib/*.jar:/home/hadoop/installation/zookeeper-3.3.4/bin/../zookeeper-3.3.4.jar:/home/hadoop/installation/zookeeper-3.3.4/bin/../lib/log4j-1.2.15.jar:/home/hadoop/installation/zookeeper-3.3.4/bin/../lib/jline-0.9.94.jar:/home/hadoop/installation/zookeeper-3.3.4/bin/../lib/commons-lang-2.4.jar:/home/hadoop/installation/zookeeper-3.3.4/bin/../lib/commons-collections-3.2.jar:/home/hadoop/installation/zookeeper-3.3.4/bin/../lib/commons-cli-1.1.jar:/home/hadoop/installation/zookeeper-3.3.4/bin/../lib/apache-rat-tasks-0.6.jar:/home/hadoop/installation/zookeeper-3.3.4/bin/../lib/apache-rat-core-0.6.jar:/home/hadoop/installation/zookeeper-3.3.4/bin/../src/java/lib/*.jar:/home/hadoop/installation/zookeeper-3.3.4/bin/../conf:/home/hadoop/installation/jdk1.6.0_30/lib/*.jar:/home/hadoop/installation/jdk1.6.0_30/jre/lib/*.jar
- 2012-01-08 07:14:21,111 - INFO [main:Environment@97] - Client environment:java.library.path=/home/hadoop/installation/jdk1.6.0_30/jre/lib/i386/client:/home/hadoop/installation/jdk1.6.0_30/jre/lib/i386:/home/hadoop/installation/jdk1.6.0_30/jre/../lib/i386:/usr/java/packages/lib/i386:/lib:/usr/lib
- 2012-01-08 07:14:21,116 - INFO [main:Environment@97] - Client environment:java.io.tmpdir=/tmp
- 2012-01-08 07:14:21,124 - INFO [main:Environment@97] - Client environment:java.compiler=<NA>
- 2012-01-08 07:14:21,169 - INFO [main:Environment@97] - Client environment:os.name=Linux
- 2012-01-08 07:14:21,175 - INFO [main:Environment@97] - Client environment:os.arch=i386
- 2012-01-08 07:14:21,177 - INFO [main:Environment@97] - Client environment:os.version=3.0.0-14-generic
- 2012-01-08 07:14:21,185 - INFO [main:Environment@97] - Client environment:user.name=hadoop
- 2012-01-08 07:14:21,188 - INFO [main:Environment@97] - Client environment:user.home=/home/hadoop
- 2012-01-08 07:14:21,190 - INFO [main:Environment@97] - Client environment:user.dir=/home/hadoop/installation/zookeeper-3.3.4
- 2012-01-08 07:14:21,197 - INFO [main:ZooKeeper@379] - Initiating client connection, connectString=slave-01:2181 sessionTimeout=30000 watcher=org.apache.zookeeper.ZooKeeperMain$MyWatcher@bf32c
- 2012-01-08 07:14:21,305 - INFO [main-SendThread():ClientCnxn$SendThread@1061] - Opening socket connection to server slave-01/192.168.0.179:2181
- Welcome to ZooKeeper!
- 2012-01-08 07:14:21,376 - INFO [main-SendThread(slave-01:2181):ClientCnxn$SendThread@950] - Socket connection established to slave-01/192.168.0.179:2181, initiating session
- JLine support is enabled
- [zk: slave-01:2181(CONNECTING) 0] 2012-01-08 07:14:21,872 - INFO [main-SendThread(slave-01:2181):ClientCnxn$SendThread@739] - Session establishment complete on server slave-01/192.168.0.179:2181, sessionid = 0x134bdcd6b730000, negotiated timeout = 30000
- WATCHER::
- WatchedEvent state:SyncConnected type:None path:null
- [zk: slave-01:2181(CONNECTED) 0] ls /
- [zookeeper]


 489
489

 被折叠的 条评论
为什么被折叠?
被折叠的 条评论
为什么被折叠?
 到【灌水乐园】发言


