


Network Engineers are always looking for new ways to gain some low-cost network testing capabilities. Few companies sufficiently fund networking labs for their networking teams to learn on prior to deployment. Many have use Cisco IOS hypervisors on laptops using the Graphical Network Simulator (GNS3), Dynagen and Dynamips that allow experimentation and learning. While you wait for Cisco’sVirtual Internet Routing Lab (VIRL) to be released you can explore using a Raspberry Pi as a low-cost router for testing.
Getting the Raspberry Pi Going:
A few weeks ago I wrote about how you could create a low-cost remote network monitoring node using a Raspberry Pi. This blog contains the information required to get your Raspberry Pi ready and loaded with the Raspbian OS and working on a dual-protocol network. The article also talked about how you could place the Raspberry Pi on the border between two networks and set it up as a router. To do this requires several USB Ethernet interfaces in addition to the on-board Ethernet interface. This would likely mean purchasing a powered USB hub to provide power to those USB devices. This article dives in deeper into how to setup the Raspberry Pi as a dual-protocol router using OSPF.
Routing Configuration Steps:
The first thing that you need to do is load the router software onto the Raspberry Pi. The idea behind the Raspberry Pi is that is comes with a stripped down OS and then you add the specific functions you need. Since not every Raspberry Pi needs to behave like a router, the routing software is not pre-loaded. There are many open-source routing software packages available (Bird Internet routing daemon (Bird), eXtensible Open Router Platform (XORP), among others), However, for our purposes we have chosen Quagga.
The commands that you will need to execute to install the needed routing packages are as follows.
sudo apt-get install quagga
sudo apt-get install radvd
We may also need to install Routing Advertisement Daemon (RADVD) if we want to send specific ICMPv6 Router Advertisement (RA) packets or use RDNSS, MIPv6, NEMO, or 6to4 tunneling.
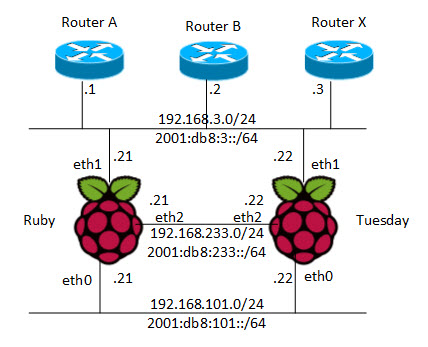
Once this software is installed (with their dependencies) it is time to start to configure the Raspberry Pi as a router. To more easily understand the configuration, here is a diagram of the network topology.
To configure the IPv4 and IPv6 addresses on the various interfaces we need to edit the /etc/network/interfaces configuration file using your favorite text editor. Below is an example of what that file looks like.
pi@tuesday:~$ more /etc/network/interfaces
auto lo
iface lo inet loopback
auto eth0
iface eth0 inet static
address 192.168.101.22
netmask 255.255.255.0
gateway 192.168.101.1
iface eth0 inet6 static
address 2001:db8:101::22
netmask 64
gateway fe80::5246:5dff:fe6c:1492
auto eth1
iface eth1 inet static
address 192.168.3.22
netmask 255.255.255.0
gateway 192.168.3.1
iface eth1 inet6 static
address 2001:db8:3::22
netmask 64
gateway 2001:db8:3::1
auto eth2
iface eth2 inet static
address 192.168.233.22
netmask 255.255.255.0
gateway 192.168.233.1
iface eth1 inet6 static
address 2001:db8:233::22
netmask 64
gateway 2001:db8:233::1Once the addresses are statically assigned to the interface, we can reset the networking to apply this new configuration file using the following command.
sudo /etc/init.d/networking restartConfiguring OSPFv2 and OSPFv3:
Most all modern routers now support dual-protocol routing protocols. In a previouspost I wrote about how you can configure a Cisco IOS router for use with OSPFv3. It is very easy to establish interoperability between a Raspberry Pi running Quagga and a Cisco IOS router.
The first thing we need to do is enable the Quagga daemons file.
sudo vi /etc/quagga/daemonsWe want this file to have the following configuration lines set to “yes”.
zebra=yes
ospfd=yes
ospf6d=yes
Next we need to configure the basic Zebra (the routing package that Quagga is based on) configuration file.
sudo vi /etc/quagga/zebra.confWe will modify this file to look like the following. This is the config files for the router named “Tuesday”.
hostname R22zebra
!
password zebra
enable password password
!
interface eth0
 link-detect
 ip address 192.168.101.22/24
 ipv6 address
2001:db8:101::22/64
 ipv6 nd suppress-ra
!
interface eth1
 link-detect
 ip address
192.168.3.22/24
 ipv6 address
2001:db8:3::22/64
 no ipv6 nd
suppress-ra
!
interface eth2
 link-detect
 ip address
192.168.233.22/24
 ipv6 address 2001:db8:233::22/64
 no ipv6 nd
suppress-ra
!
interface lo
 link-detect
 ip address
10.10.10.22/32
 ipv6 address
2001:db8:22:22::22/64
 no ipv6 nd
suppress-ra
!
no log trap
log stdout
!
line vty
no login
Now we are ready to configure the OSPFv2 routing. We do this by editing the /etc/quagga/ospfd.conf file. We can make the contents of the file look like the following.
hostname R22ospfd
!
password zebra
enable password password
!
interface eth0
!
interface eth1
!
interface eth2
!
interface lo
!
router ospf
network 192.168.101.0/24 area 0.0.0.0
network 192.168.3.0/24 area 0.0.0.0
network 192.168.233.0/24 area 0.0.0.0
network 10.10.10.22/32 area 0.0.0.0
!
line vty
no login
Finally, we are ready to configure OSPFv3 for IPv6 routing by editing the following Quagga file.
sudo vi /etc/quagga/ospf6d.confHere is the contents of that configuration file for this lab topology.
hostname R22ospf6
password zebra
enable password password
log stdout
service advanced-vty
!
debug ospf6 neighbor state
!
interface eth0
 ipv6 ospf6 cost 1
 ipv6 ospf6 hello-interval 10
 ipv6 ospf6 dead-interval 40
 ipv6 ospf6 retransmit-interval 5
 ipv6 ospf6 priority 0
 ipv6 ospf6 transmit-delay 1
 ipv6 ospf6 instance-id 0
!
interface eth1
 ipv6 ospf6 cost 1
 ipv6 ospf6 hello-interval 10
 ipv6 ospf6 dead-interval 40
 ipv6 ospf6 retransmit-interval 5
 ipv6 ospf6 priority 0
 ipv6 ospf6 transmit-delay 1
 ipv6 ospf6 instance-id 0
!
interface eth2
 ipv6 ospf6 cost 1
 ipv6 ospf6 hello-interval 10
 ipv6 ospf6 dead-interval 40
 ipv6 ospf6 retransmit-interval 5
 ipv6 ospf6 priority 0
 ipv6 ospf6 transmit-delay 1
 ipv6 ospf6 instance-id 0
!
interface lo
 ipv6 ospf6 cost 1
 ipv6 ospf6 hello-interval 10
 ipv6 ospf6 dead-interval 40
 ipv6 ospf6 retransmit-interval 5
 ipv6 ospf6 priority 0
 ipv6 ospf6 transmit-delay 1
 ipv6 ospf6 instance-id 0
!
router ospf6
 router-id 10.10.10.22
 interface eth0 area 0.0.0.0
 interface eth1 area 0.0.0.0
 interface eth2 area 0.0.0.0
 interface lo area 0.0.0.0
 area 0.0.0.0 range 2001:db8:3::/64
 area 0.0.0.0 range 2001:db8:233::/64
 area 0.0.0.0 range 2001:db8:22:22::/64
 area 0.0.0.0 range 2001:db8:101::/64
!
line vty
 exec-timeout 0 0
The last part of the configuration is checking that we have IP forwarding turned on. Following are the command that we can use to set IP forwarding on and check that setting.
pi@tuesday:~$ sudo echo "net.ipv4.ip_forward = 1"
>> /etc/sysctl.conf
pi@tuesday:~$ sudo echo "net.ipv6.conf.all.forwarding =
1" >> /etc/sysctl.conf
pi@tuesday:~$ grep forward /etc/sysctl.conf
# Uncomment the next line to enable packet forwarding for
IPv4
net.ipv4.ip_forward=1
# Uncomment the next line to enable packet forwarding for
IPv6
net.ipv6.conf.all.forwarding=1
Now we just need to start the Quagga process with the following command.
pi@tuesday:~$ sudo /etc/init.d/quagga startCisco Router Configuration:
For reference, following is the configuration of the Cisco IOS router A in our topology.
hostname RTRA
interface GigabitEthernet0/0
 ip address
192.168.3.1 255.255.255.0
 ip ospf network
broadcast
 ip ospf priority 100
 ipv6 address
2001:DB8:3::1/64
 ipv6 ospf 100 area
0.0.0.0
 ipv6 ospf network
broadcast
 ipv6 ospf priority
100
!
router ospf 100
 router-id 10.1.1.1
 area 0.0.0.0 range
192.168.3.0 255.255.255.0
 area 0.0.0.11 range
10.1.1.1 255.255.255.255
 area 0.0.0.11 range
192.168.11.0 255.255.255.0
 area 0.0.0.11 range
192.168.100.0 255.255.255.0
 area 0.0.0.12 range
192.168.12.0 255.255.255.0
 passive-interface
default
 no passive-interface
GigabitEthernet0/0
 no passive-interface
Vlan11
 network 10.1.1.1
0.0.0.0 area 0.0.0.11
 network 192.168.3.0
0.0.0.255 area 0.0.0.0
 network 192.168.11.0
0.0.0.255 area 0.0.0.11
 network 192.168.12.0
0.0.0.255 area 0.0.0.12
 network 192.168.100.0
0.0.0.255 area 0.0.0.11
 default-information
originate metric-type 1
!
ipv6 router ospf 100
 router-id 10.1.1.1
 log-adjacency-changes
detail
 area 0.0.0.0 range
2001:DB8:3::/64
 area 0.0.0.0 range
2001:DB8:1111::1111/128
 area 0.0.0.11 range
2001:DB8:11::/64
 area 0.0.0.12 range
2001:DB8:12::/64
 default-information
originate metric 600
 passive-interface
default
 no passive-interface
GigabitEthernet0/0
If you are interfacing your Raspberry Pi with a Cisco router and trying to configureOSPFv3 IPsec Authentication Header (AH) authentication, then you should be aware of somelimitations here. You can also run intoOSPFv3 authentication limitations on Cisco 6500 switches.
Verifying Operation:
Now that Quagga is running OSPFv2 and OSPFv3 we need to verify the configuration. The way this is done with Quagga is to use telnet to connect to the console port of the router. The various Quagga routing processes have different TCP port numbers.
zebra - 2601
ripd - 2602
ripng - 2603
ospfd - 2604
bgpd - 2605
ospf6d - 2606
Following is an example of how we can connect to the console port, log into the routing process, and use the Cisco-Like-Interface (CLI) to show the status of the routing processes.
pi@tuesday:/etc/quagga$ telnet localhost 2604
Trying ::1...
Trying 127.0.0.1...
Connected to localhost.
Escape character is '^]'.
Hello, this is Quagga (version 0.99.21).
Copyright 1996-2005 Kunihiro Ishiguro, et al.
R22ospfd> show ip ospf neighbor
    Neighbor ID Pri
State           Dead Time Address         Interface            RXmtL RqstL DBsmL
10.10.10.21       1
Full/Backup       33.010s
192.168.101.21  eth0:192.168.101.22      0
0     0
10.1.1.1        100
Full/DR           34.506s 192.168.3.1     eth1:192.168.3.24        0
0     0
10.8.8.8          1
2-Way/DROther     35.968s
192.168.3.2     eth1:192.168.3.24        0
0     0
192.168.28.28     1
Full/Backup       37.845s
192.168.3.3     eth1:192.168.3.24        0
0     0
10.10.10.21       1
Full/Backup       34.182s
192.168.233.21  eth2:192.168.233.24      0
0     0
R22ospfd> show ip ospf route
============ OSPF network routing table ============
N IA 10.1.1.1/32
[11] area: 0.0.0.0

via 192.168.3.1, eth1
N    10.8.8.8/32           [11] area: 0.0.0.0

via 192.168.3.2, eth1
N
10.10.10.21/32        [20] area:
0.0.0.0

via 192.168.101.21, eth0

via 192.168.233.21, eth2
N
10.10.10.22/32        [10] area:
0.0.0.0

directly attached to lo
N
192.168.3.0/24        [10] area:
0.0.0.0

directly attached to eth1
N
192.168.4.0/24        [11] area:
0.0.0.0
                           via 192.168.3.2, eth1
N IA 192.168.11.0/24
[11] area: 0.0.0.0

via 192.168.3.1, eth1
N IA 192.168.12.0/24
[20] area: 0.0.0.0

via 192.168.3.3, eth1
N
192.168.13.0/24       [11] area:
0.0.0.0

via 192.168.3.2, eth1
N
192.168.23.0/24       [11] area:
0.0.0.0

via 192.168.3.2, eth1
N IA 192.168.28.28/32
[11] area: 0.0.0.0

via 192.168.3.3, eth1
N
192.168.43.0/24       [11] area:
0.0.0.0

via 192.168.3.2, eth1
N
192.168.101.0/24      [10] area:
0.0.0.0

directly attached to eth0
N
192.168.233.0/24      [10] area:
0.0.0.0
                           directly attached to eth2
============ OSPF router routing table =============
R    10.1.1.1              [10] area: 0.0.0.0, ABR, ASBR

via 192.168.3.1, eth1
R    10.8.8.8              [10] area: 0.0.0.0, ASBR
                           via 192.168.3.2, eth1
R
192.168.28.28         [10] area:
0.0.0.0, ABR

via 192.168.3.3, eth1
============ OSPF external routing table ===========
N E1 0.0.0.0/0
[11] tag: 100
                           via 192.168.3.1, eth1
N E1 192.168.5.0/24
[11] tag: 65005

via 192.168.3.2, eth1
N E1 192.168.6.0/24
[11] tag: 65005

via 192.168.3.2, eth1
N E1 192.168.55.0/24
[11] tag: 65005

via 192.168.3.2, eth1
N E1 192.168.64.0/24
[11] tag: 65005

via 192.168.3.2, eth1
N E1 192.168.66.0/24
[11] tag: 65005

via 192.168.3.2, eth1
R22ospfd> exit
Other useful OSPFv2 commands in Quagga are:
show running-config
show ip ospf interface
show ip ospf database
show ip ospf border-routers
Now we can connect to the OSPFv3 routing daemon (TCP port 2606) and view the configuration from that perspective.


 2959
2959


 被折叠的 条评论
为什么被折叠?
被折叠的 条评论
为什么被折叠?
 到【灌水乐园】发言


