


女主宣言
大家好!给大家介绍一下,这是一篇关于“linux系统下研究数据落盘问题”的总结,相信在读完这篇来自基础架构组同学的分享之后,能够帮助大家对系统内核关于数据写入的过程有一个很好的认识。哎呀嘛,咔咔的!
PS:丰富的一线技术、多元化的表现形式,尽在“HULK一线技术杂谈”,点关注哦!
介绍
data to disk数据写到磁盘的一个级别问题

这个是一次write 写入经过的路径
The client sends a write command to the database (data is in client’s memory).
The database receives the write (data is in server’s memory).
The database calls the system call that writes the data on disk (data is in the kernel’s buffer).
The operating system transfers the write buffer to the disk controller (data is in the disk cache).
The disk controller actually writes the data into a physical media (a magnetic disk, a Nand chip, …)
当我们到第3 步, 也就是write 操作系统返回的时候, 可以保证的是如果process 挂了, 但是操作系统没挂, 这个数据我们是能够刷回磁盘。
当我们到了第4步, 也就是write 操作, 并且fsync了。这个时候我们可以保证就算机器挂了, 数据也会写到disk controller。这个时候正常情况下disk controller 是会保证数据刷回到物理介质的
那么在第三步write 写入到page cache, page cache 是什么时候刷回磁盘的, 以及我们在上层怎么控制这个刷盘的策略呢?
具体在2.6.32 这个版本, 主要的刷盘进程是sync_supers 这个进程, 这个和之前版本的pdflush进程不一样, 之前版本主要有pdflush负责刷盘操作。
kernel bdi module
通过 cat /proc/meminfo | grep Dirty 可以看到Dirty page 有多少个:
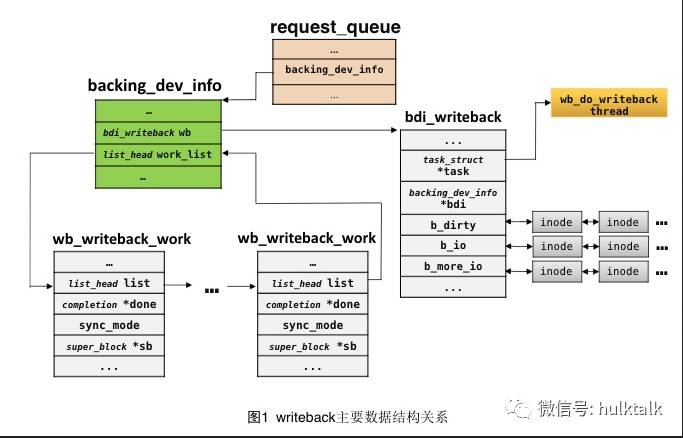
backing_dev_info: 一个块设备都会包含一个backing_dev_info, 通常是块设备的request queue 会包含 backing_dev 对象。
bdi_writeback: 具体执行write_back 线程的封装, bdi_writeback 回去wb_writeback_work 里面取出元素, 然后拿来执行。
bdi_writeback_work: 就是具体的每一次的writeback任务的抽象, 不同的任务可以采用不同的刷新策略。下图1看到bdi_writeback_work 是挂载backing_dev_info 下面的, bdi_writeback 是从backing_dev_info 下面work_list 去看, 这个队列是否是空的, 如果不是空的就从里面拉出bdi_writeback_work 来消费, 这里bdi_writeback_work 在2.6.32 版本里面是有 wb_writeback_args, bdi_work 组成。
struct backing_dev_info {
struct list_head bdi_list;
struct rcu_head rcu_head;
unsigned long ra_pages; /* max readahead in PAGE_CACHE_SIZE units */
unsigned long state; /* Always use atomic bitops on this */
unsigned int capabilities; /* Device capabilities */
congested_fn *congested_fn; /* Function pointer if device is md/dm */
void *congested_data; /* Pointer to aux data for congested func */
void (*unplug_io_fn)(struct backing_dev_info *, struct page *);
void *unplug_io_data;
char *name;
struct percpu_counter bdi_stat[NR_BDI_STAT_ITEMS];
struct prop_local_percpu completions;
int dirty_exceeded;
unsigned int min_ratio;
unsigned int max_ratio, max_prop_frac;
struct bdi_writeback wb; /* default writeback info for this bdi */
spinlock_t wb_lock; /* protects update side of wb_list */
struct list_head wb_list; /* the flusher threads hanging off this bdi */
unsigned long wb_mask; /* bitmask of registered tasks */
unsigned int wb_cnt; /* number of registered tasks */
struct list_head work_list;
struct device *dev;#ifdef CONFIG_DEBUG_FS struct dentry *debug_dir;
struct dentry *debug_stats;#endif};struct bdi_writeback {
struct list_head list; /* hangs off the bdi */
struct backing_dev_info *bdi; /* our parent bdi */
unsigned int nr;
unsigned long last_old_flush; /* last old data flush */
struct task_struct *task; /* writeback task */
struct list_head b_dirty; /* dirty inodes */
struct list_head b_io; /* parked for writeback */
struct list_head b_more_io; /* parked for more writeback */};/*
* Passed into wb_writeback(), essentially a subset of writeback_control
*/struct wb_writeback_args {
long nr_pages;
struct super_block *sb;
enum writeback_sync_modes sync_mode;
int for_kupdate:1;
int range_cyclic:1;
int for_background:1;};/*
* Work items for the bdi_writeback threads
*/struct bdi_work {
struct list_head list; /* pending work list */
struct rcu_head rcu_head; /* for RCU free/clear of work */
unsigned long seen; /* threads that have seen this work */
atomic_t pending; /* number of threads still to do work */
struct wb_writeback_args args; /* writeback arguments */
unsigned long state; /* flag bits, see WS_* */};
bdi_forker_task 在每一个back device 加入以后都会启动一个, bdi_fork_task() 函数,没有任何的中途退出机制, bdi_fork_task() 的唯一用途就是检查是否需要启动对应的 flush 线程。
所以默认的启动线程的顺序是通过bdi_register 在backing-dev 模块启动的时候就会启动一个 bdi-default 线程, 这个线程执行的是bdi_forker_task()方法, 这个线程负责启动每一个设备上面的flush- 线程, 这个flush 线程的执行的是:bdi_start_fn->bdi_writeback_task->bdi_writeback_task(这个方法是一个循环, 直到5分钟没有需要flush 的page, 然后退出)->wb_do_writeback(这个是具体的刷盘的逻辑, 根据这个来判断是否要退出上层的bdi_writeback_task逻辑)->wb_writeback()->writeback_inodes_wb()
另外一个默认启动的线程是sync_super线程, 这个线程是去定期将superblock 里面的内容刷新回去
关于 writeback 主要可以通过/sys/vm/ 配置的参数列表
/* The following parameters are exported via /proc/sys/vm *//*
* Start background writeback (via writeback threads) at this percentage
*/int dirty_background_ratio = 10;/*
* dirty_background_bytes starts at 0 (disabled) so that it is a function of
* dirty_background_ratio * the amount of dirtyable memory
*/unsigned long dirty_background_bytes;/ *
* 这里dirty_background_bytes 和 dirty_background_ratio 的关系就是下面的这个几行代码, 如果设置了 dirty_background_bytes 就是用dirty_background_bytes, 否则就用dirty_background_ratio * available_memory, 所以默认dirty_background_bytes = 0
* /
if (dirty_background_bytes)
background = DIV_ROUND_UP(dirty_background_bytes, PAGE_SIZE);else
background = (dirty_background_ratio * available_memory) / 100;/*
* free highmem will not be subtracted from the total free memory
* for calculating free ratios if vm_highmem_is_dirtyable is true
*/int vm_highmem_is_dirtyable;/*
* The generator of dirty data starts writeback at this percentage
*/int vm_dirty_ratio = 20;/*
* vm_dirty_bytes starts at 0 (disabled) so that it is a function of
* vm_dirty_ratio * the amount of dirtyable memory
* 同样 vm_dirty_bytes 和 vm_dirty_ratio 的关系是如果设置了 vm_dirty_bytes 就是用 vm_dirty_bytes, 否则就是用 vm_dirty_ratio
if (vm_dirty_bytes)
dirty_total = vm_dirty_bytes / PAGE_SIZE;
else
dirty_total = (vm_dirty_ratio * determine_dirtyable_memory()) /
100;
*/unsigned long vm_dirty_bytes;/*
* The interval between `kupdate'-style writebacks
* 启动后台flush 线程的时间, 后台默认是5 秒
*/unsigned int dirty_writeback_interval = 5 * 100; /* centiseconds *//*
* The longest time for which data is allowed to remain dirty
* 这里就是脏数据能在内存中呆的最长的时间, 默认是 30s, 在进行wb_writeback 函数周期性的刷盘的时候判断这个数据是否是旧数据, 超过这个时间的数据才进行刷盘操作
*/unsigned int dirty_expire_interval = 30 * 100; /* centiseconds *//*
* Flag that makes the machine dump writes/reads and block dirtyings.
*/int block_dump;/*
* Flag that puts the machine in "laptop mode". Doubles as a timeout in jiffies:
* a full sync is triggered after this time elapses without any disk activity.
*/int laptop_mode;EXPORT_SYMBOL(laptop_mode);
dirty_background_ratio 和 dirty_ratio 的关系?
dirty_background_ratio:是当系统里面的dirty page 超过这个百分比以后, 系统开始启动flush进程将dirty page flush到磁盘。
dirty_ratio:是当系统里面的dirty page 超过这个百分比以后, 有写磁盘操作的进程会被阻塞, 等待将dirty page flush到磁盘以后再写入。
通过dd 修改不同的 dirty_ratio 来测试性能来看,: dirty_ratio 如果设置的比较小, 那么就很容易阻塞进程的写入所以性能比较低。
┌─[chenzongzhi@xxx05] - [/data5]
└─[$] sudo sh -c 'echo 0 >/proc/sys/vm/dirty_ratio'
┌─[chenzongzhi@xxx05] - [/data5]
└─[$] cat /proc/sys/vm/dirty_ratio
0
┌─[chenzongzhi@xxx05] - [/data5]
└─[$] dd if=/dev/zero of=file-abc bs=1M count=30000
^C828+0 records in
828+0 records out
868220928 bytes (868 MB) copied, 158.016 s, 5.5 MB/s
如果把dirty_ratio 调整的比较大, 那么dd 的速度就会快很多, 基本上能够达到磁盘写的性能.
┌─[chenzongzhi@xxx05] - [/data5]
└─[$] sudo sh -c 'echo 100 >/proc/sys/vm/dirty_ratio'
┌─[chenzongzhi@xxx05] - [/data5]
└─[$] sudo sh -c 'echo 3 >/proc/sys/vm/drop_caches'
┌─[chenzongzhi@xxx05] - [/data5]
└─[$] dd if=/dev/zero of=file-abc bs=1M count=30000
dd: warning: partial read (339968 bytes); suggest iflag=fullblock
29999+1 records in
29999+1 records out
31456571392 bytes (31 GB) copied, 104.62 s, 301 MB/s
到3.10.0 版本以后, 这个bdi-default 线程, flush 线程什么也都没有了, 都变成kworker, 然后把需要flush 的任务丢到这个kworker 队列里面就可以了
3.10.0 里面
bdi_wq = alloc_workqueue("writeback", WQ_MEM_RECLAIM | WQ_FREEZABLE |
				      WQ_UNBOUND | WQ_SYSFS, 0);
所以新版本的内核里面是看不到这些bdi, pdflush 等等。这样做的好处也是很明显的, 不需要为了专门做flush 这个事情, 专门搞一个线程, 而且还需要经常去唤醒。
总结
1. 减少内存使用
vm.dirty_background_ratio = 5
vm.dirty_ratio = 10
2. 最大化的使用内存
vm.dirty_background_ratio = 50
vm.dirty_ratio = 80
3. 优化写入性能, 可以使用内存, 但是等到空闲的时候希望内存被回收, 经常用在应对突然有峰值的这种情况
vm.dirty_background_ratio = 5
vm.dirty_ratio = 80


 2994
2994


 被折叠的 条评论
为什么被折叠?
被折叠的 条评论
为什么被折叠?
 到【灌水乐园】发言


