


Spring提出了依赖注入的思想,即依赖不由程序员控制,而是通过spring容器帮我们new指定实例并且将实例注入到需要该对象的类中。依赖注入的另一种说法是“控制反转”,通俗的理解是:平常我们new一个实例,这个实例的控制权是我们程序员,而控制反转是指new实例工作不由我们程序员来做而是交给spring容器来做。
具体看看在Spring容器中为一个bean配置依赖注入的方式:
- 使用属性的setter方法注入 这是最常用的方式。
- 使用构造器注入。
- 通过注解配置bean。
1、通过bean的setXxx()方法赋值
首先要配置被注入的bean,在该bean对应的类中,应该有要注入的对象属性或者基本数据类型的属性。
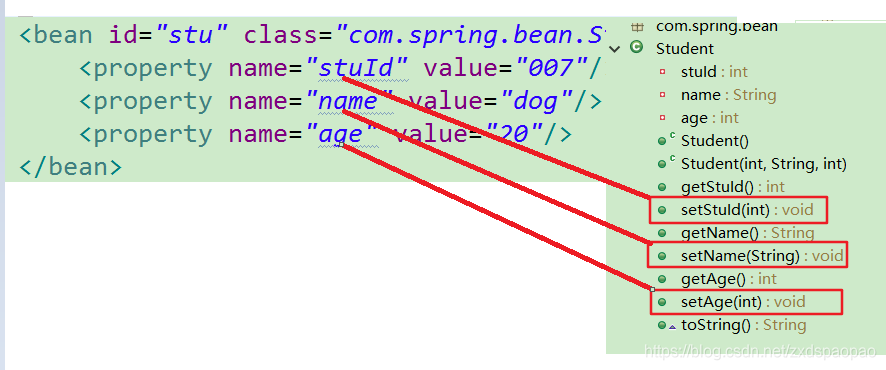
例如:为Student类注入属性值
<bean id="stu" class="com.spring.bean.Student">
		<!-- 使用property子元素为bean的属性赋值 -->
		<!-- name属性要与实体类属性名一致 -->
		<property name="stuId" value="007"/>
		<property name="name" value="dog"/>
		<property name="age" value="20"/>
	</bean>
关于标签中属性以及标签的说明
<bean>标签里的id:根据id获取bean实例对象
//根据id值获取bean实例对象
Student stu = ac.getBean("stu",Student.class);
class:指要依赖注入的全类名。
<property>标签用于注入属性值。
name:Student类的setter方法一一对应。value:依赖注入的值
对应关系如下图所示:
注入结果如图:

2、通过bean的构造器赋值
前提:不需要生成setter方法,但需要添加构造器。
//无参构造器
public Student() {
	super();
}
//全参构造器
public Student(Integer stuId, String name, Integer age) {
	super();
	this.stuId = stuId;
	this.name = name;
	this.age = age;
}
在使用构造器注入时使用的标签为<constructor-arg>,通过构造器有以下三种注入的方式:
1)通过name属性添加
<!--  方式一:通过name属性添加-->
<bean id="stu1" class="com.spring.bean.Student">
	<constructor-arg name="stuId" value="2"></constructor-arg>
	<constructor-arg name="name" value="小秘密"></constructor-arg>
	<constructor-arg name="age" value="30"></constructor-arg>
</bean>
2)通过索引值指定参数位置
<!-- 方式二:通过index属性添加 -->
<bean id="stu2" class="com.spring.bean.Student">
	<constructor-arg index="0" value="3"></constructor-arg>
	<constructor-arg index="1" value="小幂幂"></constructor-arg>
	<constructor-arg index="2" value="18"></constructor-arg>
</bean>
3)通过类型区分重载的构造器
<!-- 方式三:通过type区分重载的构造器 -->
<bean id="stu3" class="com.spring.bean.Student">
	<constructor-arg index="0" value="4" type="java.lang.Integer"></constructor-arg>
	<constructor-arg index="1" value="佟丽娅" type="java.lang.String"></constructor-arg>
	<constructor-arg index="2" value="18" type="java.lang.Integer"></constructor-arg>
</bean>
如图,可以看到三种方式都可以注入成功。

3、通过注解配置bean
在Spring中,注入依赖对象可以采用手动装配或者是自动装配,先介绍一下这两种装配模式。
① 手动装配:以value或ref的方式明确指定属性值都是手动装配。
② 自动装配:根据指定的装配规则,不需要明确指定,Spring自动将匹配的属性值注入bean中。
装配模式
1)根据类型自动装配:将类型匹配的bean作为属性注入到另一个bean中。若IOC容器中有多个与目标bean类型一致的bean,Spring将无法判断哪个bean最合适该属性,所以不能执行自动装配。
2)根据名称自动装配:必须将目标bean的名称和属性名设置的完全相同。
3)通过构造器自动装配:当bean中存在多个构造器时,此种自动装配方式将会很复杂,通常不使用。
接下来看看几个注解(下面的实例会用到)
- @Component:标识一个受Spring IOC容器管理的组件。
- @Repository:标识一个受Spring IOC容器管理的持久化层组件。
- @Service:标识一个受Spring IOC容器管理的业务逻辑层组件。
- @Controller:标识一个受Spring IOC容器管理的表述层控制器组件
- 组件命名规则
①默认情况:使用组件的简单类名首字母小写后得到的字符串作为bean的id
②使用组件注解的value属性指定bean的id
看一下@Autowired与@Resource的使用
首先引入context命名空间:
annotation.xml:
<?xml version="1.0" encoding="UTF-8"?>
<beans xmlns="http://www.springframework.org/schema/beans"
	xmlns:xsi="http://www.w3.org/2001/XMLSchema-instance"
	xmlns:context="http://www.springframework.org/schema/context"
	xsi:schemaLocation="http://www.springframework.org/schema/beans http://www.springframework.org/schema/beans/spring-beans.xsd
		http://www.springframework.org/schema/context http://www.springframework.org/schema/context/spring-context-4.0.xsd">

<context:component-scan base-package="com.atguigu.spring.annotation"></context:component-scan>
</beans>
下面就是一般开发过程中采用的模式MVC,也是使用注解依赖注入的常用方式
BookDao接口:
public interface BookDao {
	int addBook();
}
BookDaoImpl实现类:
package com.atguigu.spring.annotation.dao.iml;

import org.springframework.stereotype.Component;
import com.atguigu.spring.annotation.dao.BookDao;

@Repository
public class BookDaoImpl implements BookDao{

	@Override
	public int addBook() {
		System.out.println("bookDaoImpl");
		return 1;
	}

}
BookService接口:
public interface BookService {
	int addBook();
}
BookServiceImpl实现类:
package com.spring.annotation.service.impl;

import javax.annotation.Resource;
import org.springframework.beans.factory.annotation.Autowired;
import org.springframework.stereotype.Component;
import com.spring.annotation.dao.BookDao;
import com.spring.annotation.service.BookService;

@Service
public class BookServiceImpl implements BookService {

	//@Autowired
	@Resource(name="bookDaoImpl")
	private BookDao bookDao;

	@Override
	public int addBook() {
		return bookDao.addBook();
	}

}
BookServlet类:
package com.spring.annotation.control;

import org.springframework.beans.factory.annotation.Autowired;
import org.springframework.beans.factory.annotation.Qualifier;
import org.springframework.stereotype.Controller;
import com.spring.annotation.service.BookService;

@Controller
public class BookServlet {

	@Autowired   //依赖注入
	@Qualifier(value="bookServiceImpl")//@Qualifier注解里提供bean的名称
	private BookService bs;

	public int addBook() {
		return bs.addBook();
	}
}
Main类:
package com.spring.annotation.test;

import org.springframework.context.ApplicationContext;
import org.springframework.context.support.ClassPathXmlApplicationContext;
import com.spring.annotation.control.BookServlet;

public class Main {
	public static void main(String[] args) {
		ApplicationContext ctx = new ClassPathXmlApplicationContext("annotation.xml");
		BookServlet bs = ctx.getBean(BookServlet.class);
		System.out.println(bs.addBook());
	}
}
结果如图:

可以看到已经成功注入。
java使用@Autowired或@Resource注解方式进行Spring的依赖注入。
两者的区别:
@Autowired默认按类型装配,@Resource默认按名称装配,当找不到与名称匹配的bean时,才会按类型装配。比如:我们用@Autowired为上面的代码BookDao接口的实例对象进行注解,它会到Spring容器中去寻找与BookDao对象相匹配的类型,如果找到该类型则将该类型注入到bookDao字段中;如果用@Resource进行依赖注入,它先会根据指定的name属性去Spring容器中寻找与该名称匹配的类型,例如:@Resource(name=“bookDaoImpl”),如果没有找到该名称,则会按照类型去寻找,找到之后,会对字段bookDao进行注入。
还有就是在使用@Autowired的默认情况下,当IOC容器里存在多个类型兼容的bean时,Spring会尝试匹配bean的id值是否与变量名相同,如果相同则进行装配。如果bean的id值不相同,通过类型的自动装配将无法工作。此时可以在@Qualifier注解里提供bean的名称。


 1412
1412


 被折叠的 条评论
为什么被折叠?
被折叠的 条评论
为什么被折叠?
 到【灌水乐园】发言


