


尊重原创版权: https://www.gewuweb.com/hot/4979.html
Apache Shiro Realm实战及认证授权源码解读
尊重原创版权: https://www.gewuweb.com/sitemap.html
之前文章我们讲解了Apache Shiro的一些基础知识,今天我们会进行Shiro Realm实战以及对Shiro认证授权源码进行解读。
从之前章节的讲解我们了解到实际进行权限信息验证的是我们的 Realm,Shiro 从 Realm 获取安全数据,Shiro
框架内部默认提供了两种实现,一种是查询.ini文件的IniRealm,另一种是查询数据库的JdbcRealm,除此之外,我们还可以根据自身的需求进行自定义Realm,这其中有两个概念需要先了解一下:
- principal : 主体的标示,可以有多个,但是需要具有唯一性,常见的有用户名,手机号,邮箱等
- credential:凭证, 一般就是密码
接下来我们分别来看如何使用Shiro默认实现的realm以及如何自定义realm:
** 1.1 Shiro默认实现的realm实操和常见使用方法 **
** 1.1.1 Shiro内置realm之IniRealm实操 **
- 首先我们需要创建一个.ini配置文件,并按照相应的语法格式进行配置:
# 格式 username=password,role1,role2,...roleN
[users]
atguigu=123456,user
tom=456789,root,admin
# 格式 role=permission1,permission2...permissionN   也可以用通配符
# 下面配置user角色的权限为所有video:find,video:buy,如果需要配置video全部操作crud 则user=video:*
# 权限都是自行配置,一般格式是:资源名:操作,比如对视频的更新操作可以定义为:video:update
[roles]
user = video:find,video:buy
admin = video:update,video:delete,comment:*
# root角色有所有的权限,可以用通配符*来表示
root=*
- 新建一个【IniRealmTest】测试类:
package com.atguigu.shiro.demo;
import org.apache.shiro.SecurityUtils;
import org.apache.shiro.authc.UsernamePasswordToken;
import org.apache.shiro.config.IniSecurityManagerFactory;
import org.apache.shiro.mgt.SecurityManager;
import org.apache.shiro.subject.Subject;
import org.apache.shiro.util.Factory;
import org.junit.Test;
public class IniRealmTest {
@Test
public void test() {
//创建SecurityManager工厂,并且读取配置文件shiro.ini
Factory<SecurityManager> factory = new IniSecurityManagerFactory("classpath:shiro.ini");
SecurityManager securityManager = factory.getInstance();
//将securityManager 设置到当前运行环境中
SecurityUtils.setSecurityManager(securityManager);
//获取当前主体
Subject subject = SecurityUtils.getSubject();
//用户输入的账号密码
UsernamePasswordToken usernamePasswordToken = new UsernamePasswordToken("atguigu", "123456");
//主体提交登录认证
subject.login(usernamePasswordToken);
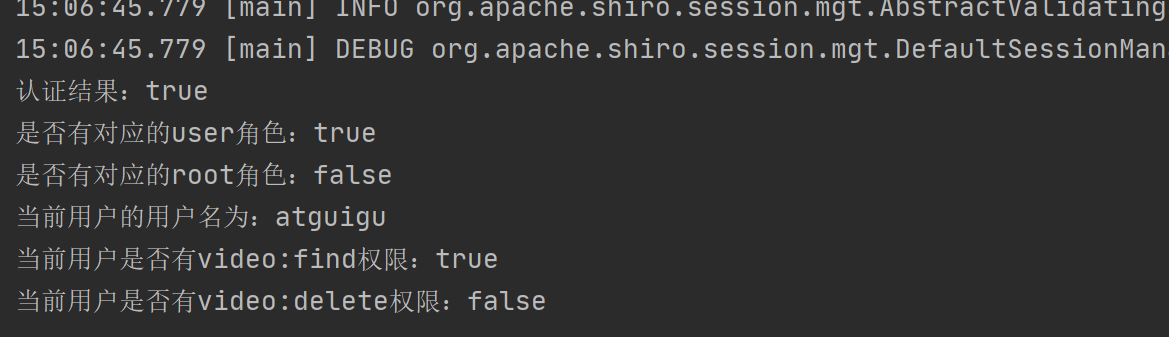
System.out.println("认证结果:"+subject.isAuthenticated());
System.out.println("是否有对应的user角色:" + subject.hasRole("user"));
System.out.println("是否有对应的root角色:" + subject.hasRole("root"));
System.out.println("当前用户的用户名为:" + subject.getPrincipal());
System.out.println("当前用户是否有video:find权限:" + subject.isPermitted("video:find"));
System.out.println("当前用户是否有video:delete权限:" + subject.isPermitted("video:delete"));
}
}
- 运行测试用例,可以看到结果如下:
** 1.1.2 Shiro内置realm之JdbcRealm实操 **
- 由于JdbcRealm需要操作数据库,所以在编写测试用例之前需要先导入连接数据库的相关依赖包:
<!--mysql驱动包-->
<dependency>
    <groupId>mysql</groupId>
    <artifactId>mysql-connector-java</artifactId>
    <!--注释掉-->
    <!--<scope>runtime</scope>-->
</dependency>
<!--这里使用阿里巴巴druid数据源-->
<dependency>
    <groupId>com.alibaba</groupId>
    <artifactId>druid</artifactId>
    <version>1.1.6</version>
</dependency>
- 创建相应的数据库表进行用户权限信息的存储,由于JdbcRealm提供了默认编写的SQL进行数据库查询,所以创建数据库表时表名和字段名都需要对应上,下面提供创建数据库表所需的SQL脚本并插入相应的测试数据:
# 角色-权限对应关系表
DROP TABLE IF EXISTS `roles_permissions`;
CREATE TABLE `roles_permissions` (
`id` bigint(20) NOT NULL AUTO_INCREMENT,
`role_name` varchar(100) DEFAULT NULL,
`permission` varchar(100) DEFAULT NULL,
PRIMARY KEY (`id`),
UNIQUE KEY `idx_roles_permissions` (`role_name`,`permission`)
) ENGINE=InnoDB DEFAULT CHARSET=utf8;
LOCK TABLES `roles_permissions` WRITE;
# 插入相应的测试数据
INSERT INTO `roles_permissions` (`id`, `role_name`, `permission`)
VALUES
(4,'admin','video:*'),
(3,'role1','video:buy'),
(2,'role1','video:find'),
(5,'role2','video:list'),
(1,'root','*');
UNLOCK TABLES;


# 用户-角色对应关系表
DROP TABLE IF EXISTS `user_roles`;
CREATE TABLE `user_roles` (
  `id` bigint(20) NOT NULL AUTO_INCREMENT,
  `username` varchar(100) DEFAULT NULL,
  `role_name` varchar(100) DEFAULT NULL,
  PRIMARY KEY (`id`),
  UNIQUE KEY `idx_user_roles` (`username`,`role_name`)
) ENGINE=InnoDB DEFAULT CHARSET=utf8;
LOCK TABLES `user_roles` WRITE;
# 插入测试数据
INSERT INTO `user_roles` (`id`, `username`, `role_name`)
VALUES
    (1,'jack','role1'),
    (2,'jack','role2'),
    (4,'atguigu','admin'),
    (3,'atguigu','root');
UNLOCK TABLES;


# 用户信息表
DROP TABLE IF EXISTS `users`;
CREATE TABLE `users` (
  `id` bigint(20) NOT NULL AUTO_INCREMENT,
  `username` varchar(100) DEFAULT NULL,
  `password` varchar(100) DEFAULT NULL,
  `password_salt` varchar(100) DEFAULT NULL,
  PRIMARY KEY (`id`),
  UNIQUE KEY `idx_users_username` (`username`)
) ENGINE=InnoDB DEFAULT CHARSET=utf8;
LOCK TABLES `users` WRITE;
# 插入测试数据
INSERT INTO `users` (`id`, `username`, `password`, `password_salt`)
VALUES
    (1,'jack','123',NULL),
    (2,'atguigu','123456',NULL);
UNLOCK TABLES;
- 运行SQL脚本创建完相应的数据表之后,需要进行工程代码的编写,JdbcRealm提供了2种方式进行实现,下面分别对两种方式进行介绍及代码实操:
-
方式一:使用.ini配置文件进行配置编写配置文件jdbcRealm.ini
#注意 文件格式必须为ini,编码为ANSI
#声明Realm,指定realm类型
jdbcRealm=org.apache.shiro.realm.jdbc.JdbcRealm
#配置数据源 由于我们引入了druid数据源依赖,所以这里使用druid数据源
dataSource=com.alibaba.druid.pool.DruidDataSourcemysql-connector-java 5 用的驱动url是com.mysql.jdbc.Driver,mysql-connector-java6以后用的是com.mysql.cj.jdbc.Driver
dataSource.driverClassName=com.mysql.cj.jdbc.Driver
#数据源链接
dataSource.url=jdbc:mysql://192.168.200.128:3306/atguigu_shiro?characterEncoding=UTF-8&serverTimezone=UTC&useSSL=false
dataSource.username=root
dataSource.password=123456
#指定数据源
jdbcRealm.dataSource=KaTeX parse error: Expected 'EOF', got '#' at position 12: dataSource #̲开启查找权限, 默认是fals…jdbcRealm -
新建一个【JdbcRealmTest】测试类:
@Test
public void test() {
//创建SecurityManager工厂,并加载jdbcrealm.ini配置文件
Factory factory = new IniSecurityManagerFactory(“classpath:jdbcrealm.ini”);
SecurityManager securityManager = factory.getInstance();
//将securityManager 设置到当前运行环境中
SecurityUtils.setSecurityManager(securityManager);
Subject subject = SecurityUtils.getSubject();
//用户输入的账号密码
UsernamePasswordToken usernamePasswordToken = new UsernamePasswordToken(“jack”, “123”);
subject.login(usernamePasswordToken);
System.out.println(" 认证结果:“+subject.isAuthenticated());
System.out.println(” 是否有对应的role1角色:"+subject.hasRole(“role1”));
System.out.println(“是否有video:find权限:”+ subject.isPermitted(“video:find”));
} -
运行测试用例,结果如下:
-
方式二:自行配置数据源及JdbcRealm依赖引入与方式一一致在【JdbcRealmTest】测试类中编写一个测试用例:
@Test
public void test2(){
DefaultSecurityManager securityManager = new DefaultSecurityManager();
DruidDataSource ds = new DruidDataSource();
ds.setDriverClassName(“com.mysql.cj.jdbc.Driver”);
ds.setUrl(“jdbc:mysql://192.168.200.128:3306/atguigu_shiro?characterEncoding=UTF-8&serverTimezone=UTC&useSSL=false”);
ds.setUsername(“root”);
ds.setPassword(“123456”);
JdbcRealm jdbcRealm = new JdbcRealm();
jdbcRealm.setPermissionsLookupEnabled(true);
jdbcRealm.setDataSource(ds);
securityManager.setRealm(jdbcRealm);
//将securityManager 设置到当前运行环境中
SecurityUtils.setSecurityManager(securityManager);
Subject subject = SecurityUtils.getSubject();
//用户输入的账号密码
UsernamePasswordToken usernamePasswordToken = new UsernamePasswordToken(“jack”, “123”);
subject.login(usernamePasswordToken);
System.out.println(" 认证结果:“+subject.isAuthenticated());
System.out.println(” 是否有对应的role1角色:“+subject.hasRole(“role1”));
System.out.println(” 是否有video:find权限:“+ subject.isPermitted(“video:find”));
System.out.println(” 是否有任意权限:"+ subject.isPermitted(“aaaa:xxxxxxxxx”));
} -
运行测试用例,结果如下:

** 1.2 Shiro自定义realm实战 **
** 1.2.1 自定义realm实战基础 **
- 步骤:创建一个类 ,继承AuthorizingRealm,AuthorizingRealm继承关系如下图:
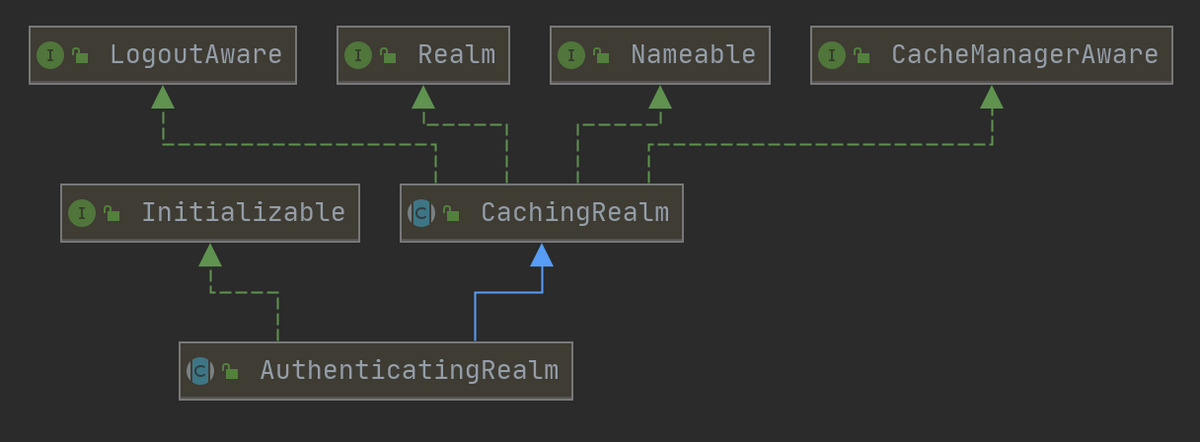
由上图可见继承关系为:AuthorizingRealm->AuthenticatingRealm->CachingRealm->Realm
- 重写授权方法 doGetAuthorizationInfo

- 重写认证方法 doGetAuthenticationInfo

- 方法:当用户登陆的时候会调用 doGetAuthenticationInfo,获取认证信息进行用户身份认证进行权限校验的时候会调用: doGetAuthorizationInfo,获取授权信息进行用户授权
- 对象介绍UsernamePasswordToken : 对应的是用户输入的账号密码信息组成的,token中有Principal和Credential,UsernamePasswordToken继承关系图如下:

由上图可见继承关系为:UsernamePasswordToken->HostAuthenticationToken->AuthenticationToken
- SimpleAuthorizationInfo:代表用户角色权限信息SimpleAuthenticationInfo :代表该用户的认证信息
** 1.2.2 自定义realm代码实操 **
有了上面的对基础知识以及认证授权的理解,我们先在合适的包下创建一个【CustomRealm】类,继承 Shiro 框架的 AuthorizingRealm
类,并实现默认的两个方法:
package com.atguigu.shiro.demo;
import org.apache.shiro.authc.*;
import org.apache.shiro.authz.AuthorizationInfo;
import org.apache.shiro.authz.SimpleAuthorizationInfo;
import org.apache.shiro.realm.AuthorizingRealm;
import org.apache.shiro.subject.PrincipalCollection;
import java.util.HashMap;
import java.util.HashSet;
import java.util.Map;
import java.util.Set;
public class CustomRealm extends AuthorizingRealm {
    //此处用Map集合模拟用户-角色-权限之间的关联关系,实际开发中会从数据库进行查询
    private final Map<String,String> userInfoMap = new HashMap<>();
    {
        userInfoMap.put("jack","123");
        userInfoMap.put("atguigu","123456");
    }
    //role -> permission
    private final Map<String, Set<String>> permissionMap = new HashMap<>();
    {
        Set<String> set1 = new HashSet<>();
        Set<String> set2 = new HashSet<>();
        set1.add("video:find");
        set1.add("video:buy");
        set2.add("video:add");
        set2.add("video:delete");
        permissionMap.put("jack",set1);
        permissionMap.put("atguigu",set2);
    }
    //user -> role
    private final Map<String,Set<String>> roleMap = new HashMap<>();
    {
        Set<String> set1 = new HashSet<>();
        Set<String> set2 = new HashSet<>();
        set1.add("role1");
        set1.add("role2");
        set2.add("root");
        roleMap.put("jack",set1);
        roleMap.put("atguigu",set2);
    }
    //进行权限校验的时候会调用
    @Override
    protected AuthorizationInfo doGetAuthorizationInfo(PrincipalCollection principals) {
        System.out.println("权限 doGetAuthorizationInfo");
        String name = (String)principals.getPrimaryPrincipal();
        Set<String> permissions = getPermissionsByNameFromDB(name);
        Set<String> roles = getRolesByNameFromDB(name);
        SimpleAuthorizationInfo simpleAuthorizationInfo = new SimpleAuthorizationInfo();
        simpleAuthorizationInfo.setRoles(roles);
        simpleAuthorizationInfo.setStringPermissions(permissions);
        return simpleAuthorizationInfo;
    }
    //当用户登陆的时候会调用
    @Override
    protected AuthenticationInfo doGetAuthenticationInfo(AuthenticationToken token) throws AuthenticationException {
        System.out.println("认证 doGetAuthenticationInfo");
        //从token获取身份信息,token代表用户输入的信息
        String name = (String)token.getPrincipal();
        //模拟从数据库中取密码
        String pwd = getPwdByUserNameFromDB(name);
        if( pwd == null || "".equals(pwd)){
            return null;
        }
        SimpleAuthenticationInfo simpleAuthenticationInfo = new SimpleAuthenticationInfo(name, pwd, this.getName());
        return simpleAuthenticationInfo;
    }
    /**
     * 模拟从数据库获取用户角色集合
     * @param name
     * @return
     */
    private Set<String> getRolesByNameFromDB(String name) {
        return roleMap.get(name);
    }
    /**
     *  模拟从数据库获取权限集合
     * @param name
     * @return
     */
    private Set<String> getPermissionsByNameFromDB(String name) {
        return permissionMap.get(name);
    }
    private String getPwdByUserNameFromDB(String name) {
        return userInfoMap.get(name);
    }
}
然后我们编写测试类,来验证是否正确:
package com.atguigu.shiro.demo;
import org.apache.shiro.SecurityUtils;
import org.apache.shiro.authc.UsernamePasswordToken;
import org.apache.shiro.mgt.DefaultSecurityManager;
import org.apache.shiro.subject.Subject;
import org.junit.Test;
public class AuthenticationTest {
private CustomRealm customRealm = new CustomRealm();
private DefaultSecurityManager defaultSecurityManager = new DefaultSecurityManager();
@Before
public void init(){
//构建环境
defaultSecurityManager.setRealm(customRealm);
SecurityUtils.setSecurityManager(defaultSecurityManager);
}
@Test
public void testAuthentication() {
//获取当前操作的主体
Subject subject = SecurityUtils.getSubject();
//用户输入的账号密码
UsernamePasswordToken usernamePasswordToken = new UsernamePasswordToken("jack", "123");
subject.login(usernamePasswordToken);
//登录
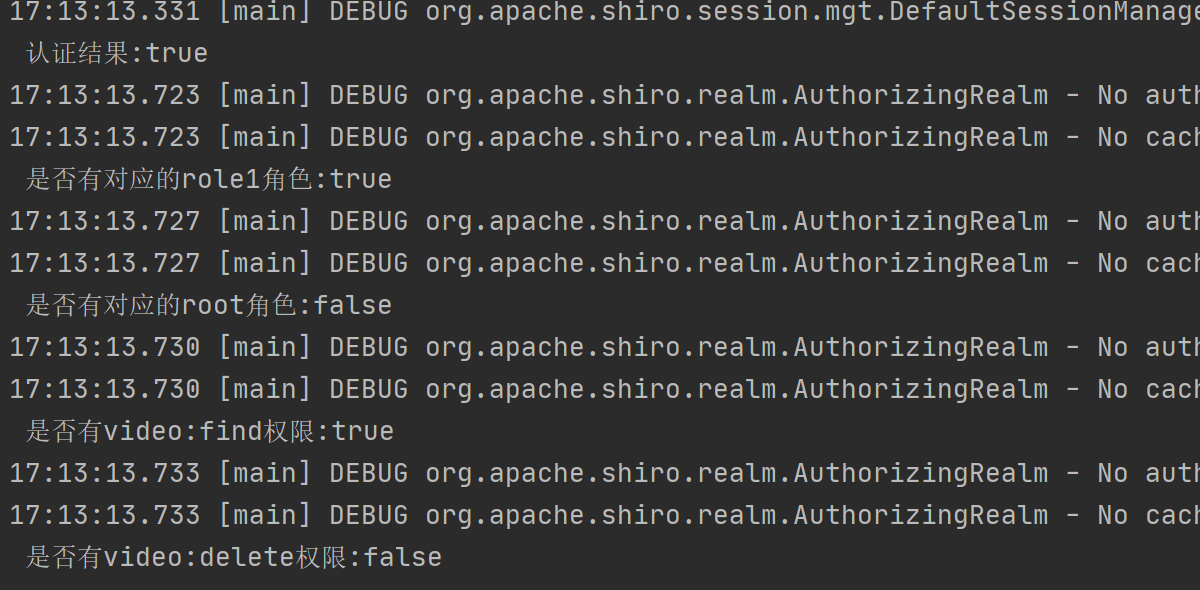
System.out.println(" 认证结果:"+subject.isAuthenticated());
//拿到主体标示属性
System.out.println(" getPrincipal=" + subject.getPrincipal());
subject.checkRole("role1");
System.out.println("是否有对应的角色:"+subject.hasRole("role1"));
System.out.println("是否有对应的权限:"+subject.isPermitted("video:add"));
}
}
运行测试用例,结果如下:

** 2. 深入Shiro源码解读认证授权流程 **
** 2.1 认证流程源码解读 **
- 我们以subject.login(token)为起点进行断点调试
- DelegatingSubject.login(token)会将身份认证请求委托给DefaultSecurityManager的login()方法进行处理,接着继续进入DefaultSecurityManager的login()方法
public class DelegatingSubject implements Subject {
    ......
    public void login(AuthenticationToken token) throws AuthenticationException {
        this.clearRunAsIdentitiesInternal();
        //调用DefaultSecurityManager的login方法进行身份信息认证
        Subject subject = this.securityManager.login(this, token);
        ......
    }
    ......
}
- DefaultSecurityManager的login()方法会调用AuthenticatingSecurityManager的authenticate()方法进行验证,接着继续进入AuthenticatingSecurityManager的authenticate()方法
public class DefaultSecurityManager extends SessionsSecurityManager {
    ......
    public Subject login(Subject subject, AuthenticationToken token) throws AuthenticationException {
        AuthenticationInfo info;
        try {
            //调用AuthenticatingSecurityManager的authenticate()方法进行验证
            info = this.authenticate(token);
        } catch (AuthenticationException var7) {
            ......
        }
        Subject loggedIn = this.createSubject(token, info, subject);
        this.onSuccessfulLogin(token, info, loggedIn);
        return loggedIn;
    }
    ......
}
- AuthenticatingSecurityManager的authenticate()方法会调用AbstractAuthenticator的authenticate()方法进行验证,接着继续进入AbstractAuthenticator的authenticate()方法
public abstract class AuthenticatingSecurityManager extends RealmSecurityManager {
    ......
    public AuthenticationInfo authenticate(AuthenticationToken token) throws AuthenticationException {
        //调用AbstractAuthenticator的authenticate()方法进行验证
        return this.authenticator.authenticate(token);
    }
    ......
}
- AbstractAuthenticator的authenticate()方法会调用ModularRealmAuthenticator的doAuthenticate()方法进行验证,接着继续进入ModularRealmAuthenticator的doAuthenticate()方法
public abstract class AbstractAuthenticator implements Authenticator, LogoutAware {
    ......
    public final AuthenticationInfo authenticate(AuthenticationToken token) throws AuthenticationException {
        if (token == null) {
            throw new IllegalArgumentException("Method argument (authentication token) cannot be null.");
        } else {
            log.trace("Authentication attempt received for token [{}]", token);
            AuthenticationInfo info;
            try {
                //调用ModularRealmAuthenticator的doAuthenticate()进行验证
                info = this.doAuthenticate(token);
                if (info == null) {
                    String msg = "No account information found for authentication token [" + token + "] by this " + "Authenticator instance.  Please check that it is configured correctly.";
                    throw new AuthenticationException(msg);
                }
            } catch (Throwable var8) {
                ......
            }
            log.debug("Authentication successful for token [{}].  Returned account [{}]", token, info);
            this.notifySuccess(token, info);
            return info;
        }
    }
    ......
}
- ModularRealmAuthenticator的doAuthenticate()方法会获取相应的realm,由于我们目前只配置了一个realm,所以会执行doSingleRealmAuthentication()方法,接着会AuthenticatingRealm的getAuthenticationInfo()方法,接着继续进入AuthenticatingRealm的getAuthenticationInfo()方法
public class ModularRealmAuthenticator extends AbstractAuthenticator{
    ......
    protected AuthenticationInfo doAuthenticate(AuthenticationToken authenticationToken) throws AuthenticationException {
        this.assertRealmsConfigured();
        //获取当前配置的realm
        Collection<Realm> realms = this.getRealms();

        //如果当前配置realm个数为1,则执行doSingleRealmAuthentication()方法,否则执行doMultiRealmAuthentication()
        return realms.size() == 1 ? this.doSingleRealmAuthentication((Realm)realms.iterator().next(), authenticationToken) : this.doMultiRealmAuthentication(realms, authenticationToken);
    }

    protected AuthenticationInfo doSingleRealmAuthentication(Realm realm, AuthenticationToken token) {
        if (!realm.supports(token)) {
            String msg = "Realm [" + realm + "] does not support authentication token [" + token + "].  Please ensure that the appropriate Realm implementation is " + "configured correctly or that the realm accepts AuthenticationTokens of this type.";
            throw new UnsupportedTokenException(msg);
        } else {
            AuthenticationInfo info = realm.getAuthenticationInfo(token);
            if (info == null) {
                String msg = "Realm [" + realm + "] was unable to find account data for the " + "submitted AuthenticationToken [" + token + "].";
                throw new UnknownAccountException(msg);
            } else {
                return info;
            }
        }
    }
    ......
}
- 在此可以看到,AuthenticatingRealm的getAuthenticationInfo()方法会调用我们自定义配置realm的doGetAuthenticationInfo(token)获取认证信息,并且调用AuthenticatingRealm的assertCredentialsMatch方法进行密码匹配认证
public abstract class AuthenticatingRealm extends CachingRealm implements Initializable{
    ......
    public final AuthenticationInfo getAuthenticationInfo(AuthenticationToken token) throws AuthenticationException {
       AuthenticationInfo info = this.getCachedAuthenticationInfo(token);
       if (info == null) {
           // 调用自定义配置realm的doGetAuthenticationInfo(token)方法
           info = this.doGetAuthenticationInfo(token);
           log.debug("Looked up AuthenticationInfo [{}] from doGetAuthenticationInfo", info);
           if (token != null && info != null) {
               this.cacheAuthenticationInfoIfPossible(token, info);
           }
       } else {
           log.debug("Using cached authentication info [{}] to perform credentials matching.", info);
       }
       if (info != null) {
           // 对获取的认证信息进行密码验证
           this.assertCredentialsMatch(token, info);
       } else {
           log.debug("No AuthenticationInfo found for submitted AuthenticationToken [{}].  Returning null.", token);
       }
       return info;
   }
   ......
}
到此,我们的认证流程就结束了,通过源码可以看到认证流程到最后就是调用的我们自定义realm并重写的doGetAuthenticationInfo(token)方法,从以上的源码分析,可以得到以下方法调用的时序图:

** 2.2 授权流程源码解读 **
- 授权流程我们以subject.checkRole()方法为起点进行断点调试
- DelegatingSubject的checkRole()方法会将授权请求委托给AuthorizingSecurityManager的checkRole()方法进行处理,接着继续进入AuthorizingSecurityManager的checkRole()方法
public class DelegatingSubject implements Subject {
    ......
    public void checkRole(String role) throws AuthorizationException {
        this.assertAuthzCheckPossible();
        //将请求委托给AuthorizingSecurityManager的checkRole()方法
        this.securityManager.checkRole(this.getPrincipals(), role);
    }
    ......
}
- AuthorizingSecurityManager的checkRole()方法会将请求委托给ModularRealmAuthorizer的checkRole()方法进行处理,接着继续进入ModularRealmAuthorizer的checkRole()方法
public abstract class AuthorizingSecurityManager extends AuthenticatingSecurityManager {
    ......
    public void checkRole(PrincipalCollection principals, String role) throws AuthorizationException {
        //将请求委托给ModularRealmAuthorizer的checkRole()方法
        this.authorizer.checkRole(principals, role);
    }
    ......
}
- ModularRealmAuthorizer的checkRole()方法会调用AuthorizingRealm的hasRole()方法验证当前用户是否有相应的权限,若没有相应的权限,则会抛出异常,接着继续进入AuthorizingRealm的hasRole()方法
public class ModularRealmAuthorizer implements Authorizer, PermissionResolverAware, RolePermissionResolverAware {
    ......
    public void checkRole(PrincipalCollection principals, String role) throws AuthorizationException {
        this.assertRealmsConfigured();
        //验证当前用户是否有相应的权限,如果没有,则会抛出异常
        if (!this.hasRole(principals, role)) {
            throw new UnauthorizedException("Subject does not have role [" + role + "]");
        }
    }

    public boolean hasRole(PrincipalCollection principals, String roleIdentifier) {
        this.assertRealmsConfigured();
        Iterator var3 = this.getRealms().iterator();
        Realm realm;
        do {
            if (!var3.hasNext()) {
                return false;
            }
            realm = (Realm)var3.next();
            //调用AuthorizingRealm的hasRole()方法进行验证,如果有相应权限则返回true,否则返回false
        } while(!(realm instanceof Authorizer) || !((Authorizer)realm).hasRole(principals, roleIdentifier));
        return true;
    }
    ......
}
- AuthorizingRealm的hasRole()方法会通过getAuthorizationInfo()方法进行调用自定义realm并重写的doGetAuthorizationInfo()方法获取当前用户拥有的授权信息
public abstract class AuthorizingRealm extends AuthenticatingRealm implements Authorizer, Initializable, PermissionResolverAware, RolePermissionResolverAware {

    ......

    public boolean hasRole(PrincipalCollection principal, String roleIdentifier) {
        AuthorizationInfo info = this.getAuthorizationInfo(principal);
        return this.hasRole(roleIdentifier, info);
    }
    protected AuthorizationInfo getAuthorizationInfo(PrincipalCollection principals) {
        if (principals == null) {
            return null;
        } else {
            AuthorizationInfo info = null;
            ......
            if (info == null) {
                //调用自定义realm并重写的doGetAuthorizationInfo()方法获取当前用户的授权信息
                info = this.doGetAuthorizationInfo(principals);
                //如果授权信息存在并且存在缓存,则将当前授权信息进行缓存
                if (info != null && cache != null) {
                    if (log.isTraceEnabled()) {
                        log.trace("Caching authorization info for principals: [" + principals + "].");
                    }
                    key = this.getAuthorizationCacheKey(principals);
                    cache.put(key, info);
                }
            }
            return info;
        }
    }
    ......
}
到此,我们的授权流程就结束了,通过源码可以看到授权流程到最后就是调用的我们自定义realm并重写的doGetAuthorizationInfo()方法,从以上的源码分析,可以得到以下方法调用的时序图:
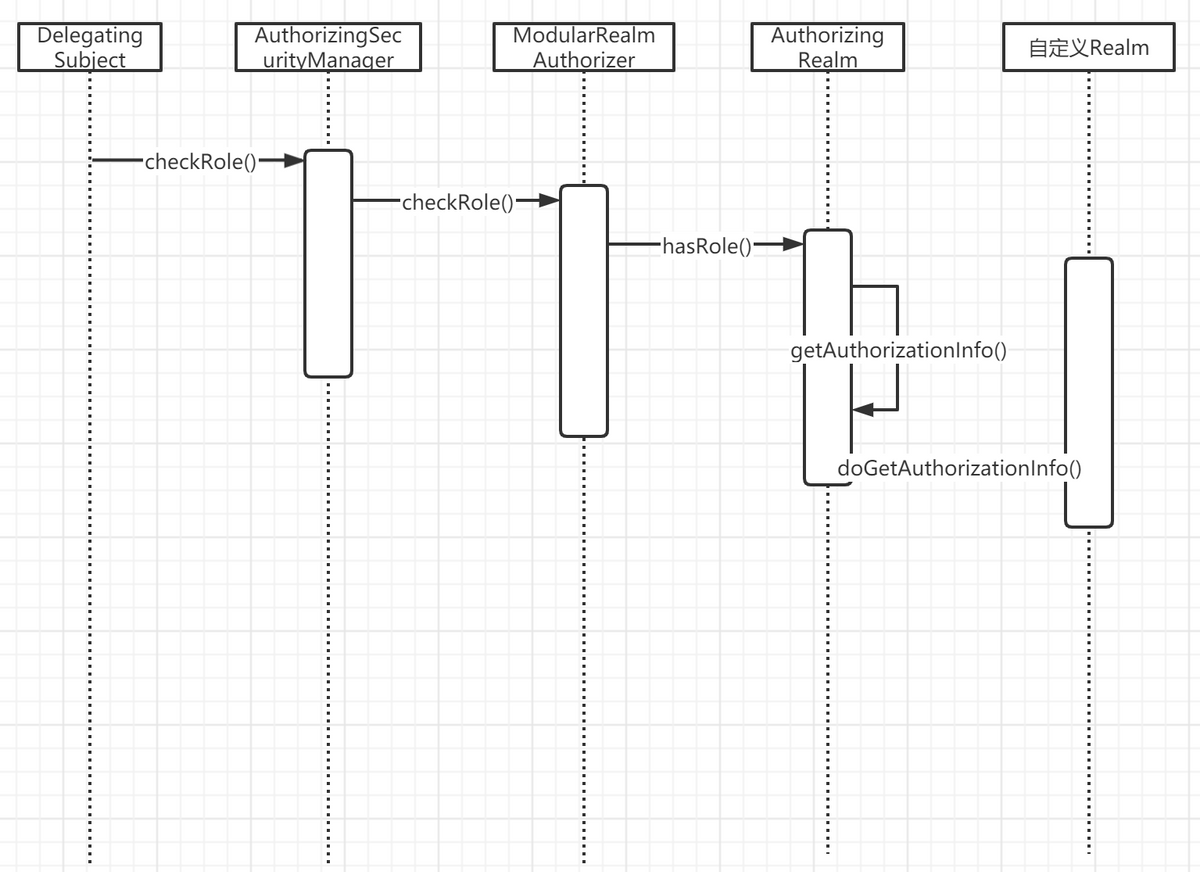
至此,我们就通过源码把Shiro的认证以及授权流程解读完了,由上边分析我们可以知道Shiro认证授权的时候,会调用我们自定义Realm时重写的doGetAuthenticationInfo()方法以及doGetAuthorizationInfo()方法进行获取当前主体的认证以及授权信息,所以我们需要根据项目的具体情况在自定义Realm中定义获取认证以及授权信息的逻辑。
** 3. Shiro数据安全之数据加解密 **
-
为什么需要加解密?在之前的学习中,我们在数据库中保存的密码都是明文的,一旦数据库数据泄露,那就会造成不可估算的损失。
-
什么是散列算法?一般叫hash,简单的说就是一种将任意长度的消息压缩到某一固定长度的消息摘要的函数,适合存储密码,比如MD5
-
什么是salt(盐) ?如果直接通过散列函数得到加密数据,容易被对应解密网站暴力破解,一般会在应用程序里面加特殊的字段进行处理,比如用户id,例子:加密数据 = MD5(明文密码+用户id), 破解难度会更大,也可以使用多重散列,比如多次md5
-
Shiro如何根据用户传过来的密码进行加密与数据库密码进行匹配?Shiro会使用AuthenticatingRealm的assertCredentialsMatch()方法进行验证密码是否正确因此,在Shiro中我们一般会自定义密码验证规则,示例如下:
@Bean
public HashedCredentialsMatcher hashedCredentialsMatcher(){
HashedCredentialsMatcher hashedCredentialsMatcher = new HashedCredentialsMatcher();
//散列算法,使用MD5算法;
hashedCredentialsMatcher.setHashAlgorithmName(“md5”);
//散列的次数,比如散列两次,相当于 md5(md5(“xxx”));
hashedCredentialsMatcher.setHashIterations(2);
return hashedCredentialsMatcher;
} -
自定义验证规则之后,Shiro进行密码验证时就会调用相应的逻辑对用户输入的密码进行加密之后与数据库存储的密码进行匹配。
总结一下:今天这篇文章我们进行Shiro
Realm实战以及对Shiro认证授权源码进行解读,之后我们将会对Shiro的缓存、Session模块进行讲解,以及会整合SpringBoot2.x进行综合实战,敬请期待。
敬请期待。
尊重原创版权: https://www.gewuweb.com/sitemap.html
自定义密码验证规则,示例如下:
@Bean
public HashedCredentialsMatcher hashedCredentialsMatcher(){
    HashedCredentialsMatcher hashedCredentialsMatcher = new HashedCredentialsMatcher();
    //散列算法,使用MD5算法;
    hashedCredentialsMatcher.setHashAlgorithmName("md5");
    //散列的次数,比如散列两次,相当于 md5(md5("xxx"));
    hashedCredentialsMatcher.setHashIterations(2);
    return hashedCredentialsMatcher;
}
- 自定义验证规则之后,Shiro进行密码验证时就会调用相应的逻辑对用户输入的密码进行加密之后与数据库存储的密码进行匹配。
总结一下:今天这篇文章我们进行Shiro
Realm实战以及对Shiro认证授权源码进行解读,之后我们将会对Shiro的缓存、Session模块进行讲解,以及会整合SpringBoot2.x进行综合实战,敬请期待。
敬请期待。


 1884
1884


 被折叠的 条评论
为什么被折叠?
被折叠的 条评论
为什么被折叠?
 到【灌水乐园】发言


