


http://book.51cto.com/art/201007/213597.htm
4.1 引导过程
《Linux内核修炼之道》第4章讲解系统初始化,万事开头难,系统的初始化是一个很复杂的过程,不过对于内核源码的学习来说,以这个部分开始应该是个不错的选择。特别是子系统初始化,应该是你选择任何内核子系统开始分析时都需要了解的内容。本节为大家介绍引导过程。
第4章系统初始化
当你想要运行程序时,最Windows的方式是在GNOME或者KDE等桌面环境中点击相应的图标,或你采用自己习惯的方式--打开终端,在shell中敲入程序的文件名并回车。这样应用程序就能够被加载并运行,但是所有这一切的前提是已经有其他的软件或程序将内核加载并运行,这样的软件或程序也被称为内核引导程序,比如GRUB和LILO。而内核引导程序本身也需要被其他某个软件来加载和运行,这一个递归的过程到系统硬件时终止。
因此说系统的初始化是一个很复杂的过程,这也恰恰验证了"万事开头难"的俗语。本章的内容将陪伴你一起经历这个困难的过程。
4.1引导过程
Linux的引导过程包括很多阶段。首先,对Linux的正常使用要求,必须有其他某个软件来加载并运行内核,这样的软件被称为内核引导程序,通常是GRUB或LILO。
更进一步,还需要有软件能够加载并运行内核引导程序。而这个软件本身又需要被其他软件来加载和运行,这样一个递归的引导过程最终必须在某个地方终止,这个地方就是系统硬件。
如图4.1所示为X86 PC的引导过程。
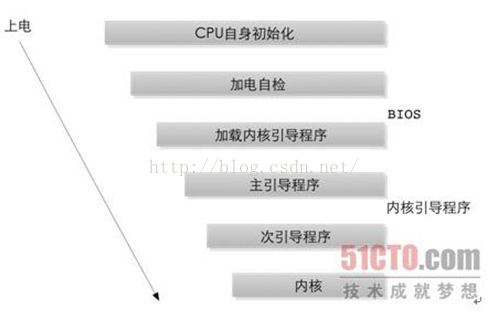
(1)CPU自身初始化。
CPU自身的初始化是引导过程的第一步,如果有多个CPU,即多处理器系统,则每个CPU都要进行自身初始化。
比如,对于双处理器的Pentium系统,一个CPU总是为主,另外一个CPU总是为辅,主CPU执行引导过程的剩余工作,随后内核才会激活辅CPU。在辅CPU被激活之前,我们可以认为该系统中只有一个CPU可用,而不必考虑另外一个CPU。
接下来,CPU从某个固定位置(一般是0Xfffffff0)取得指令并执行。该指令为跳转指令,跳转到BIOS代码的首部。注意,CPU并不真正关心BIOS是否存在,它只是执行该地址中保存的任何指令。
(2)BIOS。
BIOS被固化于主板上一个容量相对较小的只读存储器(Read-Only Memory,ROM)中,它的工作主要有两个:加电自检,即进行所谓的POST(Power On Self Test);加载内核引导程序。
POST阶段完成系统硬件的检测,包括内存检测、系统总线检测等。BIOS在POST阶段依据内置的规则,或者用户的手工选择确定启动设备。
POST完成之后,BIOS读取启动设备第一个扇区,即首512字节的信息,如图4.2所示,该扇区又被称之为主引导记录(Master Boot Record,MBR)。MBR中保存了内核引导程序的开始部分,BIOS将其加载到内存并执行。
加载内核引导程序之后,POST部分的代码会被从内存中清理出来,但仍然会有部分的运行时服务保留在内存之中,供目标操作系统使用。
(3)内核引导程序。
内核引导程序分为两个阶段:MBR中的主引导程序;活动分区引导记录中的次引导程序。
MBR中的主引导程序是一个512字节的映像,如图4.3所示,它包含了446字节的程序代码和64字节的分区表,最后两个字节固定为0xAA55,用于检查MBR是否有效。

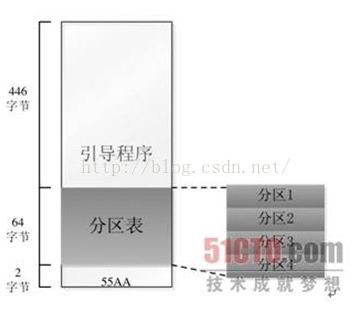
主引导程序扫描分区表,寻找活动分区,将位于活动分区引导记录中的次引导程序加载到内存中并执行。
次引导程序负责加载Linux内核映像,并将控制权转交给内核。
在PC环境中,内核引导程序常用LILO(Linux Loader)和GRUB(GrandUnified Bootloader),在嵌入式环境中,常用U-Boot和RedBoot。
(4)内核。
内核映像被加载到内存并获得控制权之后,内核阶段开始工作。通常,内核映像以压缩形式存储,并不是一个可执行的内核。因此,内核阶段的首要工作是自解压内核映像。
如图4.4所示,内核编译生成vmlinux后,通常会对其再进行压缩,成为zImage(小内核,小于512KB)或bzImage(大内核,大于512KB)。在zImage和bzImage的头部都内嵌有解压缩程序。
如图4.5所示,当用于i386映像的bzImage被调用时,将首先执行arch/i386/boot/head.S的start汇编例程,进行一些基本的硬件设置,并调用arch/i386/boot/compressed/head.S中的 startup_32函数。
startup_32例程设置一个基本的运行环境(堆栈等),并清除BSS(Block Started by Symbol),然后调用arch/i386/boot/compressed/misc.c中的C函数decompress_kernel来解压内核。
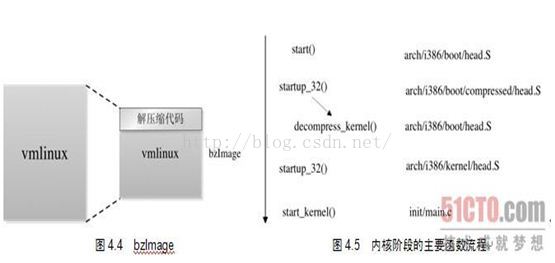
decompress_kernel函数打印出信息"Uncompressing Linux..."后,调用gunzip函数将内核解压到内存的指定位置。
之后,arch/i386/kernel/head.S中的另外一个startup_32函数被调用。新的startup_32函数对页表进行初始化,启用内存分页功能,并为任何可选的浮点单元(FPU)检测CPU的类型,将其存储起来供以后使用。
最后,init/main.c中的start_kernel函数被调用,进入体系结构无关的内核部分。自此,内核的引导过程告一段落,进入内核的初始化过程。
正如前面所述,引导过程可归纳为:CPU加载BIOS,BIOS加载内核引导程序,内核引导程序加载压缩内核,压缩内核加载解压内核。其中的每一步都将我们带入更大量、更复杂的代码中,一直到成功地运行了内核。
4.2 内核初始化
如图4.6所示,内核的初始化过程由start_kernel函数开始,至第一个用户进程init结束,调用了一系列的初始化函数对所有的内核组件进行初始化。其中,start_kernel、rest_init、kernel_init、init_post等4个函数构成了整个初始化过程的主线。
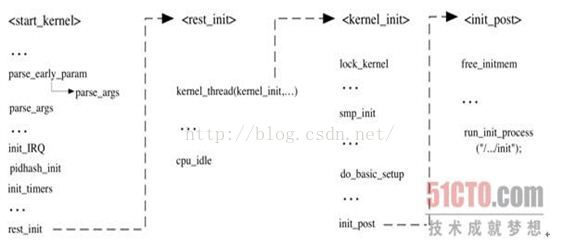
本节接下来的内容会结合内核代码,对内核初始化过程主线上的几个函数进行分析,使读者对该过程有个整体上的认识,以此为基础,读者可以根据自己的兴趣或需要,选择与某些组件相关的初始化函数,进行更进一步的研究分析。
4.2.1 start_kernel函数
从start_kernel函数开始,内核即进入了C语言部分,它完成了内核的大部分初始化工作。实际上,可以将start_kernel函数看做内核的main函数。
代码清单4.1 start_kernel函数
1. 513 asmlinkage void __init start_kernel(void)
2. 514 {
3. 515 char * command_line;
4. 516 extern struct kernel_param __start___param[], __stop___param[];
5. 517
6. /*
7. * 当只有一个CPU的时候这个函数就什么都不做,
但是如果有多个CPU的时候那么它就
8. * 返回在启动的时候的那个CPU的号
9. */
10. 518 smp_setup_processor_id();
11. 519
12. 520 /*
13. 521 * Need to run as early as possible, to initialize the
14. 522 * lockdep hash:
15. 523 */
16. 524 unwind_init();
17. 525 lockdep_init();
18. 526
19. /* 关闭当前CPU的中断 */
20. 527 local_irq_disable();
21. 528 early_boot_irqs_off();
22. /*
23. * 每一个中断都有一个中断描述符(struct irq_desc)
来进行描述,这个函数的
24. * 作用就是设置所有中断描述符的锁
25. */
26. 529 early_init_irq_lock_class();
27. 530
28. 531 /*
29. 532 * Interrupts are still disabled. Do necessary setups, then
30. 533 * enable them
31. 534 */
32. /* 获取大内核锁,锁定整个内核。 */
33. 535 lock_kernel();
34. /* 如果定义了CONFIG_GENERIC_CLOCKEVENTS,则注册clockevents框架 */
35. 536 tick_init();
36. 537 boot_cpu_init();
37. /* 初始化页地址,使用链表将其链接起来 */
38. 538 page_address_init();
39. 539 printk(KERN_NOTICE);
40. /* 显示内核的版本信息 */
41. 540 printk(linux_banner);
42. /*
43. * 每种体系结构都有自己的setup_arch()函数,是
体系结构相关的,具体编译哪个
44. * 体系结构的setup_arch()函数,由源码树顶层目录
下的Makefile中的ARCH变量
45. * 决定
46. */
47. 541 setup_arch(&command_line);
48. 542 setup_command_line(command_line);
49. 543 unwind_setup();
50. /* 每个CPU分配pre-cpu结构内存, 并复制.data.percpu段的数据 */
51. 544 setup_per_cpu_areas();
52. 545 smp_prepare_boot_cpu(); /* arch-specific boot-cpu hooks */
53. 546
54. 547 /*
55. 548 * Set up the scheduler prior starting any
interrupts (such as the
56. 549 * timer interrupt). Full topology setup
happens at smp_init()
57. 550 * time - but meanwhile we still have a
functioning scheduler.
58. 551 */
59. /* 进程调度器初始化 */
60. 552 sched_init();
61. 553 /*
62. 554 * Disable preemption - early bootup scheduling is extremely
63. 555 * fragile until we cpu_idle() for the first time.
64. 556 */
65. /* 禁止内核抢占 */
66. 557 preempt_disable();
67. 558 build_all_zonelists();
68. 559 page_alloc_init();
69. /* 打印Linux启动命令行参数 */
70. 560 printk(KERN_NOTICE "Kernel command line: %s\n", boot_command_line);
71. /* 对内核选项的两次解析 */
72. 561 parse_early_param();
73. 562 parse_args("Booting kernel", static_command_line, __start___param,
74. 563 __stop___param - __start___param,
75. 564 &unknown_bootoption);
76. /* 检查中断是否已经打开,如果已经打开,则关闭中断 */
77. 565 if (!irqs_disabled()) {
78. 566 printk(KERN_WARNING "start_kernel(): bug: interrupts were "
79. 567 "enabled *very* early, fixing it\n");
80. 568 local_irq_disable();
81. 569 }
82. 570 sort_main_extable();
83. /*
84. * trap_init函数完成对系统保留中断向量(异常、
非屏蔽中断以及系统调用) * 的初始化,init_IRQ函
数则完成其余中断向量的初始化
85. */
86. 571 trap_init();
87. /* 初始化RCU(Read-Copy Update)机制 */
88. 572 rcu_init();
89. 573 init_IRQ();
90. /* 初始化hash表,便于从进程的PID获得对应的进程描述符指针 */
91. 574 pidhash_init();
92. /* 初始化定时器相关的数据结构 */
93. 575 init_timers();
94. /* 对高精度时钟进行初始化 */
95. 576 hrtimers_init();
96. /* 初始化tasklet_softirq和hi_softirq */
97. 577 softirq_init();
98. 578 timekeeping_init();
99. /* 初始化系统时钟源 */
100. 579 time_init();
101. /* 对内核的profile(一个内核性能调式工具)功能进行初始化 */
102. 580 profile_init();
103. 581 if (!irqs_disabled())
104. 582 printk("start_kernel(): bug: interrupts
were enabled early\n");
105. 583 early_boot_irqs_on();
106. 584 local_irq_enable();
107. 585
108. 586 /*
109. 587 * HACK ALERT! This is early. We're enabling
the console before
110. 588 * we've done PCI setups etc, and console_init()
must be aware of
111. 589 * this. But we do want output early, in
case something goes wrong.
112. 590 */
113. /*
114. * 初始化控制台以显示printk的内容,在此之前调用的printk
115. * 只是把数据存到缓冲区里
116. */
117. 591 console_init();
118. 592 if (panic_later)
119. 593 panic(panic_later, panic_param);
120. 594
121. /* 如果定义了CONFIG_LOCKDEP宏,则打印锁依赖信息,否则什么也不做 */
122. 595 lockdep_info();
123. 596
124. 597 /*
125. 598 * Need to run this when irqs are enabled, because it wants
126. 599 * to self-test [hard/soft]-irqs on/off lock inversion bugs
127. 600 * too:
128. 601 */
129. 602 locking_selftest();
130. 603
131. 604 #ifdef CONFIG_BLK_DEV_INITRD
132. 605 if (initrd_start && !initrd_below_start_ok &&
133. 606 initrd_start < min_low_pfn << PAGE_SHIFT) {
134. 607 printk(KERN_CRIT "initrd overwritten
(0x%08lx < 0x%08lx) - "
135. 608 "disabling it.\n",initrd_start,
min_low_pfn << PAGE_SHIFT);
136. 609 initrd_start = 0;
137. 610 }
138. 611 #endif
139. /* 虚拟文件系统的初始化 */
140. 612 vfs_caches_init_early();
141. 613 cpuset_init_early();
142. 614 mem_init();
143. /* slab初始化 */
144. 615 kmem_cache_init();
145. 616 setup_per_cpu_pageset();
146. 617 numa_policy_init();
147. 618 if (late_time_init)
148. 619 late_time_init();
149. /*
150. * 一个非常有趣的CPU性能测试函数,可以计
算出CPU在1s内执行了多少次一个
151. * 极短的循环,计算出来的值经过处理后得
到BogoMIPS值(Bogo是Bogus的意思),
152. */
153. 620 calibrate_delay();
154. 621 pidmap_init();
155. /* 接下来的函数中,大多数都是为有关的管理机制建立专用的slab缓存 */
156. 622 pgtable_cache_init();
157. /* 初始化优先级树index_bits_to_maxindex数组 */
158. 623 prio_tree_init();
159. 624 anon_vma_init();
160. 625 #ifdef CONFIG_X86
161. 626 if (efi_enabled)
162. 627 efi_enter_virtual_mode();
163. 628 #endif
164. /* 根据物理内存大小计算允许创建进程的数量 */
165. 629 fork_init(num_physpages);
166. /*
167. * proc_caches_init(),buffer_init(),
unnamed_dev_init(), key_init()
168. *
169. */
170. 630 proc_caches_init();
171. 631 buffer_init();
172. 632 unnamed_dev_init();
173. 633 key_init();
174. 634 security_init();
175. 635 vfs_caches_init(num_physpages);
176. 636 radix_tree_init();
177. 637 signals_init();
178. 638 /* rootfs populating might need page-writeback */
179. 639 page_writeback_init();
180. 640 #ifdef CONFIG_PROC_FS
181. 641 proc_root_init();
182. 642 #endif
183. 643 cpuset_init();
184. 644 taskstats_init_early();
185. 645 delayacct_init();
186. 646
187. /*
188. * 测试该CPU的各种缺陷,记录检测到的缺陷,以
便于内核的其他部分以后可以
189. * 使用它们的工作。
190. */
191. 647 check_bugs();
192. 648
193. 649 acpi_early_init(); /* before LAPIC and SMP init */
194. 650
195. 651 /* Do the rest non-__init'ed, we're now alive */
196. /* 创建init进程 */
197. 652 rest_init();
198. 653 }
4.2.2 reset_init函数
在start_kernel函数的最后调用了reset_init函数进行后续的初始化。
代码清单4.2 reset_init函数
1. 438 static void noinline __init_refok rest_init(void)
2. 439 __releases(kernel_lock)
3. 440 {
4. 441 int pid;
5. 442
6.          /* reset_init()函数最主要的历史使命就是
启动内核线程kernel_init */
7. 443 kernel_thread(kernel_init, NULL, CLONE_FS | CLONE_SIGHAND);
8. 444 numa_default_policy();
9.          /* 启动内核线程kthreadd,运行kthread_
create_list全局链表中的kthread */
10. 445 pid = kernel_thread(kthreadd, NULL, CLONE_FS | CLONE_FILES);
11. 446 kthreadd_task = find_task_by_pid(pid);
12. 447 unlock_kernel();
13. 448
14. 449 /*
15. 450 * The boot idle thread must execute schedule()
16. 451 * at least once to get things moving:
17. 452 */
18. /*
19. * 增加idle进程的need_resched标志, 并且调用schedule释放CPU,
20. * 将其赋给更应该获取CPU的进程。
21. */
22. 453 init_idle_bootup_task(current);
23. 454 preempt_enable_no_resched();
24. 455 schedule();
25. 456 preempt_disable();
26. 457
27. 458 /* Call into cpu_idle with preempt disabled */
28. /*
29.          * 进入idle循环以消耗空闲的CPU时间片, 该函数
从不返回。然而,当有实际工作
30. * 要处理时,该函数就会被抢占。
31. */
32. 459 cpu_idle();
33. 460 }
4.2.3 kernel_init函数
kernel_init函数将完成设备驱动程序的初始化,并调用init_post函数启动用户空间的init进程。
代码清单4.3 kernel_init函数
1. 813 static int __init kernel_init(void * unused)
2. 814 {
3. 815 lock_kernel();
4. 816 /*
5. 817 * init can run on any cpu.
6. 818 */
7. /* 修改进程的CPU亲和力 */
8. 819 set_cpus_allowed(current, CPU_MASK_ALL);
9. 820 /*
10. 821 * Tell the world that we're going to be the grim
11. 822 * reaper of innocent orphaned children.
12. 823 *
13. 824 * We don't want people to have to make incorrect
14. 825 * assumptions about where in the task array this
15. 826 * can be found.
16. 827 */
17. /* 把当前进程设为接受其他孤儿进程的进程 */
18. 828 init_pid_ns.child_reaper = current;
19. 829
20. 830 __set_special_pids(1, 1);
21. 831 cad_pid = task_pid(current);
22. 832
23. 833 smp_prepare_cpus(max_cpus);
24. 834
25. 835 do_pre_smp_initcalls();
26. 836
27. /* 激活SMP系统中其他CPU */
28. 837 smp_init();
29. 838 sched_init_smp();
30. 839
31. 840 cpuset_init_smp();
32. 841
33. /*
34.          * 此时与体系结构相关的部分已经初始化完成,
现在开始调用do_basic_setup函数
35.          * 初始化设备,完成外设及其驱动程序(直接编
译进内核的模块)的加载和初始化
36. */
37. 842 do_basic_setup();
38. 843
39. 844 /*
40. 845      * check if there is an early userspace
init.  If yes, let it do all
41. 846 * the work
42. 847 */
43. 848
44. 849 if (!ramdisk_execute_command)
45. 850 ramdisk_execute_command = "/init";
46. 851
47. 852     if (sys_access((const char __user *)
ramdisk_execute_command, 0) != 0) {
48. 853 ramdisk_execute_command = NULL;
49. 854 prepare_namespace();
50. 855 }
51. 856
52. 857 /*
53. 858 * Ok, we have completed the initial bootup, and
54. 859 * we're essentially up and running. Get rid of the
55. 860 * initmem segments and start the user-mode stuff.
56. 861 */
57. 862 init_post();
58. 863 return 0;
59. 864 }
4.2.4 init_post函数
到init_post函数为止,内核的初始化已经进入尾声,第一个用户空间进程init将姗姗来迟。
代码清单4.4 init_post函数
1. 774 static int noinline init_post(void)
2. 775 {
3. 776 free_initmem();
4. 777 unlock_kernel();
5. 778 mark_rodata_ro();
6. 779 system_state = SYSTEM_RUNNING;
7. 780 numa_default_policy();
8. 781
9.  782     if (sys_open((const char __user *) "/dev/
console", O_RDWR, 0) < 0)
10. 783         printk(KERN_WARNING "Warning: unable
to open an initial console.\n");
11. 784
12. 785 (void) sys_dup(0);
13. 786 (void) sys_dup(0);
14. 787
15. 788 if (ramdisk_execute_command) {
16. 789 run_init_process(ramdisk_execute_command);
17. 790 printk(KERN_WARNING "Failed to execute %s\n",
18. 791 ramdisk_execute_command);
19. 792 }
20. 793
21. 794 /*
22. 795 * We try each of these until one succeeds.
23. 796 *
24. 797 * The Bourne shell can be used instead of init if we are
25. 798 * trying to recover a really broken machine.
26. 799 */
27. 800 if (execute_command) {
28. 801 run_init_process(execute_command);
29. 802 printk(KERN_WARNING "Failed to execute %s. Attempting "
30. 803 "defaults...\n", execute_command);
31. 804 }
32. 805 run_init_process("/sbin/init");
33. 806 run_init_process("/etc/init");
34. 807 run_init_process("/bin/init");
35. 808 run_init_process("/bin/sh");
36. 809
37. 810 panic("No init found. Try passing init= option to kernel.");
38. 811 }
第776行,到此,内核初始化已经接近尾声了,所有的初始化函数都已经被调用,因此free_initmem函数可以舍弃内存的__init_begin至__init_end(包括.init.setup、.initcall.init等节)之间的数据。
所有使用__init标记过的函数和使用__initdata标记过的数据,在free_initmem函数执行后,都不能使用,它们曾经获得的内存现在可以重新用于其他目的。
第782行,如果可能,打开控制台设备,这样init进程就拥有一个控制台,并可以从中读取输入信息,也可以向其中写入信息。
实际上init进程除了打印错误信息以外,并不使用控制台,但是如果调用的是shell或者其他需要交互的进程,而不是init,那么就需要一个可以交互的输入源。如果成功执行open,/dev/console即成为init的标准输入源(文件描述符0)。
第785~786行,调用dup打开/dev/console文件描述符两次。这样,该控制台设备就也可以供标准输出和标准错误使用(文件描述符1和2)。假设第782行的open成功执行(正常情况),init进程现在就拥有3个文件描述符--标准输入、标准输出以及标准错误。
第788~804行,如果内核命令行中给出了到init进程的直接路径(或者别的可替代的程序),这里就试图执行init。
因为当kernel_execve函数成功执行目标程序时并不返回,只有失败时,才能执行相关的表达式。接下来的几行会在几个地方查找init,按照可能性由高到低的顺序依次是: /sbin/init,这是init标准的位置;/etc/init和/bin/init,两个可能的位置。
第805~807行,这些是init可能出现的所有地方。如果在这3个地方都没有发现init,也就无法找到它的同名者了,系统可能就此崩溃。因此,第808行会试图建立一个交互的shell(/bin/sh)来代替,希望root用户可以修复这种错误并重新启动机器。
第810行,由于某些原因,init甚至不能创建shell。当前面的所有情况都失败时,调用panic。这样内核就会试图同步磁盘,确保其状态一致。如果超过了内核选项中定义的时间,它也可能会重新启动机器。
4.3 init进程
当内核被引导并进行初始化之后,内核启动了自己的第一个用户空间应用程序,即init。这是调用的第一个使用标准C库编译的程序,其进程编号始终为1。
init负责触发其他必须的进程,以使系统进入整体可用的状态。init的这些工作根据/etc/inittab文件来完成,包括设置getty进程接受用户登录,设置键盘、字图,设置网络等。如果没有init触发这些进程,内核即使成功启动,也没有多大意义。
基于这种设计模式,init进程是系统中所有进程的起源,init进程产生getty进程,getty进程产生login进程,login进程又进而产生shell进程,然后我们使用shell,就可以产生每一个需要执行的进程。


 141
141

 被折叠的 条评论
为什么被折叠?
被折叠的 条评论
为什么被折叠?
 到【灌水乐园】发言


