


In this article I will cover steps and actions we took in order to ensure a seamless migration of our current SQL Database server to a new one. This will include a lot of recommendations and what issues we faced both in testing and real environment.
Prerequisites
Before starting with any actions make sure you have the following:
– Elevated rights, preferably Administrator that can allow you to stop services, reconfigure ODBC and make several file changes in protected paths.
– In case you do not master the SQL, yet, get a good DB admin to follow this: KB 7960893:
Recommendation: have an DNS alias name created of the current DB Server and start this procedure. When the new SQL DB is ready, just modify the alias name in DNS to point to the new SQL Server. This will give some leverage, in case something goes wrong with the new one, to revert back in short amount of time. (just a matter or changing the alias IP back to old server and restarting services)
-Master password for the SSO (admin@System-Domain). This is the initial password and even if you change it in the mean time you need the primary password to continue. If you do not have it or forgot it, than the only option is to re-install the vCenter Server completely.
– Server database user (ex :vpxuser) and password are a must, in order to reconfigure the ODBC DSN;
In case you do not have it, than the process just got a hell lot complicated and for the sake of space I will not cover this one here.
Modify the ODBC Data Source :
Note: As a recommendation: have a snapshot of your vCenter server before you start the changes.
a. Stop all vCenter Server related services.
In case you are in doubt just stop them all:
Note: Just make sure that the Single Sign-On Service is the last one to stop

b. Change vCenter database location:
From the ODBC connections replace the current SQL server with the new alias name. Select the name and click “Configure”; go through the wizard to complete the modification.
Note: launch the 64 bit version: C:\Windows\System32\odbcad32.exe

c. Change vCenter Update Manager database location:
From the ODBC32 connections replace the current SQL server with the new alias name. Select than name and click “Configure”; go through the wizard to complete the modification.
Note: now, open the 32 bit version C:\Windows\SysWOW64\odbcad32.exe

Note: Recommendation – always type the password for the vpxd user or the DB user that will connect to the database. In the test lab when the password was pasted on, a space was caught in there and the vCenter Server service failed to start; we had to re-configured the DSN by typing the password, instead
Change vCenter SSO Database location
– determine what database SSO is configured to use: open a cmd prompt with elevated rights and change run directory to C:\Program Files\VMware\Infrastructure\SSOServer\utils\ (this is the default location!)
– type and run:
ssocli manage-secrets -a listallkeys
When prompted, supply the master password. (and as mentioned before: know it and type it down):

– update the configuration using the command:
ssocli configure-riat -a configure-db --database-host NewDBAlias --database-port 1433 -m MasterPassword:
Note: go to “C:\Program Files\VMware\Infrastructure\SSOServer\webapps\ims\WEB-INF\classes” (this should be the default location!)
Open the jndi.properties file to see if the modification of the database configuration for the SSO server and verify the values which were supposed to be updated.
• com.rsa.db.hostname
• com.rsa.instanceName
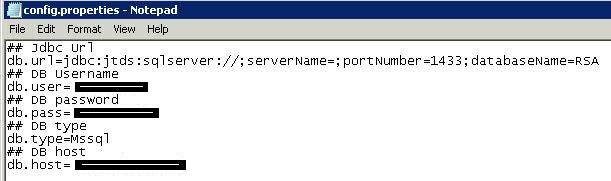
– on the server where SSO is installed, edit the file
C:\Program Files\VMware\Infrastructure\SSOServer\webapps\lookupservice\WEB-INF\classes\config.properties and check the following entry db.host = […] and modify it if needed:
Change vCenter WebServices DB location
Modify the Tomcat server settings for the vCenter Management Webservices that are not controlled through the ODBC/DSN connection:
– go to C:\ProgramData\VMware\VMware VirtualCenter\ (for Windows 2008) or C:\Documents and Settings\All Users\Application Data\ VMware\VMware VirtualCenter\ (for Windows 2003) and edit the file ”database_name.properties” (ex: vcdb.properties)
– modify the following entry to reflect the DB changes:
url=jdbc:sqlserver://NewDBAlias;databaseName\=database_name;integratedSecurity\=true
Note: It should be the only *.properties file in this directory.:

Restart the vCenter Server
If reboot is not an option than restarting the services will suffice in most of the cases.
Restart the services that you stopped
Note: Make sure that the Single Sign-On Service is started before starting the VMware vCenter Server service.
And here is a problem that we always faced: the vCenter Server service will not start in the first run so try to start it again and should work, as in most of the times but in case the service is stuck in “Starting” than it needs to be forcefully stopped like this:
- start elevated prompt and check the service’s process ID Number – “sc queryex vpxd“
- kill the process for the PID you’ve just identified – “taskkill /PID […]“
- the service will restart automatically and no need for manual restart.

Note: This should be normal behavior unless the default “Recovery” parameters of the service’s properties were modified.
Unpredicted issues:
I need to mention that this is not a complete “issue compilation” but the ones faced on testing environment.
Luckily, I learned from mistakes and on production all went smoothly.
1. vCenter Single Sign-On service fails. VMWare KB 2045528
2. vCenter Service fails VMWare KB 1006482
3. vCenter Single Sign-On fails to connect to a Microsoft SQL instance. VMWare KB 2039092
4. Update Manager fails with the error: database unavailable or has network problems. VMWare KB 1015223
5. VirtualCenter Management WebServices service fails. VMWare KB 2010958
I hope you find this useful and remember: spare no ink and let me know what you think!


 289
289

 被折叠的 条评论
为什么被折叠?
被折叠的 条评论
为什么被折叠?
 到【灌水乐园】发言


