


文章目录
官方文档:
https://router.vuejs.org/zh/installation.html
一、路由规则(基础)
所谓前端路由,即改变URL,但是页面不进行整体的刷新。实现方式主要有下面两种方式
1. URL的hash
URL 的 hash 也就是锚点 (#), 本质上是改变 window.location 的 href 属性。可以通过直接赋值 location.hash 来改变 href,但是页面不发生刷新
直接在浏览器的命令行测试:
> location.href
"http://localhost:8080"
> location.hash='/foo'
"/foo"
> location.href
"http://localhost:8080/#/foo"
查看 Network,可以看到页面并没有刷新
2. HTML5的history模式
history 接口是 HTML5 新增的, 它有五种模式改变 URL 而不刷新页面
-
history.pushState(data: any, title: string, url?: string | null)
可以理解为压栈,将新的 url 压入栈中,浏览器的 地址栏只显示栈中最上面的 url> location.href "http://localhost:8080/" > history.pushState({},'',"/app") undefined > location.href "http://localhost:8080/app" -
history.replaceState(data: any, title: string, url?: string | null)
不保留当前 url,直接替换。 -
history.go(delta?: number)
传入一个数字,正数表示向前跳转几次,负数表示向后跳转几次,> location.href "http://localhost:8080/" > history.pushState({},'',"/app") undefined > location.href "http://localhost:8080/app" > history.replaceState({},'','/demo') undefined > location.href "http://localhost:8080/demo" > history.go(-1) undefined > location.href "http://localhost:8080/" -
history.back()
等价于:history.go(-1) -
history.forward()
等价于:history.go(1)
二、安装与使用vue-router
1. 安装
在使用脚手架创建项目的时候直接添加 Router,也可以使用命令在项目中添加:
npm install vue-router --save
2. vue-router 使用步骤:
大体步骤:
- 导入路由对象,并且调用 Vue.use(VueRouter)
- 创建路由实例,并且传入路由映射配置
- 在Vue实例中挂载创建的路由实例
例子:
-
src/router/index.js:一般的,router 相关的配置信息,都放在src/router/index.js中import Vue from "vue" // 1. 导入 VueRouter 插件 import VueRouter from "vue-router"; // 2.通过 Vue.use(VueRouter),安装插件 Vue.use(VueRouter); // 3. 创建 VueRouter 对象并配置映射关系 const router = new VueRouter({ // 配置路由和组件之间的应用关系 routes: [ ] }) // 4. 将 router 对象传入到 Vue 实例中 export default router; -
main.js中import Vue from 'vue' import App from './App.vue' // 5. 导入,如果导入的是一个文件夹,会自动找到文件夹中 index.js 文件 import router from "./router"; Vue.config.productionTip = false new Vue({ // 6. 挂载创建的路由实例 router, render: h => h(App), }).$mount('#app')
3. 路由与组件映射
const router = new VueRouter({
  // 配置路由和组件之间的应用关系
  routes: [
    {
      // 路由的默认路径(指定刚进入页面时,选择哪个路由)
      path: '/',
      redirect: '/home'
    },
    {
      path: '/home',
      component: () => import("../components/Home")
    },
    {
      path: '/about',
      component: () => import("../components/About")
    }
  ]
})
4. 使用路由( router-link 和 router-view 标签)
<router-link> 与 <router-view> 标签都是 vue-router 中已经内置的组件。
-
<router-link>:用来改变地址栏中的地址-
to:用来指定路径,默认使用的是锚点。 -
tag:tag可以指定<router-link>之后渲染成什么组件,默认会被渲染成一个<a>标签 -
replace:使用该参数后不会留下 history 记录,所以指定 replace 的情况下,后退键返回不能返回到上一个页面中(可想而知,默认底层使用 history.pushState() 改变 url,加上 replace 后,就使用的是 history.replaceState() 来改变url )
-
active-class:当
<router-link>对应的路由匹配成功时, 会自动给当前元素设置一个router-link-active的 class,可以通过设置active-class来修改这个默认的 class 名称。(全部修改请查看第三章第2节)
-
-
<router-view>:该标签会根据当前的路径,动态渲染出不同的组件.网页的其他内容,比如顶部的标题/导航,或者底部的一些版权信息等会和
<router-view>处于同一个等级。在路由切换时,切换的是<router-view>挂载的组件,其他内容不会发生改变.key:标识当前组件,默认使用的是路由,当路由中存在参数时,可以使用全路径。(详见 八-1)
<template>
  <div id="app">
    <router-link to="/home">首页</router-link>
    <router-link to="/about" tag="li" replace>关于</router-link>

    <router-view></router-view>
	<!-- 使用全路径作为标识 -->
	<router-view :key="$route.fullPath"></router-view>
  </div>
</template>
5. 事件中使用路由($router)
可以不使用 <router-link> 而是直接使用按钮等其它标签,然后绑定事件,通过事件来改变 url:
<!-- push 与 replace 的区别就是会不会留下 history 记录 -->
<button @click="$router.push('/home')">Home</button>
<button @click="$router.replace('/about')">About</button>
vue 中通过 this 来访问 $router 属性
export default {
  name: 'App',
  method:{
    clickFunc() {
      this.$router.replace("/home");
    }
  }
}
- 注意:不要使用
history.pushState()、history.replaceState()等方法来直接修改 url,这样会绕过vue-router。
三、创建 VueRouter 对象时的其它配置
1. mode(指定路由模式)
默认情况下,路径的改变使用的 URL 的 hash。使用如下方式,在创建 VueRouter 对象时,更改 mode 属性,设置路由模式为 HTML5 的 History 模式
const router = new VueRouter({
  // 配置路由和组件之间的应用关系
  routes: [
  ],
  // 指定路由模式
  mode: 'history'
})
2. linkActiveClass(路由匹配成功时添加 class)
当 <router-link> 对应的路由匹配成功时, 会自动给当前元素设置一个 router-link-active 的 class。
一般在进行高亮显示的导航菜单或者底部 tabbar 时, 会使用到该类。但是通常不会修改类的属性, 会直接使用默认的 router-link-active 即可
也可以使用 linkActiveClass 来修改这个默认的 class。
const router = new VueRouter({
  // 配置路由和组件之间的应用关系
  routes: [
  ],
  // 指定路由模式
  linkActiveClass: "active"
})
四、传递参数($route)
1. 动态路由(params的类型)
要给 User 组件传入一个 ID,那么,我们可以在 vue-router 的路由路径中使用“动态路径参数”(dynamic segment) 来达到这个效果
一个“路径参数”使用冒号 : 标记。当匹配到一个路由时,参数值会被设置到 this.$route.params $route
-
$route:当前哪个路由处于活跃状态,拿到的就是哪个路由。即routes数组中对应的路由对象注意与
$router的区别,$router是指 new 出来的 VueRouter 对象,也就是下面的的常量router,而$route是VueRouter对象中的routers数组中的一个对象,即$router.routes[0]的路由是处于活跃状态时就是$route
- 在 vue-router 映射关系的 path 中,增加一个 idProp 参数,来接收上面传入的 id,这个参数传递进来后会保存在
$route.idProp中
const router = new VueRouter({
  // 配置路由和组件之间的应用关系
  routes: [
    {
      path: '/user/:idProp',
      component: () => import("../components/User")
    }
  ],
  mode: 'history'
})
- url 中加入的用户的 id 参数:
<!-- 使用 router-link 的方式 -->
<router-link :to="'/user/' + id" tag="button">用户</router-link>

<!-- 使用 JavsScript 的方式 -->
<button @click="$router.push('/user/' + id)">用户</button>
- 使用
$route.params获取到传入的 idProp 参数
<template>
  <div>
    <h3>这是直接获取的用户id:{{$route.params.idProp}}</h3>
    <li>这是从方法中获取的id:{{id2}}</li>
  </div>
</template>

<script>
  export default {
    name: "User",
    computed: {
      id2() {
        return this.$route.params.idProp;
      }
    }
  }
</script>
2. query的类型
配置路由格式:/router,也就是普通配置
传递的方式:直接传递对象,对象中用 path 来指定路由,用 query 对象来传递参数
传递后形成的路径:/router?id=123、/router?id=abc
-
传递参数:直接传递一个对象,对象的 path 用来指定路由,query 用来指定参数
<!-- 使用 router-link 的方式 --> <!-- 请求地址:http://localhost:8080/profile?name=%E6%9D%8E%E5%9B%9B&age=24&heigth=1.88 --> <router-link :to="{path: '/profile', query: {name: '张三', age: 34}}">张三档案</router-link> <!-- 使用 JavsScript 的方式 --> <button @click="$router.push({path: '/profile', query: {name: '李四', age : 24, heigth: 1.88}})">李四档案</button> -
接收参数:Profile.vue 中使用
$route.query来获取传入的query对象<template> <div> <li v-for="(val, key) in $route.query">{{key}}: {{val}}</li> </div> </template>
扩展:
- URL的完整路径各个部分的叫法,这也解释了上面为什么使用 query 来字义参数:
scheme:[//[user:password@]host[:port]][/]path[?query][#fragment]
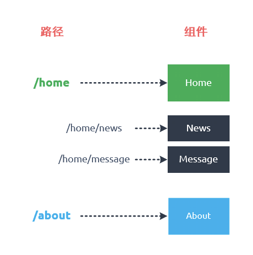
五、嵌套路由
嵌套路由是一个很常见的功能,比如在 home 页面中,我们希望通过 /home/news 或者 /home/message 访问一些内容。一个路径映射一个组件,访问这两个路径也会分别渲染两个组件。比如说,当访问 /home/news 时,先渲染 Home 组件,再在 Home 组件中渲染 News 组件。
路径和组件的关系如下:
实现嵌套路由主要是两个步骤:
- 创建对应的子组件,并且在路由映射的
children中配置对应的子路由.
export default new VueRouter({
  // 配置路由和组件之间的应用关系
  routes: [
    {
      path: '/home',
      component: () => import("../components/Home"),
      children:[
        {
          path: '',
          redirect: 'news'
        },
        {
          // 注意路径前的 /,加上表示绝对路径,不加表示相对路径
          // 下面的配置匹配的路径为:/home/news
          path: 'news',
          component: () => import("../components/HomeNews")
        },
        {
          path: 'messages',
          component: () => import("../components/HomeMessages")
        }
      ]
    }
  ]
})
- 在组件内部使用
<router-view>标签.
<template>
  <div>
    <h2>我是Home</h2>
    <p>我是Home的内容</p>

    <button @click="$router.replace('/home/news')">首页新闻</button>
    <button @click="$router.replace('/home/messages')">首页消息</button>
    <router-view></router-view>
  </div>
</template>
六、导航守卫
vue-router 提供的导航守卫主要用来监听路由的进入和离开的。导航守卫这块官网也说的比较清楚了,这块直接看官网就好(官方网址:戳这里)
这里就给全局守卫举个例子,其它的用法也基本相同。
全局前置守卫
vue-router 提供了 beforeEach 和 afterEach 的全局钩子函数,它们会在路由即将改变前和改变后触发。
使用 router.beforeEach 注册一个全局前置守卫:
const router = new VueRouter({ ... })

router.beforeEach((to, from, next) => {
  // ...
  next();
})
当一个导航触发时,全局前置守卫按照创建顺序调用。守卫是异步解析执行,此时导航在所有守卫 resolve 完之前一直处于 等待中。
每个守卫方法接收三个参数:
-
to: Route: 即将要进入的目标 路由对象 -
from: Route: 当前导航正要离开的路由 -
next: Function: 一定要调用该方法来 resolve 这个钩子。执行效果依赖 next 方法的调用参数。-
next(): 进行管道中的下一个钩子。如果全部钩子执行完了,则导航的状态就是 confirmed (确认的)。 -
next(false): 中断当前的导航。如果浏览器的 URL 改变了 (可能是用户手动或者浏览器后退按钮),那么 URL 地址会重置到 from 路由对应的地址。 -
next('/')或者next({ path: '/' }): 跳转到一个不同的地址。当前的导航被中断,然后进行一个新的导航。你可以向 next 传递任意位置对象,且允许设置诸如 replace: true、name: ‘home’ 之类的选项以及任何用在 router-link 的 to prop 或 router.push 中的选项。 -
next(error): (2.4.0+) 如果传入 next 的参数是一个 Error 实例,则导航会被终止且该错误会被传递给 router.onError() 注册过的回调。
-
-
举个小例子:
const router = new VueRouter({
  routes: [
    {
      path: '/home',
      component: () => import("../components/Home"),
      // 使用 meta 属性来添加数据
      meta: {
        title: '首页'
      }
    },
    {
      path: '/about',
      component: () => import("../components/About"),
      meta: {
        title: '关于'
      },
    }
  ],
  mode: 'history'
})

router.beforeEach((to, from, next) => {
  // 路由改变时,修改标题
  document.title = to.meta.title;

  // 如果是子组件的话,要这么取 meta 中的值:(to.matched是个数组,包含所有子组件)
  document.title = to.matched[0].meta.title;
  next();
});
七、路由懒加载
当打包构建应用时,JavaScript 包会变得非常大,影响页面加载。
路由懒加载的主要作用就是将路由对应的组件打包成一个个的 js 代码块。只有在这个路由被访问到的时候,才加载对应的组件。
结合 Vue 的异步组件和 Webpack 的代码分割功能,轻松实现路由组件的懒加载(之前的案例都是这种写法,这里就是再说明一下):
const router = new VueRouter({
  // 配置路由和组件之间的应用关系
  routes: [
    {
      path: '/home',
      // 下面的写法就是路由懒加载写法
      component: () => import("../components/Home")
    },
    {
      path: '/about',
      component: () => import("../components/About")
    }
  ]
})
八、遇到的问题
1. 多路由共用同一组件,相互干扰问题
-
问题描述:一个组件,要根据传入的参数不同,显示不同的数据,同时这个组件的状态还要保留(
<keep-alive>)。这个时候就出现了一个问题,当一个组件的数据改变时,其它组件的数据也会跟着改。 -
解决办法:
<router-view :key="$route.fullPath"/>


 277
277


 被折叠的 条评论
为什么被折叠?
被折叠的 条评论
为什么被折叠?
 到【灌水乐园】发言


