


MyBatis的逆向工程
- 正向工程:先创建Java实体类,由框架负责根据实体类生成数据库表。Hibernate是支持正向工程的
- 逆向工程:先创建数据库表,由框架负责根据数据库表,反向生成如下资源:
- Java实体类
- Mapper接口
- Mapper映射文件
创建逆向工程的步骤
添加依赖和插件
<dependencies>
    <!-- MyBatis核心依赖包 -->
    <dependency>
        <groupId>org.mybatis</groupId>
        <artifactId>mybatis</artifactId>
        <version>3.5.9</version>
    </dependency>
    <!-- junit测试 -->
    <dependency>
        <groupId>junit</groupId>
        <artifactId>junit</artifactId>
        <version>4.13.2</version>
        <scope>test</scope>
    </dependency>
    <!-- MySQL驱动 -->
    <dependency>
        <groupId>mysql</groupId>
        <artifactId>mysql-connector-java</artifactId>
        <version>8.0.27</version>
    </dependency>
    <!-- log4j日志 -->
    <dependency>
        <groupId>log4j</groupId>
        <artifactId>log4j</artifactId>
        <version>1.2.17</version>
    </dependency>
    <!-- log4j日志 -->
    <dependency>
        <groupId>log4j</groupId>
        <artifactId>log4j</artifactId>
        <version>1.2.17</version>
    </dependency>
</dependencies>
<!-- 控制Maven在构建过程中相关配置 -->
<build>
    <!-- 构建过程中用到的插件 -->
    <plugins>
        <!-- 具体插件,逆向工程的操作是以构建过程中插件形式出现的 -->
        <plugin>
            <groupId>org.mybatis.generator</groupId>
            <artifactId>mybatis-generator-maven-plugin</artifactId>
            <version>1.3.0</version>
            <!-- 插件的依赖 -->
            <dependencies>
                <!-- 逆向工程的核心依赖 -->
                <dependency>
                    <groupId>org.mybatis.generator</groupId>
                    <artifactId>mybatis-generator-core</artifactId>
                    <version>1.3.2</version>
                </dependency>
                <!-- 数据库连接池 -->
                <dependency>
                    <groupId>com.mchange</groupId>
                    <artifactId>c3p0</artifactId>
                    <version>0.9.2</version>
                </dependency>
                <!-- MySQL驱动 -->
                <dependency>
                    <groupId>mysql</groupId>
                    <artifactId>mysql-connector-java</artifactId>
                    <version>8.0.27</version>
                </dependency>
            </dependencies>
        </plugin>
    </plugins>
</build>
创建MyBatis的核心配置文件
mybatis-config
<?xml version="1.0" encoding="UTF-8" ?>
<!DOCTYPE configuration
        PUBLIC "-//mybatis.org//DTD Config 3.0//EN"
        "http://mybatis.org/dtd/mybatis-3-config.dtd">
<configuration>

    <properties resource="jdbc.properties"></properties>

    <typeAliases>
        <package name="com.study.mybatis.pojo"/>
    </typeAliases>

    <environments default="development">
        <environment id="development">
            <transactionManager type="JDBC"/>
            <dataSource type="POOLED">
                <property name="driver" value="${jdbc.driver}"/>
                <property name="url" value="${jdbc.url}"/>
                <property name="username" value="${jdbc.username}"/>
                <property name="password" value="${jdbc.password}"/>
            </dataSource>
        </environment>
    </environments>

    <mappers>
        <package name="com.study.mybatis.mapper"/>
    </mappers>
</configuration>
创建逆向工程的配置文件
- 文件名必须是:
generatorConfig.xml
<?xml version="1.0" encoding="UTF-8"?>
<!DOCTYPE generatorConfiguration
        PUBLIC "-//mybatis.org//DTD MyBatis Generator Configuration 1.0//EN"
        "http://mybatis.org/dtd/mybatis-generator-config_1_0.dtd">
<generatorConfiguration>
    <!--
    targetRuntime: 执行生成的逆向工程的版本
    MyBatis3Simple: 生成基本的CRUD(清新简洁版)
    MyBatis3: 生成带条件的CRUD(奢华尊享版)
    -->
    <context id="DB2Tables" targetRuntime="MyBatis3Simple">
        <!-- 数据库的连接信息 -->
        <jdbcConnection driverClass="com.mysql.cj.jdbc.Driver"
                        connectionURL="jdbc:mysql://localhost:3306/mybatis"
                        userId="root"
                        password="123456">
        </jdbcConnection>
        <!-- javaBean的生成策略-->
        <!--生成到 targetProject 下的 targetPackage目录下-->
        <javaModelGenerator targetPackage="com.study.mybatis.pojo" targetProject=".\src\main\java">
            <!--开启使用子包,如果不开启targetPackage属性就会为包的名字-->
            <property name="enableSubPackages" value="true" />
            <!--去掉字段前后的空格-->
            <property name="trimStrings" value="true" />
        </javaModelGenerator>
        <!-- SQL映射文件的生成策略 -->
        <!--SQL映射文件在 targetProject下的targetPackage目录下-->
        <sqlMapGenerator targetPackage="com.study.mybatis.mapper"
                         targetProject=".\src\main\resources">
            <property name="enableSubPackages" value="true" />
        </sqlMapGenerator>
        <!-- Mapper接口的生成策略 -->
        <!--注意:这里的targetPackage属性要与SQL映射文件生成策略要相同-->
        <javaClientGenerator type="XMLMAPPER"
                             targetPackage="com.study.mybatis.mapper" targetProject=".\src\main\java">
            <property name="enableSubPackages" value="true" />
        </javaClientGenerator>
        <!-- 逆向分析的表 -->
        <!-- tableName设置为*号,可以对应所有表,此时不写domainObjectName -->
        <!-- domainObjectName属性指定生成出来的实体类的类名 -->
        <!--
            tableName:为表名
            domainObjectName:为实体类的名
        -->
        <table tableName="t_emp" domainObjectName="Emp"/>
        <table tableName="t_dept" domainObjectName="Dept"/>
    </context>
</generatorConfiguration>
执行MBG插件的generate目标
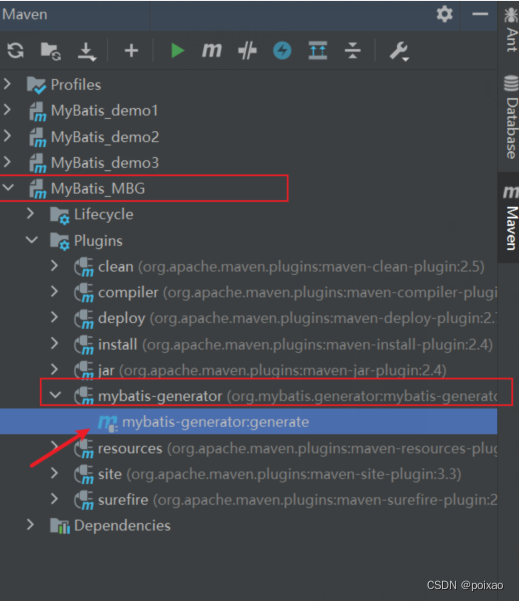
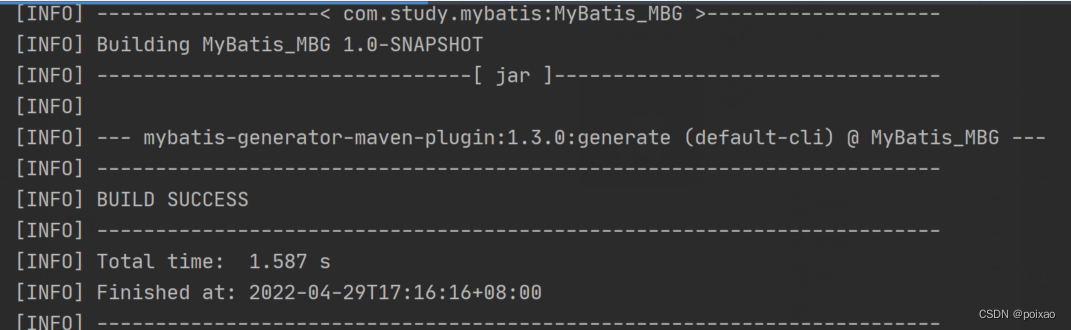
执行结果
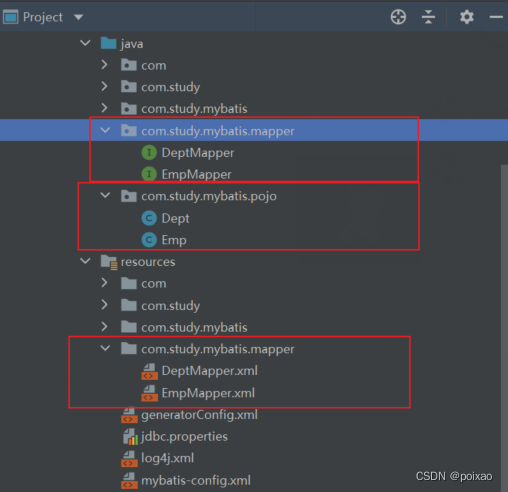
目录都会自动生成,mapper中有基本的增删改查功能
QBC
generatorConfig.xml
<context id="DB2Tables" targetRuntime="MyBatis3">
MyBatis3自动生成的方法
注意事项:
- 带Example 都是根据条件进行操作
- 带Selective 都是选择性进行操作
- 选择性插入与其他插入的区别在于
- 其他插入如果插入值为null,那么会将字段的值设置为null
- 选择性插入如果插入值为null,那么就不会为字段的值赋值
- 选择性更新和其他更新的区别
- 其他更新如果更新值为null,那么会将字段的值设置为null
- 选择性更新更新如果更新值为null,那么就不会为字段的值赋值
EmpExample example: 条件对象
Integer eid:对应主键
Emp record:对应实体类对象
| 方法 | 作用 |
|---|---|
------------------------计数--------------------------- | --------------------------------------------------- |
| int countByExample(EmpExample example); | 根据条件计数 |
------------------------删除--------------------------- | --------------------------------------------------- |
| int deleteByExample(EmpExample example); | 根据条件删除 |
| int deleteByPrimaryKey(Integer eid); | 根据主键删除 |
------------------------插入--------------------------- | --------------------------------------------------- |
| int insert(Emp record); | 插入 |
| int insertSelective(Emp record); | 选择性插入 |
------------------------查询--------------------------- | --------------------------------------------------- |
List<Emp> selectByExample(EmpExample example); | 根据条件查询 |
| Emp selectByPrimaryKey(Integer eid); | 根据主键查询 |
------------------------更新--------------------------- | --------------------------------------------------- |
| int updateByExampleSelective( @Param(“record”) Emp record, @Param(“example”) EmpExample example); | 选择性根据条件更新 |
| int updateByExample( @Param(“record”) Emp record, @Param(“example”) EmpExample example); | 根据条件更新 |
| int updateByPrimaryKeySelective(Emp record); | 选择性根据主键更新 |
| int updateByPrimaryKey(Emp record); | 根据主键更新 |
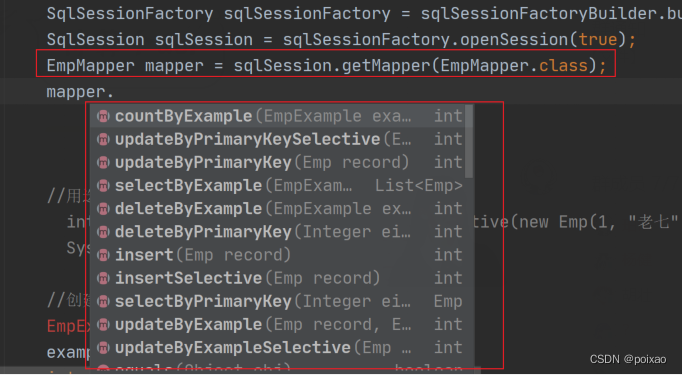
使用流程:同样是通过mapper接口的.class对象得到实现类,然后调用相应的方法
使用条件进行操作
- 使用
实体类对应的example对象的createCriteria()方法创建条件 - 属性条件姓名规律:
and+属性名+判断操作- 如: andEmpNameEqualTo(“张三”): 查找EmpName属性值为张三的数据
- 多个条件为可以往后连接,都为and关系
- 如果多个条件为
or关系,那么使用example.or()后面跟条件即可
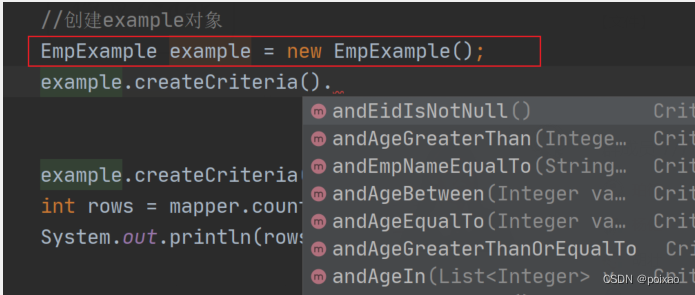
//创建example对象
EmpExample example = new EmpExample();
//判断条件为:empName为"张三"并且eid为空 或者 age大于20的数据
example.createCriteria().andEmpNameEqualTo("张三").andEidIsNotNull();
example.or().andAgeGreaterThan(20);
//查找此条件的数据
List<Emp> emps = mapper.selectByExample(example);
根据条件查询
@Test
public void testMBG() throws IOException {
    InputStream is = Resources.getResourceAsStream("mybatis-config.xml");
    SqlSessionFactoryBuilder sqlSessionFactoryBuilder = new SqlSessionFactoryBuilder();
    SqlSessionFactory sqlSessionFactory = sqlSessionFactoryBuilder.build(is);
    SqlSession sqlSession = sqlSessionFactory.openSession(true);
    EmpMapper mapper = sqlSession.getMapper(EmpMapper.class);

    //创建example对象
    EmpExample example = new EmpExample();
    /*
        1、使用example对象的createCriteria()方法创建条件
        2、属性条件姓名规律:and+属性名+判断操作
          - 如: andEmpNameEqualTo("张三"): 查找EmpName属性值为张三的数据
          - 多个条件为可以往后连接,都为and关系
        3、如果多个条件为 or 关系,那么使用example.or()后面跟条件即可
     */
    example.createCriteria().andEmpNameEqualTo("张三").andEidIsNotNull();
    example.or().andAgeGreaterThan(20);
    List<Emp> emps = mapper.selectByExample(example);
    emps.forEach(emp -> System.out.println(emp));
}
DEBUG 04-29 18:25:43,188 ==> Preparing: select eid, emp_name, age, sex, email, did
from t_emp WHERE ( emp_name = ? and eid is not null ) or( age > ? )(BaseJdbcLogger.java:137)
查询所有
//查询所有员工
List<Emp> emps1 = mapper.selectByExample(null);
emps1.forEach(emp -> System.out.println(emp));
选择性修改与其他修改

//用选择性修改 主键为1的用户
int rows = mapper.updateByPrimaryKeySelective(new Emp(1, "老七", null, null, null, null));
System.out.println("改变的行数: " + rows);
可以发现更新的值为null的字段并不会写入到数据库中


 9343
9343


 被折叠的 条评论
为什么被折叠?
被折叠的 条评论
为什么被折叠?
 到【灌水乐园】发言


