


1、在IDE中创建java项目(比较简单不再演示)
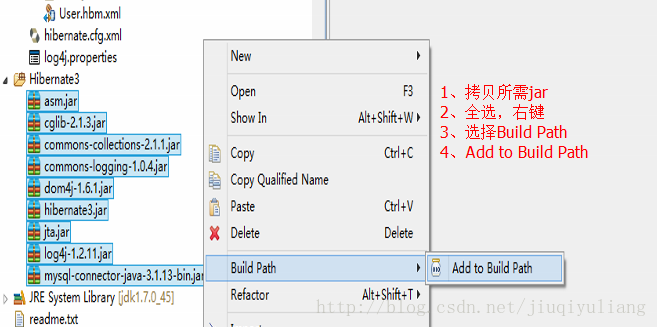
2、创建source folder,命名为Hibernate3,在Hibernate下载文件中找到我们所需要的三个配置文件和所有jar包,拷贝所需jar文件,构建依赖包
3、提供hibernate.cfg.xml文件,完成基本配置
4、写代码
(1)建立实体类User.java
(2)提供User.hbm.xml文件,完成实体类映射
(3)将User.hbm.xml文件加入到hibernate.cfg.xml文件中
(4)编写工具类ExportDB.java,将hbm生成ddl,也就是hbm2ddl
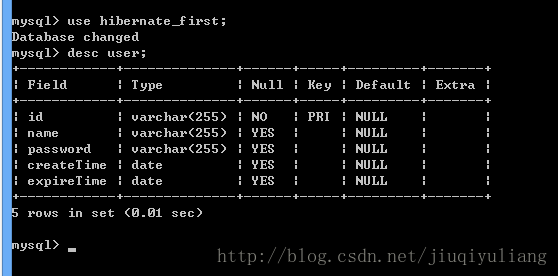
测试之前,要提前建立数据库hibernate_first,测试如下:
控制台打印的SQL语句:
数据库表结构:
(5)建立客户端类Client,添加用户数据到mySQL
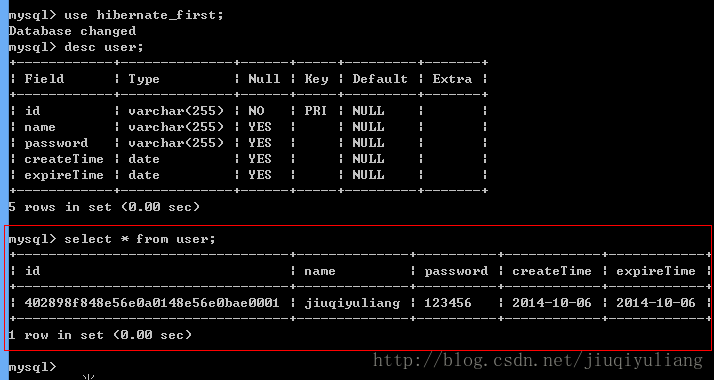
右键debug运行,测试完成之后,我们查询一下测试结果:
5、为了在调试过程中能观察到Hibernate的日志输出,最好加入log4j.properties配置文件、在CLASSPATH中新建log4j.properties配置文件或将该配置文件拷贝到src下,便于程序调试。
内容如下:
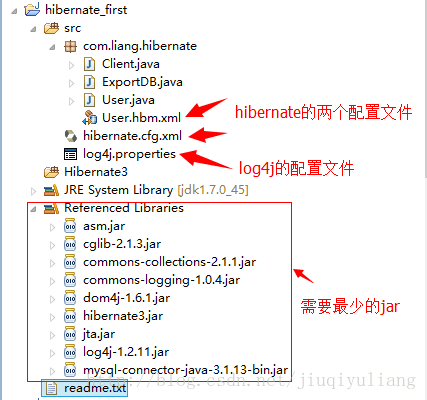
配置完成后,项目结构如下图所示:
五、最后
自己动手丰衣足食,实践出真理,纸上得来终觉浅,绝知此事要躬行。虽然这个实例非常简单,但是我们踏进了持久层框架的大门。
从上面的简单实例可以看到,我们只是使用Hibernate对User这一个实体进行了映射,比较简单,但是完全不符合实际。如何像关系型数据库一样表示多种关联关系,例如:一对一,一对多,多对多等等,我们还需要深入。下篇博文,我们介绍Hibernate的基本映射原理以及关联关系映射。
1、在IDE中创建java项目(比较简单不再演示)
2、创建source folder,命名为Hibernate3,在Hibernate下载文件中找到我们所需要的三个配置文件和所有jar包,拷贝所需jar文件,构建依赖包
3、提供hibernate.cfg.xml文件,完成基本配置
4、写代码
(1)建立实体类User.java
(2)提供User.hbm.xml文件,完成实体类映射
(3)将User.hbm.xml文件加入到hibernate.cfg.xml文件中
(4)编写工具类ExportDB.java,将hbm生成ddl,也就是hbm2ddl
测试之前,要提前建立数据库hibernate_first,测试如下:
控制台打印的SQL语句:
数据库表结构:
(5)建立客户端类Client,添加用户数据到mySQL
右键debug运行,测试完成之后,我们查询一下测试结果:
5、为了在调试过程中能观察到Hibernate的日志输出,最好加入log4j.properties配置文件、在CLASSPATH中新建log4j.properties配置文件或将该配置文件拷贝到src下,便于程序调试。
内容如下:
配置完成后,项目结构如下图所示:
五、最后
自己动手丰衣足食,实践出真理,纸上得来终觉浅,绝知此事要躬行。虽然这个实例非常简单,但是我们踏进了持久层框架的大门。
从上面的简单实例可以看到,我们只是使用Hibernate对User这一个实体进行了映射,比较简单,但是完全不符合实际。如何像关系型数据库一样表示多种关联关系,例如:一对一,一对多,多对多等等,我们还需要深入。下篇博文,我们介绍Hibernate的基本映射原理以及关联关系映射。


 4181
4181

 被折叠的 条评论
为什么被折叠?
被折叠的 条评论
为什么被折叠?
 到【灌水乐园】发言


