


如果之前你折腾过 ReactNative, 那么跑起来的效果就是几行文字.
今天给大家展示一下在官方 start 的例子基础之上展示不一样的效果.
声明
1.ReactNative 版本是0.32.0
2.React 版本是15.3.0
下面跟大家分享如何展示 RN 自带的按钮组件.
后面会陆续给大家分享如何自定义按钮以及如何处理事件的传递等.
UI 效果图如下:
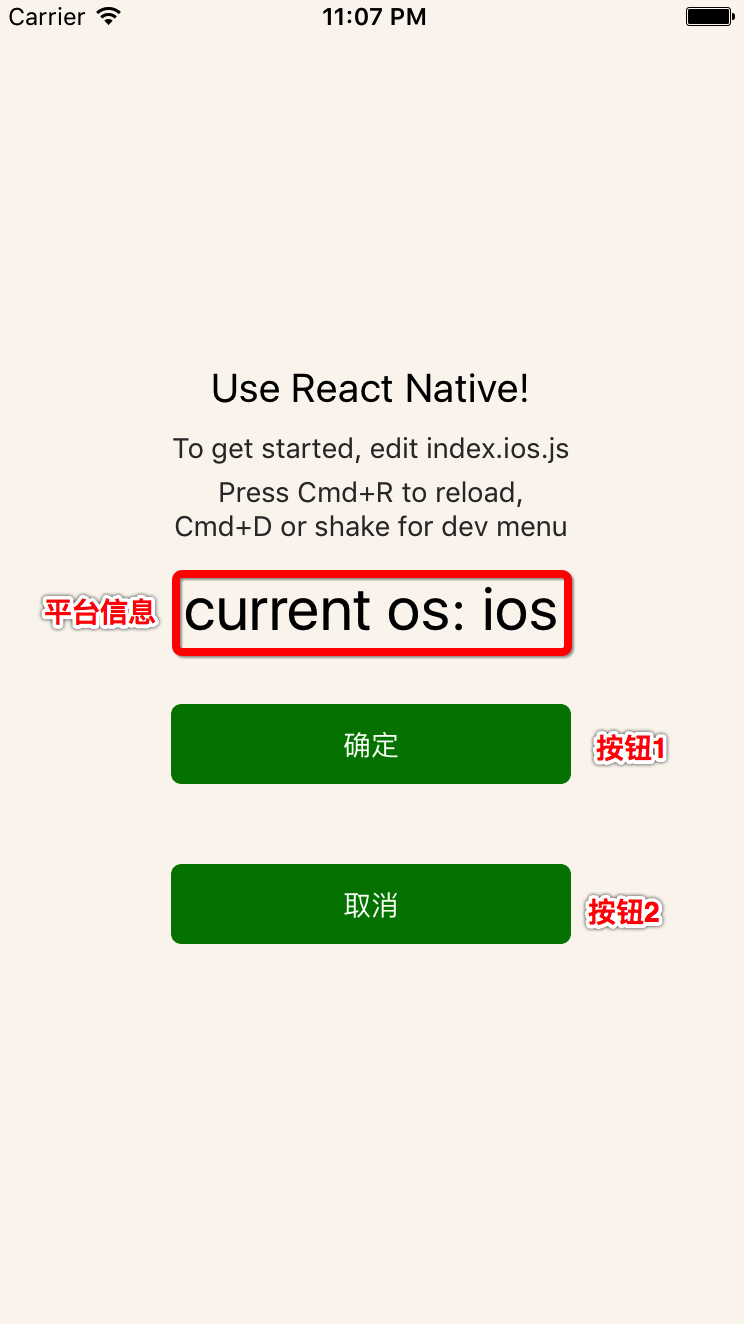
其中, 按钮1, 是TouchableOpacity
按钮2, 是TouchableHighlight, 自带按下效果.
index.ios.js
 * MZRNTutorial React Native App
 *
 * https://github.com/facebook/react-native
 */

import React, { Component } from 'react';

import {
  AppRegistry,
  StyleSheet,
  Text,
  View,
  Platform,/* 平台信息 */
  TouchableOpacity,
  TouchableHighlight
} from 'react-native';

class MZRNTutorial extends Component {

  /* 构造函数 */
  constructor(props)
  {
      super(props);
      this.state={status:1};
  }

  /* 按钮点击事件 */
  customPressHandler = () => {
      alert('当前状态: ' + this.state.status);

      this.state.status += 1;
  }

  render() {
    console.log('render ...');

    return (
      <View style={styles.container}>
        <Text style={styles.welcome}>
          Use React Native!
        </Text>
        <Text style={styles.instructions}>
          To get started, edit index.ios.js
        </Text>
        <Text style={styles.instructions}>
          Press Cmd+R to reload,{'\n'}
          Cmd+D or shake for dev menu
        </Text>

        {/* 显示当前平台信息*/}
        <Text style={styles.platformInfo}>
            current os: {Platform.OS}
        </Text>

        {/* 添加按钮1*/}
        <TouchableOpacity
            style={styles.button}
            onPress={this.customPressHandler}
            >
            <Text style={styles.buttonText}>确定</Text>
        </TouchableOpacity>

         {/* 添加按钮2*/}
        <TouchableHighlight
            style={styles.button}
            onPress={this.customPressHandler}
            >
            <Text style={styles.buttonText}>取消</Text>
        </TouchableHighlight>

    </View>
    );
  }
}

const styles = StyleSheet.create({
  button: {
    height: 40,
    width: 200,
    borderRadius: 5,
    justifyContent: 'center',
    backgroundColor: 'green',
    overflow: 'hidden',
    margin: 20
  },
  buttonText: {
    textAlign: 'center',
    color: 'white'
  },
  container: {
    flex: 1,
    justifyContent: 'center',
    alignItems: 'center',
    backgroundColor: '#FAF5F0',
  },
  welcome: {
    fontSize: 20,
    textAlign: 'center',
    margin: 10,
  },
 platformInfo: {
    fontSize: 30,
    textAlign: 'center',
    margin: 10,
  },

  instructions: {
    textAlign: 'center',
    color: '#333333',
    marginBottom: 5,
  },
  flowRight: {
   flexDirection: 'row',
   alignItems: 'center',
   alignSelf: 'stretch'
 },

});

AppRegistry.registerComponent('MZRNTutorial', () => MZRNTutorial);
AppDelegate.m
 * Copyright (c) 2015-present, Facebook, Inc.
 * All rights reserved.
 *
 * This source code is licensed under the BSD-style license found in the
 * LICENSE file in the root directory of this source tree. An additional grant
 * of patent rights can be found in the PATENTS file in the same directory.
 */

#import "AppDelegate.h"
#import "IDSRNConfig.h"
#import "RCTRootView.h"

@implementation AppDelegate

- (BOOL)application:(UIApplication *)application didFinishLaunchingWithOptions:(NSDictionary *)launchOptions
{
  NSURL *jsCodeLocation;

  /**
   * Loading JavaScript code - uncomment the one you want.
   *
   * OPTION 1
   * Load from development server. Start the server from the repository root:
   *
   * $ npm start
   *
   * To run on device, change `localhost` to the IP address of your computer
   * (you can get this by typing `ifconfig` into the terminal and selecting the
   * `inet` value under `en0:`) and make sure your computer and iOS device are
   * on the same Wi-Fi network.
   */

  //kLocalHostIP 是我本机 ip 定义的宏
  NSString *urlStr = [NSString stringWithFormat:@"http://%@:8081/index.ios.bundle?platform=ios&dev=true", kLocalHostIP];
  jsCodeLocation = [NSURL URLWithString:urlStr];

  /**
   * OPTION 2
   * Load from pre-bundled file on disk. The static bundle is automatically
   * generated by the "Bundle React Native code and images" build step when
   * running the project on an actual device or running the project on the
   * simulator in the "Release" build configuration.
   */

  //jsCodeLocation = [[NSBundle mainBundle] URLForResource:@"main" withExtension:@"jsbundle"];

  RCTRootView *rootView = [[RCTRootView alloc] initWithBundleURL:jsCodeLocation
                                                      moduleName:@"MZRNTutorial"
                                               initialProperties:nil
                                                   launchOptions:launchOptions];
  rootView.backgroundColor = [[UIColor alloc] initWithRed:1.0f green:1.0f blue:1.0f alpha:1];

  self.window = [[UIWindow alloc] initWithFrame:[UIScreen mainScreen].bounds];
  UIViewController *rootViewController = [UIViewController new];
  rootViewController.view = rootView;
  self.window.rootViewController = rootViewController;
  [self.window makeKeyAndVisible];

  return YES;
}

@end
代码注释很清楚, 自行翻阅.
可以修改样式或者其他代码, 点开模拟器, command+R 重新 load 即可看到效果.
这里有几点跟大家声明一下:
1.关闭 Bitcode
2.关闭 https 限制
3.修改 localhost 为本机 ip 地址.
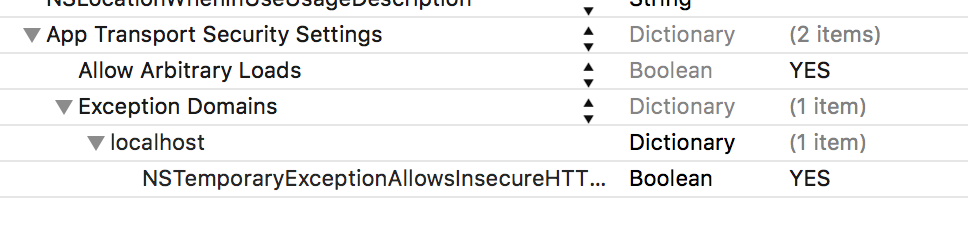
其中关闭 Https 限制, 可以更改 info.plist 文件
另外, 我的 js 代码编辑是在 atom (配合 nuclide插件) 完成的.


 1442
1442

 被折叠的 条评论
为什么被折叠?
被折叠的 条评论
为什么被折叠?
 到【灌水乐园】发言


