


1. 前言
BitMap(位图)作为Android的所有图片在内存中的抽象,使用频率很高。就对象的内存占用而言,BitMap对象是所有Java对象中最应该关注的。就我的有限的开发经历来讲,遇到的问题包括:
² ImageView加载大图片不显示,或者报错
² ListView显示多个图片,滑动过程中内存溢出,导致崩溃
² GridView显示多个图片,有些图片不能显示
² ……
所以,本文总结了BitMap优化策略的一些最佳实践。
2. 官方指南
在Android 6.0的官方开发平台上,有5节是专门来讲BitMap优化的,地址为【http://developer.android.com/reference/android/graphics/Bitmap.html】,我将这5节内容专门Copy到了Word文档,地址在【http://download.csdn.net/detail/brillianteagle/9415769】,也有人不厌其烦,将其翻译成了中文,地址【http://blog.csdn.net/ohehehou/article/details/40476779】
。下面分别介绍这5节内容,也包含了我对于这5节的思考。
2.1LoadingLarge Bitmaps Efficiently
这一节主要讲解如何有效加载大图片。对于图片来讲,可以先读取图片的尺寸信息(BitmapFactory.Options),而不必直接加载图片。
BitmapFactory.Options options = new BitmapFactory.Options();
options.inJustDecodeBounds = true;//这个属性保证了仅仅解析尺寸类型,而不必加载图片
BitmapFactory.decodeResource(getResources(), R.id.myimage, options);
int imageHeight = options.outHeight;
int imageWidth = options.outWidth;
String imageType = options.outMimeType;
根据尺寸信息来对图像进行一次预判。如果是大图片,则可以根据实际需要的图片尺寸,计算其真实的压缩比率。
public static Bitmap decodeSampledBitmapFromResource(Resources res, int resId,
        int reqWidth, int reqHeight) {

    // First decode with inJustDecodeBounds=true to check dimensions
    final BitmapFactory.Options options = new BitmapFactory.Options();
    options.inJustDecodeBounds = true;
    BitmapFactory.decodeResource(res, resId, options);

    // Calculate inSampleSize
    options.inSampleSize = calculateInSampleSize(options, reqWidth, reqHeight);

    // Decode bitmap with inSampleSize set
    options.inJustDecodeBounds = false;
    return BitmapFactory.decodeResource(res, resId, options);
}
最后,加载大图片的方式为:
public static Bitmap decodeSampledBitmapFromResource(Resources res, int resId,
        int reqWidth, int reqHeight) {

    // First decode with inJustDecodeBounds=true to check dimensions
    final BitmapFactory.Options options = new BitmapFactory.Options();
    options.inJustDecodeBounds = true;
    BitmapFactory.decodeResource(res, resId, options);

    // Calculate inSampleSize
    options.inSampleSize = calculateInSampleSize(options, reqWidth, reqHeight);

    // Decode bitmap with inSampleSize set
    options.inJustDecodeBounds = false;
    return BitmapFactory.decodeResource(res, resId, options);
}
【我的思考】这里可以只根据长或宽进行缩放因子的计算,这样就保证了图片的长宽比。
2.2 Processing Bitmaps Off the UI Thread
这一节讲了利用在后台线程解析BitMap然后加载到UI中,这是大图片、在线下载图片等需要耗时操作等情景的标准方案。
后台线程机制采用的异步线程类AsyncTask,它特别适合“后台耗时处理,然后通知UI线程”的模式,较“Thread+Handler”的代码稍微简洁一些。
这里采用了WeakReference类来封装待加载BitMap的ImageView类。对于GridView和ListView,不在可视区域的ImageView极有可能被GC回收,为了保证这一优化机制,所以必须在线程中用弱引用。如果ImageView在某个时刻划入可视区域,后台线程开始解析Bitmap,等到解析结束后极有可能ImageView已经划出了可视区域,且被回收,这样就不必加载该图片了。
class BitmapWorkerTask extends AsyncTask<Integer, Void, Bitmap> {
    private final WeakReference<ImageView> imageViewReference;//弱引用
    private int data = 0;

    public BitmapWorkerTask(ImageView imageView) {
        // Use a WeakReference to ensure the ImageView can be garbage collected
        imageViewReference = new WeakReference<ImageView>(imageView);//获得弱引用
    }

    // Decode image in background.
    @Override
    protected Bitmap doInBackground(Integer... params) {//后台进行解析
        data = params[0];
        return decodeSampledBitmapFromResource(getResources(), data, 100, 100));
    }

    // Once complete, see if ImageView is still around and set bitmap.
    @Override
    protected void onPostExecute(Bitmap bitmap) {//
        if (imageViewReference != null && bitmap != null) {//结束后查询引用是否还在
            final ImageView imageView = imageViewReference.get();
            if (imageView != null) {
                imageView.setImageBitmap(bitmap);
            }
        }
    }
}
上面这种方法有个缺陷。上面的逻辑是,如果ImageView被GC回收了,它对应的后台线程仍然在解析图片,等到图片解析完毕后,再通知UI层时时判断ImageView是否有效。而更有效率的逻辑是,一旦ImageView被GC回收,它对应的后台线程就立马取消掉。如何实现呢?这里有一个重要的技巧,就是把每个ImageView对应的后台线程封装到BitmapDrawable中,将此BitmapDrawable对象再添加到ImageView中。即:
static class AsyncDrawable extends BitmapDrawable {//将异步任务封装到BitmapDrawable中
    private final WeakReference<BitmapWorkerTask> bitmapWorkerTaskReference;

    public AsyncDrawable(Resources res, Bitmap bitmap,
            BitmapWorkerTask bitmapWorkerTask) {
        super(res, bitmap);
        bitmapWorkerTaskReference =
            new WeakReference<BitmapWorkerTask>(bitmapWorkerTask);
    }

    public BitmapWorkerTask getBitmapWorkerTask() {
        return bitmapWorkerTaskReference.get();
    }
}
这样,ListView或GridView中的ImageView一旦被GC回收,其上的AsyncDrawable也会被立即回收,包括其中的BitmapWorkerTask。
加载ImageView时,先判断它有没有对应的异步任务(例如,第一次加载),如果没有,就启动异步任务;如果有,且本次要加载的和正在处理的异步线程一致,就继续该异步线程,否则就取消掉正在处理的异步线程,再启动异步任务。
public void loadBitmap(int resId, ImageView imageView) {
    if (cancelPotentialWork(resId, imageView)) {//解除任何附着在imageView的异步任务
        final BitmapWorkerTask task = new BitmapWorkerTask(imageView);//生成异步任务
        final AsyncDrawable asyncDrawable =
                new AsyncDrawable(getResources(), mPlaceHolderBitmap, task);//异步任务封装到bitMapDrawable
        imageView.setImageDrawable(asyncDrawable);//异步任务附着到imageView
        task.execute(resId);
    }
}
其中,用于取消ImageView潜在异步任务的方法为:
public static boolean cancelPotentialWork(int data, ImageView imageView) {
    final BitmapWorkerTask bitmapWorkerTask = getBitmapWorkerTask(imageView);

    if (bitmapWorkerTask != null) {//有异步线程
        final int bitmapData = bitmapWorkerTask.data;
        // If bitmapData is not yet set or it differs from the new data
        if (bitmapData == 0 || bitmapData != data) {//异步线程加载的图片资源更改了
            // Cancel previous task
            bitmapWorkerTask.cancel(true);
        } else {
            // The same work is already in progress
            return false;
        }
    }
    // No task associated with the ImageView, or an existing task was cancelled
    return true;
}
其中,获得某个ImageView对应的异步任务的方法是:
private static BitmapWorkerTask getBitmapWorkerTask(ImageView imageView) {
   if (imageView != null) {
       final Drawable drawable = imageView.getDrawable();
       if (drawable instanceof AsyncDrawable) {//是否有异步任务
           final AsyncDrawable asyncDrawable = (AsyncDrawable) drawable;
           return asyncDrawable.getBitmapWorkerTask();
       }
    }
    return null;
}
最后,当异步任务执行完毕后,需要判断其对应的ImageView是否已经更改了异步任务,不再是“自己”了。
class BitmapWorkerTask extends AsyncTask<Integer, Void, Bitmap> {
    ...

    @Override
    protected void onPostExecute(Bitmap bitmap) {
        if (isCancelled()) {
            bitmap = null;
        }

        if (imageViewReference != null && bitmap != null) {
            final ImageView imageView = imageViewReference.get();
            final BitmapWorkerTask bitmapWorkerTask =
                    getBitmapWorkerTask(imageView);
            if (this == bitmapWorkerTask && imageView != null) {
                imageView.setImageBitmap(bitmap);
            }
        }
    }
}
2.3 Caching BitMap
本节主要讲了如何使用缓存来优化Bitmap。包括了三部分内容:
² 内存缓存方案;
² 硬盘缓存方案;
² Android配置改变时缓存方案;
2.3.1 内存缓存方案
如果ListView或GridView频繁的滑动时,ImageView在可视区域时,BitMap一旦解析完毕,就显示;ImageView滑出可视区域就被GC,再滑入可视区域就再次启动异步线程来解析加载。这样频繁的GC和解析,效率很低。
缓存本质上就是一个有内存上限的队列,先进先出。缓存的优化策略是,将异步线程中已经解析出来的BitMap加入队列,一旦超过缓存的内存上限,就开始GC缓存中队头的BitMap。在加载图片时,先查下该图片是否在缓存中,如果在,就直接加载,否则开启异步线程进行加载。
Android使用LruCache这个类来生成缓存对象。对于该类,我的博客【深入理解内存缓存类LruCache:源码分析:http://blog.csdn.net/brillianteagle/article/details/50593379】对其有更深入的解析。下面是一个LruCache的构造,缓存大小为本应用运行时内存的1/8。注意,默认运行时内存默认情况下为64M(可以修改得更大),所以这里的缓存大小为8M。
private LruCache<String, Bitmap> mMemoryCache;

@Override
protected void onCreate(Bundle savedInstanceState) {
    ...
    // Get max available VM memory, exceeding this amount will throw an
    // OutOfMemory exception. Stored in kilobytes as LruCache takes an
    // int in its constructor.
    final int maxMemory = (int) (Runtime.getRuntime().maxMemory() / 1024);

    // Use 1/8th of the available memory for this memory cache.
    final int cacheSize = maxMemory / 8;

    mMemoryCache = new LruCache<String, Bitmap>(cacheSize) {
        @Override
        protected int sizeOf(String key, Bitmap bitmap) {
            // The cache size will be measured in kilobytes rather than
            // number of items.
            return bitmap.getByteCount() / 1024;
        }
    };
    ...
}

public void addBitmapToMemoryCache(String key, Bitmap bitmap) {
    if (getBitmapFromMemCache(key) == null) {
        mMemoryCache.put(key, bitmap);
    }
}

public Bitmap getBitmapFromMemCache(String key) {
    return mMemoryCache.get(key);
}
class BitmapWorkerTask extends AsyncTask<Integer, Void, Bitmap> {
    ...
    // Decode image in background.
    @Override
    protected Bitmap doInBackground(Integer... params) {
        final Bitmap bitmap = decodeSampledBitmapFromResource(
                getResources(), params[0], 100, 100));
        addBitmapToMemoryCache(String.valueOf(params[0]), bitmap);//加入bitMap进入缓存
        return bitmap;
    }
    ...
}
加载图片时,先查下缓存是否有该图片,如果有就直接加载,否则再启动异步线程。
public void loadBitmap(int resId, ImageView imageView) {
    final String imageKey = String.valueOf(resId);

    final Bitmap bitmap = getBitmapFromMemCache(imageKey);
    if (bitmap != null) {
        mImageView.setImageBitmap(bitmap);
    } else {
        mImageView.setImageResource(R.drawable.image_placeholder);
        BitmapWorkerTask task = new BitmapWorkerTask(mImageView);
        task.execute(resId);
    }
}
上面的内容可以归结为“内存缓存”方案,适用于本地图片加载。加载的图片需要在线下载,那么如果也使用“内存缓存”方案的话,下载的图片对象如果在被GC,就要再下载一遍(与本地再解析一遍不同),效率不高。所以,本节第二个重要内容是“硬盘缓存”方案。
2.3.2 硬盘缓存方案
该方案依赖于一个开源的类DiskLruCache,我的博客【深入理解硬盘缓存类DiskLruCache:源码分析:http://blog.csdn.net/brillianteagle/article/details/50593434】对其有更深入的解析。这里,主要使用该类就可以了。
private DiskLruCache mDiskLruCache;
private final Object mDiskCacheLock = new Object();
private boolean mDiskCacheStarting = true;
private static final int DISK_CACHE_SIZE = 1024 * 1024 * 10; // 10MB
private static final String DISK_CACHE_SUBDIR = "thumbnails";

@Override
protected void onCreate(Bundle savedInstanceState) {
    ...
    // Initialize memory cache
    ...
    // Initialize disk cache on background thread
    File cacheDir = getDiskCacheDir(this, DISK_CACHE_SUBDIR);
    new InitDiskCacheTask().execute(cacheDir);
    ...
}

class InitDiskCacheTask extends AsyncTask<File, Void, Void> {
    @Override
    protected Void doInBackground(File... params) {
        synchronized (mDiskCacheLock) {
            File cacheDir = params[0];
            mDiskLruCache = DiskLruCache.open(cacheDir, DISK_CACHE_SIZE);
            mDiskCacheStarting = false; // Finished initialization
            mDiskCacheLock.notifyAll(); // Wake any waiting threads
        }
        return null;
    }
}

class BitmapWorkerTask extends AsyncTask<Integer, Void, Bitmap> {
    ...
    // Decode image in background.
    @Override
    protected Bitmap doInBackground(Integer... params) {
        final String imageKey = String.valueOf(params[0]);

        // Check disk cache in background thread
        Bitmap bitmap = getBitmapFromDiskCache(imageKey);

        if (bitmap == null) { // Not found in disk cache
            // Process as normal
            final Bitmap bitmap = decodeSampledBitmapFromResource(
                    getResources(), params[0], 100, 100));
        }

        // Add final bitmap to caches
        addBitmapToCache(imageKey, bitmap);

        return bitmap;
    }
    ...
}

public void addBitmapToCache(String key, Bitmap bitmap) {
    // Add to memory cache as before
    if (getBitmapFromMemCache(key) == null) {
        mMemoryCache.put(key, bitmap);
    }

    // Also add to disk cache
    synchronized (mDiskCacheLock) {
        if (mDiskLruCache != null && mDiskLruCache.get(key) == null) {
            mDiskLruCache.put(key, bitmap);
        }
    }
}

public Bitmap getBitmapFromDiskCache(String key) {
    synchronized (mDiskCacheLock) {
        // Wait while disk cache is started from background thread
        while (mDiskCacheStarting) {
            try {
                mDiskCacheLock.wait();
            } catch (InterruptedException e) {}
        }
        if (mDiskLruCache != null) {
            return mDiskLruCache.get(key);
        }
    }
    return null;
}

// Creates a unique subdirectory of the designated app cache directory. Tries to use external
// but if not mounted, falls back on internal storage.
public static File getDiskCacheDir(Context context, String uniqueName) {
    // Check if media is mounted or storage is built-in, if so, try and use external cache dir
    // otherwise use internal cache dir
    final String cachePath =
            Environment.MEDIA_MOUNTED.equals(Environment.getExternalStorageState()) ||
                    !isExternalStorageRemovable() ? getExternalCacheDir(context).getPath() :
                            context.getCacheDir().getPath();

    return new File(cachePath + File.separator + uniqueName);
}
2.3.3 Android配置改变时缓存方案
最后一部分是介绍当运行时配置改变时(例如,屏幕朝向改变导致Activity被销毁并重新加载)如何保证缓存不用被销毁。这里采用了Fragment的一个关键特性。如果Activty因为运行时配置改变而被销毁重新加载,那么附着在该Activity的所有Fragment都会经历同样的过程。如果不希望Fragemt的某些对象被销毁并重新生成,可以使用Fragment的setRetainInstance(true)来声明。关于这一特性,可以参看【Fragment的非中断保存setRetaineInstance:http://ju.outofmemory.cn/entry/132081】。
所以,将缓存对象放置在Fragment中,并设置不随Activity的销毁而销毁,就能保存该缓存。
private LruCache<String, Bitmap> mMemoryCache;

@Override
protected void onCreate(Bundle savedInstanceState) {
    ...
    RetainFragment retainFragment =
            RetainFragment.findOrCreateRetainFragment(getFragmentManager());
    mMemoryCache = retainFragment.mRetainedCache;
    if (mMemoryCache == null) {
        mMemoryCache = new LruCache<String, Bitmap>(cacheSize) {
            ... // Initialize cache here as usual
        }
        retainFragment.mRetainedCache = mMemoryCache;
    }
    ...
}

class RetainFragment extends Fragment {
    private static final String TAG = "RetainFragment";
    public LruCache<String, Bitmap> mRetainedCache;

    public RetainFragment() {}

    public static RetainFragment findOrCreateRetainFragment(FragmentManager fm) {
        RetainFragment fragment = (RetainFragment) fm.findFragmentByTag(TAG);
        if (fragment == null) {
            fragment = new RetainFragment();
            fm.beginTransaction().add(fragment, TAG).commit();
        }
        return fragment;
    }

    @Override
    public void onCreate(Bundle savedInstanceState) {
        super.onCreate(savedInstanceState);
        setRetainInstance(true);//关键语句
    }
}
2.4 Managing Bitmap Memory
这一节主要讲如何复用已有的BitMap内存空间,这样就免得GC某些不用的BitMap,以及分配新内存给新的BitMap。对于Android3.0及其以上版本,BitmapFactory.Options.inBitmap对应的就是要复用的BitMap对象。
首先,那些从LruCache中被自动剔除的BitMap会被保存到一个弱引用集合,这个集合内的BitMap可能会被复用。
Set<SoftReference<Bitmap>> mReusableBitmaps;
private LruCache<String, BitmapDrawable> mMemoryCache;

// If you're running on Honeycomb or newer, create a
// synchronized HashSet of references to reusable bitmaps.
if (Utils.hasHoneycomb()) {
    mReusableBitmaps =
            Collections.synchronizedSet(new HashSet<SoftReference<Bitmap>>());
}

mMemoryCache = new LruCache<String, BitmapDrawable>(mCacheParams.memCacheSize) {

    // Notify the removed entry that is no longer being cached.
    @Override
    protected void entryRemoved(boolean evicted, String key,
            BitmapDrawable oldValue, BitmapDrawable newValue) {
        if (RecyclingBitmapDrawable.class.isInstance(oldValue)) {
            // The removed entry is a recycling drawable, so notify it
            // that it has been removed from the memory cache.
            ((RecyclingBitmapDrawable) oldValue).setIsCached(false);
        } else {
            // The removed entry is a standard BitmapDrawable.
            if (Utils.hasHoneycomb()) {
                // We're running on Honeycomb or later, so add the bitmap
                // to a SoftReference set for possible use with inBitmap later.
                mReusableBitmaps.add
                        (new SoftReference<Bitmap>(oldValue.getBitmap()));
            }
        }
    }
....
}
其次,解析待加载的BitMap的属性Options,根据属性从弱引用集合中查找,找到符合条件的重用BitMap。
public static Bitmap decodeSampledBitmapFromFile(String filename,
        int reqWidth, int reqHeight, ImageCache cache) {

    final BitmapFactory.Options options = new BitmapFactory.Options();
    ...
    BitmapFactory.decodeFile(filename, options);
    ...

    // If we're running on Honeycomb or newer, try to use inBitmap.
    if (Utils.hasHoneycomb()) {
        addInBitmapOptions(options, cache);
    }
    ...
    return BitmapFactory.decodeFile(filename, options);
}
其中addInBitmapOptions(options, cache):
privatestaticvoid addInBitmapOptions(BitmapFactory.Options options,
        ImageCache cache) {
    // inBitmap only workswith mutable bitmaps, so force the decoder to
    // return mutable bitmaps.
    options.inMutable = true;

    if (cache != null) {
        // Try tofind a bitmap to use for inBitmap.
        Bitmap inBitmap = cache.getBitmapFromReusableSet(options);

        if (inBitmap != null) {
            // If a suitable bitmap has been found, set it as the value of
            // inBitmap.
            options.inBitmap = inBitmap;
        }
    }
}
其中,getBitmapFromReusableSet(options);:
protected Bitmap getBitmapFromReusableSet(BitmapFactory.Options options) {
        Bitmap bitmap = null;

    if (mReusableBitmaps != null && !mReusableBitmaps.isEmpty()) {
        synchronized (mReusableBitmaps) {
            final Iterator<SoftReference<Bitmap>> iterator
                    = mReusableBitmaps.iterator();
            Bitmap item;

            while (iterator.hasNext()) {
                item = iterator.next().get();

                if (null != item && item.isMutable()) {
                    // Check to see it the item can be used for inBitmap.
                    if (canUseForInBitmap(item, options)) {
                        bitmap = item;

                        // Remove from reusable set so it can't be used again.
                        iterator.remove();
                        break;
                    }
                } else {
                    // Remove from the set if the reference has been cleared.
                    iterator.remove();
                }
            }
        }
    }
    return bitmap;
}
其中,canUseForInBitmap(item,options)
static boolean canUseForInBitmap(
        Bitmap candidate, BitmapFactory.Options targetOptions) {

    if (Build.VERSION.SDK_INT >= Build.VERSION_CODES.KITKAT) {
        // From Android 4.4 (KitKat) onward we can re-use if the byte size of
        // the new bitmap is smaller than the reusable bitmap candidate
        // allocation byte count.
        int width = targetOptions.outWidth / targetOptions.inSampleSize;
        int height = targetOptions.outHeight / targetOptions.inSampleSize;
        int byteCount = width * height * getBytesPerPixel(candidate.getConfig());
        return byteCount <= candidate.getAllocationByteCount();
    }

    // On earlier versions, the dimensions must match exactly and the inSampleSize must be 1
    return candidate.getWidth() == targetOptions.outWidth
            && candidate.getHeight() == targetOptions.outHeight
            && targetOptions.inSampleSize == 1;
}

/**
 * A helper function to return the byte usage per pixel of a bitmap based on its configuration.
 */
static int getBytesPerPixel(Config config) {
    if (config == Config.ARGB_8888) {
        return 4;
    } else if (config == Config.RGB_565) {
        return 2;
    } else if (config == Config.ARGB_4444) {
        return 2;
    } else if (config == Config.ALPHA_8) {
        return 1;
    }
    return 1;
}
【我的思考】在提升效率方面,这一节不是特别重要。
2.5 Displaying BitMaps in Your UI
这一节使用了两个实例来说明如何在UI层展示BitMap,详细内容见官方指南的源文。
2.5.1 Load Bitmaps into a ViewPager Implementation
思路比较简单。ViewPager添加Fragment为Item的Aapter,每个Fragement就是一个ImageView。加载时利用前两节的异步线程、内存缓存技术。
2.5.2 Load Bitmaps into a GridView Implementation
与ViewPager类似。
2.6 其他优化
除了官方的优化策略,还有一些注意点,可以查看【Android开发优化之——对Bitmap的内存优化】的4条优化,其中第3、第4条本文已经谈过了。其它2条是主动释放、捕捉异常。这里只提其中一点,即主动释放BitMap内存
为何要主动释放呢?原因在于,BitMap在new的过程中是一个JNI调用,所以,GC掉的BitMap只是Java JVM控制的内存区域,JNI保持的内存区域没有及时释放。所以,对于BitMap对象,一旦不再使用,就需要主动释放其内存。
if(bitmap != null && !bitmap.isRecycled()){
bitmap.recycle();
bitmap = null;
}
System.gc();
3. 官方Demo详解

3.1缓存分析
本Demo综合应用了提前解析图片信息、异步线程加载、内存缓存、硬盘缓存、可重用Bitmap等上面5节提到的所有技术,其中缓存的逻辑如下:

除此之外,还包括了用Fragment来保存Cache对象,防止因为Activity的横竖屏切换而导致的缓存丢失(2.3.3节内容)。
3.2UML分析
3.2.1 ImageCache
根据缓存方案,本程序的将内存缓存、硬盘缓存、软引用封装成了一个类ImageCache,而且其中还有用于保存ImageCache的静态内部类Fragment(2.3.3节内容),另一个内部类ImageCacheParams用于提供缓存大小等参数。UML如下:
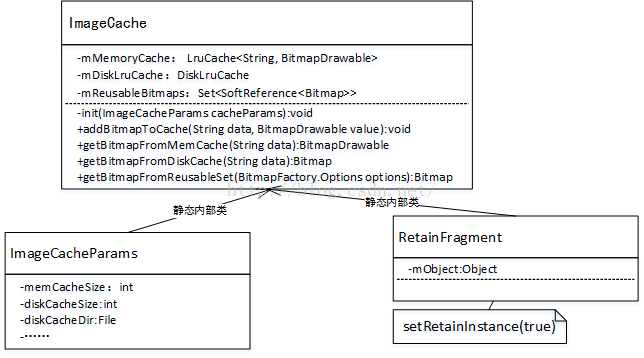
ImageCache提供了将BitMap加入缓存、从内存缓存、硬盘缓存和软引用中取可复用的Bitmap的方法。注意,在加入缓存时,同时加入了内存缓存和硬盘缓存。
3.2.2 ImageFetcher
ImageFetcher是最后封装完毕的类,加载图片即调用:
mImageFetcher.loadImage(mImageUrl, mImageView);
回溯一下,ImageFetcher的UML图为。
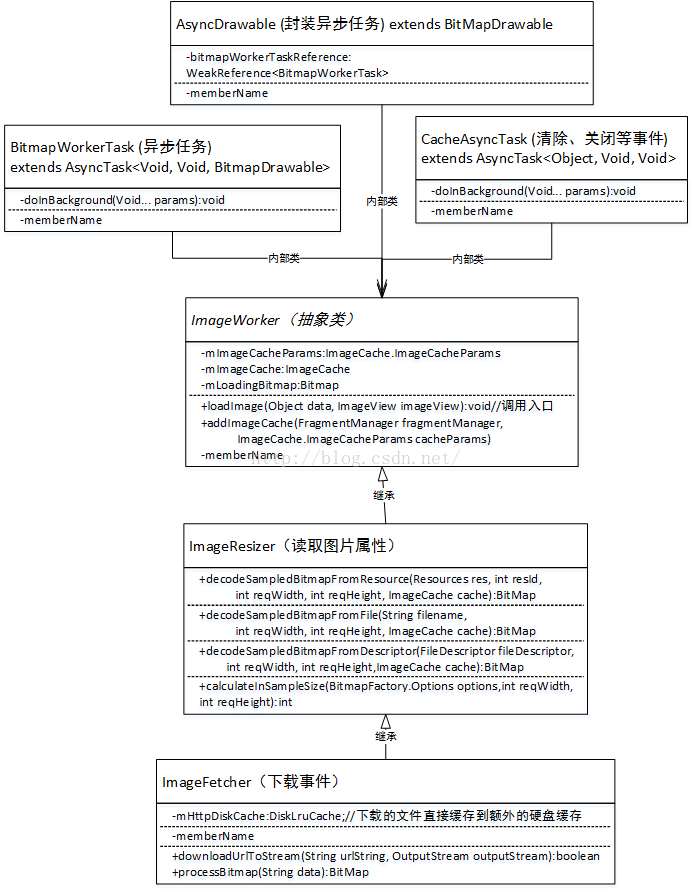
整体框架在ImageWorker中已经写好,加载图片是先查询内存缓存,如果不存在则异步处理。
    /**
     * Load an image specified by the data parameter into an ImageView (override
     * {@link ImageWorker#processBitmap(Object)} to define the processing logic). A memory and
     * disk cache will be used if an {@link ImageCache} has been added using
     * {@link ImageWorker#addImageCache(android.support.v4.app.FragmentManager, ImageCache.ImageCacheParams)}. If the
     * image is found in the memory cache, it is set immediately, otherwise an {@link AsyncTask}
     * will be created to asynchronously load the bitmap.
     *
     * @param data The URL of the image to download.
     * @param imageView The ImageView to bind the downloaded image to.
     */
    public void loadImage(Object data, ImageView imageView) {
        if (data == null) {
            return;
        }

        BitmapDrawable value = null;

        if (mImageCache != null) {
        //先查询内存缓存
            value = mImageCache.getBitmapFromMemCache(String.valueOf(data));
        }

        if (value != null) {
            // Bitmap found in memory cache
            imageView.setImageDrawable(value);
        } else if (cancelPotentialWork(data, imageView)) {
//生成异步任务
            final BitmapWorkerTask task = new BitmapWorkerTask(data, imageView);
//异步任务封装到BitMapDrawable中
            final AsyncDrawable asyncDrawable =
                    new AsyncDrawable(mResources, mLoadingBitmap, task);
            imageView.setImageDrawable(asyncDrawable);

            // NOTE: This uses a custom version of AsyncTask that has been pulled from the
            // framework and slightly modified. Refer to the docs at the top of the class
            // for more info on what was changed.
//执行异步任务
            task.executeOnExecutor(AsyncTask.DUAL_THREAD_EXECUTOR);

        }
    }
再来细看异步任务。
/**
     * The actual AsyncTask that will asynchronously process the image.
     */
    private class BitmapWorkerTask extends AsyncTask<Void, Void, BitmapDrawable> {
        private Object mData;
        private final WeakReference<ImageView> imageViewReference;

        public BitmapWorkerTask(Object data, ImageView imageView) {
            mData = data;
//异步任务的句柄为弱引用
            imageViewReference = new WeakReference<ImageView>(imageView);
        }

        /**
         * Background processing.
         */
        @Override
        protected BitmapDrawable doInBackground(Void... params) {

            if (BuildConfig.DEBUG) {
                Log.d(TAG, "doInBackground - starting work");
            }

            final String dataString = String.valueOf(mData);
            Bitmap bitmap = null;
            BitmapDrawable drawable = null;

            // Wait here if work is paused and the task is not cancelled
            synchronized (mPauseWorkLock) {
                while (mPauseWork && !isCancelled()) {
                    try {
                        mPauseWorkLock.wait();
                    } catch (InterruptedException e) {}
                }
            }

            // If the image cache is available and this task has not been cancelled by another
            // thread and the ImageView that was originally bound to this task is still bound back
            // to this task and our "exit early" flag is not set then try and fetch the bitmap from
            // the cache
            if (mImageCache != null && !isCancelled() && getAttachedImageView() != null
                    && !mExitTasksEarly) {
//图片是否在硬盘缓存
                bitmap = mImageCache.getBitmapFromDiskCache(dataString);
            }

            // If the bitmap was not found in the cache and this task has not been cancelled by
            // another thread and the ImageView that was originally bound to this task is still
            // bound back to this task and our "exit early" flag is not set, then call the main
            // process method (as implemented by a subclass)
//图片如果不在硬盘缓存就直接下载
            if (bitmap == null && !isCancelled() && getAttachedImageView() != null
                    && !mExitTasksEarly) {
                bitmap = processBitmap(mData);
            }

            // If the bitmap was processed and the image cache is available, then add the processed
            // bitmap to the cache for future use. Note we don't check if the task was cancelled
            // here, if it was, and the thread is still running, we may as well add the processed
            // bitmap to our cache as it might be used again in the future
            if (bitmap != null) {
                if (Utils.hasHoneycomb()) {
                    // Running on Honeycomb or newer, so wrap in a standard BitmapDrawable
                    drawable = new BitmapDrawable(mResources, bitmap);
                } else {
                    // Running on Gingerbread or older, so wrap in a RecyclingBitmapDrawable
                    // which will recycle automagically
                    drawable = new RecyclingBitmapDrawable(mResources, bitmap);
                }

                if (mImageCache != null) {
//图片加入内存缓存和硬盘缓存
                    mImageCache.addBitmapToCache(dataString, drawable);
                }
            }

            if (BuildConfig.DEBUG) {
                Log.d(TAG, "doInBackground - finished work");
            }

            return drawable;

        }

        /**
         * Once the image is processed, associates it to the imageView
         */
        @Override
        protected void onPostExecute(BitmapDrawable value) {

            // if cancel was called on this task or the "exit early" flag is set then we're done
            if (isCancelled() || mExitTasksEarly) {
                value = null;
            }

            final ImageView imageView = getAttachedImageView();
            if (value != null && imageView != null) {
                if (BuildConfig.DEBUG) {
                    Log.d(TAG, "onPostExecute - setting bitmap");
                }
                setImageDrawable(imageView, value);
            }

        }
再往下走,如果不在硬盘缓存,就调用的是processBitmap(mData)。这里应该就是直接网络下载了吧?这个函数的实现是在ImageFetcher中。这里的实现有额外使用了一个硬盘缓存,即DiskLruCache mHttpDiskCache。根据网址将突破下载后的图片直接放入到了mHttpDiskCache硬盘缓存中,然后再从mHttpDiskCache硬盘缓存读出文件并加入到内存缓存和硬盘缓存(ImageCache)。
为什么不直接将下载的图片放到内存缓存和硬盘缓存(ImageCache)呢?因为下载的内容是字节流,并不能直接生产BitMap,下载中可能中断,DiskLruCache mHttpDiskCache相当于是一级缓存,准备完毕图片后才加入到内存缓存和硬盘缓存(ImageCache)。
/**
     * The main process method, which will be called by the ImageWorker in the AsyncTask background
     * thread.
     *
     * @param data The data to load the bitmap, in this case, a regular http URL
     * @return The downloaded and resized bitmap
     */
    private Bitmap processBitmap(String data) {
        if (BuildConfig.DEBUG) {
            Log.d(TAG, "processBitmap - " + data);
        }

        final String key = ImageCache.hashKeyForDisk(data);
        FileDescriptor fileDescriptor = null;
        FileInputStream fileInputStream = null;
        DiskLruCache.Snapshot snapshot;
        synchronized (mHttpDiskCacheLock) {
            // Wait for disk cache to initialize
            while (mHttpDiskCacheStarting) {
                try {
                    mHttpDiskCacheLock.wait();
                } catch (InterruptedException e) {}
            }

            if (mHttpDiskCache != null) {
                try {
                    snapshot = mHttpDiskCache.get(key);
                    if (snapshot == null) {
                        if (BuildConfig.DEBUG) {
                            Log.d(TAG, "processBitmap, not found in http cache, downloading...");
                        }
                        DiskLruCache.Editor editor = mHttpDiskCache.edit(key);
                        if (editor != null) {
                        //将文件下载到mHttpDiskCache.
                            if (downloadUrlToStream(data,
                                    editor.newOutputStream(DISK_CACHE_INDEX))) {
                                editor.commit();
                            } else {
                                editor.abort();
                            }
                        }
                        snapshot = mHttpDiskCache.get(key);
                    }
                    if (snapshot != null) {
                        fileInputStream =
                                (FileInputStream) snapshot.getInputStream(DISK_CACHE_INDEX);
//从mHttpDiskCache取得文件描述信息
                        fileDescriptor = fileInputStream.getFD();
                    }
                } catch (IOException e) {
                    Log.e(TAG, "processBitmap - " + e);
                } catch (IllegalStateException e) {
                    Log.e(TAG, "processBitmap - " + e);
                } finally {
                    if (fileDescriptor == null && fileInputStream != null) {
                        try {
                            fileInputStream.close();
                        } catch (IOException e) {}
                    }
                }
            }
        }

        Bitmap bitmap = null;
        if (fileDescriptor != null) {
//从mHttpDiskCache读取BitMap
            bitmap = decodeSampledBitmapFromDescriptor(fileDescriptor, mImageWidth,
                    mImageHeight, getImageCache());
        }
        if (fileInputStream != null) {
            try {
                fileInputStream.close();
            } catch (IOException e) {}
        }
        return bitmap;
    }
好了,继续往下走,解析图片时,可以看内存中是否有复用的BitMap空间。
/**
     * Decode and sample down a bitmap from a file input stream to the requested width and height.
     *
     * @param fileDescriptor The file descriptor to read from
     * @param reqWidth The requested width of the resulting bitmap
     * @param reqHeight The requested height of the resulting bitmap
     * @param cache The ImageCache used to find candidate bitmaps for use with inBitmap
     * @return A bitmap sampled down from the original with the same aspect ratio and dimensions
     *         that are equal to or greater than the requested width and height
     */
    public static Bitmap decodeSampledBitmapFromDescriptor(
            FileDescriptor fileDescriptor, int reqWidth, int reqHeight, ImageCache cache) {

        // First decode with inJustDecodeBounds=true to check dimensions
        final BitmapFactory.Options options = new BitmapFactory.Options();
        options.inJustDecodeBounds = true;
        BitmapFactory.decodeFileDescriptor(fileDescriptor, null, options);

        // Calculate inSampleSize
        options.inSampleSize = calculateInSampleSize(options, reqWidth, reqHeight);

        // Decode bitmap with inSampleSize set
        options.inJustDecodeBounds = false;

        // If we're running on Honeycomb or newer, try to use inBitmap
        if (Utils.hasHoneycomb()) {
            addInBitmapOptions(options, cache);
        }

        return BitmapFactory.decodeFileDescriptor(fileDescriptor, null, options);
    }
这里面的addInBitmapOptions(options,cache)的作用就是查询弱引用中是否有可以复用的BitMap内存空间。请回顾本文的2.4节。
@TargetApi(Build.VERSION_CODES.HONEYCOMB)
    private static void addInBitmapOptions(BitmapFactory.Options options, ImageCache cache) {

        // inBitmap only works with mutable bitmaps so force the decoder to
        // return mutable bitmaps.
        options.inMutable = true;

        if (cache != null) {
            // Try and find a bitmap to use for inBitmap
            Bitmap inBitmap = cache.getBitmapFromReusableSet(options);

            if (inBitmap != null) {
                options.inBitmap = inBitmap;//关键部分。
            }
        }

    }
4 总结
本文以官方文档和Demo为核心,全面讲解了BitMap优化的最佳实践。对于本地大量图片的读取,不需要硬盘缓存,可以优化的点为:
内存缓存;
内存缓存以Fragment为容器,防止因为Activity的横竖屏切换而销毁掉内存缓存;
异步线程解析图片;
异步线程以弱引用的形式封装到BitMapDrawable中,并将其附着到ImageView上
……
对于网络下载,需要考虑地方更多了。除了上面几条,下载时需要直接放入额外的硬盘缓存中,再从额外的硬盘缓存中读取BitMap加入到内存缓存和硬盘缓存。


 549
549

 被折叠的 条评论
为什么被折叠?
被折叠的 条评论
为什么被折叠?
 到【灌水乐园】发言


