


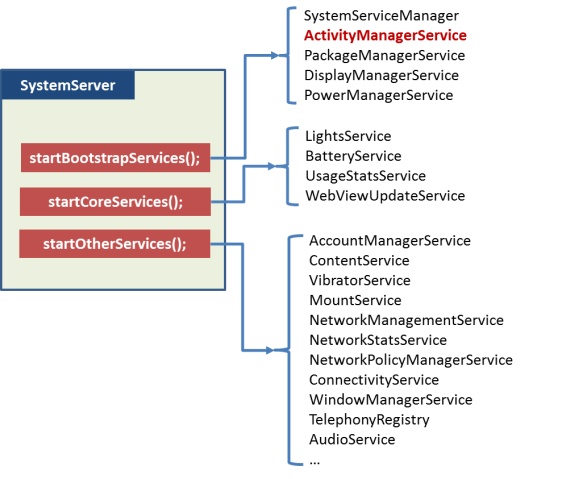
SystemServer是由系统启动的时候zygote启动的第一个java程序
Android中的很多使用java语言编写的service都是在SystemServer中启动的
AMS的是在SystemServer中的startBootstrapServices方法中启动的
frameworks/base/services/java/com/android/server$ tree
.
`-- SystemServer.java
            startBootstrapServices();
            startCoreServices();
startOtherServices();把其中ActivityManagerService相关的部分,提取出来。
android系统中的很多核心关键服务都是在这个函数中启动的
这个方法中有这么一段代码:
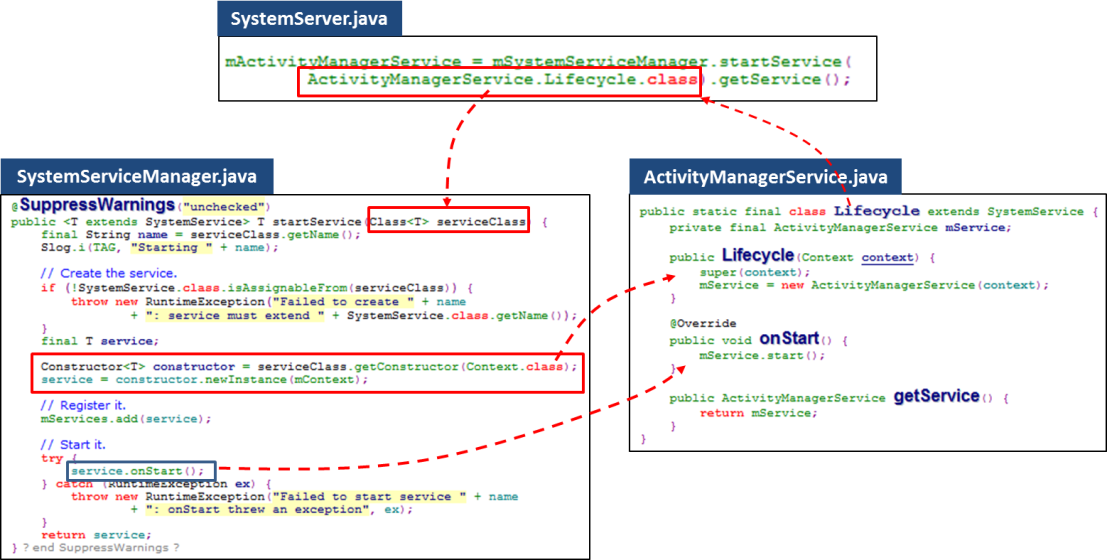
startBootstrapServices@SystemServer.java:
    private void startBootstrapServices() {


        // Activity manager runs the show.
        mActivityManagerService = mSystemServiceManager.startService(
                ActivityManagerService.Lifecycle.class).getService();
        mActivityManagerService.setSystemServiceManager(mSystemServiceManager);
        mActivityManagerService.setInstaller(installer);
这里调用了mSystemServiceManager对象的startService启动了AMS,注意这里给出的参数是ActivityManagerService.Lifecycle.class,在进一步分析startService之前,我们需要看一下这个类:
Lifecycle@ActivityManagerService.java
frameworks/base/services/core/java/com/android/server/am$
.
|-- ActiveServices.java
|-- ActivityManagerDebugConfig.java
|-- ActivityManagerService.java
|-- ActivityManagerShellCommand.java
|-- ActivityMetricsLogger.java
|-- ActivityRecord.java
|-- ActivityResult.java
|-- ActivityStack.java
|-- ActivityStackSupervisor.java
|-- ActivityStarter.java
|-- ActivityStartInterceptor.java
    public static final class Lifecycle extends SystemService {
        private final ActivityManagerService mService;

        public Lifecycle(Context context) {
            super(context);
            mService = new ActivityManagerService(context);
        }

        @Override
        public void onStart() {
            mService.start();
        }

        public ActivityManagerService getService() {
            return mService;
        }
}onStart@SystemService.java
frameworks/base/services/core/java/com/android/server$ ls SystemService*
SystemService.java
SystemServiceManager.java
    /**
     * Called when the dependencies listed in the @Service class-annotation are available
     * and after the chosen start phase.
     * When this method returns, the service should be published.
     */
    public abstract void onStart();
可以看出来,这是当服务启动的时候回调的方法,具体再哪里调用,我们后面会分析。弄清楚了Lifecycle类之后,我们现在可以来分析mSystemServiceManager对象的startService方法,mSystemServiceManager是SystemServiceManager类的一个对象,下面是startService方法:
startService@SystemServiceManager.java
    /**
     * Creates and starts a system service. The class must be a subclass of
     * {@link com.android.server.SystemService}.
     *
     * @param serviceClass A Java class that implements the SystemService interface.
     * @return The service instance, never null.
     * @throws RuntimeException if the service fails to start.
     */
    @SuppressWarnings("unchecked")
    public <T extends SystemService> T startService(Class<T> serviceClass) {
        try {
            final String name = serviceClass.getName();
            Slog.i(TAG, "Starting " + name);
            Trace.traceBegin(Trace.TRACE_TAG_SYSTEM_SERVER, "StartService " + name);

            // Create the service.
            if (!SystemService.class.isAssignableFrom(serviceClass)) {
                throw new RuntimeException("Failed to create " + name
                        + ": service must extend " + SystemService.class.getName());
            }
            final T service;
            try {

                //获得构造器
                Constructor<T> constructor = serviceClass.getConstructor(Context.class);

                //实例化一个对象
                service = constructor.newInstance(mContext);

            } catch (InstantiationException ex) {
                throw new RuntimeException("Failed to create service " + name
                        + ": service could not be instantiated", ex);
            } catch (IllegalAccessException ex) {
                throw new RuntimeException("Failed to create service " + name
                        + ": service must have a public constructor with a Context argument", ex);
            } catch (NoSuchMethodException ex) {
                throw new RuntimeException("Failed to create service " + name
                        + ": service must have a public constructor with a Context argument", ex);
            } catch (InvocationTargetException ex) {
                throw new RuntimeException("Failed to create service " + name
                        + ": service constructor threw an exception", ex);
            }

            // Register it.
            mServices.add(service);//这里的mServices, 是SystemServiceManager对象维护的一个动态数组,保存所管理的所有SystemServices

            // Start it.
            try {
                service.onStart();
            } catch (RuntimeException ex) {
                throw new RuntimeException("Failed to start service " + name
                        + ": onStart threw an exception", ex);
            }
            return service;
        } finally {
            Trace.traceEnd(Trace.TRACE_TAG_SYSTEM_SERVER);
        }
}我们这里判断了传递进来的类是不是SystemService类的子类,如果不是的话直接刨除运行时异常立即停止运行,因为服务必须继承自SystemService类!代码中的异常信息也可以看到这一点。接下来,就获得类的构造器,并且实例化一个对象:
            final T service;
            try {
                Constructor<T> constructor = serviceClass.getConstructor(Context.class); //获得类LifeCycle的构造器
                service = constructor.newInstance(mContext); //实例化Lifecycle 的一个对象:
下面是LifeCycle的构造器:
        public Lifecycle(Context context) {
            super(context);
            mService = new ActivityManagerService(context);
} // Note: This method is invoked on the main thread but may need to attach various
// handlers to other threads. So take care to be explicit about the looper.
public ActivityManagerService(Context systemContext) {
mContext = systemContext;
mFactoryTest = FactoryTest.getMode();
//获得当前运行在SystemServer进程中的ActivityThread对象
mSystemThread = ActivityThread.currentActivityThread();
Slog.i(TAG, "Memory class: " + ActivityManager.staticGetMemoryClass());
//创建用于处理本线程消息的线程和Handler对象;Handler对象是MainHandler类
mHandlerThread = new ServiceThread(TAG,
android.os.Process.THREAD_PRIORITY_FOREGROUND, false /*allowIo*/);
mHandlerThread.start();
mHandler = new MainHandler(mHandlerThread.getLooper());
mUiHandler = new UiHandler();
/* static; one-time init here */
if (sKillHandler == null) {
sKillThread = new ServiceThread(TAG + ":kill",
android.os.Process.THREAD_PRIORITY_BACKGROUND, true /* allowIo */);
sKillThread.start();
sKillHandler = new KillHandler(sKillThread.getLooper());
}
//创建Intent广播管理类对象
mFgBroadcastQueue = new BroadcastQueue(this, mHandler,
"foreground", BROADCAST_FG_TIMEOUT, false);
mBgBroadcastQueue = new BroadcastQueue(this, mHandler,
"background", BROADCAST_BG_TIMEOUT, true);
mBroadcastQueues[0] = mFgBroadcastQueue;
mBroadcastQueues[1] = mBgBroadcastQueue;
//所有的Service列表对象
mServices = new ActiveServices(this);
//所有的Provider列表对象
mProviderMap = new ProviderMap(this);
mAppErrors = new AppErrors(mContext, this);
// TODO: Move creation of battery stats service outside of activity manager service.
//获取/data/system目录,该目录用于创建MainHandler?
File dataDir = Environment.getDataDirectory();
File systemDir = new File(dataDir, "system");
systemDir.mkdirs();
//获取Battery服务对象
mBatteryStatsService = new BatteryStatsService(systemDir, mHandler);
mBatteryStatsService.getActiveStatistics().readLocked();
mBatteryStatsService.scheduleWriteToDisk();
mOnBattery = DEBUG_POWER ? true
: mBatteryStatsService.getActiveStatistics().getIsOnBattery();
mBatteryStatsService.getActiveStatistics().setCallback(this);
//获取进程状态信息对象
mProcessStats = new ProcessStatsService(this, new File(systemDir, "procstats"));
//获取App权限管理服务对象
mAppOpsService = new AppOpsService(new File(systemDir, "appops.xml"), mHandler);
mAppOpsService.startWatchingMode(AppOpsManager.OP_RUN_IN_BACKGROUND, null,
new IAppOpsCallback.Stub() {
@Override public void opChanged(int op, int uid, String packageName) {
if (op == AppOpsManager.OP_RUN_IN_BACKGROUND && packageName != null) {
if (mAppOpsService.checkOperation(op, uid, packageName)
!= AppOpsManager.MODE_ALLOWED) {
runInBackgroundDisabled(uid);
}
}
}
});
//打开/data/system/urigrants.xml, 管理URI权限
mGrantFile = new AtomicFile(new File(systemDir, "urigrants.xml"));
//获取用户控制对象
mUserController = new UserController(this);
//获取OpenGL ES版本
GL_ES_VERSION = SystemProperties.getInt("ro.opengles.version",
ConfigurationInfo.GL_ES_VERSION_UNDEFINED);
mTrackingAssociations = "1".equals(SystemProperties.get("debug.track-associations"));
//恢复默认设置???
mConfiguration.setToDefaults();
mConfiguration.setLocales(LocaleList.getDefault());
mConfigurationSeq = mConfiguration.seq = 1;
//CPU跟踪初始化
mProcessCpuTracker.init();
mCompatModePackages = new CompatModePackages(this, systemDir, mHandler);
//创建Intent防火墙(6.0以后版本)
mIntentFirewall = new IntentFirewall(new IntentFirewallInterface(), mHandler);
mStackSupervisor = new ActivityStackSupervisor(this);
mActivityStarter = new ActivityStarter(this, mStackSupervisor);
mRecentTasks = new RecentTasks(this, mStackSupervisor);
//CPU使用监控进程
mProcessCpuThread = new Thread("CpuTracker") {
@Override
public void run() {
while (true) {
try {
try {
synchronized(this) {
final long now = SystemClock.uptimeMillis();
long nextCpuDelay = (mLastCpuTime.get()+MONITOR_CPU_MAX_TIME)-now;
long nextWriteDelay = (mLastWriteTime+BATTERY_STATS_TIME)-now;
//Slog.i(TAG, "Cpu delay=" + nextCpuDelay
// + ", write delay=" + nextWriteDelay);
if (nextWriteDelay < nextCpuDelay) {
nextCpuDelay = nextWriteDelay;
}
if (nextCpuDelay > 0) {
mProcessCpuMutexFree.set(true);
this.wait(nextCpuDelay);
}
}
} catch (InterruptedException e) {
}
updateCpuStatsNow();
} catch (Exception e) {
Slog.e(TAG, "Unexpected exception collecting process stats", e);
}
}
}
};
//将服务加入看门狗的监控
Watchdog.getInstance().addMonitor(this);
Watchdog.getInstance().addThread(mHandler);
}这个构造器比较长,并且基本都是一些AMS日常工作的初始化,包括创建四大组件的管理对象以及一些内部对象,因此我们这里就不详细分析构造器的工作了,后面分析AMS的服务逻辑的时候我们在来分析对应的初始化工作。
现在我们只要知道在AMS的构造器中做了这些工作就可以了:
1. 创建一堆类的对象,这些对象对于AMS的日常工作来说是必需的。
2. 初始化battery stats相关服务,AMS除了负责activity的管理工作,还负责battery stats相关的工作
3. 初始化cpu统计相关服务,主要是启动一个线程,轮询处理。为AMS提供有关CPU运行统计方面数据做准备。
再回到:
startService@SystemServiceManager.java中,继续看:
最后进行这个方法中最重要的操作,那就是将服务添加到SystemServiceManager中去,方便别的进程使用Binder查找到这个服务:
            // Register it.
mServices.add(service); //mServices是个动态数组public class SystemServiceManager {
private static final String TAG = "SystemServiceManager";
private final Context mContext;
private boolean mSafeMode;
// Services that should receive lifecycle events.
private final ArrayList<SystemService> mServices = new ArrayList<SystemService>();接下来的操作就是回调我们前面提到的onStart方法:
            // Start it.
            try {
                service.onStart(); //这里调用ActivityManagerService内部类LifeCycle的OnStart方法
            } catch (RuntimeException ex) {
                throw new RuntimeException("Failed to start service " + name
                        + ": onStart threw an exception", ex);
            }
return service; @Override
public void onStart() {
mService.start();
}
我们看到,这里直接调用ActivityManagerService的start方法:
start@ActivityManagerService.java private void start() {
Process.removeAllProcessGroups();
mProcessCpuThread.start();
mBatteryStatsService.publish(mContext);
mAppOpsService.publish(mContext);
Slog.d("AppOps", "AppOpsService published");
LocalServices.addService(ActivityManagerInternal.class, new LocalService());
}这里的start方法很是简单:
首先是调用Process类的removeAllProcessGroups方法移除所有的进程组,清空所有记录;
然后就是启动ProcessCpuThread线程,mProcessCpuThread这个对象就是在刚才的构造器中初始化的;
下面是发布BatteryStatsService,调用的是publish方法:
publish@BatteryStatsService.java
    public void publish(Context context) {
        mContext = context;
        mStats.setRadioScanningTimeout(mContext.getResources().getInteger(
                com.android.internal.R.integer.config_radioScanningTimeout)
                * 1000L);
        mStats.setPowerProfile(new PowerProfile(context));
        ServiceManager.addService(BatteryStats.SERVICE_NAME, asBinder());
}start方法的接下来的操作就是发布AppOpsService了,AppOpsService这个服务是提供android app ops服务的,什么是android app ops服务呢?App Ops是在android 4.3中加入的一个权限管理框架,这个框架可以让你自由地赋予或者撤销某个app的权限,方便管理,下图是操作时候的界面:
好了,如果读者还没有晕掉的话,你会知道上面我们都是在分析SystemServiceManager中的startService方法。。。。。
到目前为止,我们的分析流程是这样的:
1. startBootstrapServices@SystemServer.java
2. startService@SystemServiceManager.java
3. Lifecycle@ActivityManagerService.java
4. onStart@Lifecycle
5. start@ActivityManagerService.java
现在我们回过头来看下startBootstrapServices@SystemServer.java中AMS的启动部分:
        // Activity manager runs the show.
        mActivityManagerService = mSystemServiceManager.startService(
                ActivityManagerService.Lifecycle.class).getService();
        mActivityManagerService.setSystemServiceManager(mSystemServiceManager);
        mActivityManagerService.setInstaller(installer);
我们发现我们刚刚分析完了mSystemServiceManager.startService(ActivityManagerService.Lifecycle.class)这部分的逻辑!!
在这方法调用完成之后会返回Lifecycle类的对象(上面讲解过,不知道你是不是记得??),然后调用这个对象的getService方法赋值给mActivityManagerService,getService方法定义如下:
getService@Lifecycle
        public ActivityManagerService getService() {
            return mService;
}///
第二个桥段:
接下来在SystemServer.java中的操作就是调用AMS的setSystemServiceManager来将SystemServiceManager类的对象设置进去:
setSystemServiceManager@ActivityManagerService
    public void setSystemServiceManager(SystemServiceManager mgr) {
        mSystemServiceManager = mgr;
    }
/**
* Manages creating, starting, and other lifecycle events of
* {@link com.android.server.SystemService system services}.
*
* {@hide}
*/
这里说的很清楚,并且这个类的方法也是简单明了,具体这个类在AMS中怎么使用,我们后面分析AMS的业务逻辑的时候会提到。在startBootstrapServices@SystemServer.java的最后就是调用setInstaller方法将installer设置进去。installer是用来安装app的,我们的AMS使用它只是想在AMS的启动完成的时候调用installer的markBootComplete方法告诉它现在AMS启动完成了,installer可以进行工作了。这个调用是在AMS的finishBooting方法中调用的,finishBooting是ActivityStackSupervisor中初始化完毕之后回调的,ActivityStackSupervisor是用来管理ActivityStack的,这个类是android 5.0中新引入的。这部分涉及到ActivityStack的管理,所以这里不过多涉及,后面我们分析ActivityStack实现时再来详述这部分。现在大家只要知道,AMS启动最后它的finishBooting会被ActivityStackSupervisor回调,然后这个方法中会调用installer的markBootComplete,并且还会调用SystemServiceManager的startBootPhase通知启动的阶段信息:
startBootPhase@SystemServiceManager.java
    /**
     * Starts the specified boot phase for all system services that have been started up to
     * this point.
     *
     * @param phase The boot phase to start.
     */
    public void startBootPhase(final int phase) {
        if (phase <= mCurrentPhase) {
            throw new IllegalArgumentException("Next phase must be larger than previous");
        }
        mCurrentPhase = phase;

        Slog.i(TAG, "Starting phase " + mCurrentPhase);
        try {
            Trace.traceBegin(Trace.TRACE_TAG_SYSTEM_SERVER, "OnBootPhase " + phase);
            final int serviceLen = mServices.size();
            for (int i = 0; i < serviceLen; i++) {
                final SystemService service = mServices.get(i);
                try {
                    service.onBootPhase(mCurrentPhase);
                } catch (Exception ex) {
                    throw new RuntimeException("Failed to boot service "
                            + service.getClass().getName()
                            + ": onBootPhase threw an exception during phase "
                            + mCurrentPhase, ex);
                }
            }
        } finally {
            Trace.traceEnd(Trace.TRACE_TAG_SYSTEM_SERVER);
        }
}到这里,AMS启动只是完成基本的准备阶段,下面还有很多的工作需要做的,大家有点耐心啊~~AMS作为android系统的重量级的服务,怎么会就那么简单呢??你说是吧?还是踏踏实实地看代码吧~~~~
接下的操作还是在startBootstrapServices方法中:
startBootstrapServices@SystemServer.java
        // Power manager needs to be started early because other services need it.
        // Native daemons may be watching for it to be registered so it must be ready
        // to handle incoming binder calls immediately (including being able to verify
        // the permissions for those calls).
        mPowerManagerService = mSystemServiceManager.startService(PowerManagerService.class);

        // Now that the power manager has been started, let the activity manager
        // initialize power management features.
        Trace.traceBegin(Trace.TRACE_TAG_SYSTEM_SERVER, "InitPowerManagement");
        mActivityManagerService.initPowerManagement();
        Trace.traceEnd(Trace.TRACE_TAG_SYSTEM_SERVER);
这里的操作比较简单,注释中说道,既然power manager已经启动了,那么我们的AMS就可以初始化和battery stats相关的工作了。这里我们暂时先不详细分析initPowerManagement的过程,后面我们分析AMS的电源部分的时候会详细说明这一块的内容。接着往下看startBootstrapServices的中关于AMS的代码:
        // Set up the Application instance for the system process and get started.
mActivityManagerService.setSystemProcess();setSystemProcess@ActivityManagerService.java
    public void setSystemProcess() {
        try {
            ServiceManager.addService(Context.ACTIVITY_SERVICE, this, true);
            ServiceManager.addService(ProcessStats.SERVICE_NAME, mProcessStats);
            ServiceManager.addService("meminfo", new MemBinder(this));
            ServiceManager.addService("gfxinfo", new GraphicsBinder(this));
            ServiceManager.addService("dbinfo", new DbBinder(this));
            if (MONITOR_CPU_USAGE) {
                ServiceManager.addService("cpuinfo", new CpuBinder(this));
            }
            ServiceManager.addService("permission", new PermissionController(this));
            ServiceManager.addService("processinfo", new ProcessInfoService(this));

            ApplicationInfo info = mContext.getPackageManager().getApplicationInfo(
                    "android", STOCK_PM_FLAGS | MATCH_SYSTEM_ONLY);
            mSystemThread.installSystemApplicationInfo(info, getClass().getClassLoader());

            synchronized (this) {
                ProcessRecord app = newProcessRecordLocked(info, info.processName, false, 0);
                app.persistent = true;
                app.pid = MY_PID;
                app.maxAdj = ProcessList.SYSTEM_ADJ;
                app.makeActive(mSystemThread.getApplicationThread(), mProcessStats);
                synchronized (mPidsSelfLocked) {
                    mPidsSelfLocked.put(app.pid, app);
                }
                updateLruProcessLocked(app, false, null);
                updateOomAdjLocked();
            }
        } catch (PackageManager.NameNotFoundException e) {
            throw new RuntimeException(
                    "Unable to find android system package", e);
        }
    }
    private void startOtherServices() {
     ......
            // We now tell the activity manager it is okay to run third party
        // code.  It will call back into us once it has gotten to the state
        // where third party code can really run (but before it has actually
        // started launching the initial applications), for us to complete our
        // initialization.
        mActivityManagerService.systemReady(new Runnable() {
            @Override
            public void run() {
                Slog.i(TAG, "Making services ready");
                mSystemServiceManager.startBootPhase(
                        SystemService.PHASE_ACTIVITY_MANAGER_READY);
1). 如果现在已经启动完毕再次调用的话,就执行回调代码
systemReady@ActivityManagerService.java:
    public void systemReady(final Runnable goingCallback) {
        synchronized(this) {
            if (mSystemReady) {
                // If we're done calling all the receivers, run the next "boot phase" passed in
                // by the SystemServer
                if (goingCallback != null) {
                    goingCallback.run();
                }
                return;
            }

            mLocalDeviceIdleController //先执行这里
                    = LocalServices.getService(DeviceIdleController.LocalService.class);

            // Make sure we have the current profile info, since it is needed for security checks.
            mUserController.onSystemReady();
            mRecentTasks.onSystemReadyLocked();
            mAppOpsService.systemReady();
            mSystemReady = true;
        }
2.
mUserController.onSystemReady();3.
mRecentTasks.onSystemReadyLocked();4.
mAppOpsService.systemReady();5. 清理多余进程,除了persistent进程
        ArrayList<ProcessRecord> procsToKill = null;
        synchronized(mPidsSelfLocked) {
            for (int i=mPidsSelfLocked.size()-1; i>=0; i--) {
                ProcessRecord proc = mPidsSelfLocked.valueAt(i);
                if (!isAllowedWhileBooting(proc.info)){
                    if (procsToKill == null) {
                        procsToKill = new ArrayList<ProcessRecord>();
                    }
                    procsToKill.add(proc);
                }
            }
        }

        synchronized(this) {
            if (procsToKill != null) {
                for (int i=procsToKill.size()-1; i>=0; i--) {
                    ProcessRecord proc = procsToKill.get(i);
                    Slog.i(TAG, "Removing system update proc: " + proc);
                    removeProcessLocked(proc, true, false, "system update done");
                }
            }

            // Now that we have cleaned up any update processes, we
            // are ready to start launching real processes and know that
            // we won't trample on them any more.
            mProcessesReady = true;
        }
6. 如果是工厂测试模式,则启动工厂测试模块
        synchronized(this) {
            // Make sure we have no pre-ready processes sitting around.

            if (mFactoryTest == FactoryTest.FACTORY_TEST_LOW_LEVEL) {
                ResolveInfo ri = mContext.getPackageManager()
                        .resolveActivity(new Intent(Intent.ACTION_FACTORY_TEST),
                                STOCK_PM_FLAGS);
                CharSequence errorMsg = null;
                if (ri != null) {
                    ActivityInfo ai = ri.activityInfo;
                    ApplicationInfo app = ai.applicationInfo;
                    if ((app.flags&ApplicationInfo.FLAG_SYSTEM) != 0) {
                        mTopAction = Intent.ACTION_FACTORY_TEST;
                        mTopData = null;
                        mTopComponent = new ComponentName(app.packageName,
                                ai.name);
                    } else {
                        errorMsg = mContext.getResources().getText(
                                com.android.internal.R.string.factorytest_not_system);
                    }
                } else {
                    errorMsg = mContext.getResources().getText(
                            com.android.internal.R.string.factorytest_no_action);
                }
                if (errorMsg != null) {
                    mTopAction = null;
                    mTopData = null;
                    mTopComponent = null;
                    Message msg = Message.obtain();
                    msg.what = SHOW_FACTORY_ERROR_UI_MSG;
                    msg.getData().putCharSequence("msg", errorMsg);
                    mUiHandler.sendMessage(msg);
                }
            }
        }
7. 读取设置信息
retrieveSettings();8. 打开URI读取权限
        final int currentUserId;
        synchronized (this) {
            currentUserId = mUserController.getCurrentUserIdLocked();
            readGrantedUriPermissionsLocked();
        }
9.执行参数的callback,完成SystemServer的处理逻辑
if (goingCallback != null) goingCallback.run();10.
        mBatteryStatsService.noteEvent(BatteryStats.HistoryItem.EVENT_USER_RUNNING_START,
                Integer.toString(currentUserId), currentUserId);
        mBatteryStatsService.noteEvent(BatteryStats.HistoryItem.EVENT_USER_FOREGROUND_START,
                Integer.toString(currentUserId), currentUserId);
11. 启动当前用户
mSystemServiceManager.startUser(currentUserId);
12. 启动带有FLAG_PERSISTENT标记的应用,并且启动home launcher
        synchronized (this) {
            // Only start up encryption-aware persistent apps; once user is
            // unlocked we'll come back around and start unaware apps
            startPersistentApps(PackageManager.MATCH_DIRECT_BOOT_AWARE);

            // Start up initial activity.
            mBooting = true;
            // Enable home activity for system user, so that the system can always boot
            if (UserManager.isSplitSystemUser()) {
                ComponentName cName = new ComponentName(mContext, SystemUserHomeActivity.class);
                try {
                    AppGlobals.getPackageManager().setComponentEnabledSetting(cName,
                            PackageManager.COMPONENT_ENABLED_STATE_ENABLED, 0,
                            UserHandle.USER_SYSTEM);
                } catch (RemoteException e) {
                    throw e.rethrowAsRuntimeException();
                }
            }
            startHomeActivityLocked(currentUserId, "systemReady"); //启动Home桌面App

            try {
                if (AppGlobals.getPackageManager().hasSystemUidErrors()) {
                    Slog.e(TAG, "UIDs on the system are inconsistent, you need to wipe your"
                            + " data partition or your device will be unstable.");
                    mUiHandler.obtainMessage(SHOW_UID_ERROR_UI_MSG).sendToTarget();
                }
            } catch (RemoteException e) {
            }

            if (!Build.isBuildConsistent()) {
                Slog.e(TAG, "Build fingerprint is not consistent, warning user");
                mUiHandler.obtainMessage(SHOW_FINGERPRINT_ERROR_UI_MSG).sendToTarget();
            }

            long ident = Binder.clearCallingIdentity();
            try { //发送用户启动完成的消息
                Intent intent = new Intent(Intent.ACTION_USER_STARTED);
                intent.addFlags(Intent.FLAG_RECEIVER_REGISTERED_ONLY
                        | Intent.FLAG_RECEIVER_FOREGROUND);
                intent.putExtra(Intent.EXTRA_USER_HANDLE, currentUserId);
                broadcastIntentLocked(null, null, intent,
                        null, null, 0, null, null, null, AppOpsManager.OP_NONE,
                        null, false, false, MY_PID, Process.SYSTEM_UID,
                        currentUserId);
                intent = new Intent(Intent.ACTION_USER_STARTING);
                intent.addFlags(Intent.FLAG_RECEIVER_REGISTERED_ONLY);
                intent.putExtra(Intent.EXTRA_USER_HANDLE, currentUserId);
                broadcastIntentLocked(null, null, intent,
                        null, new IIntentReceiver.Stub() {
                            @Override
                            public void performReceive(Intent intent, int resultCode, String data,
                                    Bundle extras, boolean ordered, boolean sticky, int sendingUser)
                                    throws RemoteException {
                            }
                        }, 0, null, null,
                        new String[] {INTERACT_ACROSS_USERS}, AppOpsManager.OP_NONE,
                        null, true, false, MY_PID, Process.SYSTEM_UID, UserHandle.USER_ALL);
            } catch (Throwable t) {
                Slog.wtf(TAG, "Failed sending first user broadcasts", t);
            } finally {
                Binder.restoreCallingIdentity(ident);
            }

            <pre class="prettyprint" name="code"><code class="hljs java has-numbering"><span class="hljs-comment">            // 开始恢复显示activity栈顶的界面,也就是home的主界面。</span></code>
这段代码的作用就是启动带有FLAG_PERSISTENT标记的app,启动应用通过调用addAppLocked方法完成,这个方法后面我们分析AMS的进程管理的时候再详细描述。
接着就是启动我们熟悉的home了,通过调用startHomeActivityLocked方法完成,
这个方法会首先查找当前home启动器,然后再启动对应的启动器(因为用户可能会下载安装了第三方的启动器)。home启动完成之后,系统会发送ACTION_BOOT_COMPLETE消息,通知app系统启动完成。
到这里,AMS的主体业务才算是启动完毕。


 331
331

 被折叠的 条评论
为什么被折叠?
被折叠的 条评论
为什么被折叠?
 到【灌水乐园】发言


